Uncategorized

Episiotomy

episiotomy

What is an episiotomy

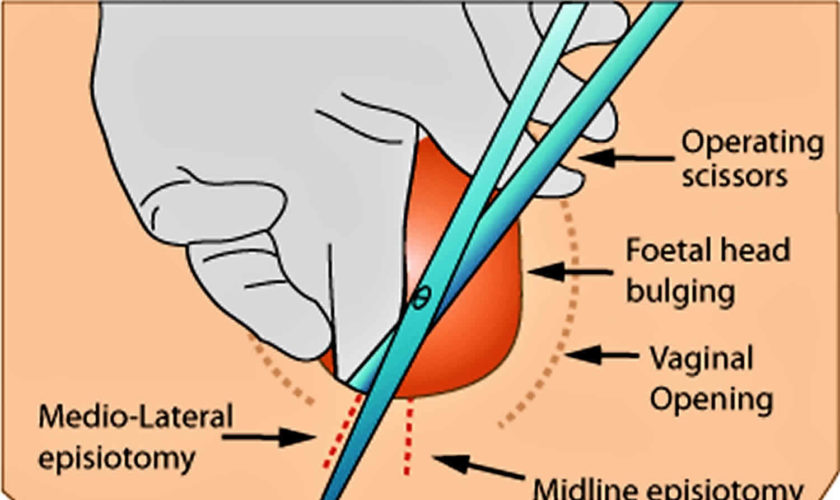
An episiotomy also known as perineotomy, is a minor surgical incision that widens the opening of the vagina and perineum during childbirth. Episiotomy is usually carried out by a skilled birth attendant to enlarge the vaginal opening 1). An episiotomy is a cut to the perineum — the skin and muscles between the vaginal opening and anus. Episiotomy is usually performed during second stage of labor to quickly enlarge the opening for the baby to pass through. An episiotomy, which can be done at a 90 degree angle from the vulva towards the anus (midline episiotomy) or at an angle from the posterior end of the vulva (medio-lateral episiotomy), is performed under local anesthetic (pudendal anesthesia), and is sutured after delivery. You shouldn’t feel any pain while your health care provider making the incision or repairing it after delivery.

Normally, once the baby’s head is seen, your healthcare provider will ease your baby’s head and chin out of your vagina. Once the baby’s head is out, the shoulders and the rest of the body follow. Sometimes the vaginal opening does not stretch enough for the baby’s head. In this case, an episiotomy aids your healthcare provider in delivering your baby. It’s important to make a surgical incision rather than letting the tissue tear. Your provider will usually do an episiotomy when the baby’s head has stretched your vaginal opening to several centimeters.

Your healthcare provider may advise an episiotomy in these situations:

  • The baby does not have enough oxygen (fetal distress)
  • Complicated birth, such as when the baby is positioned bottom or feet first (breech) or when the baby’s shoulders are trapped (shoulder dystocia)
  • Long pushing stage of labor
  • The mother needs a forceps or vacuum-assisted delivery
  • Large baby
  • Preterm baby
  • Birth is imminent and the perineum hasn’t had time to stretch slowly
  • The baby’s head is too large for the vaginal opening
  • The mother isn’t able to control her pushing.

Your healthcare provider may have other reasons to recommend an episiotomy.

The first documented episiotomy dates back to over 270 years ago 2). Rates of episiotomy increased substantially during the first half of the 20th century. At that time, there was an increasing move for women to give birth in a hospital and for physicians to manage normal uncomplicated childbirths. Since then, episiotomy has become one of the most commonly performed surgical procedures in the world 3). Reported rates of episiotomies vary from as low as 9.7% (Sweden) to as high as 100% (Taiwan) 4). The large differences in episiotomy rates closely relate to the differences in policies regarding the use of episiotomy. Episiotomy rates are high in some countries, such as Argentina and China, with a policy of routine use of episiotomy for nearly all first births 5). Other places adopt a policy of ‘selective’ use of episiotomy where the use of episiotomy is restricted rather than universally performed – clinicians use their clinical judgement to determine the need for episiotomy where the benefits likely outweigh the harms in situations such as impending severe perineal tear, prolonged second stage of labor, shoulder dystocia, instrumental delivery, and non-reassuring fetal heart rate 6). In the USA, the episiotomy rate decreased from 60.9% in 1979 to 24.5% in 2004 7). In Finland, the episiotomy rate decreased from 71.5% to 54.9% between 1997 to 1999 and 2006 to 2007 among primiparous women, and from 21.5% to 9.2% between 1997 to 2001 and 2006 to 2007 among multiparous women 8).

Episiotomy is made with scissors or scalpel and requires repair by suturing 9). There are seven ways of performing an episiotomy, with ‘midline’ and ‘mediolateral’ being the two main types of episiotomy in the literature and medical practice 10). A midline (sometimes called ‘median’) episiotomy is “a vertical incision from the posterior fourchette and runs along the midline through the central tendon of the perineal body” 11). Critics point out that if a midline episiotomy extends, it is likely to extend into the anal sphincter causing a third- or fourth-degree tear. A mediolateral episiotomy is “an incision beginning in the midline and directed laterally and downwards away from the rectum” 12). In theory, if a mediolateral tear extends, it will extend away from the anal sphincter. An episiotomy is generally done late in second stage when the perineum is stretched thin. Prior to the incision, local anaesthesia is injected to numb the perineum, if a mother does not have regional anaesthesia 13).

Normal birth can cause tears to the vagina and the surrounding tissue, usually as the baby’s head is born, and sometimes these tears extend to the rectum. These are repaired surgically, but take time to heal. To avoid these severe tears, doctors have recommended making an episiotomy (surgical cut) to the perineum with scissors or scalpel to prevent severe tearing and facilitate the birth. Both a tear and an episiotomy need sutures, and can result in severe pain, bleeding, infection, pain with sex, and can contribute to long term urinary incontinence.

Many women get through childbirth without tearing their vagina on their own, and without needing an episiotomy. In fact, recent studies involving 11 randomized controlled trials (with 5977 women) that compared episiotomy as needed (selective episiotomy) with routine episiotomy in terms of benefits and harms for mother and baby in women at low risk of instrumental delivery 14) show that not having an episiotomy is best for most women in labor. Overall, the findings show that selective use of episiotomy in women (where a normal delivery without forceps is anticipated) means that fewer women have severe perineal trauma. Thus the rationale for conducting routine episiotomies to prevent severe perineal trauma is not justified by current evidence, and the research authors could not identify any benefits of routine episiotomy for the baby or the mother 15).

Episiotomy Key Findings

Routine episiotomies are no longer recommended. Routine use of episiotomy procedure does not result in maternal or fetal benefit and should be restricted, according to a practice bulletin from the American College of Obstetricians and Gynecologists 16). Still, episiotomy procedure is warranted in some cases (e.g., avoiding severe maternal lacerations, facilitating or expediting difficult deliveries). A systematic review comparing routine episiotomy with restrictive use reported that 72.7 percent of women in the routine-use group underwent episiotomy compared with 27.6 percent in the restricted-use group. The restricted-use group had significantly lower risks of posterior perineal trauma, suturing, and healing complications but a significant increase in anterior perineal trauma. No statistically significant differences were reported for severe vaginal or perineal trauma, dyspareunia, or urinary incontinence.

Episiotomies don’t heal better than tears. Episiotomies often take longer to heal since the surgical cut is often deeper than a natural tear. In both cases, the surgical cut or tear must be stitched and properly cared for after childbirth. At times, an episiotomy may be needed to ensure the best outcome for you and your baby.

  • Labor is stressful for the baby and the pushing phase needs to be shortened to decrease problems for the baby.
  • Your baby’s head or shoulders are too big for the mother’s vaginal opening.
  • Your baby is in a breech position (feet or buttocks coming first) and there is a problem during delivery.
  • Your baby is large (fetal macrosomia)
  • Your baby needs to be delivered quickly
  • Instruments (forceps or vacuum extractor) are needed to help get the baby out. Research shows that in some births, particularly with forceps deliveries, an episiotomy may prevent third-degree tears, where the tear affects the anal muscle.
  • You have a serious health condition, such as heart disease, and it’s recommended that delivery should be as quick as possible to minimize any further health risks
  • You have been trying to give birth for several hours and are now tired after pushing

Studies suggest that in first-time vaginal births, it’s more common to have severe injuries involving the anal muscle if the perineum tears spontaneously rather than if an episiotomy is performed.

The National Institute for Health and Care Excellence (NICE) recommends that an episiotomy should be considered if:

  • the baby is in distress and needs to be born quickly, or
  • there is a clinical need, such as a delivery that needs forceps or ventouse suction cup, or a risk of a tear to the anus

Episiotomy and Maternal Postpartum Outcomes

Trials of fair to poor quality provide consistent findings that clearly support limited use of episiotomy. Routine episiotomy achieves no short‐term goals that it has been hypothesized to achieve. Indeed, routine use is harmful to the degree that it creates a surgical incision of greater extent than many women might have experienced had episiotomy not been performed.

Episiotomy Incision Type and Maternal Morbidity

A single study found that women with midline episiotomy had a significantly greater rate of anal sphincter injuries than women with mediolateral episiotomy 17). Treatment groups did not report differences in pain or satisfaction with intercourse at 3 months. Because of considerable methodological flaws in this trial (poor internal validity), any conclusions must be drawn cautiously. However, because differences in sphincter injury rates are clinically important, the study authors 18) consider the finding of increased risk of severe injury with midline episiotomy compared to mediolateral episiotomy to be relevant observational evidence.

Repair of Perineal Defect and Maternal Morbidity

Limited but consistent evidence favored two‐layer repair over three‐layer repair; limited and inconsistent evidence favored continuous over interrupted sutures. Evidence was insufficient to comment on comparisons between standard and rapidly absorbed sutures, tissue adhesive and absorbable sutures, or nonabsorbable and absorbable sutures. The study authors 19) found no evidence that treated catgut is superior to untreated catgut with regard to perineal morbidity; the former may in fact be associated with higher morbidity. The evidence suggests short‐term advantages for perineal repeat associated with the use of polyglycolic‐acid sutures compared to chromic‐catgut sutures.

Three major classes of suture material (nonabsorbable, absorbable, and tissue adhesive) and two subtypes of sutures (treated versus untreated and standard versus rapidly absorbed) were studied, all in the presence of different approaches to the method of suturing; thus, individual effects of the materials themselves cannot be examined. Likewise, methods of repair were examined in the context of different materials both among and within studies for different stages of repair. The study authors 20) are unable to assess the true effects of a certain method of repair because they cannot tell whether outcomes are confounded or modified by suture material.

Episiotomy and Urinary Incontinence, Fecal Incontinence, and Pelvic Floor Defects

These prospective studies did not identify improvements in continence for urine or stool or in pelvic floor muscle function among women who had had episiotomy compared to those who had not. This finding includes comparison to women who had spontaneous lacerations of similar severity.

Several authors reported decrements in pelvic floor function among women who had had episiotomy. Only a single study, using multivariable models, found that episiotomy was an independent predictor of urinary continence 21). In the majority of other studies using multivariate models, adjusting for factors such as parity, neonatal weight, and length of second‐stage labor, episiotomy was not an independent risk factor for incontinence. Taken in total, this literature, predominantly of fair to poor quality, does not support use of episiotomy for the purpose of preventing pelvic floor defects, urinary incontinence, or incontinence of stool or flatus.

These studies are limited because they do not follow women long enough to detect disease occurrence. At present, the assumption that intermediate variables, such as pelvic muscle strength measured by perineometry, urodynamic test results, or early reports of symptoms, can predict later disease has not been validated. Prospective evaluation only during the months after birth when the pelvic floor is still in a recovery and stabilization period may be misleading. Conclusions about whether episiotomy prevents or increases risk for incontinence and prolapse later in adult life cannot be reached from currently available randomized and cohort studies.

The data available show that at one-year follow-up, immediate primary overlap repair of the external anal sphincter compared with immediate primary end-to-end repair appears to be associated with lower risks of developing fecal urgency and anal incontinence symptoms 22). At the end of 36 months there appears to be no difference in flatus or fecal incontinence between the two techniques. However, since this evidence is based on only two small trials, more research evidence is needed in order to confirm or refute these findings.

Episiotomy and Future Sexual Function

The studies addressing this question need to be considered in two groups: mediolateral episiotomy and midline episiotomy. From the clinical trials of episiotomy strategy—liberal versus restrictive—one trial addressed each type of incision and one directly compared the two incision types. None found substantive differences in sexual function. The preponderance of the studies, however, supported a conclusion that degree of perineal trauma is associated with probability of pain with intercourse, in a dose‐response fashion such that greater perineal injury is associated with greater probability of pain.

Measures that are more complex than those typically used in the literature are needed to understand properly the relationships between perineal trauma and future sexual function. Specific factors such as prior sexual function and current libido, in addition to factors such as duration of second‐stage labor, size of infant, and lactation status, need to be incorporated into multivariable models to derive more informative and less biased estimates of the long‐term effects of episiotomy or to determine that they do not exist.

Figure 1. Episiotomy

episiotomy

types of episiotomy

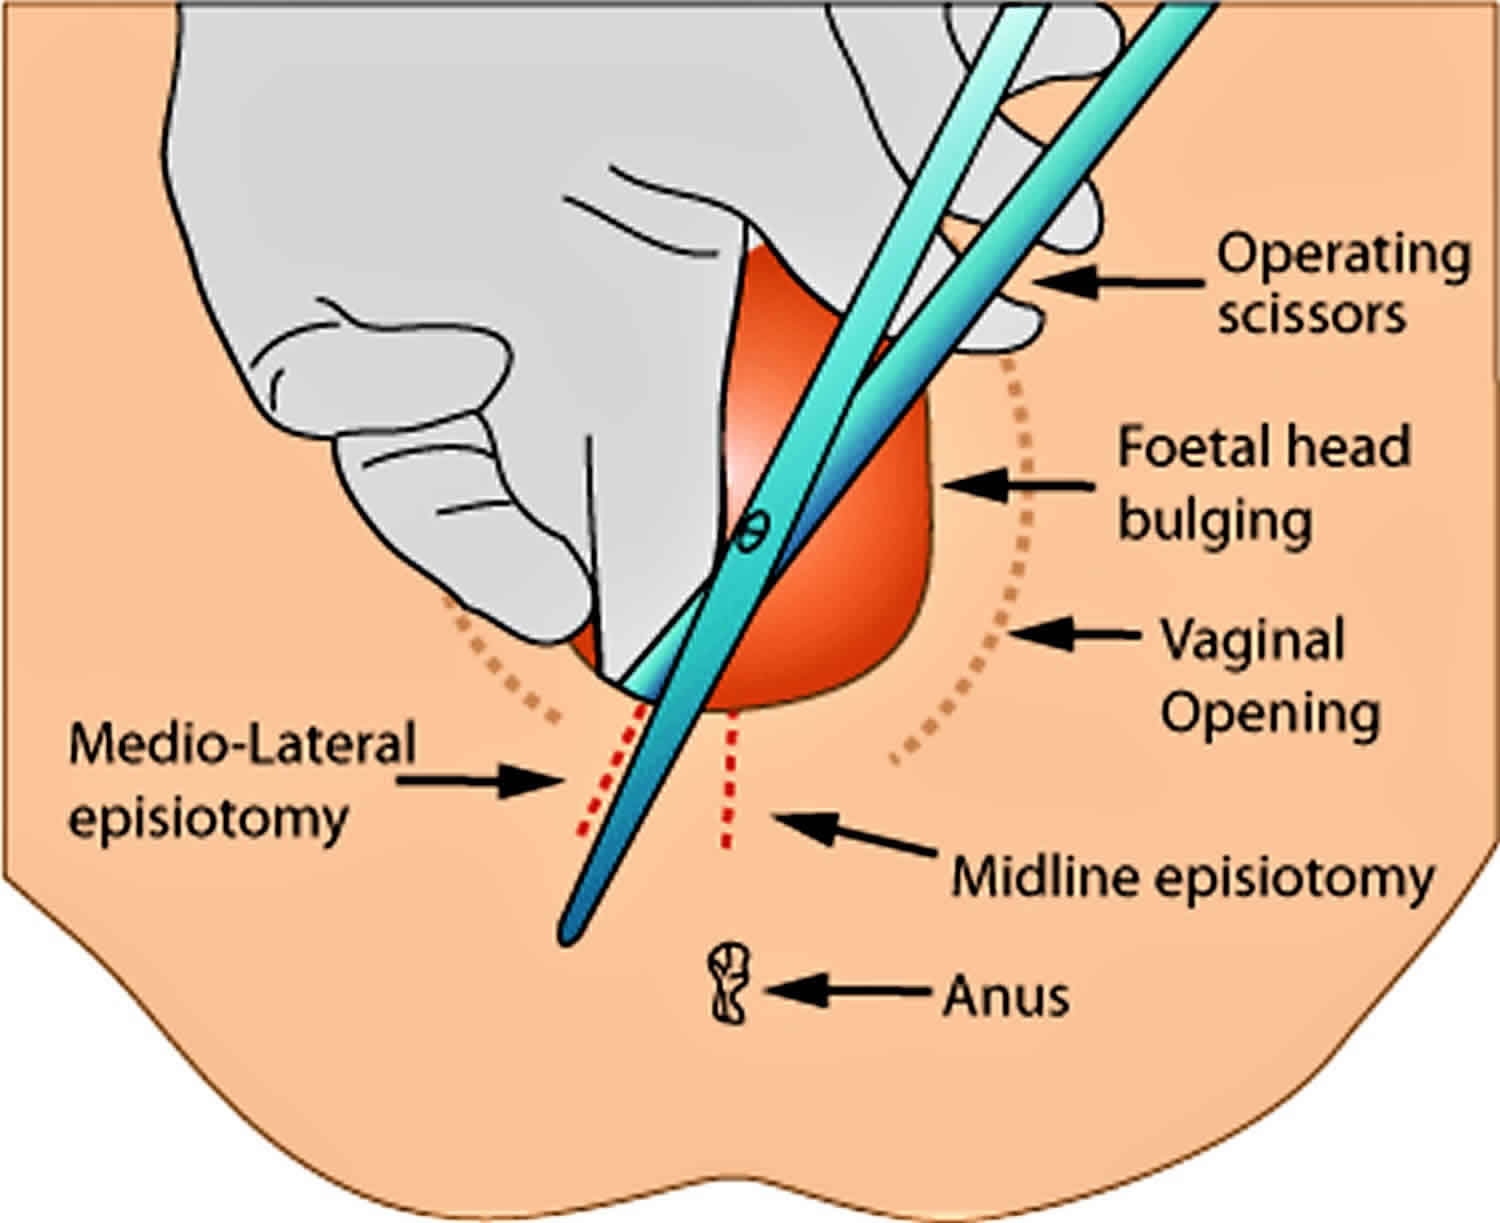
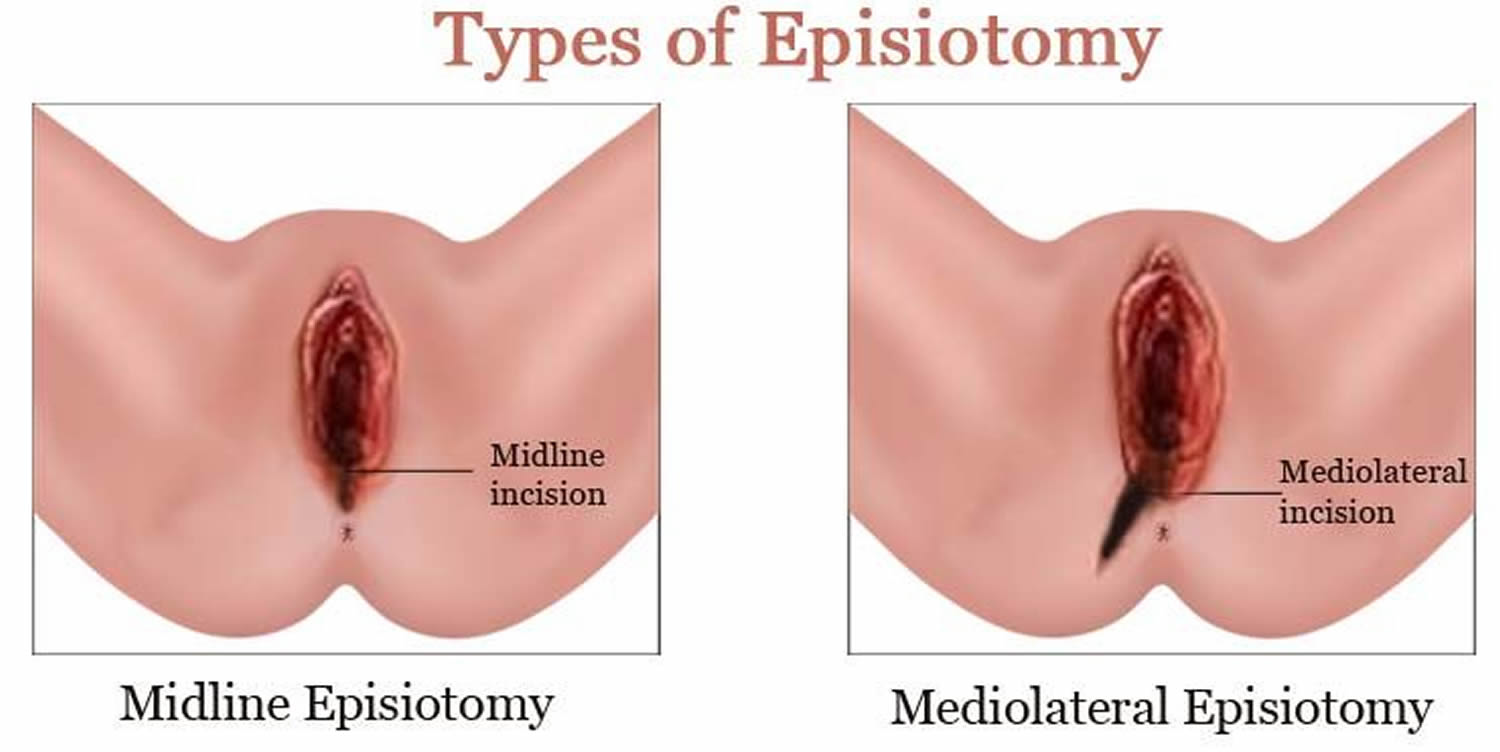
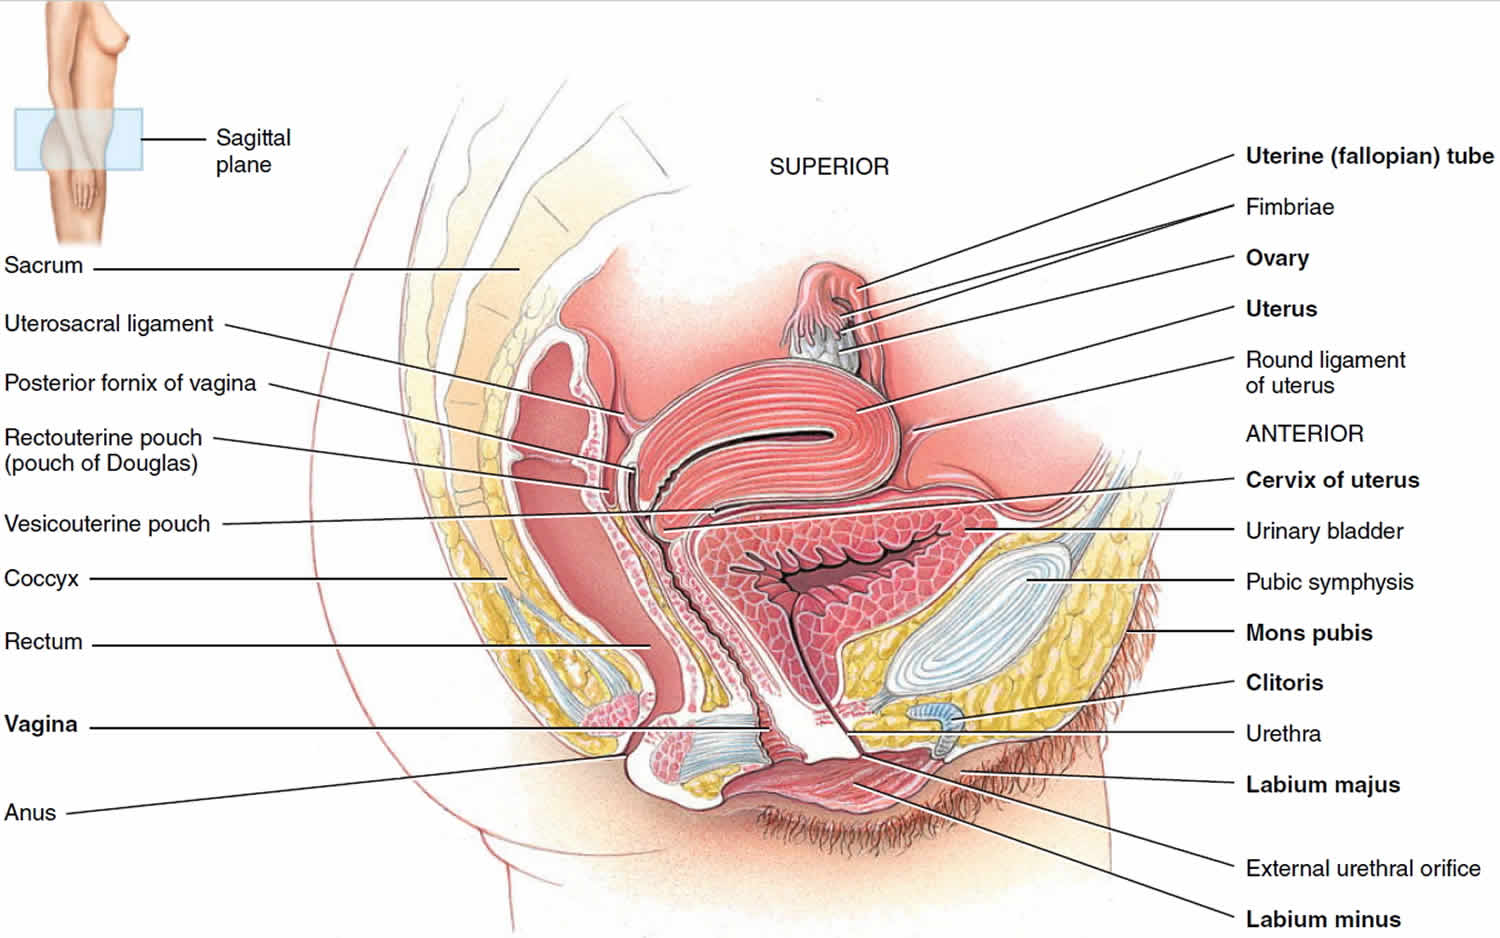
Figure 2. Female reproductive system

Female reproductive system

Female pelvic floor

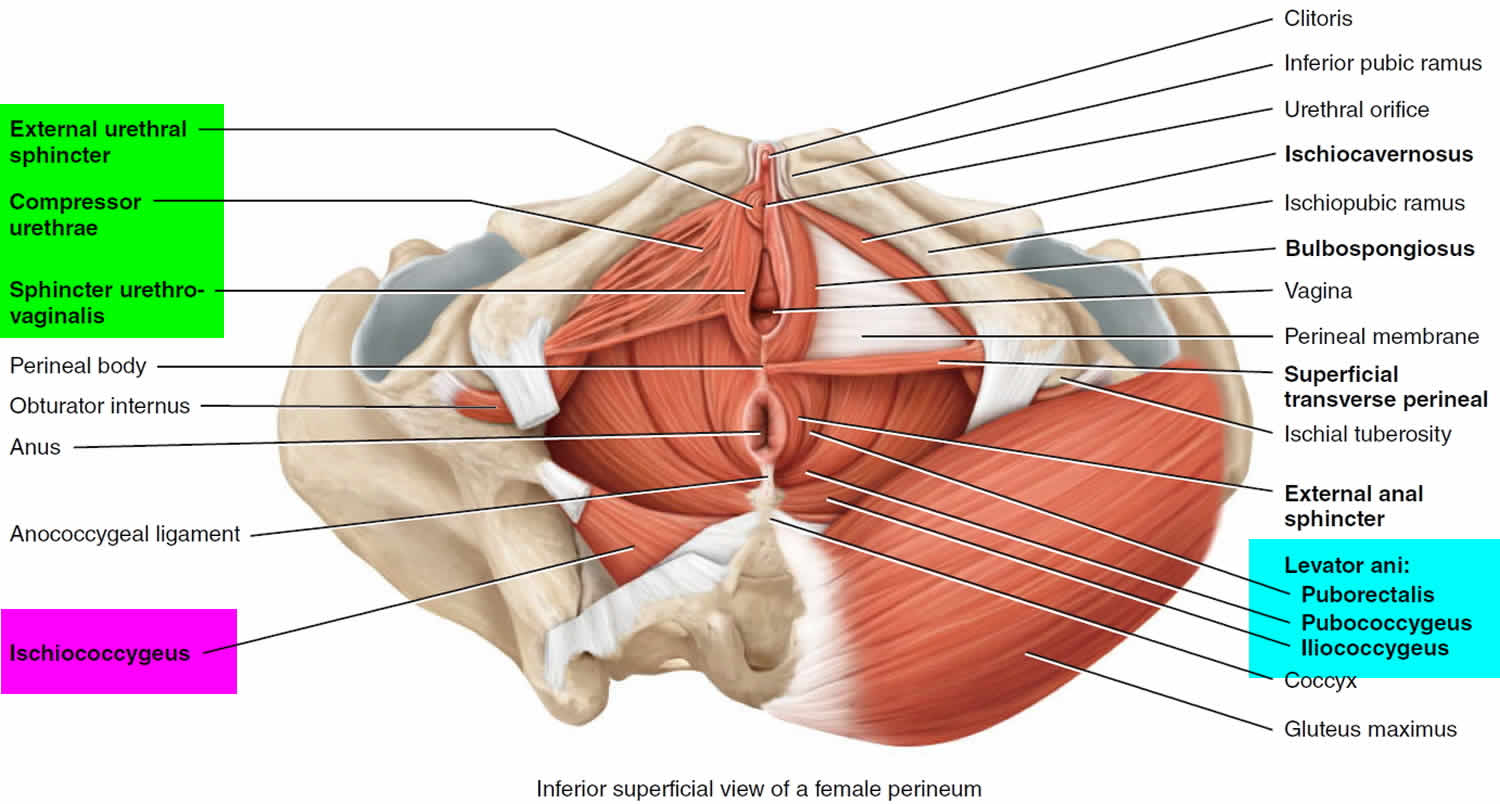
The pelvic floor is a complex layer of muscles and ligaments which stretches like a hammock from the pubic bone at the front of your pelvis to the coccyx at the bottom your spine (see Figure 3).

The muscles of the pelvic floor are the levator ani and ischiococcygeus. Along with the fascia covering their internal and external surfaces, these muscles are referred to as the pelvic diaphragm, which stretches from the pubis anteriorly to the coccyx posteriorly, and from one lateral wall of the pelvis to the other. This arrangement gives the pelvic diaphragm the appearance of a funnel suspended from its attachments. The pelvic diaphragm separates the pelvic cavity above from the perineum below. The anal canal and urethra pierce the pelvic diaphragm in both sexes, and the vagina also goes through it in females. The three components of the levator ani muscle are the pubococcygeus, puborectalis, and iliococcygeus. The levator ani is the largest and most important muscle of the pelvic floor. It supports the pelvic viscera and resists the inferior thrust that accompanies increases in intraabdominal pressure during functions such as forced exhalation, coughing, vomiting, urination, and defecation. The muscle also functions as a sphincter at the anorectal junction, urethra, and vagina. In addition to assisting the levator ani, the ischiococcygeus pulls the coccyx anteriorly after it has been pushed posteriorly during defecation or childbirth.

Figure 3. Pelvic floor female

Pelvic floor female

Episiotomy vs Tear

Vaginal birth can cause tears to the vagina and perineum. Estimates of the frequency vary, with some estimates (that include episiotomy) indicating this occurs in 85% of births 23), compared with a more recent retrospective cohort reporting that 4% of 1785 Australian women sustained a perineal scrape and 34% sustained a first- or second-degree perineal tear 24). While minor tears may heal quickly without intervention, some are more severe, damaging tissue, muscle and sometimes extending to the anal sphincter. These more severe tears need surgical repair, and depending on the extent, may cause a number of problems in the early postnatal period. Women may experience pain, bleeding, infection, dyspareunia (pain during sexual intercourse), and have a prolonged hospital stay. In a small percentage of women, the damage to the vaginal and perineal tissues can result in some long-term problems such as pain, urinary fistula (an abnormal connection between vagina and bladder), urinary incontinence (the inability of control causing urinary ‘accidents’), rectal fistula (an abnormal connection between the vagina and rectum), fecal incontinence (the inability of control causing fecal ‘accidents’), dyspareunia and genital-urinary prolapse (the pelvic organs descending from their normal position) 25).

Tears of the perineum and vagina are classified as follows 26):

  1. First degree: involving the fourchette, perineal skin and vaginal mucous membrane, but not the underlying fascia and muscle;
  2. Second degree: involving the perineal muscles and skin but not involving the anal sphincter;
  3. Third degree: injury to the anal sphincter complex;
    • 3a: less than 50% of the external anal sphincter torn;
    • 3b: 50% of the external anal sphincter torn; and
    • 3c: the external and internal anal sphincter are torn;
  4. Fourth degree: injury extends through the anal sphincter complex (external anal sphincter and internal anal sphincter) to ano-rectal epithelium epithelium.

Severe perineal trauma usually refers to a third-degree or fourth-degree tear 27).

Preventing a perineal tear

A midwife can help you avoid a tear during labor when the baby’s head becomes visible.

The midwife will ask you to stop pushing and to pant or puff a couple of quick short breaths, blowing out through your mouth.

This is so your baby’s head can emerge slowly and gently, giving the skin and muscles of the perineum time to stretch without tearing.

The skin of the perineum usually stretches well, but it may tear, especially in women who are giving birth for the first time.

Research suggests massaging the perineum in the last few weeks of pregnancy can reduce the chances of having an episiotomy during birth.

A review of four trials showed massaging the perineum from 35 weeks of pregnancy reduced the likelihood of tears, needing an episiotomy, and pain in women who had not given birth vaginally before.

The type and frequency of massage varied across the trials. Most involved inserting one or two fingers into the vagina and applying downward or sweeping pressure towards the perineum.

The benefit was more marked among those women who carried out perineal sweeping twice a week.

The role of warm compresses and tissue massage

During the second stage of labor — when you’re pushing — your health care provider might apply warm compresses or warm mineral oil to the tissue between your vaginal opening and your anus. This might soften the tissue and help prevent tears in the skin.

Although the evidence for warm compresses is stronger, some health care providers also massage the area between the vaginal opening and the anus as labor progresses. This is known as perineal massage.

Your health care provider might even recommend trying perineal massage at home after week 34 of pregnancy. To get started, wash your hands and rub a mild lubricant, such as K-Y jelly, on your thumbs. Place your thumbs just inside your vagina and press downward toward your rectum. Hold for one to two minutes. Then, slowly massage the lower half of your vagina. Repeat the massage once a day for 10 minutes at a time until delivery.

How episiotomy might work

Episiotomy, a surgical cut of the vagina and perineum, is sometimes used in an attempt to prevent serious perineal damage caused by tearing and to facilitate the birth of the baby.

It is thought that enlarging the vaginal outlet by episiotomy would reduce vaginal soft tissue stretching and tension during childbirth, thereby preventing higher degrees of perineal traumas and their subsequent complications 28). More space also allows for instrumentation of assisted deliveries by forceps or vacuums 29). At other times, episiotomy is performed to shorten second stage of labor for various maternal and fetal indications 30) such as maternal exhaustion and fetal bradycardia.

Clinicians who advocate routine episiotomies reason that perineal tears, including severe tears, can occur in women who are not thought likely to have serious tears and who have not had an episiotomy under a selective regimen. However, the effectiveness of routine episiotomy preventing severe perineal trauma has been questioned and the procedure has its own associated complications. Since not all vaginal births result in perineal trauma, some women are subjected to unnecessary incisions and their associated complications and morbidity as a result of a ‘routine’ episiotomy policy. Even in obstetrical emergencies such as shoulder dystocia, and in instrumental-assisted deliveries, episiotomy may not reduce severe perineal tears 31).

Complications associated with episiotomy include bleeding, pain and discomfort of the wound and sutures (which may cause pain while sitting, and in turn affect breastfeeding), wound scarring, dyspareunia, or complications in subsequent vaginal births. Other adverse effects of episiotomy include: (a) extension of episiotomy through the anal sphincter and rectum by the clinician making the incision, or by spontaneous extension of the incision; (b) unsatisfactory anatomic healing resulting in skin tags, asymmetry or excessive narrowing of the introitus, vaginal prolapse, recto-vaginal fistula and fistula-in-ano 32); (c) increased blood loss and hematoma; (d) pain and oedema around the episiotomy wound; (e) infection and dehiscence 33); (f) dyspareunia, which may be a short-term consequence, or may become more established and cause persistent dyspareunia 34); and finally, (h) at least one woman has died as a result of infection complicating an episiotomy wound 35).

How can I avoid an episiotomy?

You can do things to strengthen your body for labor that may lower your chances of needing an episiotomy.

  • Practice Kegel exercises.
  • Perform perineal massage during the 4 to 6 weeks before birth. To get started, wash your hands and rub a mild lubricant, such as K-Y jelly, on your thumbs. Place your thumbs just inside your vagina and press downward toward your rectum. Hold for one to two minutes. Then, slowly massage the lower half of your vagina. Repeat the massage once a day for 10 minutes at a time until delivery.
  • Practice the techniques you learned in childbirth class to control your breathing and your urge to push.
  • A slowed second stage of labor where pushing is controlled
  • Warm compresses and support during delivery
  • Use of perineum massage techniques
  • Avoiding lying on your back while pushing
  • Good nutrition–healthy skin stretches more easily.

Keep in mind, even if you do these things, you may still need an episiotomy. Your obstetrician will decide if you should have one based on what happens during your labor.

How to do Kegel Exercises

Pelvic floor, or Kegel, exercises involve strengthening pelvic floor muscles. Strong pelvic floor muscles more effectively hold pelvic organs in place. A woman does not need special equipment for Kegel exercises.

The exercises involve tightening and relaxing the muscles that support pelvic organs. A health care provider can help a woman learn proper technique.

A Kegel exercise is like pretending you have to urinate and then holding it. You relax and tighten the muscles that control urine flow. It is important to find the right muscles to tighten.

Next time you have to urinate, start to go and then stop. Feel the muscles in your vagina (for women), bladder, or anus get tight and move up. These are the pelvic floor muscles. If you feel them tighten, you have done the exercise right. Your thighs, buttock muscles, and abdomen should remain relaxed.

If you still are not sure you are tightening the right muscles:

  • Imagine that you are trying to keep yourself from passing gas.
  • Women: Insert a finger into your vagina. Tighten the muscles as if you are holding in your urine, then let go. You should feel the muscles tighten and move up and down.

Let your doctor, nurse, or therapist help you. Many people have trouble finding the right muscles. Your doctor, nurse, or therapist can check to make sure you are doing the exercises correctly. You can also exercise by using special weights or biofeedback. Ask your health care team about these exercise aids.

Don’t squeeze other muscles at the same time. Be careful not to tighten your stomach, legs, or other muscles. Squeezing the wrong muscles can put more pressure on your bladder control muscles. Just squeeze the pelvic muscle. Don’t hold your breath.

Step 1

Sit comfortably with your knees slightly apart. Imagine that you are trying to stop yourself passing wind from your bowel. To do this, you must squeeze the muscle around the back passage. Try lifting and squeezing the muscle as if you have wind. If you sense a “pulling” feeling, you are squeezing the right muscles for pelvic exercises. You should be able to feel the muscle move and your buttocks or legs should not move at all. You should notice that the skin around your back passage tightens up and creates the sensation of lifting you from your chair.

Step 2

Imagine that you are sitting on the toilet to pass urine and try to stop yourself from producing a stream of urine. You should be using the same group of muscles that you used before but you will find this a little more difficult. Do not try to stop the urinary stream when you are actually passing water because it can cause problems with bladder emptying.

Or you can lie down and put your finger inside your vagina. Squeeze as if you were trying to stop urine from coming out. If you feel tightness on your finger, you are squeezing the right pelvic muscles.

Step 3

Try to tighten the muscles around your back passage and vagina, by lifting up inside as if you are trying to stop passing wind and urine at the same time. Do not tense your abdomen, squeeze your legs together, tighten your buttocks or hold your breath. If you can master this, most of the muscle contraction should be coming from the pelvic floor.

How do you practice the exercises?

You need to develop two types of muscle activity, slow and fast.

  • to practice slow contractions
    • do the exercises above and try to hold the pelvic floor tight for up to ten seconds. Rest for four seconds and then repeat the contraction as many times as you can, up to a maximum of ten
  • to practice quick contractions
    • draw the pelvic floor rapidly upwards and hold this for one second. Repeat up to a maximum of ten times. This will protect you against sudden leakage during coughing, laughing or exercise
    • Aim to do one set of slow contractions followed by one set of fast contractions up to six times a day. Do not over-do it or the muscles will get tired. The exercises can be performed standing, sitting or lying down but you may find it easier at first to do them sitting down.

Once you know what the movement feels like, do Kegel exercises 3 times a day:

  • Make sure your bladder is empty, then sit or lie down.
  • Tighten your pelvic floor muscles. Hold tight and count to 8.
  • Relax the muscles and count to 10.
  • Repeat 10 times, 3 times a day (morning, afternoon, and night).

Breathe deeply and relax your body when you are doing these exercises. Make sure you are not tightening your stomach, thigh, buttock, or chest muscles.

After 4 to 6 weeks, you should feel better and have fewer symptoms. Keep doing the exercises, but do not increase how many you do. Overdoing it can lead to straining when you urinate or move your bowels.

Some notes of caution:

  • Once you learn how to do them, do not practice Kegel exercises at the same time you are urinating more than twice a month. Doing the exercises while you are urinating can weaken your pelvic floor muscles over time or cause damage to bladder and kidneys.
  • In women, doing Kegel exercises incorrectly or with too much force may cause vaginal muscles to tighten too much. This can cause pain during sexual intercourse.
  • Incontinence will return if you stop doing these exercises. Once you start doing them, you may need to do them for the rest of your life.
  • It may take several months for your incontinence to lessen once you start doing these exercises.

Other things that help

  • Get into the habit of doing your exercises regularly and linking them to everyday activities e.g. do them after emptying your bladder, while answering the telephone, standing in a queue or whenever you turn on a tap. Do your pelvic exercises at least three times a day. Every day, use three positions: lying down, sitting, and standing. You can exercise while lying on the floor, sitting at a desk, or standing in the kitchen. Using all three positions makes the muscles strongest.
  • At first, find a quiet spot to practice—your bathroom or bedroom—so you can concentrate. Lie on the floor. Pull in the pelvic muscles and hold for a count of 3. Then relax for a count of 3. Work up to 10 to 15 repeats each time you exercise.
  • If you are not sure you are doing the exercises correctly, insert a thumb or two fingers into the vagina and try the exercises; you should feel a gentle squeeze as the muscles contract
  • Use the pelvic floor exercises to prevent leakage before you do anything which might make you leak; this way, your control will gradually improve
  • Drink normally – six to eight cups (two liters) per day – avoiding caffeine and alcohol if you can
  • Avoid going to the toilet “just in case”; go only when you feel that your bladder is full
  • Watch your weight; extra weight puts more strain on your pelvic floor muscles and your bladder
  • Avoid constipation. Straining can put excessive pressure on your bladder and bowels
  • Pelvic floor exercises take three to six months to produce maximum benefit, but you should continue them for life to prevent problems recurring or worsening; you should seek help from a health professional there is little or no change in your symptoms after exercising for three months
  • Other methods which help some women include weighted vaginal cones, biofeedback and electrical stimulation; consult your doctor, urologist or specialist nurse for more details

Be patient. Don’t give up. It’s just 5 minutes, three times a day. You may not feel your bladder control improve until after 3 to 6 weeks. Still, most women do notice an improvement after a few weeks.

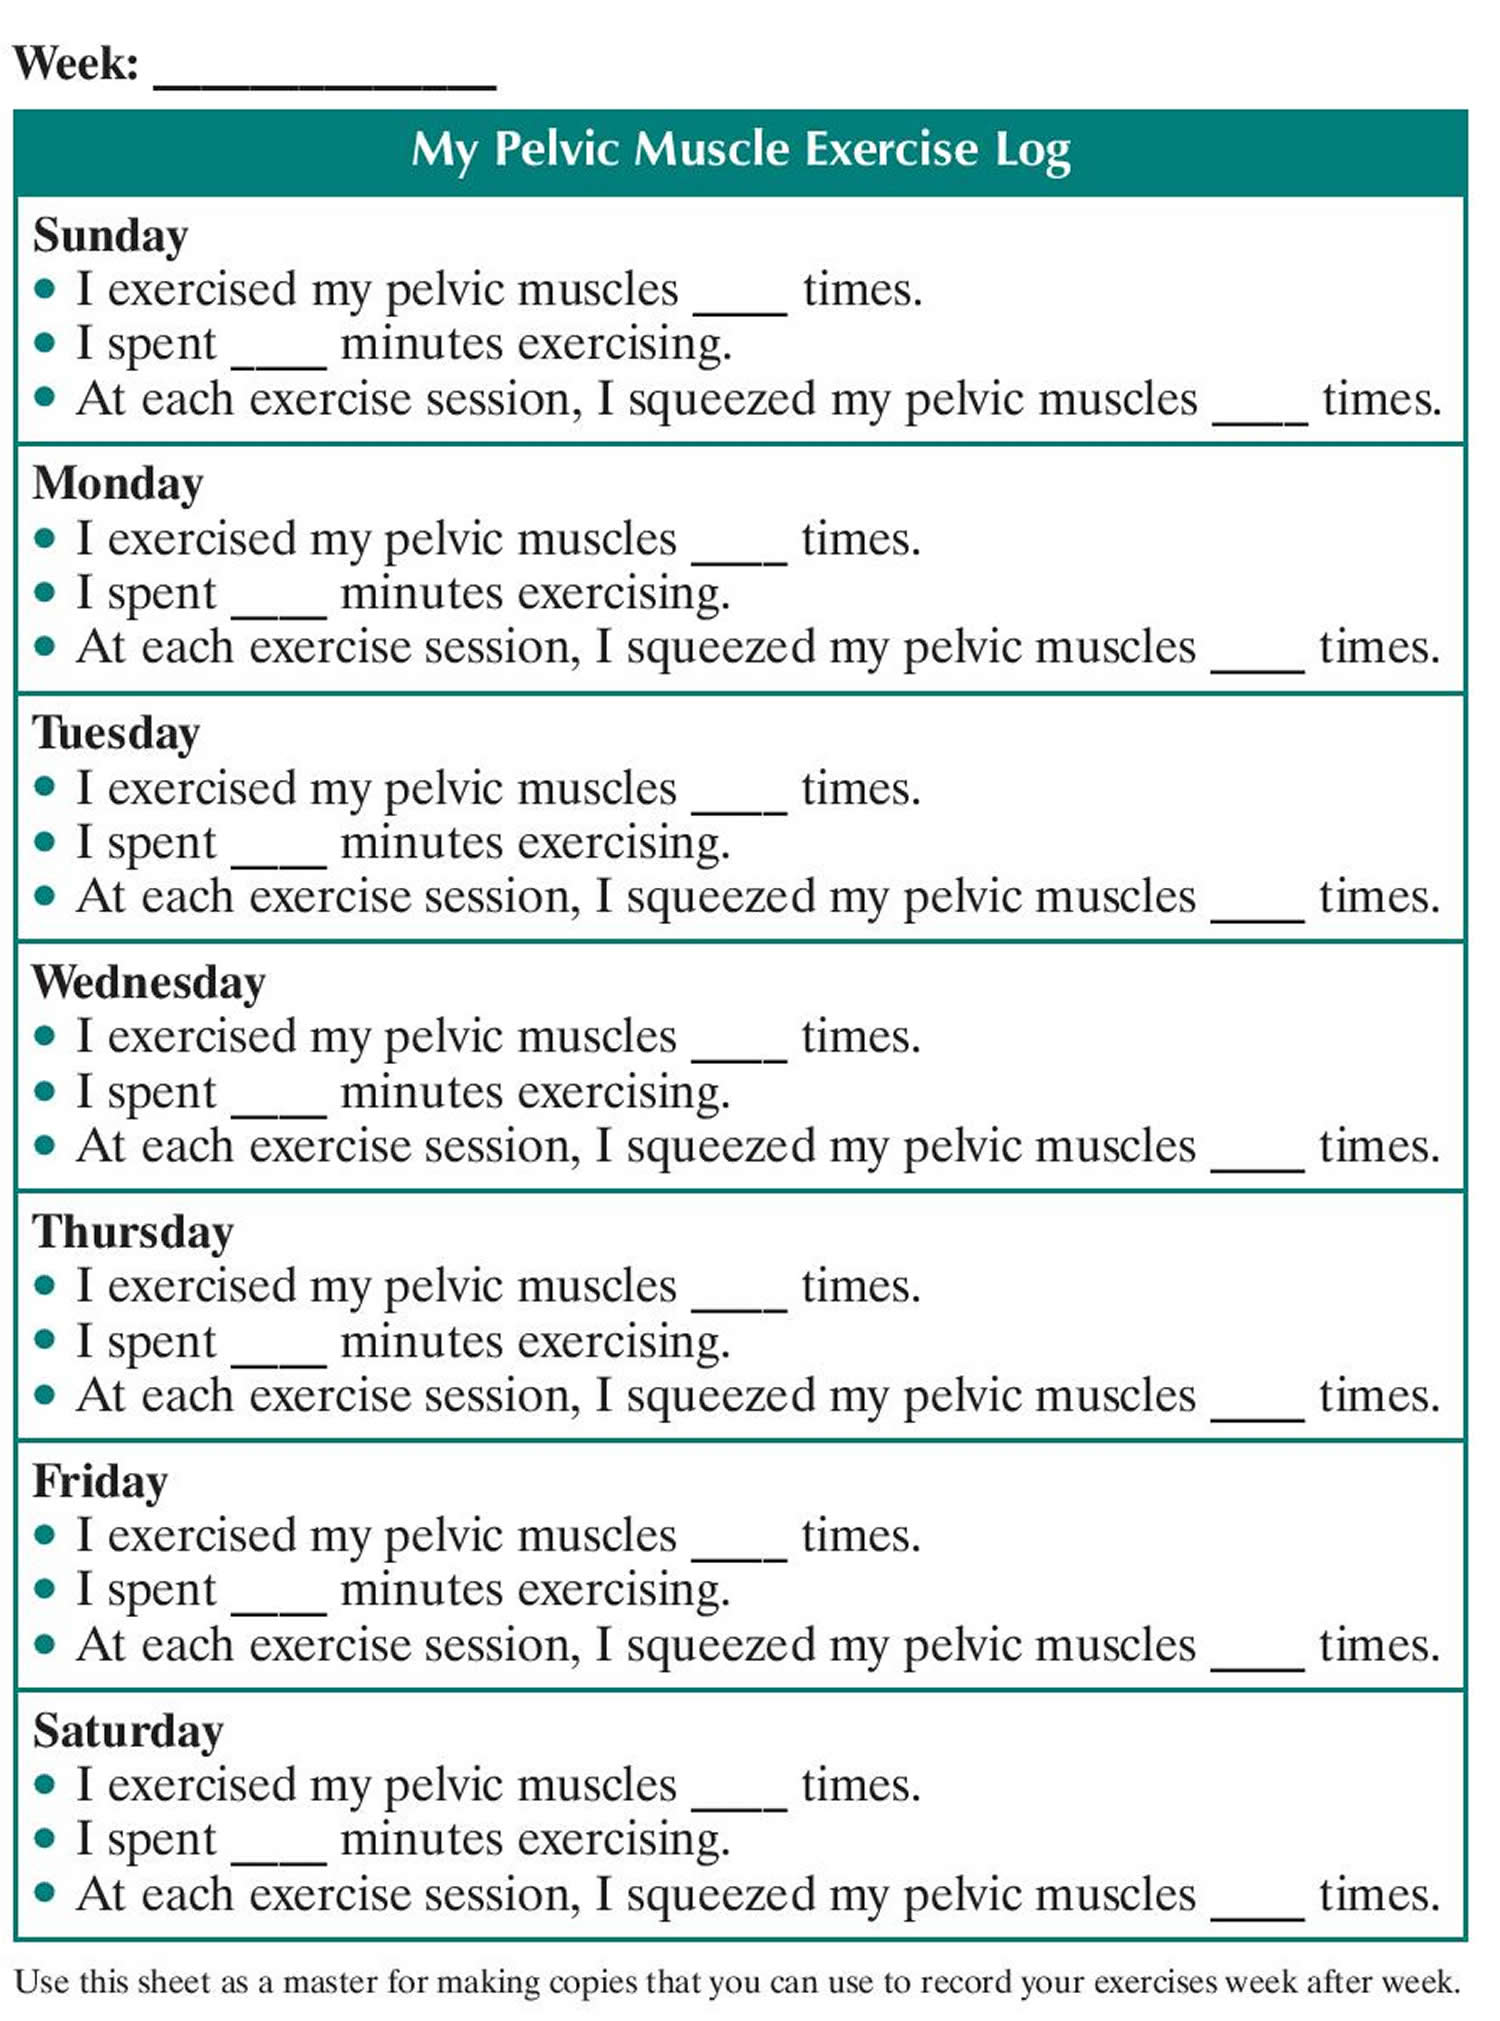
Use the Exercise Log below to keep track of your sessions.

Week: ______________

My Pelvic Muscle Exercise Log

Sunday

  • I exercised my pelvic muscles ____ times.
  • I spent ____ minutes exercising.
  • At each exercise session, I squeezed my pelvic muscles ____ times.

Monday

  • I exercised my pelvic muscles ____ times.
  • I spent ____ minutes exercising.
  • At each exercise session, I squeezed my pelvic muscles ____ times.

Tuesday

  • I exercised my pelvic muscles ____ times.
  • I spent ____ minutes exercising.
  • At each exercise session, I squeezed my pelvic muscles ____ times.

Wednesday

  • I exercised my pelvic muscles ____ times.
  • I spent ____ minutes exercising.
  • At each exercise session, I squeezed my pelvic muscles ____ times.

Thursday

  • I exercised my pelvic muscles ____ times.
  • I spent ____ minutes exercising.
  • At each exercise session, I squeezed my pelvic muscles ____ times.

Friday

  • I exercised my pelvic muscles ____ times.
  • I spent ____ minutes exercising.
  • At each exercise session, I squeezed my pelvic muscles ____ times.

Saturday

  • I exercised my pelvic muscles ____ times.
  • I spent ____ minutes exercising.
  • At each exercise session, I squeezed my pelvic muscles ____ times.

Figure 4. Pelvic floor muscle exercise log – use this sheet as a master for making copies that you can use to record your exercises week after week.

Pelvic floor muscle exercise log

Episiotomy risks

There are some risks to having an episiotomy. Because of the risks, episiotomies are not as common as they used to be. The risks include:

Complications associated with episiotomy include:

  • Bleeding,
  • Pain and discomfort of the wound and sutures (which may cause pain while sitting, and in turn affect breastfeeding),
  • Wound scarring,
  • Dyspareunia (painful sex). Sex may be painful for the first few months after birth.
  • Complications in subsequent vaginal births.
  • The cut may tear and become larger during the delivery. The tear may reach into the muscle around the rectum, or even into the rectum itself.
  • There may be more blood loss.
  • The cut and the stitches may get infected.

Other adverse effects of episiotomy include:

  • (a) extension of episiotomy through the anal sphincter and rectum by the clinician making the incision, or by spontaneous extension of the incision;
  • (b) unsatisfactory anatomic healing resulting in skin tags, asymmetry or excessive narrowing of the introitus, vaginal prolapse, recto-vaginal fistula and fistula-in-ano 36);
  • (c) increased blood loss and hematoma;
  • (d) pain and oedema around the episiotomy wound;
  • (e) infection and dehiscence 37);
  • (f) dyspareunia, which may be a short-term consequence, or may become more established and cause persistent dyspareunia 38); and finally,
  • (h) at least one woman has died as a result of infection complicating an episiotomy wound 39).

What happens if you need an episiotomy?

Just before your baby is born and as the head is about to crown, your doctor or midwife will give you local anaesthetic to numb the area so you won’t feel any pain (if you have not already had an epidural). If you’ve already had an epidural, the dose can be topped up before the cut is made.

Next, a small incision (cut) is made. There are 2 types of cuts: midline (median) and medio-lateral.

  1. A midline episiotomy is the most common type. It is a straight cut in the middle of the area between the vagina and anus (perineum). A midline incision is the easiest to repair, but has a higher risk of extending into the anal area. Median episiotomy is associated with a greater risk of extension to the anal sphincter (third-degree extension) or rectum (fourth-degree extension).
  2. A mediolateral episiotomy is made at an angle. It is less likely to tear through to the anus, but it takes longer to heal than the median cut and might be more difficult to repair. Reported disadvantages of the mediolateral procedure include greater blood loss, and, possibly, more discomfort during the early postpartum period. Although the data are insufficient to determine the superiority of either approach, the procedures seem to have similar outcomes, including pain from the incision and time to resumption of intercourse.

Generally, an episiotomy follows this process:

  • You will lie on a labor bed, with your feet and legs supported for the birth.
  • If you have not been given any anesthesia, your provider will inject a local anesthetic into the perineal skin and muscle. This will numb the tissues before the incision is made. If epidural anesthesia is used, you will have no feeling from your waist down. In this case, you won’t need more anesthesia for the episiotomy.
  • During the second stage of labor (pushing stage), as your baby’s head stretches your vaginal opening, your healthcare provider will use surgical scissors or a scalpel to make the episiotomy incision.
  • Your health care provider will then deliver the baby through the enlarged opening.
  • Next, your provider will deliver the placenta (afterbirth).
  • He or she will check the incision for any further tearing.
  • Your provider will use stitches (sutures) to repair the perineal tissues and muscle. The stitches will dissolve over time.

You shouldn’t feel any pain while your health care provider making the incision or repairing it after delivery.

Episiotomy healing

After an episiotomy, you may have pain at the incision site. An ice pack may help reduce swelling and pain. Warm or cold shallow baths (sitz baths) may ease soreness and speed healing. Medicated creams or local numbing sprays may also be helpful.

You may take a pain reliever as recommended by your doctor. Be sure to take only recommended medicines.

Keep the incision clean and dry using the method your healthcare provider recommends. This is important after urination and bowel movements. If bowel movements are painful, stool softeners recommended by your healthcare provider may be helpful.

Do not douche, use tampons, or have sex until your healthcare provider says it’s OK. You may also have other limits on your activity, including no strenuous activity or heavy lifting.

You may go back to your normal diet unless your healthcare provider tells you otherwise.

Your healthcare provider will tell you when to return for further treatment or care.

Your healthcare provider may give you other instructions after the procedure, based on your situation.

Wait 6 weeks before you:

  • Use tampons
  • Have sex
  • Do any other activity that might rupture (break) the stitches

Coping with pain

It’s common to feel some pain after an episiotomy. Painkillers such as acetaminophen (Tylenol) can help relieve pain and are safe to use if you’re breastfeeding.

You shouldn’t take ibuprofen if you’re breastfeeding and your baby was born premature (before 37 weeks of pregnancy), had a low birth weight, or has a medical condition.

Aspirin also isn’t recommended as it can be passed on to your baby through your breast milk. Your midwife will advise you if you’re not sure what painkillers to take.

Research suggests around 1% of women (1 in 100) feel severe pain that seriously affects their day-to-day activities and quality of life after having an episiotomy.

If this happens, it may be necessary to treat the pain with stronger prescription-only painkillers, such as codeine.

However, prescription-only medicine may affect your ability to breastfeed safely. Your doctor or midwife will be able to advise you about this.

To ease the pain, you can try:

  • placing an ice pack or ice cubes wrapped in a towel on the incision – avoid placing ice directly on to your skin as this could cause damage
  • using a doughnut-shaped cushion or squeezing your buttocks together while you’re sitting to help relieve pressure and pain at the site of your cut

Exposing the stitches to fresh air can help encourage the healing process. Taking off your underwear and lying on a towel on your bed for around 10 minutes once or twice a day may help.

It’s unusual for postoperative pain to last longer than two to three weeks. If the pain lasts longer than this, you should speak to a doctor, health visitor, or another health professional.

How long does it take for an episiotomy to heal?

Stitches should heal within one month of the birth. Most women heal without problems, although it may take many weeks. If you have an episiotomy or tear during delivery, the wound might hurt for a few weeks — especially when you walk or sit. If the incision or tear is extensive, the tenderness might last longer. Any stitches used to repair the episiotomy will usually be absorbed on their own.

You can return to normal activities when you feel ready, such as light office work or house cleaning.

To promote healing:

  • Soothe the wound. Cool the wound with an ice pack, or place a chilled witch hazel pad between a sanitary napkin and the wound.
  • Take the sting out of urination. Pour warm water over your vulva during urination, and rinse yourself with a squeeze bottle afterward.
  • Take warm baths, but wait until 24 hours after you have given birth. Make sure that the bathtub is cleaned with a disinfectant before every bath.
  • Prevent pain and stretching during bowel movements. Press a clean pad against the wound when passing a bowel movement.
  • Sit down carefully. Tighten your buttocks as you lower yourself to a seated position. Sit on a pillow or padded ring.
  • Use medication as needed. Your health care provider might order prescription medications or recommend an over-the-counter pain reliever or stool softener. However, pain-relieving creams or ointments haven’t been found to be effective for episiotomy wounds.
  • Consider complementary treatments. Some research suggests that lavender might help relieve pain after a tear or episiotomy. If your health care provider approves, add a few drops of lavender essential oil to your bath water or apply the oil directly to the tissue between your vaginal opening and your anus.

You can do many other things to help speed up the healing process, such as:

  • Use sitz baths (sit in water that covers your vulvar area) a few times a day. Wait until 24 hours after you have given birth to take a sitz bath as well. You can buy tubs in any drug store that will fit on the rim of the toilet. If you prefer, you can sit in this kind of tub instead of climbing into the bathtub.
  • Change your pads every 2 to 4 hours.
  • Keep the area around the stitches clean and dry. Pat the area dry with a clean towel after you bathe.
  • After you urinate or have a bowel movement, spray warm water over the area and pat dry with a clean towel or baby wipe. DO NOT use toilet paper.
  • Do Kegel exercises. Squeeze the muscles that you use to hold in urine for 5 minutes. Do this 10 times a day throughout the day.
  • Take stool softeners and drink lots of water. This will prevent constipation. Eating lots of fiber will also help. Your health care provider can suggest foods with plenty of fiber.

While you’re healing, expect the discomfort to progressively improve. Contact your health care provider if the pain intensifies, you develop a fever or the wound produces a pus-like discharge. These could be signs of an infection.

Going to the toilet

Keep the cut and the surrounding area clean to prevent infection. After going to the toilet, pour warm water over your vaginal area to rinse it.

Pouring warm water over the outer area of your vagina as you pee may also help ease the discomfort.

You may find squatting over the toilet, rather than sitting on it, reduces the stinging sensation when passing urine.

When you’re passing a stool, you may find it useful to place a clean pad at the site of the cut and press gently as you poo. This can help relieve pressure on the cut.

When wiping your bottom, make sure you wipe gently from front to back. This will help prevent bacteria in your anus infecting the cut and surrounding tissue.

If you find passing stools particularly painful, taking laxatives may help. This type of medication is usually used to treat constipation and makes stools softer and easier to pass.

Most laxatives work within 3 days. They should only be used for a short time.

The most common causes of constipation include:

  • not eating enough fiber – such as fruit, vegetables and cereals
  • not drinking enough fluids
  • not exercising or being less active
  • often ignoring the urge to go to the toilet
  • changing your diet or daily routine
  • stress, anxiety or depression
  • a side effect of medication

Constipation is also common during pregnancy and for 6 weeks after giving birth.

In much rarer cases, constipation may be caused by a medical condition.

How you can treat constipation yourself

Simple changes to your diet and lifestyle can help treat constipation. It’s safe to try these simple measures when you’re pregnant.

You may notice a difference within a few days. Sometimes it takes a few weeks before your symptoms improve.
Make changes to your diet

To make your stool softer and easier to pass:

  • drink plenty of fluids and avoid alcohol
  • increase the fiber in your diet
  • add some wheat bran, oats or linseed to your diet

Increase your activity

A daily walk or run can help you to defecate more regularly.

Improve your toilet routine

Keep to a regular time and place and give yourself plenty of time to use the toilet. Don’t delay if you feel the urge to poo.

To make it easier to poo, try resting your feet on a low stool while going to the toilet. If possible, raise your knees above your hips.

Pain during sex

There are no rules about when to start having sex again after you’ve given birth. In the weeks after giving birth, many women feel sore as well as tired, whether they’ve had an episiotomy or not. Don’t rush into it. If sex hurts, it won’t be pleasurable.

If you’ve had a tear or an episiotomy, pain during sex is very common in the first few months.

Studies have found around 9 out of 10 women who had an episiotomy reported resuming sex after the procedure was very painful, but pain improves over time.

If penetration is painful, say so. If you pretend everything is all right when it isn’t, you may start to see sex as a nuisance rather than a pleasure, which won’t help you or your partner.

You can still be close without having penetration – for example, through mutual masturbation.

Pain can sometimes be linked to vaginal dryness. You can try using a water-based lubricant available from pharmacies to help.

Don’t use an oil-based lubricant, such as Vaseline or moisturising lotion, as this can irritate the vagina and damage latex condoms or diaphragms.

You can get pregnant as little as three weeks after the birth of a baby, even if you’re breastfeeding and your periods haven’t started again.

Use some kind of contraception every time you have sex after giving birth, including the first time (unless you want to get pregnant again).

You’ll usually have an opportunity to discuss your contraceptive options before you leave hospital (if you’ve had your baby in hospital) and at the postnatal check.

You can also talk to your doctor, midwife or health visitor, or go to a contraception clinic at any time.

Pelvic Floor Exercises

Strengthening the muscles around the vagina and anus by doing pelvic floor exercises can help promote healing, and will reduce the pressure on the cut and surrounding tissue.

Pelvic floor exercises involve squeezing the muscles around your vagina and anus as though to stop yourself from going to the loo or passing wind (farting).

Episiotomy infection

Tell your healthcare provider if you have any of the following:

  • Bleeding from the episiotomy site
  • Your pain gets worse.
  • You go for 4 or more days without a bowel movement.
  • You pass a blood clot larger than a walnut.
  • Foul-smelling vaginal drainage
  • Fever or chills
  • Severe perineal pain

Episiotomy scar tissue

For a few women, excessive, raised or itchy scar tissue forms around the place where a tear happened or where an episiotomy was performed. If your scar tissue is causing problems for you, tell your doctor.

Scar tissue doesn’t stretch, so you may need an episiotomy again if you have excessive scar tissue and you have another baby. You can talk to your midwife or doctor about this.

References   [ + ]

read more

Brushing teeth for kids

brushing teeth for kids

How to brush teeth for kids

Brushing your child’s teeth should begin when the teeth first begin to come in, or as directed by your child’s doctor or pediatric dentist. Even before your child actually has teeth, it is important to perform mouth care. Using a damp washcloth or piece of gauze, gently rub it over your infant’s gums to help clean the mouth. A soft toothbrush, wet with water, may be used after your infant has developed some teeth. Experts advise consulting your child’s dentist regarding the appropriate time for your toddler to begin using toothpaste. Use only a very small amount of toothpaste, because young children will often swallow it, instead of spitting it out. The single best way to remove harmful plaque — a thin, sticky film loaded with bacteria — from teeth and gums is to brush teeth regularly and properly.

Because every mouth is different, there is more than one technique of brushing that has proven to be effective. Deciding which technique is most appropriate for your child depends largely on your child’s teeth positions and gum condition. Consult your child’s pediatric dentist to determine which brushing technique is most appropriate for your child’s mouth.

Generally, most dentists recommend a circular technique for brushing. This includes brushing only a small group of teeth at a time — gradually covering the entire mouth. The importance of maintaining a circular or elliptical motion is emphasized, as using a back and forth motion may cause the following:

  • Receding gums
  • Exposed and sensitive root surface
  • Wearing down of the root surfaces at the gum line

Instead, dentists recommend the following method:

  • Step 1: Place the toothbrush beside the teeth at a 45-degree angle.
  • Step 2: Gently brush only a small group of teeth at a time (in a circular or elliptical motion) until the entire mouth is covered.
  • Step 3: Brush the outside of the teeth, inside of the teeth, and the chewing surfaces.
  • Step 4: Gently brush the tongue to remove bacteria and freshen breath.
  • Step 5: Repeat steps one through four at least twice daily, especially after meals and snacks.

Toddler teeth need cleaning twice a day – in the morning and before bed.

Use a small, soft toothbrush designed for children under two years. Just use water on the toothbrush until your child is 18 months old, unless a dentist tells you otherwise. At 18 months, you can start using a pea-sized amount of low-fluoride toothpaste, unless a dentist recommends a higher fluoride strength.

Your child can start helping to clean her teeth at around two years of age. Letting your child hold the toothbrush with you will help her feel she’s part of the action. But your child needs your help and supervision with cleaning teeth until she’s about eight years old.

The best way to brush your child’s teeth

You might like to try the following routine when brushing your child’s teeth:

  1. Stand or sit behind your child so that he feels secure. Brushing teeth in front of a mirror is good too, because it lets you see your child’s mouth.
  2. Cup your child’s chin in your hands with her head resting against your body.
  3. Angle the bristles of the toothbrush towards the gum. Move the brush in gentle circles to clean the outer and inner sides of the teeth and gums.
  4. Brush back and forth on the chewing surfaces of the teeth.
  5. Gently brush your child’s tongue.
  6. Encourage your child to brush without swallowing. When your child starts using toothpaste, get him to spit it out. There’s no need to rinse after brushing because the fluoride toothpaste left behind protects your child’s teeth.

If you’re using an electric toothbrush, avoid moving the brush in circles. Keep your hand still, and guide the brush across your child’s teeth and gums.
Tips to make brushing teeth easier

Toddlers often don’t like brushing their teeth. But even a quick brush is better than nothing, because it helps your child learn that brushing teeth is a normal part of her daily routine.

Children are more likely to go along with cleaning teeth if it’s fun. Here are some ideas:

  • Sing while you’re brushing. You could try ‘This is the way we brush our teeth, brush our teeth, brush our teeth, so early in the morning’.
  • Pretend the toothbrush is a train. You could try saying ‘Toot toot chugga chugga’ as you move the brush around your child’s teeth.
  • Let your child play with his favorite toy while you’re brushing.

Toddler teeth development

Children get teeth at different times, but first teeth usually appear between 6 and 10 months. In some children, teeth appear as early as three months. In others, they don’t arrive until around 12 months.

Baby teeth can arrive in any order, although the central bottom teeth are often first. All 20 baby teeth will usually arrive by the time your child is three years old.

The 32 adult teeth replace the baby teeth between the ages of 6 and 20 years.

Facts about primary or baby (deciduous) teeth

  • Proper care of a child’s deciduous teeth (also known as “baby” or primary teeth) is very important, as these teeth hold space for the future eruption of permanent teeth.
  • If a baby tooth decays or is removed too early, the space necessary for the permanent teeth is lost and can only be regained through orthodontic treatment.
  • Infected baby teeth can cause the permanent teeth to develop improperly resulting in stains, pits, and weaker teeth.
  • Primary teeth are important in speech development.
  • Primary teeth aid in chewing food properly, promoting healthy nutrition.

Most children begin losing their baby teeth around the ages of five or six, with usually the front teeth first. They continue to lose baby teeth until the age of 12 or 13 when all of the permanent teeth finally come through, except for the third molars (wisdom teeth). These molars begin to appear around the ages of 17 to 21.

Figure 1. Baby teeth

Baby teeth coming in order

Dental health in children

Birth to six months of age

  • Clean the infant’s mouth with gauze or use a soft infant toothbrush after feedings and at bedtime.
  • Consult your child’s dentist regarding fluoride supplements.
  • Regulate feeding habits (bottle-feeding and breastfeeding).

Six to 12 months of age

  • During this time, the first tooth should appear. Consult a pediatric dentist for an examination.
  • Brush teeth after each feeding and at bedtime with a small, soft-bristled brush and baby paste without fluoride.
  • As the child begins to walk, stay alert for potential dental and/or facial injuries.
  • Wean the child from the bottle by his or her first birthday. If a woman breastfeeds her child, the American Academy of Pediatric Dentistry recommends breastfeeding for at least one year. The World Health Organization (WHO) recommends breastfeeding for at least two years.

Twelve to 24 months of age

  • Follow the schedule of dental examinations and cleanings, as recommended by your child’s pediatric dentist. Generally, dental examinations and cleanings are recommended every six months for children and adults.
  • As your child learns to rinse his or her mouth, and as most primary (baby) teeth have erupted by this age, brushing with a pea-sized portion of fluoridated toothpaste becomes appropriate, in most cases. However, it is advised to consult your child’s pediatric dentist regarding the appropriate time for your toddler to begin using toothpaste.

What type of toothbrush should be used?

It’s important to choose the right toothbrush – one designed especially for children aged 2-5 years. A toothbrush head should be small — about 1 inch by 1/2 inch and should have a cushioned handle suitable for firm grasping. These toothbrushes also often have cartoons and fun designs on the handle, which your child might like. The bristles of the brush should be soft, nylon, and rounded at the ends. This helps ensure that the brush bristles are kind to the gums and tooth surfaces. Soft, polished bristles allow you to reach into the crevice (sulcus) between the teeth and gums to remove plaque without damaging the gums. Some brushes are too abrasive and can wear down the enamel on teeth. Thus, in most cases, medium and hard bristles are not recommended. Only gentle pressure is needed when brushing to remove the plaque. Excessive pressure can cause the gums to recede and can abrade the tooth surface.

The novelty of electric toothbrushes might also appeal to your child. Some electric toothbrushes can give a slightly better clean than manual brushes, but it’s best to go with what your child prefers.

Keeping the toothbrush clean

After cleaning your child’s teeth and gums, rinse the toothbrush with tap water.

Store the toothbrush upright in an open container to allow it to air-dry.

You should replace toothbrushes every 3-4 months, or when the bristles get worn or frayed.

How often is brushing necessary?

Generally, brushing is recommended twice a day for at least three to four minutes each time. People generally think they are brushing long enough, when, in fact, most people spend less than one minute brushing. In addition, it is generally better to brush three to four minutes twice a day instead of brushing quickly five or more times throughout the day.

Dentists advise brushing teeth during the day while at school or play. Keeping a toothbrush handy — in a desk or backpack — increases the chance that your child will brush during the day.

Which type of toothpaste is best?

Fluoride is the most crucial ingredient in toothpaste. Fluoride is a safe mineral that helps keep teeth strong and prevents tooth decay. As long as the toothpaste contains fluoride, the brand or type (paste, gel, or powder) generally does not matter. All fluoride toothpastes work effectively to fight plaque and cavities, and to clean and polish tooth enamel. The brand you choose should bear the American Dental Association seal of approval on the container, which means that adequate evidence of safety and efficacy have been demonstrated in controlled, clinical trials.

You can start using a pea-sized amount of low-fluoride toothpaste on your child’s toothbrush from 18 months of age.

Some toothpastes offer tartar control pyrophosphates to prevent the build-up of soft calculus deposits on teeth, while others offer whitening formulas to safely remove stains, making teeth brighter and shinier. But, contrary to clever advertising and popular belief, fluoride is the true active ingredient that works the hardest to protect your child’s teeth.

How often should my child visit the dentist?

Children should visit the dentist to have their teeth checked by about 12 months of age or when their first tooth comes through, whichever happens first. This lets your child get to know the dentist. It also gives you and your dentist a chance to talk about your child’s needs and plan your child’s dental care.

Talk to your dentist about how often your child needs to return for check-ups. Dentists usually recommend every 6-12 months.

read more

How to teach kids to read

how to teach kids to read

How to teach kids to read

Contrary to what some people believe, learning to read is not a ‘natural’ process that happens all on its own. Reading is a complex process that requires the proper teaching of various skills and strategies, such as phonics (knowing the relationship between letters and sounds) and phonemic awareness (the ability to identify and manipulate individual sounds or phonemes).

The good news is that although reading itself is a complex process, the steps taken in order to build these skills are fairly simple and straightforward. Reading with your child is one of the most important things you can do to develop your child’s ability to read, write and build skills for starting school. When children become good readers in the early grades, they are more likely to become better learners throughout their school years and beyond.

Some time, usually between the ages of 5 and 6, most children begin to read. Learning to read accurately, fluidly, with good comprehension and stamina is also a crucial set of skills for school success. Schools know this. That’s why in the best ones, the early years of primary education are devoted to teaching kids to read using scientifically proven methods to ensure that all kids are reading at grade level.

Preschool and kindergarten teachers set the stage for your child to learn to read with some critical early skills. First, second and third grade teachers then take up the task of building the skills that children will use everyday for the rest of their lives. As a parent, you can help by understanding what teachers are teaching and by asking questions about your child’s progress and the classroom reading program. You can also help your children become readers. Learning to read takes practice, more practice than children get during the school day.

Children become best at what they do most. Reading and writing should not simply be another activity that is only done at school. Reading and writing should become daily activities around the house as well as at school. As a start, parents should find out what is being taught each week in school and try to reinforce those lessons at home. Skills that your child is learning, such as sound-letter associations, can be practiced quite effectively through simple games.

But before your child learns to read and write, he needs to develop the building blocks for literacy – the ability to speak, listen, understand, watch and draw. The language experiences that children have before they start school form powerful brain connections. These connections are used for language, thinking and understanding. Without activities like talking, singing and reading, the brain doesn’t develop these important connections.

Becoming a reader involves the development of important skills, including learning to:

  • use language in conversation
  • listen and respond to stories read aloud
  • recognize and name the letters of the alphabet
  • listen to the sounds of spoken language
  • connect sounds to letters to figure out the “code” of reading
  • read often so that recognizing words becomes easy and automatic
  • learn and use new words
  • understand what is read

And as your child gets older, she also needs to learn about the connection between letters on a page and spoken sounds. For this to happen, she needs plenty of experience with:

  • pictures and objects – how you can use words to talk about them
  • letters and words – their shapes, sounds and names
  • sounds – how words can rhyme, begin and end with the same letters, be broken up into parts like syllables, be formed by blending different sounds and so on.

You can help with all these areas of your child’s early literacy development by:

  • communicating with your child
  • reading together
  • playing with rhyme and other sounds with your child.

And the great news is that you can do this in ways that are fun for both of you.

It’s a good idea to read with your child often. It’s best to start reading from birth, but it’s never too late to begin. Reading with children from an early age helps them develop a solid foundation for literacy. It also promotes bonding and is good for your relationship with your child.

Reading with your child:

  • shows her that books can give both pleasure and information
  • helps her learn the sounds of letters in spoken language
  • helps her understand that stories aren’t coming from you, but from the words on the page – this teaches her about how the printed word works
  • helps her develop a larger vocabulary – books might use new or unfamiliar words
  • improves her thinking and problem-solving skills
  • can get your child thinking and talking about a new concept, an event or something that interests her.

What you can do:

  • Choose lift-the flap books, touch-and-feel books or books with rhyming or repeating words for younger children.
  • Encourage your child to hold the book and turn the pages. This helps him start to understand that the book should be a certain way up, and that pages are always turned in the same direction.
  • Slide your finger underneath the words as you read them, pointing out each word. This teaches your child about print and shows her that we always start on the left and move to the right when reading English. You could ask, ‘Where should I start reading on this page?’ or ‘Do you know this letter?’
  • Point out pictures and talk about the pictures your child points to.
  • Make the sounds of animals or other objects in the book – have fun!
  • Visit the library. There are lots of different types of books you can borrow.

Teaching your child to read

  • Teaching the sounds of language. The teacher provides opportunities for children to practice with the sounds that make up words . Children learn to put sounds together to make words and to break words into their separate sounds.
  • Practicing the sounds of language. Read books with rhymes . Teach your child rhymes, short poems, and songs. Play simple word games: How many words can you make up that sound like the word “bat”?
  • Teaching the letters of the alphabet. Teachers help children learn to recognize letter names and shapes.
  • Helping children learn and use new words.
  • Helping your child take spoken words apart and put them together. Help your child separate the sounds in words, listen for beginning and ending sounds, and put separate sounds together.
  • Practicing the alphabet by pointing out letters wherever you see them and by reading alphabet books.
  • Reading to children everyday. Read with expression and talk with your child about what they are reading.
  • Systematically teaching phonics—how sounds and letters are related .
  • Giving children the opportunity to practice the letter-sound relationships they are learning. Children have the chance to practice sounds and letters by reading easy books that use words with the letter-sound relationships they are learning .
  • Helping children write the letter-sound relationships they know by using them in words, sentences, messages, and their own stories.
  • Showing children ways to think about and understand what they are reading. Asks your child questions to show them how to think about the meaning of what they read.
  • Pointing out the letter-sound relationships your child is learning on labels, boxes, newspapers, magazines and signs.
  • Listening to your child read words and books from school. Be patient and listen as your child practices. Let your child know you are proud of his reading.
  • Continuing to teach letter-sound relationships for children who need more practice. On average, children need about two years of instruction in letter-sound relationships to become good spellers as well as readers.
  • Teaching the meaning of words, especially words that are important to understanding a book.
  • Teaching ways to learn the meaning of new words. Children should be taught how to use dictionaries to learn word meanings, how to use known words and word parts to figure out other words , and how to get clues about a word from the rest of the sentence.
  • Helping children understand what they are reading. Good readers think as they read and they know whether what they are reading is making sense. Help children to check their understanding. When children are having difficulty, show them ways to figure out the meaning of what they are reading.
  • Re-reading familiar books. Children need practice in reading comfortably and with expression using books they know.
  • Building reading accuracy. As your child is reading aloud, point out words he missed and help him read words correctly. If you stop to focus on a word, have your child reread the whole sentence to be sure he understands the meaning.
  • Building reading comprehension. Talk with your child about what she is reading. Ask about new words . Talk about what happened in a story. Ask about the characters , places and events that took place. Ask what new information she has learned from the book. Encourage her to read on her own.
  • Share conversations with your child over meal times and other times you are together. Children learn words more easily when they hear them spoken often. Introduce new and interesting words at every opportunity.
  • Read together everyday. Spend time talking about stories, pictures, and words.
  • Be your child’s best advocate. Keep informed about your child ’s progress in reading and ask the teacher about ways you can help.
  • Be a reader and a writer. Children learn habits from the people around them.
  • Visit the library often. Story times, computers, homework help, and other exciting activities await the entire family.

When should I start reading with my young child?

You can start reading to your child as early as you like – the earlier the better. Reading together is a chance to hold your baby in your arms, for your baby to listen to your voice, and for you to share the pictures in the book. Babies love all these things, so why not start as early as possible.

There is no specific age to begin sharing books together. Some say that reading with young children can begin soon after birth. Other parents like to start around 4 to 6 months because your baby will have some head control then and can sit up in your lap. You should start whenever you’re ready.

What is phonemic awareness?

Phonemic awareness is the ability to identify and manipulate individual sounds (phonemes) in spoken words. Reading is the product of decoding and comprehension 1). Although this sounds simple, learning to read is much tougher than people think. To learn to decode and read printed English, children must be aware that spoken words are composed of individual sound parts termed phonemes. This is what is meant by phoneme awareness.

Phonological awareness is the ability to recognize and manipulate the spoken parts of words. The levels of phonological awareness are, from simplest to most complex: syllables, onset–rime, and phonemes. Scientists know that a student’s skill in phonological awareness is a good predictor of later reading success or difficulty.

Phoneme awareness and phonics are not the same. When educators assess phoneme awareness skills, they ask children to demonstrate knowledge of the sound structure of words without any letters or written words present. For example, What word would be left if the /k/ sound were taken away from cat. What sounds do you hear in the word big? To assess phonics skills, they ask children to link sounds (phonemes) with letters. Thus, the development of phonics skills depends on the development of phoneme awareness.

Why is phoneme awareness critical in beginning reading, and why is it difficult for some children? Because to read an alphabetic language like English, children must know that written spellings systematically represent spoken sounds. When youngsters figure this out, either on their own or with direct instruction, they have acquired the alphabetic principle. However, if beginning readers have difficulty perceiving the sounds in spoken words for example, if they cannot hear the /at/ sound in fat and cat and perceive that the difference lies in the first sound they will have difficulty decoding or sounding out new words. In turn, developing reading fluency will be difficult, resulting in poor comprehension, limited learning, and little enjoyment.

Scientists are beginning to understand why many children have difficulty developing phoneme awareness. When you speak, the individual sounds (phonemes) within the words are not consciously heard by the listener. Thus, no one ever receives any natural practice understanding that words are composed of smaller, abstract sound units. For example, when one utters the word bag, the ear hears only one sound, not three (as in /b/ /a/ /g/. This is because when bag is spoken, the /a/ and /g/ phonemes are folded into the initial /b/ sound. Thus, the acoustic information presented to the ears reflects an overlapping bundle of sound, not three discrete sounds. This process ensures rapid, efficient communication. Consider the time it would take to have a conversation if each of the words you uttered were segmented into their underlying sound structure.

However, nature has provided a conundrum here: What is good for the listener is not so good for the beginning reader. Although spoken language is seamless, the beginning reader must detect the seams in speech, unglue the sounds from one another, and learn which sounds (phonemes) go with which letters. Scientists now understand that specific systems in the brain recover sounds from spoken words, and just as in learning any skill, children understand phoneme awareness with different aptitudes and experiences.

Developing automaticity and understanding

In the initial stages of reading development, learning phoneme awareness and phonics skills and practicing these skills with texts is critical. Children must also acquire fluency and automaticity in decoding and word recognition. Consider that a reader has only so much attention and memory capacity. If beginning readers read the words in a laborious, inefficient manner, they cannot remember what they read, much less relate the ideas to their background knowledge. Thus, the ultimate goal of reading instruction for children to understand and enjoy what they read may not be achieved.

Reading researchers reveal that making meaning requires more than phoneme awareness, phonics, and reading fluency, although these are necessary skills. Good comprehenders link the ideas presented in print to their own experiences. They have also developed the necessary vocabulary to make sense of the content being read. Good comprehenders have a knack for summarizing, predicting, and clarifying what they have read, and many are adept at asking themselves guide questions to enhance understanding.

What is the difference between phonological awareness and phonemic awareness?

Phonological awareness refers to a global awareness of the sound structures of speech and the ability to manipulate those structures. Phonological awareness is an umbrella term that encompasses both basic levels of awareness of speech sounds, such as rhyming, alliteration, the number of words in a sentence, and the syllables within words, as well as more advanced levels of awareness such as onset-rime awareness and full phonemic awareness.

Phonemic awareness is the most advanced level of phonological awareness. It refers to a child’s awareness of the individual phonemes — the smallest units of sound — in spoken words, and the ability to manipulate those sounds.

Phonological awareness involves a continuum of skills that develop over time and that are crucial for reading and spelling success, because they are central to learning to decode and spell printed words. Phonological awareness is especially important at the earliest stages of reading development — in preschool, kindergarten, and first grade for typical readers.

Explicit teaching of phonological awareness in these early years can eliminate future reading problems for many students. However, struggling decoders of any age can work on phonological awareness, especially if they evidence problems in blending or segmenting phonemes.

How about phonological awareness and phonics?

Phonological awareness refers to a global awareness of sounds in spoken words, as well as the ability to manipulate those sounds.

Phonics refers to knowledge of letter sounds and the ability to apply that knowledge in decoding unfamiliar printed words.

So, phonological awareness refers to oral language and phonics refers to print. Both of these skills are very important and tend to interact in reading development, but they are distinct skills; children can have weaknesses in one of them but not the other.

For example, a child who knows letter sounds but cannot blend the sounds to form the whole word has a phonological awareness (specifically, a phonemic awareness) problem. Conversely, a child who can orally blend sounds with ease but mixes up vowel letter sounds, reading pit for pet and set for sit, has a phonics problem.

Why should I read with my young child?

Reading is vital for your child’s development. Sharing books with your young child helps them to start to develop the sort of skills that they will need when they start school. Reading together is not trying to teach your little one to read before they are ready, it is helping your child to develop a love of books. Reading together from an early age helps your child to understand how a book works and to learn how much fun they can be. Sharing books together is a special time. The pictures and words in the book give you lots of things to have fun with, talk and laugh about, all while you bond with your child.

Why some children have difficulties learning to read?

Good readers are phonemically aware, understand the alphabetic principle, apply these skills in a rapid and fluent manner, possess strong vocabularies and syntactical and grammatical skills, and relate reading to their own experiences. Difficulties in any of these areas can impede reading development. Further, learning to read begins far before children enter formal schooling. Children who have stimulating literacy experiences from birth onward have an edge in vocabulary development, understanding the goals of reading, and developing an awareness of print and literacy concepts.

Conversely, the children who are most at risk for reading failure enter kindergarten and the elementary grades without these early experiences. Frequently, many poor readers have not consistently engaged in the language play that develops an awareness of sound structure and language patterns. They have limited exposure to bedtime and laptime reading. In short, children raised in poverty, those with limited proficiency in English, those from homes where the parents’ reading levels and practices are low, and those with speech, language, and hearing handicaps are at increased risk of reading failure.

However, many children with robust oral language experience, average to above average intelligence, and frequent early interactions with literacy activities also have difficulties learning to read. Why? Programmatic longitudinal research, clearly indicates that deficits in the development of phoneme awareness skills not only predict difficulties learning to read, but they also have a negative effect on reading acquisition. Whereas phoneme awareness is necessary for adequate reading development, it is not sufficient. Children must also develop phonics concepts and apply these skills fluently in text. Although substantial research supports the importance of phoneme awareness, phonics, and the development of speed and automaticity in reading, we know less about how children develop reading comprehension strategies and semantic and syntactic knowledge. Given that some children with well developed decoding and word- recognition abilities have difficulties understanding what they read, more research in reading comprehension is crucial.

Substantial evidence shows that many children in the 1st and 2nd grades and beyond will require explicit instruction to develop the necessary phoneme awareness, phonics, spelling, and reading comprehension skills. But for these children, this will not be sufficient. For youngsters having difficulties learning to read, each of these foundational skills should be taught and integrated into textual reading formats to ensure sufficient levels of fluency, automaticity, and understanding.

How often should I read with my young child?

There is no magic number for how long or how often you should read together. Young children generally like routines so you could try to make reading a part of your everyday routine. Bedtime is a time that lots of families like for sharing stories. Anywhere, anytime is great. Your child might choose books for you to share at any time of the day, just because they like it.

How do I get my young child involved in reading?

  • Try to find a quiet space to share books (turn off the TV and radio) so your child can hear your voice. A quiet space will let you both enjoy the experience.
  • Get comfy together, and sit so that you can both clearly see and touch the book. Encourage your toddler to point to things in the book and turn the pages.
  • Let your child choose the books.
  • Your child might like to have the same book read over and over. Imagine how good your child will feel about themselves when he or she tells you the word that finishes the sentence or describes what is going to happen next.
  • Your child’s interests will change as they grow. When they choose the book you are supporting your child to share their interests with you.
  • Play games and have fun. Books can help you get started on lots of different activities. Your infant will like being moved to the rhythm of the book and actions that match the book. There are many stories that are actually songs. You can sing them together.
  • Ask questions and point to familiar things in the book. Help your child to explore what they see in the book and relate it to their real world. Ask about things they like, things they have seen before, the colors they see, and to count things on the page.
  • Join the library, it’s free. Your child will have fun selecting the books and have lots to choose from. You may also be able to go to “read aloud” sessions at the library. You and your child will see many people who love reading and have lots of fun.

Reading milestones

This is a general outline of the milestones on the road to reading success. Keep in mind that kids develop at different paces and spend varying amounts of time at each stage. If you have concerns, talk to your child’s doctor, teacher, or the reading specialist at school. Early intervention is key in helping kids who struggle to read.

Infancy (Up to Age 1)

Kids usually begin to:

  • learn that gestures and sounds communicate meaning
  • respond when spoken to
  • direct their attention to a person or object
  • understand 50 words or more
  • reach for books and turn the pages with help
  • respond to stories and pictures by vocalizing and patting the pictures

Toddlers (Ages 1–3)

Kids usually begin to:

  • answer questions about and identify objects in books — such as “Where’s the cow?” or “What does the cow say?”
  • name familiar pictures
  • use pointing to identify named objects
  • pretend to read books
  • finish sentences in books they know well
  • scribble on paper
  • know names of books and identify them by the picture on the cover
  • turn pages of board books
  • have a favorite book and request it to be read often

Early Preschool (Age 3)

Kids usually begin to:

  • explore books independently
  • listen to longer books that are read aloud
  • retell a familiar story
  • sing the alphabet song with prompting and cues
  • make symbols that resemble writing
  • recognize the first letter in their name
  • learn that writing is different from drawing a picture
  • imitate the action of reading a book aloud

Late Preschool (Age 4)

Kids usually begin to:

  • recognize familiar signs and labels, especially on signs and containers
  • recognize words that rhyme
  • name some of the letters of the alphabet (a good goal to strive for is 15–18 uppercase letters)
  • recognize the letters in their names
  • write their names
  • name beginning letters or sounds of words
  • match some letters to their sounds
  • develop awareness of syllables
  • use familiar letters to try writing words
  • understand that print is read from left to right, top to bottom
  • retell stories that have been read to them

Kindergarten (Age 5)

Kids usually begin to:

  • produce words that rhyme
  • match some spoken and written words
  • write some letters, numbers, and words
  • recognize some familiar words in print
  • predict what will happen next in a story
  • identify initial, final, and medial (middle) sounds in short words
  • identify and manipulate increasingly smaller sounds in speech
  • understand concrete definitions of some words
  • read simple words in isolation (the word with definition) and in context (using the word in a sentence)
  • retell the main idea, identify details (who, what, when, where, why, how), and arrange story events in sequence

First and second grade (Ages 6–7)

Kids usually begin to:

  • read familiar stories
  • “sound out” or decode unfamiliar words
  • use pictures and context to figure out unfamiliar words
  • use some common punctuation and capitalization in writing
  • self-correct when they make a mistake while reading aloud
  • show comprehension of a story through drawings
  • write by organizing details into a logical sequence with a beginning, middle, and end

Second and third grade (Ages 7–8)

Kids usually begin to:

  • read longer books independently
  • read aloud with proper emphasis and expression
  • use context and pictures to help identify unfamiliar words
  • understand the concept of paragraphs and begin to apply it in writing
  • correctly use punctuation
  • correctly spell many words
  • write notes, like phone messages and email
  • understand humor in text
  • use new words, phrases, or figures of speech that they’ve heard
  • revise their own writing to create and illustrate stories

Fourth through eighth grade (Ages 9–13)

Kids usually begin to:

  • explore and understand different kinds of texts, like biographies, poetry, and fiction
  • understand and explore expository, narrative, and persuasive text
  • read to extract specific information, such as from a science book
  • understand relations between objects
  • identify parts of speech and devices like similes and metaphors
  • correctly identify major elements of stories, like time, place, plot, problem, and resolution
  • read and write on a specific topic for fun, and understand what style is needed
  • analyze texts for meaning.

Reading with babies (from 4 months)

Sharing stories from birth gives children a great start to life. Share rhymes, songs and stories every day

What babies like:

  • being close to you
  • watching your face and lips move
  • hearing the sound of your voice
  • listening to different sounds and music
  • hearing same words, rhymes and stories over and over again
  • looking at books with colors, faces and pictures of other babies
  • touching and tasting books

What are the benefits of reading to my baby?

An infant won’t understand everything you’re doing or why. But reading aloud to your baby is a wonderful shared activity you can continue for years to come and it’s important for your baby’s brain.

Reading aloud:

  • teaches a baby about communication
  • introduces concepts such as numbers, letters, colors, and shapes in a fun way
  • builds listening, memory, and vocabulary skills
  • gives babies information about the world around them

By the time babies reach their first birthday they will have learned all the sounds needed to speak their native language. The more stories you read aloud, the more words your baby will hear and the better they’ll be able to talk.

Hearing words helps to build a rich network of words in a baby’s brain. Kids whose parents talk and read to them often know more words by age 2 than children who have not been read to. And kids who are read to during their early years are more likely to learn to read at the right time.

When you read to your baby:

  • Your baby hears you using many different emotions and expressive sounds. This supports social and emotional development.
  • It encourages your baby to look, point, touch, and answer questions. This helps with social development and thinking skills.
  • Your baby improves language skills by copying sounds, recognizing pictures, and learning words.

But perhaps the most important reason to read aloud is that it makes a connection between the things your baby loves the most — your voice and closeness to you — and books. Spending time reading to your baby shows that reading is important. And if infants and children are read to often with joy, excitement, and closeness, they begin to associate books with happiness — and new readers are created.

Young babies may not know what the pictures in a book mean, but they can focus on them, especially faces, bright colors, and different patterns. When you read or sing lullabies and nursery rhymes, you can entertain and soothe your infant.

Between 4–6 months:

  • Your baby may begin to show more interest in books. Your little one will grab and hold books, but will mouth, chew, and drop them as well. Choose sturdy vinyl or cloth books with bright colors and familiar, repetitive, or rhyming text.

Between 6–12 months:

  • Your baby starts to understand that pictures represent objects, and may start to show that they like certain pictures, pages, or even entire stories better than others. Your baby will respond while you read, grabbing for the book and making sounds. By 12 months, your little one will turn pages (with some help from you), pat or start to point to objects on a page, and repeat your sounds.

How you can help your baby grow into a strong reader

  • smile and hold your baby close so they can see your face and the book
  • copy the sounds your baby makes e.g. “da-da-da”
  • help your baby bounce and move to the rhythm of your voice or music
  • talk or sing about what you are doing when caring for your baby
  • notice what your baby is looking at and name it
  • share stories with your baby in the language you feel most comfortable with
  • start at the front of a book — you don’t have to finish it, a few pages is great.
  • keep books in easy reach of your baby
  • join the library — it’s free and fun.

How to read to your baby

Here’s a great thing about reading aloud: It doesn’t take special skills or equipment, just you, your baby, and some books. Read aloud for a few minutes at a time, but do it often. Don’t worry about finishing entire books — focus on pages that you and your baby enjoy.

Try to read every day, perhaps before naptime and bedtime. Reading before bed gives you and your baby a chance to cuddle and connect. It also sets a routine that will help calm your baby.

It’s also good to read at other points in the day. Choose times when your baby is dry, fed, and alert. Books also come in handy when you’re stuck waiting, so have some in the diaper bag to fill time sitting at the doctor’s office or standing in line at the grocery store.

Here are some other reading tips:

  • Cuddling while you read helps your baby feel safe, warm, and connected to you.
  • Read with expression, make your voice higher or lower where it’s appropriate, or use different voices for different characters.
  • Don’t worry about following the text exactly. Stop once in a while and ask questions or make comments on the pictures or text. (“Where’s the kitty? There he is! What a cute black kitty.”)
  • Your child might not be able to respond yet, but this lays the groundwork for doing so later.
  • Sing nursery rhymes, make funny animal sounds, or bounce your baby on your knee — anything that shows that reading is fun.
  • Babies love — and learn from — repetition, so don’t be afraid of reading the same books over and over. When you do, repeat the same emphasis each time as you would with a familiar song.
  • As your baby gets older, encourage your little one to touch the book or hold sturdier vinyl, cloth, or board books. You don’t want to encourage chewing on books, but by putting them in the mouth, your baby is learning about them, finding out how books feel and taste — and discovering that you can’t eat them!

What to read to your baby

Books for babies should have simple, repetitive, and familiar text and clear pictures. During the first few months of life, your child just likes to hear your voice. So you can read almost anything, especially books with a sing-song or rhyming text. As your baby gets more interested in looking at things, choose books with simple pictures against solid backgrounds.

As your baby begins to grab, you can read vinyl or cloth books that have faces, bright colors, and shapes. When your baby begins to respond to what’s inside the books, add board books with pictures of babies or familiar objects like toys. When your baby starts to do things like sit up in the bathtub or eat finger foods, find simple stories about daily routines like bedtime or bathtime. When your child starts talking, choose books that let babies repeat simple words or phrases.

Books with mirrors and different textures (crinkly, soft, scratchy) are also great for this age group. So are fold-out books you can prop up, or books with flaps that open for a surprise. Board books make page turning easier for infants, and vinyl or cloth books can go everywhere — even the tub. Babies of any age like photo albums with pictures of people they know and love. And babies love nursery rhymes.

One of the best ways to make sure that your little one grows up to be a reader is to have books around your house. When your baby is old enough to crawl over to a basket of toys and pick one out, make sure some books are in the mix.

Besides the books you own, you also can borrow from the library. Many libraries have story time for babies too. Don’t forget to pick up a book for yourself while you’re there. Reading for fun is another way you can be your baby’s reading role model.

Reading with babies (from 12 months)

Sharing stories from birth gives children a great start to life. Share rhymes, songs and stories every day.

What babies like:

  • sitting close, seeing the book and your face
  • looking at and listening to the world around them
  • moving to the rhythm of stories, nursery rhymes and music
  • touching objects with different textures (soft, smooth, prickly)• hearing the same songs, books and stories over and over again
  • feeling and holding the book and helping to turn the pages — board books are great
  • looking at books about family, food, animals and colors.

How you can help your baby grow into a strong reader

  • ensure your baby can see your face and the book you are sharing
  • play and laugh with your baby
  • give your baby different textures to touch and talk about what they feel like
  • sing songs that your baby can clap, dance and move to• talk about what your baby is doing or pointing to
  • tell your baby’s favorite stories and rhymes over and over again
  • name the pictures your baby touches or points to in the book
  • keep books at home to share with your baby
  • take your baby to the library to look at books and join in reading sessions and activities — it’s free and fun.

How to teach toddler to read

At this age and stage, reading with your child is all about having fun with books, spending special time together and modelling a love of books.

Reading, storytelling, talking and singing with your toddler helps him learn about sounds, words and language. Try to read daily with your toddler. Ask your child to fill in the words in stories she knows, and name what she sees in the pictures. Your toddler might enjoy books with animals, stories about playtime, and lift-the-flap and pop-up books.

Sharing stories, talking and singing every day helps your child’s development in lots of ways. You’re getting your child familiar with sounds, words, language, print and, eventually, the value and joy of books. This all builds your child’s early literacy skills and helps him go on to read successfully later in childhood.

Reading stories also stimulates your child’s imagination and helps her learn about the world around her. And reading together creates a precious time for bonding with your child.

What toddlers like:

  • talking with you about the games they are playing
  • pointing to and naming things they see
  • reciting the same rhymes, songs and stories over and over again
  • listening to songs and stories with his or her name in them
  • filling in the words in songs and stories they know
  • reading about animals and making animal noises
  • choosing the book and helping to turn the pages.

NOTE: Ebooks can be handy, especially if you’re travelling or away from home. If your child wants to read ebooks, share them with your child and choose stories without distracting animations or games. Ebooks shouldn’t replace paper books. It’s important to balance screen time with other activities.

How you can help your toddler grow into a strong reader

  • talk to your toddler about what they are doing as they play
  • help your toddler notice words, sounds and letters in everyday life e.g. street signs, grocery packaging
  • sing simple songs together, make your own music and dance to the rhythm
  • find words that rhyme in stories and songs
  • play and have fun — you don’t have to read the whole book
  • encourage your toddler to turn the pages and talk about what he or she sees e.g. “Show me the snake”
  • share books, read-along storytelling apps and eBooks wherever you are
  • carry books with you when you go somewhere
  • visit a library, borrow some books or join in toddler story time sessions at the library — it’s free and fun.

Here are some tips that can help you and your toddler reader make the most of book time:

  • Help your child choose a book, then ask him to hold the book and turn the pages.
  • Get your child to fill in the words in a story she knows. Also try pausing and letting her finish sentences for you.
  • Ask your toddler to name what he sees in the pictures.
  • Talk with your toddler about the sounds animals make.
  • Sing nursery rhymes and fun songs together.

These general tips are helpful for reading and storytelling with most young children:

  • Make a routine, and try to share at least one book every day. The routine could include a special reading space – for example, a chair, lounge or beanbag that’s big and comfortable enough for you and your child, with a box of books or bookshelf nearby.
  • Make reading and storytelling relaxed and fun so that your child looks forward to it. There’ll be days when she doesn’t want to spend a long time reading, and that’s OK. Just be guided by her interest.
  • Turn off the TV or radio, and find a quiet space to read so your child can focus and listen to your voice.
  • Hold your child close or on your knee while you read so he can see your face and the book.
  • Involve your child in reading by encouraging talk about the pictures, and by repeating familiar words or passages. Try out funny noises and sounds – play and have fun.
  • If she wants to, let your child choose the books. She might have favorite authors and illustrators. Be prepared to read your child’s favorite books over and over again.

What to read with your toddler

There are so many books to choose from that it can be hard to know where to start.

In general, young children often enjoy books that have good rhyme, rhythm and repetition and these qualities can help children learn. Books that are the right length for your child will keep him engaged.

Toddlers might especially enjoy:

  • books with animals and animal noises
  • books about a favorite topic, like cars, trucks, fairies, pets, stars and planets, music, castles, the ocean, princesses or trains
  • books about playtime that relate to their experiences
  • lift-the-flap and pop-up books – at this age, children can have fun with books with moveable pieces.

Here are some great books for toddlers:

  • Crocodile beat by Gail Jorgensen and Patricia Mullins
  • On your potty by Virginia Miller
  • Rumble in the jungle pop-up book by Giles Andreae and David Wojtowycz
  • Time for bed by Mem Fox
  • The very hungry caterpillar by Eric Carle
  • The wheels on the bus by Penny Dann
  • What colour are your knickers by Sam Lloyd
  • The whose … series by Jeanette Rowe, which includes Whose baby? and Whose nose?
  • I went walking by Sue Williams
  • Peepo by Janet and Allan Ahlberg
  • Each peach, pear, plum by Janet and Allan Ahlberg
  • Cuddle time by Libby Gleeson
  • The Gruffalo by Julia Donaldson
  • The Hairy Maclary collection by Lynley Dodd.

Why not visit your local library? It’s free to join and borrow. The staff will be able to recommend books for you and your child to enjoy.

How to teach 3 year old to read

Sharing stories from birth gives children a great start to life. Read, play and learn with books.

What children like:

  • naming the things they know
  • talking, singing and moving to music
  • hearing words that rhyme
  • making up their own stories and drawing the pictures
  • listening to stories about themselves, families, friends and going to school
  • reading alphabet and counting books
  • helping to tell a story or song they know.

How you can help your 3 year old grow into a strong reader

  • point out signs, grocery packaging and other words and pictures when you shop
  • help your child to draw and talk about the drawings they make
  • make up actions to go with the words of songs
  • as you read, run your finger under the words
  • talk about the story and ask questions e.g. “What is the bird doing?”
  • help your child find the first letter of their name in the book
  • share eBooks and apps to help your child learn about sounds and letters in words
  • keep books at your place to share with your child
  • visit your local library regularly and borrow books.

How to teach a kindergartener to read

Reading, storytelling, talking and singing with your child helps her learn about sounds, words and language. Sharing stories, talking and singing every day helps your child’s development in lots of ways. Try to read daily with your kindergartener. Encourage him to turn pages and trace words. Ask him questions about the book and story. Your kindergartener might enjoy alphabet, shape and counting books, and funny stories with quirky characters.

You’re getting your child familiar with sounds, words, language and, eventually, the value and joy of books. This all builds your child’s early literacy skills, like the ability to listen to and understand words. It also helps her go on to read successfully later in childhood.

Reading stories stimulates your child’s imagination and helps him learn about the world around him.

And reading is also a great time for you to bond with your child and share time together. When your child sees you reading and writing, you’re creating a home environment that helps develop literacy skills. Your reading and writing can be as simple as reading magazines or newspapers and writing shopping lists or messages for your partner or children.

At this age and stage, reading with your child is all about spending special time together, and having fun by enjoying the language and illustrations in picture books. Here are some tips that can help you and your kindergartener make the most of your reading time.

NOTE: Ebooks can be handy, especially if you’re traveling or away from home. If your child wants to read ebooks, share them with your child and choose stories without distracting animations or games. Ebooks shouldn’t replace paper books. It’s important to balance screen time with other activities.

Looking at the book

Before you start, ask your child some questions about the book:

  • Who are the author and illustrator of the book?
  • What do you think this story is about?
  • Who might be in it?
  • What do you think will happen?

Reading the story

  • Vary the pace of your reading, as well as how loud you read. Changing your voice and expression for different characters can also be fun.
  • Encourage your child to use her finger to trace the words while you read them.
  • Let your child turn the pages of the book himself.
  • Ask your child some questions about the story – for example, ‘What do you think happens next?’, ‘Why is the baby happy?’ and ‘Who has the ball?’
  • Chant or sing repetitive phrases and words together.

Looking at letters, words and punctuation

  • Point out the differences between letters and words, and the difference between a lower-case and capital letter. For example, ‘There is a capital M. Can you see how it’s bigger than this lower-case m?’
  • Point out different punctuation marks, including full stops, exclamation marks and question marks. Explain what these mean – for example, ‘There is a question mark. When we see one of those, we know that somebody is asking a question’.
  • When you see words printed in bold or large font, point these out and explain how this changes the ways that we say those words. For example, ‘Look at how big the word BOOHOO is. The baby must be crying very loudly’.
  • Ask questions about the names and sounds of letters.
  • Play ‘find the letters and words’ games, especially with the letters in your child’s name.

Other reading activities

  • Help your child make up her own stories and drawings to go with them.
  • If your child can’t read words yet, encourage your child to tell you a story based on the pictures in a storybook.

General tips for kindergartener readers

  • Make a routine, and try to share at least one book every day. Sharing a book can be a nice way to start and finish the day. A comfortable and favorite reading place can be part of the routine.
  • Turn off the TV or radio so your child can focus.
  • Hold your child close or on your knee while you read so he can see your face and the book.
  • Try out funny noises and sounds – play and have fun!
  • Involve your child by encouraging talk about the pictures and repeating familiar words.
  • Let your child choose the books. Be prepared to read favorite books over and over again.

In kindergarten, work on building the following skills.

Develop sound awareness

  • Have your child recognize and give rhyming words. For example: “what rhymes with cat?”, or “do cat and mat rhyme?”
  • Try naming pictures of objects and grouping those that rhyme together.
  • Work on isolating and identifying the first and last sounds in words, for example, I Spy: “I spy with my little eye something that starts with /B/.”

What to read with your kindergartener

There are so many books to choose from that it can be hard to know where to start.

As a broad rule, young children often enjoy books that have good rhyme, rhythm and repetition. In fact, one of the ways that children learn is through repetition and rhyme.

In the preschool years (ages 3-5 years), your child might especially enjoy:

  • alphabet, shape, size and counting books
  • books that tell simple stories, especially ones with rhythm and repetition
  • books about families, friends and going to school
  • books with characters who are about the same age as your child and characters who have quirky traits
  • books that use humor and have a sense of fun – for example, a character who uses a funny word, or who is silly or even ‘naughty’
  • books relating to particular interests – for example, books about dinosaurs, fairies, football or animals. Some preschoolers are very interested in non-fiction books, including books about the
  • stars, the ocean, inventions, food and travels around the world.

Here are some books for you and your preschooler to explore:

  • Alexander and the terrible, horrible, no good, very bad day by Judith Viorst
  • Are we there yet? by Alison Lester
  • Early learning big book of Australian nature by Steve Parish
  • The Hairy Maclary collection by Lynley Dodd
  • Koala Lou by Mem Fox
  • Let’s get a pup by Bob Graham
  • Naughty agapanthus by Barbara Macfarlane
  • Olivia by Ian Falconer and others in this series
  • One fish, two fish, red fish, blue fish by Dr Seuss
  • Owl babies by Martin Waddell and Patrick Benson
  • Possum magic by Mem Fox
  • Squish rabbit by Katherine Battersby
  • The cat in the hat by Dr Seuss
  • The rice bag hammock by Shaeeza Haniff
  • The very hungry caterpillar by Eric Carle
  • The wheels on the bus by Penny Dann
  • Za-Za’s baby brother by Lucy Cousins.

Why not visit your local library? It’s free to join and borrow. The staff will be able to recommend books for you and your child to enjoy.

Or if your child attends child care, kindergarten or preschool, you could talk to his teachers or carers to get some ideas. Some preschools allow children to borrow books each week or to bring a special book from home to share with the group.

Teach sound blending skills

Use a few pictures as cues. Ask your child to listen to some sounds and put them together to tell you which picture you mean. Start by splitting the words into only two sound units. Say “c – at.” If your child can blend these to find the picture of the cat, then increase the number of sounds your child has to blend, for example: “c-a-t.”

Develop the concepts of a word and a sound

Clap out the number of words in a sentence and clap out the number of sounds in a word. For a variation, tap blocks as you say each word or sound.

Teach letter recognition and sound-letter associations

  • Teach one or two letters at a time. Practice until they are well learned before introducing more letters. The Jolly Phonics method teaches not only the letter name, but also the sound the letter makes and a unique movement to help the child remember the associations.
  • Play “Concentration,” “Go Fish,” or Letter Dominos using the letters you are practicing.
  • Try recognizing the letters you are working on when looking at signs, billboards, food packaging, labels, and store fronts out in the community.

How to teach a grade one child to read

In grade one, developing the following skills is important:

  • Help your child to focus on the position of sounds in words.
  • Draw a picture of a train (engine, passenger car, caboose). Put the letters representing each sound into the “train cars.” Say the sounds while pointing to the letters. Then blend the sounds together.
  • On a sheet of paper. Have your child point to the correct letter or letters every time you say a word beginning with the sound(s).
  • Read daily with your child, pointing to each word.
  • Read simple pattern and phonics books with your child.

Develop a personal Word Bank

Make cards with words that your child has started to learn. Have your child practice sounding out and reading the words. Shuffle the cards daily and see how many words your child can read in two minutes. Graph their progress over the week.
Introduce one or two sight words each week. Have your child trace the letters and make up sentences using those words. Put sight words on flash cards. Add to the Word Bank.
Make up simple pattern books using sight words and pictures. “I like _______.”, or “______ is fun.”

Create a daily journal

Begin a daily journal about family events. Start with one sentence and gradually increase the number of sentences. Encourage your child to try to sound out words. Provide correct spellings for mis-spelled words. Teach the use of capitals and periods. Type edited work on a computer. Keep this work in a binder with pictures from the event.

Other useful tips

  • Develop a personal dictionary or buy a simple dictionary.
  • For children who are still reversing letters, tape an alphabet strip to their desks for easy reference that shows correct capital and lowercase letters. Since b/d reversals are the most common, color code the letters (b in red, d in blue) to help the child remember which is which.
  • For children who forget the short vowel sounds, tape a sound strip to their desks. Use pictures as cues. For example, a picture of an ant could be placed above or below the letter a, to represent the short a sound.

How to teach a grade two and three child to read

Repeated reading technique

To develop reading fluency, try the Repeated Reading technique. Select a three or four paragraph, non-fiction passage which is slightly too hard for child. Read the passage to your child, while your child reads along. Then ask your child to read the passage while you listen. Go over the words they cannot read. Have them read the passage aloud daily. Keep track of the time they take to read the passage, and their errors and then graph their progress.

Paired reading

Use Paired Reading if your child struggles with decoding. Read one sentence, then have your child read the next, or you read one paragraph, and your child reads the next.
Teach spelling rules

Practice spelling rules until application of the rule becomes automatic, as follows:

  • Review the rule.
  • Spell single words to dictation.
  • Make up sentences using words exemplifying the spelling rule. Mis-spell some of those key words and have your child find and fix the spelling errors.
  • Complete spelling dictations.

Promote good reading comprehension

  • Continue reading age-appropriate books to your child to develop vocabulary and awareness of different grammatical structures.
  • When reading familiar books, leave out a word occasionally and see if your child can supply the right word.
  • Ask questions about what has happened and what might happen next.
  • Ask your child to define new terms; if they cannot, provide a definition.

Have your child assessed by a psychologist as soon as you feel their reading or spelling skills are lagging behind academic expectations.

How to help a child struggling with reading

Parents can be a huge help when their child is learning to read and write. Parents and family members can be a huge help when children are learning to read and write. At each grade level, parents can work with their child at home to build certain skills and abilities. Children become best at what they do most. Reading and writing should not simply be another activity that is only done at school. Reading and writing should become daily activities.

Problems with expression go beyond spelling and grammar. They have to do with the organization of thoughts and ideas. For example, most children’s stories have a beginning, middle, and end. As a child learns to write and express themselves, they should be able to organize and structure their own compositions in a way that makes sense to another reader. Expressive writing programs address these and other issues of this nature.

Kindergarten

In kindergarten, work on building the following skills.

Sound awareness

  • Have your child recognize and give rhyming words. For example, “What rhymes with cat?”; “Do cat and mat rhyme?”
  • Try naming pictures of objects and grouping those that rhyme together.
  • Work on isolating and identifying the first and last sounds in words, for example, play I Spy: “I spy with my little eye something that starts with /B/.”

Sound blending skills

Use a few pictures as cues. Ask your child to listen to some sounds and put them together to tell you which picture you mean. Start by splitting the words into only two sound units. Say “c – at.” If your child can blend these to find the picture of the cat, then increase the number of sounds your child has to blend: “c-a-t.”

Understanding the concept of a word and a sound

Clap the number of words in a sentence and clap the number of sounds in a word. For a variation, tap blocks or a table as you say each word or sound.

Recognizing letters and linking letters with sounds (sound-letter associations)

  • Teach one or two letters at a time. Practise until they are well learned before introducing more letters. The Jolly Phonics method teaches not only the letter name but also the sound the letter makes and a unique movement to help the child remember the associations.
  • Play “Concentration,” “Go Fish,” or Letter Dominos using the letters you are practising.
  • Try recognizing the letters you are working on when looking at signs, billboards, food packaging, labels and store fronts out in the community.

Grade 1

  • Help your child to focus on the position of sounds in words.
  • Draw a picture of a train (engine, passenger car or caboose). Put the letters representing each sound into the “train cars”. Say the sounds while pointing to the letters. Then blend the sounds together.
  • Write letters on a sheet of paper. Have your child point to the correct letter or letters every time you say a word beginning with the sound(s).
  • Read aloud with your child every day, pointing to each word as you say it.
  • Read simple pattern and phonics books with your child.

Develop a personal word bank

  • Write out any challenging or new words on paper or flash cards. Have your child practise sounding out and reading the words. Shuffle the cards daily and see how many words your child can read in two minutes. Keep track of their progress over the week.
  • Introduce one or two sight words each week. Have your child trace the letters and make up sentences using these words. Put sight words on flash cards and add them to the word bank.
  • Make up simple pattern books using sight words and pictures. “I like _______.”; “______ is fun.”

Create a daily journal

Begin a daily journal about family events. Start with one sentence and gradually increase the number of sentences. Encourage your child to try to sound out words. Provide correct spellings for mis-spelled words. Teach the use of capitals and periods. Type edited work on a computer. Keep this work in a binder with pictures from the event.

Other useful tips to help with reading in grade 1

  • Develop a personal dictionary or buy a simple dictionary.
  • For children who are still reversing letters, tape an alphabet strip to their desks for easy reference that shows correct capital and lowercase letters. Since b/d reversals are the most common, color code the letters (for example, b in red, d in blue) to help the child remember which is which.
  • For children who forget the short vowel sounds, tape a sound strip to their desks. Use pictures as cues. For example, a picture of an ant could be placed above or below the letter a, to represent the short a sound.

References   [ + ]

read more

Toddler discipline

toddler discipline

Toddler discipline

Discipline is about helping your child learn how to behave – as well as how not to behave. Discipline works best when you have a warm and loving relationship with your child. Kids begin knowing what “no” means at around seven months on average and once they can speak, many go through a stage where it becomes their favorite word to use. Unfortunately, parents can also count on kids going through a stage where they gleefully ignore when mom or dad says no, and other attempts and discipline. That’s because it is natural for them to start pushing boundaries — testing their independence and trying to explore the world on their own terms.

Discipline doesn’t mean punishment. In fact, discipline and discipline strategies are positive. They’re built on talking and listening, and they guide children towards:

  • knowing what behavior is appropriate, whether it’s at home, a friend’s house, child care, preschool or school
  • managing their own behavior and developing important skills like the ability to get along well with others
  • learning to understand, manage and express their feelings.

Physical punishment, for example, smacking or spanking – doesn’t teach children how to behave. Spanking isn’t good for children’s wellbeing and doesn’t help them learn to follow rules. When parents use physical punishment, children are more likely to have challenging behavior, anxiety or depression. There’s also a risk that spanking might hurt your child.

Sometimes children behave in challenging ways to express big feelings. When this happens it’s good to try talking with your child about his feelings or you can talk afterwards when he’s calm. When you help your child to understand his feelings, it helps him to manage his feelings and behavior.

Choosing an approach to discipline is about finding the right balance. Not enough discipline can leave children feeling insecure and parents feeling out of control. Too much negative discipline, and not enough praise and rewards, might get children behaving well, but out of fear. This can lead to problems with children’s self-esteem and anxiety later in life.

Discipline works best when it’s firm but fair. This means you set limits and consequences for your child’s behavior, while also encouraging good behavior with praise, rewards and other strategies.

Your approach to discipline will also depend on things like your parenting style, your child’s stage of development and your child’s temperament.

Here are four steps towards discipline and better child behavior

Clear expectations for your child’s behavior are the foundation of discipline for your child. Here’s how to get started.

1. Decide on family rules

A good place to start is with 4-5 family rules. For example, your family rules might be things like:

  • We speak nicely to each other.
  • We look after other people.
  • Everyone helps out around the house.
  • We look after our own belongings.

Children as young as three can help you make the rules and talk about why your family needs them.

2. Be a role model for the behavior you expect

Children learn by watching what you do. Showing your child the behavior you like by doing it yourself will help your child learn. For example, if you want your child to sit down to eat, sitting down together to eat family meals can help children learn this behavior.

3. Praise your child for good behavior

Praise is when you tell your child what you like about her or her behavior. When your child gets praise for behaving well, she’s likely to want to keep behaving well.

Descriptive praise is when you tell your child exactly what it is that you like. It’s best for encouraging good behavior. For example, ‘Ali, I really like how you used please and thank you just then. Great manners!’

4. Set clear limits and consequences

Decide on a consequence for breaking a family rule. For example, if your eight-year-old hasn’t done his household chores, the consequence might be the loss of pocket money for the week.

When you use consequences in the same way and for the same behavior every time, your child knows what to expect.

General principles of discipline

While every child is different, most children need to be given consistent, clear rules and expectations about behavior. The following are some general principles about discipline:

  • Discipline needs to begin as soon as the child is mobile ? pulling up and crawling.
  • Young infants rely on their parents to provide a safe environment.
  • Discipline should be age-focused and should teach age-appropriate behaviors.
  • Try to recognize and praise your child when he or she is being good.
  • Be a good role model for your child.
  • After the discipline occurs, hug your child. Make sure the child knows it is the behavior you are not happy with, not the child.
  • Physical punishment is not needed or appropriate.
  • Rewards for good behavior should be immediate.

Decrease unwanted behavior

It is important to remember not to reward a child or give positive reinforcement for a bad behavior. For example, if a child is having a temper tantrum, giving him or her a cookie to be quiet is rewarding the child for the bad behavior. In order to help decrease the chance of bad behavior, consider the following:

  • Do not reinforce the behavior; simply ignore the child.
  • The behavior may have to result in an unpleasant consequence, such as punishment.
  • Active punishment has two forms, including the following:
    • Denying the child privileges or desired activities, such as decreasing TV time or no dessert
    • Undesirable or uncomfortable activities can be required of the child, such as doing chores or having “time-out”
  • The behavior can result in natural consequences. For example, a child who will not eat may go to bed hungry.
  • It is generally accepted that spanking and other forms of physical punishment are not helpful. These types of discipline teach the child aggressive behaviors and poor conflict management.

Methods of discipline

Discipline methods often depend on the age of the child, and how much the child understands his or her behavior.

A big part of discipline in the early years is simply keeping kids safe. For example, don’t touch the oven, don’t pull on the cat’s tail, don’t run into the street, but it is actually more helpful to tell children what you do want them to do, instead. Kids know what ‘no’ means, but they don’t necessarily know what to do next after you say no, so you always want to make sure that you have an alternative for them. Saying, “Keep your hands to yourself” or “Use gentle hands” makes that clear. By setting consistent limits early, parents are also laying the groundwork for good behavior in the future.

Setting limits has other benefits, too. Telling children which behaviors you do — and don’t — want to see actually makes kids feel more secure, because it reminds them that you’re in charge and guides them to the areas where they should be developing their skills and independence such as playing with the plastic tea set and not trying to touch the real one.

Rules are also a way to help kids begin to consider the perspective of others, or at least set the stage for empathy. Two-year-olds might be too egocentric to comprehend how others feel, but they can begin to learn that sharing is a nice thing to do and practice handing grandma a toy.

But how should parents share rules with children, and how can those rules be enforced — particularly when children are very young and might not understand the concept of consequences?

The ways that you use discipline will change depending on what’s happening for your child at different stages of development.

The following are some suggestions for discipline techniques for each age group:

Babies

Babies do things to test their developing skills. They also enjoy making things happen. For example, your baby probably likes getting a reaction when he pulls your hair. But babies don’t understand consequences. They also don’t know the difference between right and wrong.

This means that negative consequences, or punishment, don’t work for babies. Instead, babies need warm, loving care so they feel secure. So when your baby pulls your hair, you might say ‘no’ and show him how to touch your hair gently. You’ll probably need to do this over and over again because your baby might not remember from one time to the next.

  • Safety is the main concern.
  • Infants will respond to a loud, firm voice saying “no.”
  • Provide a safe environment that decreases the chances of things being broken by the child.
  • After saying “no,” direct your child to an acceptable behavior, such as a toy.
  • Do not reward bad behavior. Ignore temper tantrums, but confront other problems, such as biting or hitting.
  • Praise and reward good behavior.

Toddlers

Toddlers often struggle with big feelings like frustration and anger. Their social and emotional skills are only just starting to develop, and they might be testing out their growing independence.

You can help your child behave well by tuning in to his feelings, changing the environment, distracting him and planning ahead for challenging situations.

Preschoolers

  • Preschoolers need clear and consistent rules.
  • This age group needs time to prepare for the next activity. Give your child a warning before it is time to stop playing.
  • Preschoolers need lots of explanation as to why things are being done.
  • Use time-out for bad behavior.
  • Use praise for good behavior.

School-aged children

School-aged children need the above rules and guidelines plus the following:

  • Give your child chances to explain his or her side and opinion and opportunities to express his or her feelings and concerns.
  • Give your child choices.
  • Give your child chances to help solve problems together regarding his or her behavior.

Adolescents

  • This age group needs patient and understanding parents as they test all limits.
  • Adolescents need to be told the long-term outcomes of bad behaviors.
  • Adolescents need to be involved with limit-setting, based on their maturity.

Toddler behavior management

Toddlers often struggle with big feelings like frustration and anger. Their social and emotional skills are only just starting to develop, and they might be testing out their growing independence. You can help your child behave well by tuning in to his feelings, changing the environment, distracting him and planning ahead for challenging situations.

Behavior management is about guiding your child’s behavior so that she/he learns the appropriate way to behave. A positive and constructive approach is often the best way to guide your child’s behavior. This means giving your child attention when he behaves well, rather than just punishing him when he does something you don’t like.

But it’s normal for children to behave in challenging ways at different stages and in particular situations. So trying to understand your child’s behavior is an important step in managing it. This way you can choose a reliable behavior management option that’s well matched to the causes of your child’s behavior.

And if you use behavior management strategies at the same time as you nurture strong family relationships, you’re well on your way to helping your child learn about appropriate behavior.

Understanding is the first step to child behavior management

If you can understand why your child is behaving in a particular way, you can work out how best to respond. So before you choose behavior management strategies, it’s a good idea to check a few things.

  1. First, if your child’s behavior changes suddenly, check whether your child is healthy and getting enough sleep. Sometimes challenging behavior is the first sign that children aren’t well. If you’re not sure, take your child to your doctor for a check-up.
  2. Next think about your child’s development. It’s good to keep in mind that different kinds of challenging behavior are normal at different stages of development. For example, tantrums are very common in toddlers and preschoolers, because at this age children have big feelings and not enough words to express them.
  3. Third, consider whether there have been any changes in your family life that might affect your child’s behavior. For example, challenging behavior is normal after the birth of a new baby, when children start school or after a death in the family.

Understanding the developmental reasons and emotions behind your child’s behavior doesn’t mean you can ignore challenging behavior, but it does help you work out how to respond. Also, knowing what’s typical at different stages and in different circumstances helps you know whether you need extra help with your child’s behavior.

Choosing behavior management tools that are right for you

No single behavior management strategy will fix everything. Some strategies might work better than others for your family and situation. You’ll probably have to use a few strategies in combination.

If you’re finding the strategies hard to use or they’re not working for you, it’s a good idea to seek support from your doctor or a parenting hotline.

If you’re managing challenging behavior in children with autism spectrum disorder, you might need extra support.

Tried and tested behavior management strategies

When you’re choosing behavior management strategies to guide your child’s behavior, you want options that will work. You want the behavior management options that are based on reliable research evidence. And they’ve been tried and tested many times in many practical family situations. However, you might still have to try a few different options to work out what best suits your child’s age and stage and your family circumstances.

Behavior management strategies work best when you’re putting time and effort into building a positive atmosphere at home and strengthening your family relationships with affection and communication.

Good family relationships help your child feel secure and loved. This is what children need to grow and learn.

Looking after yourself

Managing children’s challenging behavior isn’t always easy. When you look after yourself with healthy food, rest and exercise, you’ll feel better and find it easier to stay calm and respond to your child’s behavior.

Requests and instructions

A request is when you ask your child to do something. For example, ‘Will you help me fold this washing?’ Or ‘Do you want to wear your coat? It’s cold today’. Your child can choose to say yes or no to a request. Requests give your child choices and a sense of control, which might make your child more likely to cooperate.

An instruction is when you tell your child to do something. For example, ‘Please help me fold this washing now’ or ‘Please put your coat on when we go out’. This tells your child what you want him to do and when. You’re not giving your child the option of saying no. Instructions are often important for safety – for example, ‘Hold my hand while we cross the road’. And learning to follow instructions helps your child prepare for preschool and school. But children can feel overwhelmed or rebellious if there are too many instructions.

So try using requests more often than instructions.

It’s important to be clear about whether you’re asking or telling your child to do something. If you say something like, ‘Why can’t anyone help me tidy up in here?’ it’s harder for your child to know what to do. She might not know whether you’re asking for her help, telling her what to do, or complaining that no-one is helping.

If what you want isn’t clear, your child probably won’t get it!

Requests or instructions?

Instructions and requests are both important, and it’s best to use a mix of instructions and requests.

Giving effective instructions:

Instructions can be hard for your child. These ideas can help you get more cooperation when you need to give instructions. Give only one instruction at a time for younger children.

If you’re firm and consistent your child will eventually learn that sometimes she needs to do things she doesn’t want to do to help your family, get praise, avoid discomfort or get what she wants. This is an important step in developing self-discipline and independence.

Ensure you have your child’s attention. Getting your child’s attention will help make sure he’s listening. You can do this by:

  • moving in close – within 2 meters is ideal
  • getting down to your child’s eye level
  • using your child’s name
  • using a low and calm voice
  • asking your child to repeat the instructions back to you.

Use clear language. Instructions should be clear, short and appropriate for your child’s age. For example, for a toddler you might say ‘Toys away’. But for a five-year old you could say ‘Please put your toys away now’.

Be positive. Positive instructions help your child succeed because they tell her exactly what you want her to do. For example, say ‘Please chew with your mouth closed’ instead of ‘Don’t eat like that’.

Give instructions that include options. This can increase the chances of your child doing what you ask, because it gives your child some choice. For example, ‘It’s bath time. Do you want bubbles or no bubbles?’ Or ‘It’s time to get dressed – the red pants or the blue ones?’

Be prepared to repeat yourself. Children often need reminders. For example, ‘Sam, I’m telling you again. Put your shoes on now’. You can try adding an incentive or reason for your child to do as he’s told. For example, ‘If you put your shoes on quickly, we’ll have more time at the park’. For a younger child you might say ‘First shoes, then park’.

Use consequences. If your child won’t follow your instructions, you can use consequences for children over three. For example, ‘Please put your other toys away before I get out the paints’. The consequence might be no painting – very boring! – until your child tidies up.

Helping your child learn to cooperate with requests and instructions

It can take time for children to learn to cooperate with instructions and requests. These ideas might help things along:

  • Keep using the same, familiar words – for example, ‘Listen Jamie’, ‘You need to’ and ‘Now please’. These words act as cues, and eventually your child will understand.
  • Give your child praise and encouragement when he does cooperate – for example, ‘Great job, I couldn’t have done it without you’.
  • Set up daily routines. A routine can help your child get through repetitive daily tasks. Routines can also be particularly helpful for young children and children with additional needs.
  • Try engaging your child in tasks by making them fun or part of a game. For example, ‘Beat the buzzer’ is a game that can help children get ready and out the door in the morning.

Why your child might not cooperate

If your child isn’t cooperating, it might be because you’re expecting more than she can do. You might need to teach your child skills or show her how to do things so she can cooperate.

There might be a good reason why your child won’t do what you’re asking – for example, because he feels unwell, tired or scared. Asking an over-tired and hungry child to clean up his room probably isn’t going to work. If your child isn’t cooperating for a good reason, you might need to change your instruction so your child is more likely to cooperate. For example, ‘After dinner, I want you to clean up your room’.

Sometimes children go through phases of refusing to cooperate at all. This is normal. Your child’s behavior will change as she develops. Try to be consistent, firm and loving and focus on getting your child to cooperate on the important things, like safety.

If your child has additional needs, it’s helpful to coach other people – for example, older siblings, extended family members and neighbors – so they know how to give your child effective requests and instructions.

Most children love attention – and many don’t mind whether it’s positive or negative. If your child is getting lots of negative attention for refusing to cooperate, he might keep behaving this way. Instead, try to give your child more attention for cooperation. Respond in a low-key way when he doesn’t cooperate.

Distraction a behavior management tool

Distraction is a simple way to manage children’s behavior. Distraction can help you avoid situations that might result in difficult behavior. Don’t use distraction if your child is very upset or has hurt someone.

Distraction is a simple strategy that’s good for situations when behavior might be a problem. For example, this might be when children:

  • are getting cranky
  • have been sitting still for a long time
  • are having trouble sharing or taking turns with others.

Pointing out something interesting, starting a simple game, pulling funny faces – you’ve probably come up with many tricks like these to distract your child.

Distraction usually works. So it’s a great option for managing your child’s behavior in many situations.

Tips for distraction

Here are distraction tips that usually work for children of all ages:

  • Give children something else to do. Introduce a new activity, toy or game, or even show children something new they can do with the toy they already have.
  • Change the scene. Put children where they can see different things, or move them to a new spot either inside or outside.
  • Think ahead. Have a few ideas for fun activities. It could be as simple as planning some outside play when you can see that children are getting bored inside.
  • Sing some songs or rhymes together. This can be useful when you can’t stop what you’re doing, like when you’re driving or cooking.
  • If you’re out and about, take some fun toys or books that you can pull out when you need them.

Distraction can work for older children too. Here are some ideas:

  • Change the topic of conversation.
  • Suggest a simple game or activity. For example, suggest your children try a jigsaw or a game of Uno if they say they have nothing to do.
  • Suggest a break when things aren’t going well. For example, you could say, ‘Looks like you’re feeling frustrated with your drawing. What about riding your scooter instead?’

If you sense that your child is bored and needs distraction, why not encourage your child to come up with her own ideas? Making the most of boredom can be great for her creativity and problem-solving skills.

It’s easy to suggest screen time as a distraction. If you do this, it’s good to be clear about what you’re letting your child do. For example, be specific about what apps she can play with or what TV show she can watch, and for how long.

When not to use distraction

Distraction works best when you can see that your child might be about to do something wrong or get upset.

Distraction won’t help if your child:

  • has hurt someone
  • is having a tantrum
  • is very upset.

In situations like these, it’s best to deal with the behavior directly. For example, if your child has hurt another child, it might be tempting to distract both children with toys or activities. But this doesn’t help your child understand that it isn’t OK to hurt other people. It might be better to use time-out, as long as your child is old enough to understand this consequence.

Also, trying to distract your child when he’s having a tantrum might send the message that his strong feelings aren’t important. It’s better to handle tantrums by acknowledging your child’s feelings.

Planned ignoring a behavior management tool

Planned ignoring is when you take your attention away from your child for a little while when your child behaves badly. Planned ignoring is paying no attention to a child when she’s misbehaving. It means not looking at her and not talking to her while she behaves that way. This can be a useful child behavior tool and needn’t feel like rejection.

For example, if you’re having a family meal and your child is bouncing up and down on his seat, you could leave him out of the conversation and not look at him until he stops. When he stops, you could say, ‘I love it when you sit still on your chair at dinner. Why don’t you tell us what you did at preschool today?’.

The key is to reward your child with lots of attention when she’s behaving well – but don’t give her any attention when she behaves badly. By consistently paying and withholding attention like this, you can help shape your child’s behavior.

Here are some tips for using planned ignoring:

  • Completely ignore. Don’t look at your child or say anything while she’s misbehaving. Glances, smiles or even frowns can be rewarding. Saying ‘I am ignoring you!’ is not ignoring. Where it’s safe and practical, walk away from your child while she’s behaving badly.
  • Start ignoring when the behavior starts. Stop ignoring when the behavior has been stopped for a while. This might mean 20 seconds of ignoring for a toddler and a few minutes of ignoring for older children. You can respond again when your child stops misbehaving.
  • Plan some ways of distracting yourself if you think you’ll find it hard to ignore your child. You could put on some music, count in your head or plan your shopping list. Some simple breathing exercises can also help you feel in control and stay calm.
  • Consistently pay attention to the behavior you want to see instead of the behavior you’re ignoring. This makes planned ignoring work better.

However, ignoring isn’t always the best option. Before deciding to ignore behavior, it’s a good idea to check a few things.

  • Is the behavior rewarded by someone else’s attention? If the behavior is rewarded by someone else’s attention – for example, siblings or friends – it won’t make any difference if you ignore it. In this case, you might need to look at another behavior tool – for example, changing your child’s environment .
  • Should you ignore the behavior? Some behavior might be rewarded by your attention, but you might not be able or willing to ignore it. You can’t ignore dangerous behavior or behavior that hurts others or damages property – for example, biting, hitting, pulling on the curtains or throwing things. In this case, a behavior tool like consequences or time-out might be appropriate.
  • Can you ignore the behavior if it gets worse? Sometimes you might start ignoring behavior, but it gets worse and you end up giving it attention. For example, your child is tapping a block on a wooden floor, which you ignore. But then your child starts banging the block. If you criticize your child for banging the block, you run the risk of rewarding that behavior. This makes it more likely to happen again. In this situation, you could try simple breathing exercises while the banging is happening. But if you feel that you can’t ignore the behavior if it gets worse, it’s better not to try ignoring it in the first place.
  • Can you ignore the behavior wherever it happens? If you ignore the behavior in one place but not another, you’ll get more of the behavior in the place you don’t want it. For example, if you ignore your child yelling at home but not at the supermarket, you might get more yelling at the supermarket. You could try planning ahead for the behavior at the supermarket.
  • Can you ignore the behavior whenever it happens? This is crucial. If you ignore sometimes and not at other times, you can make it harder to change your child’s behavior. Rewarding your child’s behavior some of the time strengthens the behavior more than if the behavior is rewarded every time it happens. Planning ahead for your child’s behavior and stress management for you can help.
  • Will other people ignore the behavior? If you have managed to successfully ignore a behavior, but your partner, friend or relative suddenly comes in and pays attention, your good work will be undone. Backing each other up is an important part of managing your children’s behavior, so it’s good if you and your partner can talk and agree on what behavior you’ll ignore.

Sometimes others will find it difficult to understand your use of planned ignoring and might not be able to do it. If you’re in this situation it’s better not to use ignoring.

Be prepared – behavior that’s ignored often gets worse before it gets better. Children might complain or nag more, hoping you’ll respond. You should consider this when deciding whether to use planned ignoring as a behavior tool.

Why does planned ignoring work?

Planned ignoring works because your attention is a big reward for your child.

If your child behaves in a particular way and gets your attention, he’s likely to behave that way again. But if you ignore the behavior, it’s less likely to happen again. So attention for good behavior usually leads to more good behavior, and no attention for bad behavior usually leads to less bad behavior.

Because your attention is such a big reward for your child, sometimes it doesn’t matter what kind of attention you give her. A reaction to bad behavior is better than no attention at all, so even criticism or disciplining could feel like a reward to your child – and can actually lead to more bad behavior.

Some children with autism spectrum disorder avoid interaction with others. For these children, it’s best not to use planned ignoring. Talk with your child’s doctor or therapist about other ways to manage your child’s behavior.

Should I tell my child I’m ignoring him?

It depends on whether telling your child might reward him with attention. For minor bad behavior, you might not say anything. Or you could explain once that you won’t respond when your child behaves in a particular way. Then ignore the behavior whenever it happens after that, without saying anything else.

Using routines to manage behavior

Routines help family members know who should do what, when, in what order and how often. For example, your children know that they take turns with loading and unloading the dishwasher each day. This can mean less conflict and fewer arguments about these kinds of boring activities. Routines help family life run smoothly and can help with children’s behavior. Routines don’t mean you and your family are rigid or inflexible. Changes and last-minute diversions are a normal part of life.

You can use routines to help children with regular activities and to plan for demanding times of the day. Talking about routines or involving children in creating them can help children understand and follow routines.

A routine can also help you plan for times and activities when your child often misbehaves, like when you’re shopping, driving or visiting. For example, a simple routine for driving might be listening to music or playing ‘I spy’ together, before your child looks at books by herself.

You can also build routines for young children around play, meals and sleep. When children have had enough good-quality sleep, nutritious food and plenty of play, they’re more likely to behave the way you want.

And routines help young children feel safe and secure. They need to feel safe and secure to develop confidence and learn, including learning about appropriate ways to behave.

Creating routines

Here are some tips to get you started with family routines:

  • Plan routines for demanding times in the family day – for example, before and after work and school. Things often run more smoothly when you have a routine that gives everybody something to do or that keeps children busy while you get things done.
  • Add some downtime into your child’s routine. This gives your child time for a sleep or rest, which can help with behavior. It also gives him time to learn to entertain himself.
  • If you want to put time limits on some activities, like screen use, make this part of the routine. For example, children can watch TV or use their tablets, but only between 5 and 5.30 pm (or whatever suits your family).
  • Link two or more activities together. This can help your child get through boring activities faster. It also works because doing one activity helps you remember to do the other one. For example, your child could clean teeth while having a bath.
  • Talk about routines with your child. Even toddlers can understand simple, consistent explanations – for example, ‘First clean teeth. Then story time with Dad’. And for school-age children, discussions about routines can help them learn important things like how to be ready on time.
  • Use language or ideas your child can understand to talk about your routine. For example, if your child is too young to understand time, try saying, ‘We only watch Play School’, instead of ‘We only watch half an hour of TV’.

Getting children to follow routines

So you’ve got a routine, but how do you get your child to follow it without complaining? Here are some ideas:

  • Put up an illustrated poster of your routine where everyone can see it. Making the poster with your child could be fun and give you the chance to talk about the routine.
  • Involve your child in parts of the routine that she can manage by herself – for example, washing her hands before eating.
  • Find ways to remind your child to follow the routine without your help. For example, put a radio alarm clock in your child’s room. The music can be a signal that it’s time to wake up, time to start getting ready for school, or time to come out of the bedroom in the morning.
  • Think about whether parts of the routine can be your child’s responsibility. Your child can learn new skills and help the family by doing household chores. For example, a preschooler could set the table.
  • Watch out for and praise your child when he follows the routine without help.

Positive attention to improve behavior

Positive attention is when you respond to your child with warmth and interest. It helps your child feel secure and valued. When your child behaves well, give him lots of positive attention. Positive attention for behavior means catching your child being good and praising them. This makes the behavior more likely in future. Positive attention also helps your child feel secure and loved. It’s good for your relationship with your child. All children do best in an environment where they’re supported, encouraged and enjoyed. They grow and develop through repeated, positive interactions in their first relationships.

Positive attention is the way you show delight in your child and warmth in your relationship through:

  • smiling at your child
  • making eye contact and using caring facial expressions
  • being physically gentle and caring with your child
  • using words to celebrate and encourage your child
  • showing interest in your child’s interests, activities and achievements.

Your attention is a big reward for your child. If your child behaves in a particular way and gets your attention, she’s likely to behave that way again.

When you give attention for good behavior, it shows your child that behaving in a way that you like will get positive interest. This means you can use attention to encourage the behavior you want.

When you start paying attention to good behavior, you might realize how often your child already behaves well. You might also find you start to feel more positive because you’re more focused on your child’s good behavior than on his difficult behavior. And as your child responds more and more to your positive attention, there might be less difficult behavior for you to manage.

Positive attention is also about showing delight in your child and warmth in your relationship. It helps your child feel secure and loved, which is important for her overall development.

Positive attention for behavior means catching your child being good. It means tuning in to what your child is doing and letting him know that you’ve noticed he’s doing the right thing and that you’re pleased.

There are lots of ways you can give this kind of positive attention:

  • praise – for example, ‘Good sharing, Vanessa’
  • encouragement – for example, ‘Keep trying, Jack’
  • physical affection or gestures – for example, hugs and cuddles, or a ‘thumbs up’ when your child plays quietly while you’re on the phone
  • active listening – for example, listening with interest when your child tells you something in a normal voice instead of shouting.

This kind of attention works best if you do it often, rather than occasionally. That’s because you get into the habit of looking for positives. Also, your child gets plenty of reminders of what kind of behavior you like and want to see more of.

You can also give attention for good behavior anywhere – at the supermarket, when you’re eating, doing the dishes or walking to school, and on the bus. It doesn’t take any extra time when it’s something you do as part of your everyday interactions with your child.

Praising good behavior is particularly important for behavior that your child has found difficult to learn. You can praise the effort as well as the behavior. For example, your child might have had a lot of trouble remembering not to interrupt when you’re on the phone. You could say something like, ‘Well done, Darcy. I know it’s hard for you to wait while I’m talking, so I really appreciate that you let me finish’.

In general, praise your child six times for every one time you correct her.

Your child won’t always behave in ways you like. So the trick is to pay more attention to the behavior you want, and less to the behavior you don’t want. You can use planned ignoring and consequences to show your child his behavior isn’t OK, without giving him too much attention.

Giving your child positive attention, how to make it part of everyday life

The more you give your child positive attention, the more natural it becomes and the better it is for your relationship with her. A good relationship with you is also better for your child’s behavior.

Here are some general things you can do that will also help with your relationship and your child’s behavior:

  • Take time to tune in to your child. Notice the things that fascinate him – petals on a flower, ants crisscrossing the pavement, sauce bottles at the supermarket – rather than rushing him on to the next activity. Take notice of the books he’s choosing at the library, or the skills he’s building on the monkey bars at the park. He’ll know he’s valued if you take interest in the things that interest him.
  • Follow your child’s lead. When you’re spending time with your child, it’s good to let your child choose games or activities whenever possible. This sends the message that your child’s interests are important, which helps her feel loved and gives her confidence.
  • Get close. You can sit on the floor, kneel in the grass, or squat beside your child’s chair. Face your child and move to his side rather than watching from across the room. Look into his eyes, uncross your arms, and smile, smile, smile.
  • Comment on what your child is doing. For example, you could say, ‘I see you like the red truck’ or ‘That’s an interesting bug you’re looking at’. This shows your child that you’re paying attention and are interested. You build her trust and confidence and your relationship simply by giving attention.

Before you correct your child, ask yourself: does it really matter, or could I just let it go? If you’re always correcting your child, this sends the message that your child isn’t capable or valued.

Why positive attention is important?

From birth, children need experiences and relationships that show them they’re valued, capable human beings who bring pleasure to others. Positive attention, reactions and responses from key grown-ups help children build a picture of how valued they are.

Your child’s self-image builds up over time with positive, loving messages from you and other important people in his life. A healthy self-image is very important, not only for your child’s relationship with others, but also for his confidence as he learns about the world.

Your child’s feelings of security and safety come from her interactions with you and the other people who care for her. If you reassure and support your child when she’s frightened, uncertain or faced with a new or unfamiliar situation, she’ll feel safe and secure.

How to show positive attention

You have many opportunities to give your child positive attention in your daily interactions together.

Daily activities like changing a nappy, supervising a bath or walking to school let you connect with your child in meaningful ways. For example, just giving your toddler cuddles and tickles while you’re drying him after a bath is a way of showing positive attention.

No matter what your child’s age, there are simple things you can do every day to send the message that your child is special and important. For example:

  • Look at your child and smile at her.
  • Show interest in what your child is doing – ask him to tell you about it if he can.
  • Pay attention and listen closely when your child talks to you.
  • Make up some special rituals you can share together.

There are also ways you can show positive attention to children of different ages.

Newborns and babies

From the moment they’re born, children are paying attention to what you say and do – and how you say and do it. Even before babies can understand and use words, they respond to your tone of voice, gestures, facial expressions and body language.

Here are ways to give your baby positive attention:

  • Comfort your baby when she cries.
  • Smile back when your baby smiles.
  • Respond to the sounds your baby makes by saying something in return.
  • Chat about what’s going on around the two of you.
  • Notice what your baby is interested in and encourage him to explore – for example, show him how to shake a colorful rattle that has caught his eye.

Toddlers

As your child gets older, she understands more of what you say, as well as how you say it. Here are some tips for positive attention at this age:

  • Tell your child exactly what you like about what he’s doing. For example, ‘I love it when you help to pick up the blocks’. Use a positive tone of voice to match the praise.
  • Get into the moment with your child. This could be as simple as squatting down to look at a caterpillar together.
  • When you’re talking together, leave time after you talk so your child can reply, even if she can’t always find the right words.

Preschoolers

There are so many ways you can give your preschooler positive attention as he learns about the world. For example:

  • Make time to do your child’s favorite activities with her – for example, jigsaws, Lego, painting and so on.
  • Give lots of feedback about the kinds of behavior that you want to encourage – for example, ‘Thanks for bringing your plate to the kitchen. That makes it much quicker to tidy up after lunch’.
  • Remember to smile and make eye contact with your child when you greet him in the morning – perhaps even take a moment for a special cuddle.

School-age children

Even though your child’s world expands when she goes to school, your warmth, love and positive attention are still the biggest influences on her development.

Try these ideas:

  • Stop what you’re doing and listen when your child wants to talk about his day at school. This might not always be as soon as he gets home, though – it might be when he’s in the bath or just before he goes to sleep.
  • Ask follow-up questions when your child starts talking. This keeps the conversation going.
  • Notice and guide your child’s positive interactions with others – for example, ‘I think Hunter really liked it when you asked her questions about her holiday. It gave her a chance to talk about something that was important to her’.

When it’s hard to be positive

It’s not realistic or even normal to be positive all the time. And your child will cope just fine if you’re occasionally insensitive, unavailable or distracted. It’s what happens over time, not each particular incident, that makes the difference. If your child gets mostly positive attention from you over time, he’ll feel loved and secure.

When parents are regularly distracted or can’t focus on their children’s needs, children can be negatively affected. If this begins at infancy and keeps happening, babies as young as six months can show signs of stress. This can affect children’s health and wellbeing in the early years as well as in the future.

If many of your daily interactions with your child are negative, or if it’s hard for you to feel or act positively with your child, it’s worth seeking professional help. Start by seeing your doctor or a counselor. These professionals can help you fix things with your child and get your relationship back on track – your relationship might even end up stronger.

Changing the environment

Your child’s environment can influence his behavior. If you change your child’s environment, you can often change your child’s behavior. You can change the physical environment, the timing of activities, and your requests and instructions.

If your child is behaving in a way you don’t like, it’s a good idea to look at what’s going on in your child’s environment. By changing your child’s environment, you might be able to change your child’s behavior too.

Changing the environment can just mean making small, manageable changes to what’s happening around your child. It doesn’t mean moving house, changing the furniture, installing expensive play equipment and so on.

When it comes to children’s behavior, the environment just means the little things around your child. Your child’s ‘behavior environment’ includes:

  • his location – for example, at the park, at home, at the supermarket
  • toys, books and play equipment, but also other things you might not want him to play with
  • other children and how they’re behaving
  • sensations like noise and light
  • the time of day
  • your requests and instructions.

These things can influence your child’s behavior and even trigger unwanted behavior sometimes. For example, it’s normal for your child to:

  • want to play with the things around her
  • explore her surroundings
  • feel tired if it’s nap time
  • feel overwhelmed if there’s a lot of noise or activity
  • not want to share her favorite toys
  • not follow your instructions if she doesn’t understand them.

Changing your child’s physical environment

Here are some ideas for changing the physical things in your child’s environment to help your child behave the way you want.

At home

  • Move fragile or expensive items out of sight and reach – this is important for safety as well as good behavior.
  • Make a ‘quiet space’ for your child to use when he feels overwhelmed. This could just be a special cushion with some of your child’s favourite books nearby.
  • Make sure screens like tablets and TVs are off when you need your child to focus on something like getting ready for school in the morning.

Out and about

  • Choose a safe outside space if you can – for example, a courtyard, play area or backyard. You’ll be less stressed, and your child’s activities are less likely to upset others.
  • On car, train or bus journeys, change where you all sit. For example, have one parent sit between two children. Or let one child sit next to a window for a while, then change.
  • For a family day out, look for places that have things that both you and your child will enjoy – for example, a playground for your child and a coffee cart for you.
  • Use music to change the environment on a car trip. You can play upbeat music if your child is bored, or soothing music when you want her to settle.

Toys and belongings

  • Install a child gate on the door of an older sibling’s room. This will give the older child some time playing with toys, undisturbed by a younger sibling.
  • Put your child’s favorite toys in a place that he can reach. This way he won’t be tempted to climb or get into unsafe places when he’s looking for his toys.
  • Help your child choose and put away toys she might not want to share with visiting children.

Changing the timing of activities in your child’s environment

You can change your child’s environment by changing when things happen. Here are some ideas:

  • Encourage quiet, calming activities before bedtime.
  • Take your child grocery shopping after an afternoon nap.
  • Get up earlier to reduce pressure and stress in the morning rush for school.
  • Start bath time earlier to avoid tantrums about getting out of the bath.
  • Plan frequent breaks on a long car drive.

Changing your requests and instructions

You might be able to change your child’s behavior by changing the way you tell or ask your child to do things.

An instruction is when you tell your child to do something. If you give clear, short and simple instructions, your child will know what’s expected of him – for example, ‘Please hold my hand when we cross the road’. But children can feel overwhelmed or rebellious if there are too many instructions.

A request is when you ask your child to do something. For example, ‘Could you set the table, please?’ Your child can choose to say yes or no to a request. Requests give your child choices and a sense of control, which might make your child more likely to cooperate.

It’s a good idea to aim for a mix of instructions and requests. And try to use requests more often than instructions.

Transitions, helping children change activities

It can be hard for children to move from one activity to another, especially if they’re enjoying something and don’t want to stop. Routines can help with transitions that happen every day. Children can accept change better when they know it’s coming. It also helps to give children enough warning, allow time for transitions, offer choices and resist bad behavior.

Transitions happen when your child has to stop doing one activity and start doing something else. Examples of transitions include:

  • getting ready to leave the house
  • putting away toys before bedtime
  • turning off the television or computer
  • getting out of the bath.

Your child probably needs to make transitions many times a day. But transitions can be hard, especially if your child is happy with what she’s doing and doesn’t want to stop.

Tips on planning transitions

A predictable family routine is likely to help with transitions that happen every day. Children can accept change better when they know it’s coming.

Here are some tips for planning transitions:

  • Explain what’s happening to your child before you start the day or leave the house. Knowing what to expect will help children – especially older children – have realistic expectations.
  • Use a family calendar that shows what different family members are doing each day. You could use a calendar with pictures for younger children.
  • Consider whether you need to teach your child new skills or knowledge to help him with daily transitions. For example, you might need to teach your child to tie his shoelaces to make leaving the house easier. Or perhaps your child needs a written or visual list to help him pack his schoolbag each morning.

Giving choices about transitions

You can’t always give your child a choice about stopping one activity and starting another. But sometimes you can give her a choice about other things. Here are some ideas:

  • Give your child a choice about things that are part of the transition. For example, ‘Evan, we have to go the car in a minute. You can take one toy with you. Which one will it be?’ or ‘Do you want to do that yourself or shall we do it together?’
  • Limit options. For example, let your child choose between two different t-shirts, but not every item in his wardrobe! If he won’t choose, you can choose for him.
  • Avoid giving your child a choice about a transition if there isn’t really a choice. For example, when you say, ‘Orla, would you like to pack up those toys now?’ you suggest a choice. Instead you could say, ‘Orla, start packing up those toys now please’.

Making transitions more positive

Pointing out the positive side of the transition can direct your child’s attention away from the change and onto something that he likes or is happy about:

  • See whether you can make transitions fun. For example, ‘Can you march like a soldier to the car?’ or ‘How about we play “I spy” on the trip home?’
  • Link something your child doesn’t want to do with something that she likes – for example, ‘First we clean up the toys, then we have a snack’.
  • Point out any good things your child can look forward to after the transition. For example, ‘If we leave now, we’ll have time to play with your trains before dinner’.
  • Praise your child for handling transitions well. Emphasize how good it is when you both work together as a team.

Timing transitions

Transitions are a part of every child’s day. Timing them right can make it easier for your child to change from one thing to another:

  • Choose your timing. If you can, stop one thing and start another during a natural break in your child’s activity. For example, wait until your child has finished her puzzle before you tell her lunch is ready. If you’re sensitive to what your child is doing, it can make transitions easier for you both.
  • Give your child some warning about any change of activity coming up. For example, ‘Derek, you have five more minutes to play. Then it will be time to go home’, or ‘Derek, one more go on the slide and then we’re going home’.
  • If your child finds transitions particularly challenging, consider allowing more time between activities. This gives your child extra time to make the change and adjust.

Troubleshooting transitions

It’s OK if your child is disappointed about having to stop. That’s natural. You can use his disappointment as an opportunity to talk about emotions, and encourage him to use words to express feelings – for example, ‘I know you feel frustrated that you didn’t have time to play another game’.

But if your child plays up or has a tantrum, be careful not to accidentally reward that behavior by giving her more time on the activity. You can be understanding, but also clear and firm. Gently insist that your child does what you ask.

Teaching skills to children

Sometimes difficult behavior happens because children can’t do what you expect. This means that new skills can help with difficult behavior. You can use verbal instructions, modeling and step-by-step guidance to teach physical and social skills. Practice, repetition, praise and encouragement are key to learning new skills.

You are your child’s first and most important teacher. Every day you’re helping your child learn new information, skills and ways of behaving.

Teaching skills to children can be an important first step in managing their behavior. For example, if your child doesn’t know how to set the table, she might refuse to do it – because she can’t do it. The solution? Teaching her how.

There are three key ways you can help children learn everything from basic self-care to more complicated social skills:

  1. Instructions: teaching skills by telling
  2. Modelling: teaching skills by showing
  3. Step by step: teaching skills by breaking down tasks

Remember that skills take time to develop, and practice is important. But if you have any concerns about your child’s behavior, development or ability to learn new skills, see your GP or your child and family health nurse.

When you’re teaching your child a skill, you’ll probably use more than one method at a time. For example, your child might find it easier to understand instructions if you also break down the skill or task into steps. Likewise, modelling might work better if you give instructions at the same time.

No matter which of the three methods you use, these tips will help your child learn new skills:

  • Before you start, make sure that your child has the coordination, physical ability and developmental maturity to handle the new skill. You might need to teach your child some basic skills before working on more complicated skills.
  • Consider timing and environment. Children learn better when they’re more alert and focused. So avoid teaching new skills just before nap or meal times, for example. It’s also good to avoid distractions in your child’s environment, like the TV or younger siblings who need attention.
  • Give your child the chance to practise the skill. Skills take time to learn, and the more your child practises, the better. Show or explain the step or task again if you need to.
  • Give praise and encouragement, especially in the early stages of learning. Praise your child when she follows your instruction or practises the skill, and say exactly what she did well.
  • Avoid giving lots of negative feedback when your child doesn’t get it right. Maybe just point out one or two things your child could do differently next time. Rather than say that your child has done it ‘wrong’, use words and gestures to explain what he could do differently next time.
  • Remember that behavior might get worse before it improves, especially if you’re asking more from your child. A positive and constructive approach can help – for example, ‘Well done for getting the knots on your laces right! Would you like to do the loops together today?’

Teaching skills by telling

This is just teaching your child how to do something by explaining what to do or how to do it. You probably give instructions and explanations to your child all the time.

How to give good instructions:

  • Give instructions only when you have your child’s attention. Use your child’s name and encourage your child to look at you while you speak.
  • Get down to your child’s physical level to speak.
  • Remove any background distractions like the TV.
  • Use language that your child understands. Keep your sentences short and simple.
  • Use a clear, calm voice.
  • Use gestures to emphasize things that you want your child to notice.
  • Gradually phase out your instructions and reminders as your child gets better at remembering how to do the task.

A poster or illustration can help your child picture the instructions you’re giving. Your child can check the poster by himself when he’s ready to work through the instructions independently. A poster can also help children who have trouble understanding words.

Sometimes your child won’t follow instructions. This can happen for lots of reasons. Your child might not understand. She might not have the skills to do what you ask every time. Or she just might not want to do what you’re asking. You can help your child learn to cooperate by balancing instructions and requests.

Teaching skills by showing

Through watching you, your child learns what to do and how to do it. When this happens, you’re ‘modelling’. Modelling is usually the most efficient way to teach children a new skill. For example, you’re more likely to show rather than tell your child how to make a bed, sweep a floor or throw a ball.

You can also use modelling to show your child skills and behavior that involve non-verbal communication, like body language and tone of voice. For example, you can show how you turn to face people when you talk to them, or look them in the eyes and smile when you thank them.

Modelling can work for social skills too. Prompting your child with phrases like ‘Thank you, Mum’, or ‘More please, Dad’ is an example of this.

How to make modelling work well

Use the following steps:

  • Get your child’s attention and make sure he’s looking at you.
  • Get your child to watch first, then move slowly through the steps of the skill so that your child can clearly see what you’re doing.
  • Point out the important parts of what you’re doing. For example, ‘See how I am …’. You might want to do this later if you’re modelling social skills like greeting a guest.
  • Give your child lots of opportunities to practise for herself once she has seen you do it – for example, ‘OK, now you have a go’.

Teaching skills by breaking down tasks

Some tasks or activities are complicated or involve a sequence of actions. For these, you can break down the task into smaller steps. The idea of step-by-step teaching is to teach the steps that make up a skill one at a time. When your child has learned the first step, then you teach the next step, then the next, and so on. Move to the next step only when your child can do the previous step reliably and without your help. You keep going until your child can do the whole task for himself.

If the task is complicated, show the first part of the task and give your child a chance to practise. Then move onto the next bit. Start with the easiest parts if you can.

Step-by-step teaching

Here is how you might break down the task of dressing:

  • Get clothes out.
  • Put on underpants.
  • Put on socks.
  • Put on shirt.
  • Put on pants.
  • Put on a jumper.

You could break down each of these steps into parts as well. This can help if a task is complex or if your child has learning difficulties. For example, ‘Put on a jumper’ could be broken down like this:

  • Face the jumper the right way.
  • Pull the jumper over the head.
  • Put one arm through.
  • Put the other arm through.
  • Pull the jumper down.

You can teach the steps by moving:

  • forwards – teaching the first step, then the next step and so on
  • backwards – teaching the last step, then the second last step and so on.

Teaching backwards has some advantages. Your child is less likely to misbehave because it’s easier and quicker to learn the last step. Also the task is finished as soon as your child completes the step. Often the most rewarding thing about a job or task is getting it finished!

In the earlier example, you might teach a child to get dressed by starting with a jumper. In this instance, you would help the child get dressed until it came to the final step – the jumper.

You might help the child put the jumper over her head and put her arms in – then you might let her pull the jumper down by herself. Once the child can do this, you might encourage her to put her arms through by herself and then pull the jumper down. This would go on until the child had mastered each step of the task and could do the whole thing for herself.

When your child is learning a new physical skill like getting dressed, it can help to put your hands over your child’s hands and guide him through the movements. Phase out your help as your child begins to get the idea, but keep saying what to do. Then simply point or gesture. When your child is confident with the skill, you can phase out gestures too.

Planning ahead a behavior management tool

Some situations make difficult behavior from your child more likely, for example, going on car trips, shopping or visitors coming over. Planning ahead can help you manage situations that are challenging for you and your child. To plan ahead for good behavior, use the seven steps in this guide. These steps help you to think about what causes behavior problems and how to manage them if they happen. Start by identifying challenging situations.

1. Identify challenging situations

Before you can plan ahead, you need to identify situations that are challenging for you and your child. These might be times when you’ve felt stressed, frustrated or embarrassed by your child’s behavior.

To begin, try to work out what’s making the situation difficult. Is it too many demands, time pressures or boredom? Or does the environment lead to difficult behavior from your child – for example, checkouts with lollies at her eye level?

It’s also worth thinking about whether you can avoid the situation or ask someone to help. For example, you might stay home with your child while your partner goes grocery shopping.

If you can’t avoid the situation, or you think it might help if your child learns how to cope better in the situation, planning ahead might help. The steps below take you through some ideas for planning ahead.

You might find it helpful to read more about how you can encourage good behavior by changing your child’s environment.

2. Make expectations clear

Talk with your child before you go into a challenging situation. It helps if you’re clear about what you expect from the situation and what behavior is OK.

Family rules can help your family members get along better and make family life more peaceful.

With toddlers and preschoolers, you can say what you expect. School-age children will have their own ideas, so work together to develop a few specific rules. With school-age children, this step is more of a negotiation, but you still have the final say.

Rules should be clear, simple and focused on the behavior you want to see. For example, rules for a doctor’s waiting room might be, ‘Talk quietly’, ‘Ask before you touch’, ‘Be gentle with the toys and magazines’, and ‘Play on the floor next to me’. Your child will be more likely to remember the rules if there aren’t too many of them.

It’s also a good idea to agree in advance on what happens when the rules are followed and when they’re broken. For example, for the doctor’s waiting room you might say, ‘If you stay close to me and ask before you touch, you can play with the toys or read the books. If you forget to stay close or touch without asking, you’ll sit on the chair next to me for one minute’.

Check that your child understands by asking him to explain the rules and the consequences to you. Do this again just before you enter the challenging situation – for example, just before you go through the door of the doctor’s surgery.

3. Think of your child as a ‘learner’

Difficult behavior can happen because a child doesn’t have the skills to cope with a situation. Ask yourself how you can help your child learn what to do in challenging situations. Here are some suggestions.

  • Give your child chances to practise and succeed. When your chid is learning a new way to behave, it will help if she can practise the behavior and succeed in easier situations. Once she’s coping better, she can try harder situations. Here are some examples:
    • Shopping: plan a few short shopping trips for just a few items.
    • Visiting/visitors: arrange a series of short visits from/to a friend or relative.
    • Phone calls: arrange a series of short telephone calls.
  • Think about when your child is likely to be at his best. If you can, plan challenging situations around your child’s routine. For example, try to make appointments for directly after your child’s nap or snack.
  • Work out what skills your child needs to learn. For example, if problems happen during phone calls, your child might need to learn how to say ‘excuse me’, how to wait for you to respond, how to accept your answer, and how to keep busy and quiet. These are things you could talk about. You could also show your child how to do these things, and praise him when he does them.

4. Plan ways of helping your child keep busy and engaged

For toddlers, plan some activities that will keep them busy in challenging situations. Have a ‘going-out bag’ ready, with a drink, a snack and a few small but interesting items – for example, paper and colored pencils, stickers or blocks.

With your help, preschoolers and school-age children can plan interesting activities themselves, or you can get them involved in what you’re doing. For example, while grocery shopping you might ask your child to find things on the shelves and put them in the trolley, or to identify colours or words on labels. When queuing at the post office, you could play a quiet game of ‘I spy’ or ‘Who am I?’

You can have special activities just for car trips or telephone calls. These could be audiobooks, music, sticker books and so on.

5. Encourage good behavior

During a challenging situation, look for and encourage behavior you like. Take the time to stop what you’re doing every now and then to let your child know when you like what she’s doing.

It can be hard to remember to do this, but praise makes it more likely that your child will repeat the behavior. Try to praise more than you criticize. As a guide, try to praise your child six times for every one time you say something negative. For example, during a shopping trip, you might praise your child for staying close, speaking in a quiet voice, and helping you find things. If the challenging situation is a telephone call, you might briefly stop talking to praise your child for playing quietly.

6. Use consequences for behavior you don’t like

If you put the steps above into action, your child will be more likely to behave well. But it’s best to plan consequences that you’ll use if your child misbehaves. The good news is that most consequences that you would use at home you can also use somewhere else with some changes. For example, if you’re using time-out at home, you can also use it on shopping trips by getting your child to sit or stand beside you for a short time at the supermarket.

7. Have a follow-up talk

It can help to have a talk with your child after you’ve been in a challenging situation. During the talk, highlight things your child did well, and celebrate the progress you’re making together.

You might also point out one or two things your child might do differently in future. These can become your goals for next time.

Why planning ahead helps with behavior management?

Shopping trips, traveling in the car, taking telephone calls, attending appointments for yourself, visiting friends – these are all times when it can be challenging to meet your child’s needs and get things done.

In these situations, there’s a risk of difficult behavior from your child and frustration, stress or anger on your part. This is for a few reasons:

  • You’re trying to care for your child as well as get something done.
  • You’ve got to do something or be somewhere at a particular time.
  • Your children are bored.

Planning ahead can help you to manage these challenging situations better.

What you need to know about spanking children

Smacking or spanking is a physical punishment. When parents spank a child, they’re often trying to say, ‘You’ve done the wrong thing – behaving that way isn’t OK’. But this isn’t the message children receive. A child who’s being smacked might think her parent is saying, ‘I’m angry with you and I don’t like you’.

Children mostly feel fear, anger and sadness when they’re smacked. They might also feel confused and lose trust in their parents. They usually can’t think about what they’ve done wrong or understand why they’re getting a smack.

Smacking looks like it works because children stop what they’re doing when they get a smack. But smacking isn’t a good choice for discipline. That’s because it doesn’t help children learn about self-control or appropriate behavior.

As a form of punishment, smacking has three other big drawbacks:

  • First, there’s a risk that smacking might hurt your child.
  • Second, it can give children the message that smacking or hitting other people is an OK way to deal with strong feelings.
  • Third, physical punishment like smacking can lead to longer-term problems in children’s health and development. Children who are smacked can be more aggressive than children who aren’t smacked. They’re more likely to have challenging behavior, anxiety or depression.

There are better ways than smacking to guide your children towards good behavior.

Alternatives to smacking helping your child behave well

One of the best ways for parents to avoid situations where they might feel like smacking is to create opportunities for children to behave well. Having clear family rules is the first step. Rules let your child know what behavior you expect and can help you avoid difficult behavior from your child.

You can also plan ahead for situations where your child tends to behave in challenging ways. For example, you might want to wait until after your child has had a nap or a snack before you take her grocery shopping. This can make it easier for your child to sit still in the trolley.

If your child is behaving in a way you don’t like, it’s a good idea to look at what’s going on in your child’s environment. By changing your child’s environment, you might be able to change your child’s behavior too. This can be as simple as moving fragile things out of reach.

And sometimes just distracting your child in a challenging situation is enough to reduce bad behavior.

Using consequences instead of smacking

Part of firm and fair discipline is setting limits on children’s behavior. For preschoolers and school-age children this can include using consequences when children break rules or misbehave.

Consequences work in the long term only when you combine them with positive strategies to encourage good behavior.

Consequences aren’t recommended for children under three years old, because they don’t help young children change their behavior. Babies and toddlers are too young to understand that a consequence has happened because of something they did. And they also don’t know the difference between right and wrong.

Managing frustration, anger and stress as a parent

Managing your own feelings is an important part of creating a warm and loving family environment that helps your child behave well.

If you can manage your own angry or frustrated feelings in positive and healthy ways – for example, by staying calm, taking a few deep breaths or even walking away – you give your child a great example of how to behave.

If you find yourself getting stressed and angry a lot and you don’t know how to relieve your feelings, it might be worth looking into some stress management and anger management strategies.

And if you feel like smacking your baby or child, put your child in a safe place – for example, a cot – or ask someone else to hold him for a while. Take some time out until you feel calmer. Try going to another room to breathe deeply or calling a family member or friend to talk things through.

If you feel this way a lot, talk to your doctor.

read more

How to bathe a newborn

how to give a newborn a bath

How to bathe a newborn

Bathing a newborn can be tricky at first, especially if your newborn seems unhappy in the bath. A few simple steps can make bath time enjoyable and easy for you and your baby. Bathing your baby takes practice, so try to relax and take your time. You might like to start by bathing your baby when someone else is around to help. If you’re worried about losing your grip on your baby, you can make the bath less slippery by lining it with a clean cloth nappy or towel.

A newborn’s skin is soft and delicate. Contrary to popular thought, most newborn babies do not need a bath every single day. With all the diaper changes and wiping of the mouth and nose after feedings, most babies may only need to be bathed 2 or 3 times a week or every other day. Baths can be given any time of day. Bathing before a feeding often works well. Many parents prefer to bathe their baby in the evening, as part of the bedtime ritual. This works well especially if bath time is relaxing and soothing for the baby.

A safe bath temperature is 98.6 to 100.4 °F (37-38°C). A newborn’s skin is soft and delicate. It takes less than a second for a child to be severely scalded by water that’s too hot. Before putting your child into the bath, check the water temperature. Swirl the water around to remove hot spots.

Sponge baths are required at first. Bathing in a tub of water should not be done until the baby’s umbilical cord falls off, and a baby boy’s circumcision heals, to prevent infection.

It’s normal for newborns to find bath time distressing at first. But most babies quickly learn to like bath time. To help your baby enjoy bath time, you can try placing your hand gently on his tummy. This can help your baby feel safe and secure in the bath.

If your baby doesn’t like baths, give her a ‘top and tail’ bath one day and a proper bath the next. By around three months, it’s likely your baby will love the bath.

These steps make bathing your newborn easy:

  • Before undressing your baby, wipe his eyelids (from inner eye to outer eye) with cotton wool dipped in lukewarm water. Use a new piece of cotton wool for each eye. Then wash his whole face. Be careful not to put anything into his ears or nose.
  • Undress your baby, taking her nappy off last.
  • Cradle your baby’s head with one arm, supporting his head and neck with the other arm. Gently lower him into the bath, feet first, keeping a close hold at all times.
  • Supporting her head, lay your baby down in the bath so the back of her head is submerged. Gently splash some water onto her head.
  • Gently wash your baby’s genitals and bottom last, using water only. Also clean out any bits of poo or vomit from his body creases.

Figure 1. Preparing a newborn bath

Preparing a newborn bath

Figure 2. How to bathe a newborn

How to bathe a newborn baby

Figure 3. Newborn bathing safety (Remember: Never leave your baby alone or in the care of another young child in or near water—not even for a moment)

Newborn bathing safety

Bathing safety

Drowning and scalds are the two main risks with bath time. Children can drown in a few seconds in very shallow water (less than 5 centimeters of water). It can happen silently, and within seconds. Never leave your baby alone in the bath, even if you’re using a bath seat or cradle. Never leave older children or siblings to supervise. If you’re disturbed by the phone or another task, take your baby out of the bath.

Most child drownings inside the home occur in bathtubs, and more than half of bathtub deaths involve children under 1 year of age. In many cases, bathtub drownings happen during a lapse in adult supervision. If you forgot something or need to answer the door, bring your baby with you. This is important even if you are using a supportive infant tub or bath seat. Infant bath seats can tip over and children can slip out of them and drown in even a few inches of water in the tub.

You can avoid these burns and drowning risks by following the four golden rules for safe bath times:

  1. Always supervise babies, toddlers and children under five years in the bath. Never leave older children or siblings to supervise. They don’t have the skills to see and react to an emergency situation.
  2. Check the water temperature is between 98.6 and 100.4 °F (37°C and 38°C) before you put your child in. Use a water thermometer or your wrist or your elbow. Tap water that’s too hot can quickly cause burns serious enough to require a hospital visit or even surgery. In fact, hot water scalds are the top cause of burns among babies and young children.
  3. Get everything ready in advance so you can stay with your child for bath time – towel, face washer, cotton wool, clean nappy and clean clothes.
  4. Let the water out as soon as bath time is over. About 5-10 minutes is long enough for a baby bath.

How to prevent drowning in the bath

Drowning is one of the major causes of death for children under five years. Stay within arm’s reach whenever your baby is near water.

Babies can drown in as little as just 1 or 2 inches of water. It can happen silently, and within seconds. Infants don’t have much neck and muscle control. If even a small amount of water covers their nose and mouth, they won’t be able to breathe.

Very young children are prone to drowning. This is because they’re top-heavy. They can slip into or under the water very suddenly, and they can drown in only a few centimetres of water. Also, drowning can be very quick – 20 seconds is all it takes. And young children can drown silently, without coughing or splashing, so you might not even realise they’re in danger.

Constant supervision is the key to drowning prevention.

These tips can also improve bathroom safety:

  • Beware of distractions that could take you away from the bath and make you lose track of time. Turn your mobile to silent and leave it outside the room before you run the bath.
  • Run only enough water for washing and play. Belly-button height is plenty for a child who can sit up on his own.
  • Watch your child all the time, even if you’re using a bath seat or cradle. A bath seat isn’t a safety device. Without your supervision, bath seats won’t keep your child safe.
  • Use a non-slip bathmat in the bath if your bath doesn’t have a non-slip surface.
  • Keep bathroom and laundry doors shut when you’re not using them. This will stop young children getting to taps or water sources on their own.

How to prevent burns and scalds in the bathroom

Young children have very sensitive skin, which means that bath water that’s too hot can scald them very quickly. The safe temperature for a child’s bath is between 98.6 and 100.4 °F (37°C and 38°C), whereas grown-ups tend to bathe in water between 105.8 °F (41°C) and 107.6°F (42°C).

The best way to prevent burns or scalds in the bathroom is to ensure that hot water is delivered to your basin, bath or shower at a maximum temperature of 122 °F (50°C). But this isn’t a bathing temperature. You still need to mix cold water with the hot water to get the right bathing temperature.

This means it’s also essential to test the bath temperature with a water thermometer, or with your wrist and elbow. The temperature should be comfortably warm, but not hot. If your skin flushes when you put your elbow in, the water is too hot for a child’s skin.

These tips can also help you prevent bathroom burns and scalds:

  • Keep your child well away from the bath until it’s a safe temperature.
  • Always run cold water first. Never fill a bath with hot water first. Your child could put his hand or foot in the water and be scalded. Swirl the water in the bath so there are no hot and cold spots.
  • If you have a mixer tap, run the hot and cold water together. Increase the temperature by adding more warm water, not straight hot water. If you run hot water by itself, your child might put a hand or foot in the stream and be burned.
  • If you have a mixer tap, point the lever towards the cold setting when you’ve finished running the bath. Make sure your child can’t get to the lever.
  • Make sure the hot water tap is turned off hard. When the bath is ready, briefly run cold water through the tap so water in the tap won’t burn anyone.
  • Consider buying anti-scald devices for your home. You can ask a licensed plumber to recommend devices that keep hot water at a safe temperature.
  • Never leave your child in the care of an older child who might be able to turn on the hot water tap.
  • Never leave your child alone in the bath or in the bathroom. She could easily turn on the hot water tap and not be able to turn it off. If you’re called away to the phone or door, wrap your baby in a towel and take her with you.

Basic first aid for burns and scalds involves cooling the burned area under running water for 15 to 20 minutes. If your child is upset or too cold, you can cool the burn for a few minutes at a time over the next three hours. Cool the burn, not the child.

Call an ambulance if the burn is to your child’s face, airway, hands or genitals, or if the burn is larger than the size of your child’s hand.

Go to a doctor or hospital if the burn is the size of a quarter or larger, or if it’s deep, raw, angry or blistered. Also go if the pain persists or is severe, or you’re not sure how bad the burn is.

Don’t apply ice, iced water, lotions, moisturizers, oil, ointments, butter or flour, creams or powders to the burn. This will make the damage worse.

Water safety in the bathroom

Beyond bath time, protect your baby from other bathroom water hazards. Babies can topple headfirst into the toilet bowl, for example, and be unable to get themselves out. Help prevent drowning by:

  • Put toilet lids down. Install safety latches or locks on all toilet seat lids to keep curious little fingers from lifting them.
  • Pull the plug on the tub. Consider removing the bath tub drain plug when it’s not in use to avoid the tub filling if a child turns on the faucet.
  • Keep the bathroom door closed. As an added layer of safety, use safety latches or door knob covers to keep bathrooms closed.

Empty water containers immediately after use

Never leave a filled, open-top water container unattended. Whenever they’re not in use, be sure to completely empty any liquids in containers such as:

  • buckets and pails used for cleaning or painting
  • wading pools
  • coolers with melted ice
  • large water bowls for pets
  • trash cans or recycling bins that may collect rainwater

Secure swimming pools

Swimming pools, including large, inflatable above-ground pools and other temporary pools, should be completely surrounded by a fence on all 4 sides. Pool fences should:

  • be at least 4 feet high and have no opening under it or between slats more more than 4 inches wide.
  • completely separate the pool from the house.
  • have a self-closing and self-latching gate that opens away from the pool, with the latch at least 54 inches from the ground.

Check the gate frequently to be sure it works and keep it locked at all times. Keep toys out of the pool area when not in use so that children are not tempted to try to get through the fence during non-swim time. Also be sure to always cover and lock spas and whirlpools right after using them.

When should a newborn get his first bath?

The timing of your baby’s very first bath has changed over the last few years. While most institutions used to bathe babies within an hour or two of birth, many are changing their policies. The World Health Organization (WHO) recommends delaying baby’s first bath until 24 hours after birth or waiting at least 6 hours if a full day isn’t possible for cultural reasons.

Why wait?

Here are some reasons why it is now recommended to delay baby’s first bath:

  • Body temperature and blood sugar: Babies who get baths right away may be more likely to become cold and develop hypothermia. The minor stress of an early bath can also make some babies more likely to have a drop in blood sugar (hypoglycemia).
  • Bonding and breastfeeding: Taking the baby away for a bath too soon can interrupt skin-to-skin care, mother-child bonding, and early breastfeeding success. One study 1) showed a 166% increase in hospital breastfeeding success after implementing a 12-hour delay in baby’s first bath compared to those bathed within the first couple hours.
  • Dry skin: Vernix, a waxy white substance that coats a baby’s skin before birth, acts as a natural moisturizer and may have anti-bacterial properties. According to the American Academy of Pediatrics, it’s best to leave vernix on a newborns’ skin for a while to help prevent their delicate skin from drying out. This is especially important for preemies, as their skin is highly prone to injury.

Can my baby have a bath before the umbilical cord falls off?

Only give your newborn sponge baths until the stump of the umbilical cord falls off, which usually happens by about one or two weeks of age. If it remains beyond that time, there may be other issues at play. See your baby’s doctor if the umbilical cord has not dried up and fallen off by the time your baby is two months old.

When to give your newborn a bath?

You can bath your baby at any time of the day. It’s a good idea to pick a time when you’re relaxed and you won’t be interrupted. And it’s best to avoid bathing your baby when he’s hungry or straight after a feed.

If your baby likes a bath and it seems to relax her, you can use bathing as a way to help settle her for sleep in the evening.

Where to bath your newborn?

You can give your newborn a bath in a small plastic bath or even in the kitchen sink. The kitchen sink might be easiest in the first few weeks. A plastic baby bath is probably the best option once your baby gets bigger.

You can bath your baby in any room that’s warm, safe and clean – it doesn’t have to be a bathroom.

You can also shower with your baby. Keep your baby’s face away from the pouring water and make sure to use warm, not hot, water.

What equipment is needed for bathing newborns?

  • Thick towels or a sponge-type bath cushion
  • Soft washcloths
  • Basin or clean sink
  • Cotton balls
  • Baby shampoo and baby soap (nonirritating)
  • Hooded baby towel
  • Clean diaper and clothing.

Proper skin care for your newborn

A baby’s soft and delicate skin needs special care. Generally it is best to use products made especially for babies, but your baby’s doctor can advise you about other products. Products for adults may be too harsh for a baby and may contain irritants or allergens. Many parents like to use lotions for the sweet baby smell. However, unless the baby’s skin is dry, lotions really are not needed. Powders should be avoided, unless they are recommended by your baby’s doctor. When using any powder, put the powder in your hand and then apply it to the baby’s skin. Shaking powder into the air releases dust and talc which can make it hard for the baby to breathe.

Many babies have rashes and bumps that are normal. Some rashes may be a sign of a problem or infection. Diaper rash can be irritating to the baby and needs to be treated. If you have concerns about a rash, or your baby is uncomfortable or has a fever, call your baby’s doctor.

Laundry detergents may cause irritation to a baby’s delicate skin. Even if you use a detergent marketed for baby laundry, it is a good idea to rinse the laundry an extra time to remove residues.

How often to give your newborn a bath?

Newborns don’t need a bath every day. They rarely sweat or get dirty enough to need a full bath that often.

A bath 2-3 times a week is enough to keep your newborn clean. But if your baby really likes baths, you can bath him once a day. Three baths per week during baby’s first year may be enough. Bathing more frequently can dry out your baby’s skin.

You can keep your baby’s genitals clean between baths by using warm water and cotton wool.

About 5-10 minutes is long enough for a newborn bath. This is especially important if your baby has dry or sensitive skin.

How to give a baby a sponge bath

A sponge bath is like a regular bath, except you don’t put your baby in the water.

Baby sponge bath safety tips:

  • Make sure the room is warm, without drafts (about 75° F).
  • Gather all equipment and supplies in advance.
  • Add warm water to a clean sink or basin (warm to the inside of your wrist or elbow).
  • Place baby on a bath cushion or thick towels on a flat surface that is waist high.
  • Keep the baby covered with a towel or blanket.
  • NEVER take your hands off the baby, even for a moment. If you have forgotten something, wrap up the baby in a towel and take him or her with you.
  • Start with the baby’s face. Use 1 moistened, clean cotton ball to wipe each eye, starting at the bridge of the nose then wiping out to the corner of the eye.
  • Wash the rest of the baby’s face with a soft, moist washcloth without soap.
  • Clean the outside folds of the ears with a soft washcloth. DO NOT insert a cotton swab into the baby’s ear canal because of the risk of damage to the ear drum.
  • Add a small amount of baby soap to the water or washcloth, and gently bathe the rest of the baby from the neck down. Uncover only one area at a time. Rinse with a clean washcloth or a small cup of water. Be sure to avoid getting the umbilical cord wet.
  • Wash the baby’s head last with shampoo on a washcloth. Rinse, being careful not to let water run over the baby’s face. Holding the baby firmly with your arm under his or her back and your wrist and hand supporting his or her neck, you can use a high faucet to rinse the hair.
  • Scrubbing is not necessary, but most babies enjoy their arms and legs being massaged with gentle strokes during a bath.
  • Wrap the baby in a hooded bath towel and cuddle your clean baby close.
  • Follow cord care instructions given by your baby’s doctor.
  • Use a soft baby brush to comb out your baby’s hair. DO NOT use a hair dryer on hot to dry a baby’s hair because of the risk of burns.
  • Expect your baby to cry the first few times you bathe him or her. Usually, this is just because a bath is a new experience. However, be sure to check that the water is not too warm or cold or that soap has not gotten in your baby’s eyes.

A ‘top and tail’ bath is when you use cotton wool and warm water for your baby’s eyes and face, and a washcloth for her hands and bottom. ‘Topping and tailing’ means you can concentrate on the areas that really need a wash, and your baby can keep most of her clothes on while you do it.

Here’s how to get ready for a newborn bath:

  • Take the phone off the hook or turn your cellphone off while bathing baby. You’ll be less likely to get distracted.
  • Make sure you have everything you need at hand – for example, towel, washcloth, lotion, clean clothes and clean nappy. Avoid using soap because this will dry out your baby’s skin. If needed, use a gentle non-soap cleanser or fragrance-free oil.
  • Position the bath somewhere stable and at a height where you can comfortably hold your baby. A kitchen table is often best.
  • Fill the bath with about 5 cm of water for babies up to six months old. Use jugs of water to fill the bath if you’re planning to bath your baby away from the tap.
  • Take off your watch and jewellery and wash your hands.
  • Check the water temperature is 98.6 to 100.4 °F (37-38°C) before you put your baby in. If you don’t have a thermometer, use your wrist or elbow to test the temperature – it should be comfortably warm, not hot.
  • Before bathing your baby in a sink, briefly run cold water through the tap once you’ve finished filling the bath.
  • Don’t add extra water while your baby is in the bath.

Drying and dressing your newborn after a bath

Here’s how to take your newborn out of the bath, ready for drying and dressing:

  • Supporting your baby’s head and neck, lift her out of the bath then place her on her back on a clean, dry, soft towel. Also keep her warm.
  • Wrap your baby in a soft towel and pat dry. Pay attention to skin creases, including armpits, groin, under the chin, around the neck and behind the ears.
  • If your baby’s skin is dry, or if he has nappy rash, you might want to apply a mild lotion like white soft paraffin, or zinc and castor oil. Pawpaw cream might also be helpful.
  • Dress your baby, putting her nappy on first.
  • Place your baby in a safe place, like a cot or bassinette.
  • Empty the bath water.

How to give your newborn a tub bath

Once your baby’s umbilical cord has fallen off and the stump is healed, and after a boy’s circumcision has healed, you can give your baby a tub bath by placing your baby directly in the water. This can be a pleasurable experience for you and your baby. However, some babies may not like to be bathed, especially the first few times. He may protest a little. (If this happens go back to sponge baths for a week or two, then try the bath again). Babies usually make it clear when they’re ready. Or you can try talking softly or singing and trying some bath toys if your baby protests. His first baths should be as gentle and brief as possible.

What equipment is needed for a tub bath?

  • Baby bathtub (preferably with a bottom drain plug)
  • Nonslip mat or pad
  • Bath thermometer (these often have “safe” bath temperature ranges marked on them)
  • When bathing your baby in a tub:
  • Clear the counter or table top of breakable objects and electrical appliances to prevent injury.
  • Fill the tub with warm water, using a bath thermometer.
  • Follow the same general bathing instructions for a sponge bath.
  • NEVER take your hands off your baby, or walk away, even for a moment.
  • Be sure to clean the bathtub after each use.

Baby bathtub safety tips

  • Use an infant tub or sink. The US Consumer Product Safety Commission recommends a hard plastic baby bathtub that has a sloped, textured surface or sling that keeps your baby from sliding. Only use an infant bath tub manufactured on or after October 2, 2017 so it meets current safety standards. Some parents find it easiest to bathe a newborn in a bathinette, sink, or plastic tub lined with a clean towel. Yes, a sink! Sometimes easiest is best; just be careful. Sinks are slippery and have all sorts of things sticking out like faucets and handles.
  • Avoid using bath seats. These seats provide support so a child can sit upright in an adult bathtub. Unfortunately, they can easily tip over. A child can fall into the bathwater and drown.
  • Use touch supervision. Have a towel and other bath supplies within reach so you can keep a hand on your baby at all times. If you’ve forgotten something or need to answer the phone or door during the bath, you must take the baby with you.
    • Start practicing infant water safety now: Never leave a baby alone in the bath, even for an instant. Most child drownings inside the home occur in bathtubs, and more than half of bathtub deaths involve children under 1 year of age.
  • Check the water temperature. Fill the basin with 2 inches of water that feels warm—not hot—to the inside of your wrist or elbow. If you’re filling the basin from the tap, turn the cold water on first (and off last) to avoid scalding yourself or your child. The American Academy of Pediatrics recommends that the hottest temperature at the faucet should be no more than 120 degrees Fahrenheit to help avoid burns. In many cases you can adjust your water heater setting to not go above this temperature. Tap water that’s too hot can quickly cause burns serious enough to require a hospital visit or even surgery. In fact, hot water scalds are the top cause of burns among babies and young children.
  • Keep baby warm. Once you’ve undressed your baby, place her in the water immediately so she doesn’t get chilled. Use one of your hands to support her head and the other to guide her in, feet first. Talk to her encouragingly, and gently lower the rest of her body until she’s in the tub. Most of her body and face should be well above the water level for safety, so you’ll need to pour warm water over her body frequently to keep her warm.
  • Use soap sparingly. Soaps can dry out your baby’s skin. If a cleanser is needed for heavily soiled areas, use only mild, neutral-pH soaps without additives. Rinse soap from the skin right away. Wash baby’s hair two or three times a week using a mild shampoo or body wash.
    • You may see some scaly patches on your baby’s scalp called cradle cap―a harmless condition that appears in many babies. You can loosen the scales with a soft-bristled brush while shampooing in the bathtub, but it’s also okay to leave it alone if it doesn’t bother you. It’s unlikely to bother your baby, and she will outgrow it.
  • Clean gently. Use a soft cloth to wash your baby’s face and hair, being careful not to scrub or tug the skin. Massage her entire scalp gently, including the area over her fontanelles (soft spots). When you rinse shampoo from her head, cup your hand across her forehead so the suds run toward the sides, not into her eyes. If some suds do get into her eyes, use the wet washcloth to wipe them with plain, lukewarm water. Wash the rest of her body from the top down.
  • Have fun in the tub. If your baby enjoys her bath, give her some extra time to splash and play in the water. The more fun your child has in the bath, the less she’ll be afraid of the water. Bathing should be a very relaxing and soothing experience, so don’t rush unless she’s unhappy.
    • Young infants don’t really need bath toys, since just being in the water is usually exciting enough. Once a baby is old enough for the bathtub, however, toys become key. Containers, floating toys, even waterproof books make wonderful distractions as you cleanse your baby.
  • Get out and dry off. When bath time is finished, promptly wrap a towel around your baby’s head and body to help her stay warm while she is still wet. Bathing a baby of any age is wet work, so you may want to wear a terry-cloth apron or hang a towel over your shoulder to keep yourself dry. Gently pat baby dry and apply a small amount of fragrance-free, hypoallergenic moisturizing lotion right after a bath to help prevent dry skin or eczema.

References   [ + ]

read more

Can you give babies honey

Can you give babies honey

Can you give babies honey?

No. Babies younger than 1 year old should not be given honey because of the risk of infant botulism. Infant botulism is a rare but serious gastrointestinal condition caused by exposure to Clostridium botulinum toxin (a poison, the same toxin as in Botox used by doctor in cosmetic or medical procedures). Infant botulism typically occurs in babies between the ages of 2 months and 8 months. To reduce the risk of infant botulism, avoid giving honey — even a tiny taste — to children under the age of 1 year. The American Academy of Pediatrics recommends that you do not give honey to a baby younger than 12 months. Honey is safe for children 1 year and older.

Clostridium botulinum bacteria that cause infant botulism usually thrive in soil and dust. Clostridium botulinum bacteria also can contaminate some foods like honey, in particular. Clostridium botulinum spores can grow and multiply in a baby’s intestines, producing a dangerous toxin. Infant botulism can occur in infants up to age 12 months. Parents can help prevent infant botulism by not giving their baby honey or any processed foods containing honey (like honey graham crackers) until after their child’s first birthday.

Light and dark corn syrups might also contain botulism-causing bacteria, but a link hasn’t been proved. Check with your doctor before giving these syrups to a baby.

To protect your baby from infant botulism:

  • Don’t offer honey. Wild honey is a potential source of Clostridium botulinum spores. Avoid giving honey — even a tiny taste — to babies under the age of 1 year.
  • Avoid exposure to potentially contaminated soil or dust. Soil can contain Clostridium botulinum spores, which can circulate in the air and be inhaled into the lungs. In the United States, the risk is greatest in Pennsylvania, Utah and California — where soil botulinum spore counts are high. Exposure to contaminated soil is most likely near construction and agricultural sites or other areas where soil is disturbed.
  • Be careful when canning food. Pressure-cook home-canned foods to reduce the risk of contamination with Clostridium botulinum spores. Pressure-cook these foods at 250 °F (121 °C) for 20 to 100 minutes, depending on the food. Consider boiling home-canned foods for 10 minutes before serving them.

Constipation is often the first sign of infant botulism, typically accompanied by decreased muscle tone (floppiness), muscle weakness, a weak cry, trouble breathing and poor sucking, poor feeding and constipation. If you suspect your baby might have infant botulism, seek medical help immediately. Your baby need to be treated in a hospital. Prompt treatment with the intravenous botulism immune globulin— a substance given through the baby’s veins to work against the botulinum toxin and can help prevent life-threatening complications of infant botulism. Seriously ill children may need help breathing, using a mechanical ventilator, and eating, using feeding tubes or intravenous feeding. With early diagnosis and proper medical care, a baby should fully recover from the infant botulism.

When to see a doctor

Seek urgent medical care if you suspect that your baby has botulism. Early treatment increases your baby’s chances of survival and lessens her risk of complications.

Seeking medical care promptly may also alert public health authorities. They may then be able to keep other people from eating contaminated food. Botulism isn’t contagious from person to person.

What age can a baby have honey?

Honey is safe for children 1 year and older.

Infant botulism

If infant botulism is related to food, such as honey, problems generally begin within 18 to 36 hours after the toxin enters the baby’s body. Signs and symptoms include:

  • Constipation, which is often the first sign
  • Floppy movements due to muscle weakness and trouble controlling the head
  • Weak cry
  • Irritability
  • Drooling
  • Drooping eyelids
  • Tiredness
  • Difficulty sucking or feeding
  • Paralysis

Certain signs and symptoms usually don’t occur with botulism. For example, botulism doesn’t generally increase blood pressure or heart rate, or cause fever or confusion. Sometimes, however, wound botulism may cause fever.

Infant botulism causes

Infant botulism is caused by a toxin (a poison) from Clostridium botulinum bacteria, which live in soil and dust. The bacteria can get on surfaces like carpets and floors and also can contaminate honey. Babies get infant botulism after consuming spores of the bacteria, which then grow and multiply in their intestinal tracts and make toxins. That’s why babies younger than 1 year old should never be given honey. The source of infant botulism may be honey, but it’s more likely to be exposure to soil contaminated with the bacteria.

Clostridium botulinum bacteria are harmless to older kids and adults. That’s because their mature digestive systems can move the Clostridium botulinum toxins through their body before they cause harm.

Infant botulism usually affects babies who are 3 weeks to 6 months old. But all babies are at risk for it until their first birthday.

The typical incubation period for infant botulism can range from 3 to 30 days after exposure to the Clostridium botulinum spores.

Infant botulism prevention

Infant botulism occurs mostly in babies younger than 6 months. It develops when Clostridium botulinum spores are eaten by a baby and the bacteria grow in his intestines, making toxins within the gut. The source of the Clostridium botulinum spores is usually unclear. They may be present in soil or dust and then become airborne where they are breathed in and swallowed by the child. Honey is another potential source of the disease-causing spores, however honey should be avoided in children under 12 months of age. Experts don’t know why some infants get botulism while others don’t. One way to reduce the risk of botulism is to not give infants honey or any processed foods with honey before their first birthday. Honey is a proven source of the bacteria. If you have questions about other products to avoid, ask your doctor.

Food preparation and home canning can be made safer from botulism by following guidelines such as:

  • Boil foods for 10 minutes, which can destroy toxins.
  • Do not feed your child any foods that appear to be spoiled.
  • Discard any food containers that are bulging. They may contain gas produced by Clostridium botulinum.

There is no vaccine available to prevent botulism.

Infant botulism signs and symptoms

Babies with infant botulism might have:

  • constipation (often the first sign that parents notice)
  • weak facial muscles that makes their face look “flat”
  • a weak cry
  • weak muscles in the arms, legs, and neck
  • breathing problems
  • trouble swallowing with a lot of drooling

They also might not feed well or move as much as usual.

Infant botulism complications

Because it affects muscle control throughout your body, botulinum toxin can cause many complications. The most immediate danger is that you won’t be able to breathe, which is the most common cause of death in botulism. Other complications, which may require rehabilitation, may include:

  • Difficulty speaking
  • Trouble swallowing
  • Long-lasting weakness
  • Shortness of breath

Botulism diagnosis

To diagnose botulism, your doctor will check you for signs of muscle weakness or paralysis, such as drooping eyelids and a weak voice. Your doctor will also ask about the foods you’ve eaten in the past few days, and ask if you may have been exposed to the bacteria through a wound.

In cases of possible infant botulism, the doctor may ask if the child has eaten honey recently and has had constipation or sluggishness.

Analysis of blood, stool or vomit for evidence of the toxin may help confirm an infant or foodborne botulism diagnosis. But because these tests may take days, your doctor’s exam is the main way to diagnose botulism.

Infant botulism treatment

Babies with infant botulism need care in a hospital, usually in the intensive care unit (ICU). Your health care team will try to limit the problems the botulinum toxin causes in your baby’s body.

Doctors treat infant botulism with an antitoxin called botulism immune globulin intravenous (BIGIV). They give this to babies as soon as possible. Babies with botulism who get intravenous botulism immune globulin recover sooner and spend less time in the hospital than babies who don’t.

If the toxin affects the breathing muscles, a baby might need to use a breathing machine (ventilator) for a few weeks until they get stronger. It also can affect the swallowing muscles, so babies usually need intravenous (IV) fluids or feedings through a tube to get nourishment.

For cases of foodborne botulism, doctors sometimes clear out the digestive system by inducing vomiting and giving medications to induce bowel movements. If you have botulism in a wound, a doctor may need to remove infected tissue surgically.

Infant botulism prognosis

Most children recover fully from botulism, although it can take several weeks to months. In cases in which the condition is untreated, the symptoms of food-borne botulism sometimes progress to a stage in which the breathing muscles become paralyzed, causing death from respiratory failure.

read more

How to build confidence in kids

how to build confidence in kids

How to build confidence in kids

Confidence comes from feelings of well-being, acceptance of your body and your self-esteem and belief in your own ability, skills and experience. Confidence is a belief in yourself, the conviction that you have the ability to meet life’s challenges, be successful or make the right choice in a particular situation and the willingness to act accordingly. Being confident requires a realistic sense of your capabilities and feeling secure in that knowledge. Confidence is related to self-esteem and resilience. Self-esteem is feeling good about yourself and feeling that you’re a worthwhile person. But having high self-esteem doesn’t mean you always feel confident.

Confidence and resilience are related too. Resilience is the ability to bounce back from difficult experiences and cope in hard or stressful situations. If your child has resilience and learns that she can cope when life is difficult, it will leave her feeling more confident to tackle difficult situations. It’s a positive cycle.

Resilience is more than just coping. When you’re resilient, you’re more prepared to seek new ways to overcome your challenges and achieve your goals. Although this might mean taking some risks, it also creates opportunities for success and greater self-confidence.

Projecting confidence helps people gain credibility, make a strong first impression, deal with pressure, and tackle personal and professional challenges. It’s also an attractive trait, as confidence helps put others at ease.

Confidence is not an innate, fixed characteristic. Confidence is an ability that can be acquired and improved over time.

Social confidence can be developed by practicing in social settings. Individuals can observe the structure and flow of any conversation before jumping in, and they can prepare questions or topics to discuss ahead of time.

Anxiety can take hold when people are plagued by self-doubt, so putting themselves in and getting accustomed to the specific situation they fear can assure people that nothing truly bad will happen. And the activity gets easier with practice.

Confidence helps teenagers make safe, informed decisions. Confident teenagers can avoid people and situations that aren’t necessarily right for them, and find those that are.

If your child is confident, he’s also more likely to be assertive, positive, engaged, enthusiastic and persistent.

For example, a confident teenage girl whose boyfriend breaks up with her might be upset for a little while. But then she might realise that she can bounce back from the sadness she’s feeling now and focus more on the positive aspects of her life, like other friends and family. On the other hand, a girl who feels less confident in her relationship skills might be more upset, or even feel that the break-up was her fault. This could also affect her self-esteem, and leave her feeling that she isn’t worth dating.

Teenagers with low confidence are less likely to join in activities, more likely to hold back in class, and might be more willing to give in to peer influence. When a child lacks confidence, he might expect to fail at things he tries, or he might not try as hard when things get tricky.

Risks to kids confidence

Your child’s confidence might be at risk if you, he or other people he respects focus on his outcomes rather than his efforts. If the outcome is a ‘failure’ – for example, a poor exam result, a grand final loss – it can seem like the end of the world. But if your child knows that his effort is what you value most, this can lessen the blow of a ‘failure’.

During adolescence, physical changes can also affect teenagers’ confidence. If teenagers feel self-conscious about their bodies, it can affect their confidence overall and how they feel about themselves.

Bullying, or peer pressure to be the same as others, can also affect teenagers’ confidence.

Getting help for kids confidence

If your child’s confidence changes suddenly, or if low confidence is stopping her from trying new things, a good first step is to talk with your child. This will help you find out what’s happening for her.

If it isn’t something you can help your child with yourself, it might be a good idea to get help from a teacher, school counselor or psychologist.

How to build confidence in your child

Here are some tips for building confidence and resilience in your child.

Be practical

Look for the practical and positive things your child can do to build skills and increase her chances of success. Giving your child a clear strategy to improve her likelihood of success is a great way to help her understand exactly what she can do to achieve goals. For example, ‘Ada, if you want to be picked for the basketball team, you need to make sure you’re listening to the coach and practising between sessions’.

Give your child opportunities to try new things

When your child tries lots of different things, he’ll get to know what he’s good at and what he enjoys. He’ll also learn that most people do well at some things and not so well at others – and that’s fine. After all, we can’t all be Olympic athletes, gaming champions or musical geniuses.

Encourage your child to keep trying

If your child fails at something, help her understand that everyone makes mistakes. It’s OK if you can’t do something the first time you try. You could share some examples of times that you’ve failed, or have needed to keep trying at something.

Model confidence in your own ability

You can be a role model when it comes to confidence. For example, you could talk to your child about what you’re going to do to try to succeed at a task. If it doesn’t work out, you can model resilience by talking about what you’re going to try next time. You can also discuss things you’ve done that might have been scary or tough for you to do, showing your child that you’ve also been through times when you’ve needed confidence.

Encourage your child to act confident

Acting confident is the first step to feeling confident. So you could suggest to your child that he makes eye contact with others, is bold, does what he loves, tries not to focus on what he can’t do, and walks away from situations he knows aren’t good.

Practise social skills

If your child feels anxious in social situations, she might need some guidance from you. For example, body posture, smiling, connecting with others, showing interest in others’ activities and joining in conversations can help build confidence.

Praise your child’s efforts

If an exam, interview or game doesn’t work out the way your child hoped, try to praise your child for the effort he put into the activity, rather than the outcome. You could also suggest some ideas about what he could do differently next time.

What is self esteem?

Self-esteem is feeling good about yourself and liking yourself and who you are. This doesn’t mean being overconfident – just believing in yourself and knowing what you do well. Good self-esteem helps children try new things, take healthy risks and solve problems. It gives them a solid foundation for their learning and development.

The most important thing you can do to foster your child’s self-esteem is to tell your child that you love him. Say it often and for no reason other than to show you appreciate your child.

For children, self-esteem comes from:

  • knowing that they’re loved and that they belong to a family and a community that values them
  • spending quality time with their families
  • being encouraged to try new things, finding things they’re good at and being praised for things that are important to them.

Being connected to other people who care about her is good for your child’s self-esteem. It gives her a stronger sense of her place in your immediate and extended family. And being connected to friends and people in the community helps your child learn how to relate to others and can boost her confidence.

Kids with self-esteem:

  • feel liked and accepted
  • feel confident
  • feel proud of what they can do
  • think good things about themselves
  • believe in themselves

Kids who feel good about themselves have the confidence to try new things. They are more likely to try their best. They feel proud of what they can do. Self-esteem helps kids cope with mistakes. It helps kids try again, even if they fail at first. As a result, self-esteem helps kids do better at school, at home, and with friends.

Kids with low self-esteem:

  • are self-critical and hard on themselves
  • feel they’re not as good as other kids
  • think of the times they fail rather than when they succeed
  • lack confidence
  • doubt they can do things well.

Kids with low self-esteem feel unsure of themselves. If they think others won’t accept them, they may not join in. They may let others treat them poorly. They may have a hard time standing up for themselves. They may give up easily, or not try at all. Kids with low self-esteem find it hard to cope when they make a mistake, lose, or fail. As a result, they may not do as well as they could.

How self-esteem develops

Self-esteem can start as early as babyhood. It develops slowly over time. It can start just because a child feels safe, loved, and accepted. It can start when a baby gets positive attention and loving care.

As babies become toddlers and young children, they’re able to do some things all by themselves. They feel good about themselves when they can use their new skills. Their self-esteem grows when parents pay attention, let a child try, give smiles, and show they’re proud.

As kids grow, self-esteem can grow too. Any time kids try things, do things, and learn things can be a chance for self-esteem to grow. This can happen when kids:

  • make progress toward a goal
  • learn things at school
  • make friends and get along
  • learn skills — music, sports, art, cooking, tech skills
  • practice favorite activities
  • help, give, or be kind
  • get praise for good behaviors
  • try hard at something
  • do things they’re good at and enjoy
  • are included by others
  • feel understood and accepted
  • get a prize or a good grade they know they’ve earned

When kids have self-esteem, they feel confident, capable, and accepted for who they are.

How to build self esteem in children

Every child is different. Self-esteem may come easier to some kids than others. And some kids face things that can lower their self-esteem. But even if a child’s self-esteem is low, it can be raised.

Here are things parents can do to help kids feel good about themselves:

  • Help your child learn to do things. At every age, there are new things for kids to learn. Even during babyhood, learning to hold a cup or take first steps sparks a sense of mastery and delight. As your child grows, things like learning to dress, read, or ride a bike are chances for self-esteem to grow.
  • When teaching kids how to do things, show and help them at first. Then let them do what they can, even if they make mistakes. Be sure your child gets a chance to learn, try, and feel proud. Don’t make new challenges too easy — or too hard.
  • Praise your child, but do it wisely. Of course, it’s good to praise kids. Your praise is a way to show that you’re proud. But some ways of praising kids can actually backfire.
    • Here’s how to do it right:
      • Don’t overpraise. Praise that doesn’t feel earned doesn’t ring true. For example, telling a child he played a great game when he knows he didn’t feels hollow and fake. It’s better to say, “I know that wasn’t your best game, but we all have off days. I’m proud of you for not giving up.” Add a vote of confidence: “Tomorrow, you’ll be back on your game.”
      • Praise effort. Avoid focusing praise only on results (such as getting an A) or fixed qualities (such as being smart or athletic). Instead, offer most of your praise for effort, progress, and attitude. For example: “You’re working hard on that project,” “You’re getting better and better at these spelling tests,” or, “I’m proud of you for practicing piano — you’ve really stuck with it.” With this kind of praise, kids put effort into things, work toward goals, and try. When kids do that, they’re more likely to succeed.
  • Be a good role model. When you put effort into everyday tasks (like raking the leaves, making a meal, cleaning up the dishes, or washing the car), you’re setting a good example. Your child learns to put effort into doing homework, cleaning up toys, or making the bed. Modeling the right attitude counts too. When you do tasks cheerfully (or at least without grumbling or complaining), you teach your child to do the same. When you avoid rushing through chores and take pride in a job well done, you teach your child to do that too.
  • Ban harsh criticism. The messages kids hear about themselves from others easily translate into how they feel about themselves. Harsh words (“You’re so lazy!”) are harmful, not motivating. When kids hear negative messages about themselves, it harms their self-esteem. Correct kids with patience. Focus on what you want them to do next time. When needed, show them how.
  • Focus on strengths. Pay attention to what your child does well and enjoys. Make sure your child has chances to develop these strengths. Focus more on strengths than weaknesses if you want to help kids feel good about themselves. This improves behavior too.
  • Let kids help. Self-esteem grows when kids get to see that what they do matters to others. Kids can help out at home, do a service project at school, or do a favor for a sibling. Helping and kind acts build self-esteem and other good feelings.

Here are some ideas for nurturing your child’s self-esteem through relationships:

  • Strengthen your child’s sense of his family, culture and community. For example, show your child family photos and share family stories, take part in community or cultural events like religious festivals, and encourage your child join a local sporting club or interest group, or join as a family.
  • Encourage your child to value being part of your family. One way to do this is by involving your child in chores. When everyone contributes to the smooth running of the household, you all feel important and valued.
  • Make your child’s friends welcome and get to know them. Encourage your child to have friends over to your house, and make time for your child to go to their houses.

Quality time and your child’s self-esteem

When you spend quality time with your child you let your child know she’s important to you. Doing things together as a family can help strengthen a sense of belonging and togetherness in your family, which is also good for your child’s self-esteem.

Here are some ideas:

  • Develop family rituals. These could include a story at bedtime, a special goodbye kiss or other ways of doing things that are special to your family.
  • Let your child help you with something, so that he feels useful. For example, your preschooler could help you set the table for dinner.
  • Plan some regular one-on-one time with your child, doing something that she enjoys, whether it’s drawing, doing puzzles, kicking a soccer ball or baking cakes.

Achievements, challenges and your child’s self-esteem

Success and achievements can help your child feel good about himself. But your child can also build self-esteem doing things he doesn’t always enjoy or succeed at. You can still praise his effort and determination – and remind him that these will help him succeed in other areas, or next time.

There are lots of ways to help your child succeed, achieve and cope well with failure:

  • When your child has a problem, encourage her to think calmly, listen to other people’s points of view and come up with possible solutions to try. This builds important life skills.
  • Help your child learn new things and achieve goals. When your child is younger, this might mean praising and encouraging him when he learns something new, like riding a bike. When he’s older, it might be taking him to sport and helping him practise.
  • Celebrate big and small achievements and successes. And remember to praise your child’s effort, not just her results. For example, ‘You tried that puzzle piece in lots of different spots and you finally got it right. Well done!’.
  • Keep special reminders of your child’s successes and progress. You can go through them with your child and talk about your special memories, and the things he has achieved.
  • Teach your child that failing is a part of learning. For example, if she keeps missing the ball when she’s learning to catch, say ‘You’re getting closer each time. I can see how hard you’re trying to catch it’.
  • Teach your child to treat himself kindly when he does fail. You could be a role model here. For example, ‘I tried a new recipe, and the cake looks a bit funny. But that’s OK. It smells delicious’.

Things that can damage children’s self-esteem

  • Messages that say something negative about children are bad for their self-esteem – for example, ‘You are slow, naughty, a bully, a sook …’. When children do something you don’t like, it’s better to tell them what they could do instead. For example, ‘You haven’t done your homework. You need to sit down now and finish your maths questions’.
  • Messages that imply that life would be better without children might harm their self-esteem. For example, ‘If it weren’t for the children, we could afford a new car’.
  • Ignoring your children, treating them like a nuisance and not taking an interest in them are likely to be bad for children’s self-esteem. An example might be, ‘I am sick and tired of you’. Frowning or sighing all the time when children want to talk to you might have the same effect.
  • Negative comparisons with other children, especially brothers and sisters, are also unlikely to be helpful. Each child in your family is different, with individual strengths and weaknesses. It’s better if you can recognize each child’s successes and achievements.

All parents feel frustrated and tired sometimes. But if parents send the message that they feel like this about their children all the time, children get the message that they’re a nuisance.

Changes like moving house, school or country, or separation or divorce, might also affect your child’s self-esteem. If your family is going through experiences like these, try to keep up family rituals and your child’s activities, as well as giving your child lots of love. This will help your child feel OK about herself and her identity even as things around her are changing.

What is resilience?

Resilience is the ability to ‘bounce back’ during or after difficult times and get back to feeling as good as before.

Resilience is also the ability to adapt to difficult circumstances that you can’t change and keep on thriving. In fact, when you’re resilient, you can often learn from difficult situations.

Your child’s resilience can go up and down at different times. And your child might be better at bouncing back from some challenges than others.

All teenagers can build resilience, by developing attitudes like self-respect, social and organizational skills, and positive thinking habits. Your support is also a key building block for your child’s resilience.

You can’t always stop your child from experiencing problems or tough times. But you can play a big role in helping your child build resilience. Your child can also gain strength from other supportive adults, like grandparents, aunts, uncles or teachers. Friends and classmates can be great sources of support too.

Why children need resilience?

Children need resilience to bounce back from everyday challenges like arguments with friends, disappointing test results or sporting losses. Some young people face more serious challenges like family breakdown, family illness or death, or bullying. And some have more challenges than others because of learning difficulties or disabilities, or because they have more anxious personalities. Resilience will help them with these challenges.

When you’re resilient, you’re more prepared to seek new ways to overcome your challenges and achieve your goals. Although this might mean taking some risks, it also creates opportunities for success and greater self-confidence.

How to build resilience in kids

Challenges are a normal part of life, and young people have to learn to cope with them by themselves. Let your child have a go at sorting out her own problems and fighting her own battles before you step in. Fumbles and even failures are part of the process.

Personal values and attitudes for building resilience

Self-respect is a great building block for resilience. Self-respect grows out of setting standards for behavior. If your child has self-respect, she believes that she matters and should be treated respectfully by others. She’s also more likely to protect herself by avoiding risky behavior and situations. A strong sense of self-respect will also help your child be less vulnerable to bullies and bullying.

Empathy, respect for others, kindness, fairness, honesty and cooperation are also linked to resilience. This includes showing care and concern for people who need support, accepting people’s differences, being friendly, not mistreating or bullying others, and taking responsibility for your actions.

If your child shows these attitudes and behavior towards others, he’s more likely to get a positive response in return. This helps him feel good about himself.

Having a strong, loving relationship with you and staying connected with you are the basis for all these qualities and values in your child. If you show your child love and respect, she’ll be more likely to care for herself and others.

Social skills for resilience

Social skills are another important building block for resilience. They include skills for making and keeping friends, sorting out conflict, and working well in teams or groups.

When your child has good relationships at school and gets involved in community groups, sports teams or arts activities, he has more chances to develop connections and a sense of belonging.

These social connections also mean that your child will probably have more people she trusts when she wants to talk about things that worry or upset her.

Positive thinking habits for resilience

Resilience is about being realistic, thinking rationally, looking on the bright side, finding the positives, expecting things to go well and moving forward, even when things seem bad.

When your child is upset, you can help him keep things in perspective by focusing on facts and reality. For example, you could try gently asking, ‘Does this really matter as much as you think it does? On a scale from 1-10, how bad is it really?’

You can also help your child understand that a bad thing in one part of her life doesn’t mean everything is bad. For example, if your child gets a poor exam result, you could point out that it won’t stop her from playing weekend sport or going out with friends.

If your child is being hard on himself, you could suggest more helpful self-talk instead. For example, he might say something like ‘I’m going to die of embarrassment speaking in front of my class’. You could suggest alternatives like ‘Public speaking isn’t my favourite thing, but I can cope’, or ‘Public speaking isn’t my strength, but it’s good to try new challenges’.

Your child is more likely to feel positive if she can see that difficult times are a part of life, and that things will get better. It might just take longer than your child would like. You can help your child with this by talking about how you or people you know have gone through tough times.

Working with your child on solutions to problems can build resilience too. And having problem-solving strategies can help your child feel he has the power to deal with difficult situations and get through challenging times.

It’s also important for your child to feel and talk through difficult emotions like anxiety, fear and anger. Facing difficult emotions will help your child grow stronger. With resilience your child will be able to ride out these adolescent ups and downs.

It’s also good for your child to have simple strategies for turning low moods into better ones. Here are some ideas:

  • Do things you enjoy or that help you relax, like watching a funny TV show or DVD or reading a good book.
  • Spend time with friends or support people.
  • Do something kind for someone else – for example, carrying the grocery shopping in from the car.
  • Look for the positive or funny side of a difficult situation. For example, a sprained ankle might mean missing sport on the weekend, but it gives you the chance to binge-watch your favorite TV series.
  • Do some physical activity, like playing sport or going for a vigorous walk.
  • Go over some good memories by looking through photographs.

You’re a role model for your child. Let her see and hear you being positive and optimistic. You can do this by thanking other people for their support, saying ’Things will get better soon and I can cope with this’, and expecting that good things are possible.

Skills for getting things done

Feeling confident, capable and ready to get things done are big parts of resilience. Important skills in this area are goal-setting, planning, being organiszed and self-disciplined, being prepared to work hard and being resourceful.

You can foster these skills in your child by helping him work out his specific strengths and limitations. Then you can encourage him to set goals that put his strengths into action, and that help him to focus on what he’s good at.

For example, if your child is good at singing or music, you could suggest she joins the school band, or even starts her own band. If she’s good with young children, you could suggest she looks into some babysitting work or coaching junior sport.

Supporting your child to take on new or extra responsibilities is a great way to build your child’s confidence and sense of what he can do. Examples might be a leadership role at school or a part-time job as he gets older.

read more

Teaching respect to children

teaching kids respect

Teaching your children respect

Respect means that you care about another person well-being and how they feel. Respect means that you accept somebody for who they are, even when they’re different from you or you don’t agree with them. When you respect someone, you treat them kindly and use good manners. Sometimes it means doing things for them or listening to their instructions. Having respect for someone means that you like the way that person acts, works, or the way that persons treats you and others. Treating someone with respect means that you interact with them in a way that shows that you care about their well-being and how they feel. When you respect someone, you treat them kindly and use good manners. Sometimes it means doing things for them or listening to their instructions.

Receiving respect from others is also important because it helps you to feel safe and to express yourself. If people are behaving badly towards you and hurting you or your feelings, then you cannot, and must not, respect their unkind behavior.

Respect has several meanings:

  • Having regard for others. That means accepting that other people are different but just as important as you feel you are. Some people may call this tolerance.
  • Having a proper respect for yourself. That means that you stand up for yourself and don’t let yourself be talked into doing stuff that you know is wrong or makes you feel uncomfortable.
  • Not interfering with others or their property.
  • To consider something worthy of high regard. That really means taking all those other values and living them.

A good mnemonic for respect:

  • Respect family
  • Equity for everyone
  • Say sorry, please and thank you
  • People deserve respect
  • Ensure that everyone’s rights are respected
  • Carry respect into all of your life
  • Take time to respect yourself

What does respect feel and look like:

  • You feel safe being around each other
  • You know it’s OK for both of you to express who you are
  • When you disagree you listen to each other and be patient
  • You don’t yell or talk over the top of each other
  • Neither of you are controlling the other person’s choices
  • You both talk openly about your needs and wants
  • You both allow the other person space if they need it
  • You can both admit when you’ve made a mistake.

Home is the place where your child first learn about respect:

  • Your child learn about using good manners, like saying ‘please’ and ‘thank you’.
  • Your child learn to share things like toys, games and food with other children.
  • Your child learn to look after their own things and take care of other things in the house (eg. not jumping on furniture, wiping your feet etc, so that the house is a good place for everyone to be).
  • Your child learn to wait for his/her turn in talking.
  • Your child learn to listen.
  • Your child learn to understand that she/he will not always get what they want.
  • Your child learn to respect others by helping with chores and not letting the family down.
  • Your child learn to respect others in the community where you live.
  • Your child learn how to talk to different adults in a way they expect to be spoken to e.g., grandma and her friends may not like to be called by their first name.

Respect at school

When your child goes to school she/he will have to learn some different ways to respect others and himself.

  • Your child will learn how to be a member of a class.
  • Your child will learn how to behave with teachers and other ‘school kids’.
  • Your child learn to respect and keep school rules, which help to make their school a safe and caring place for everyone.
  • Your child will learn to respect the property of classmates and the school.
  • Your child will meet with people from different backgrounds, maybe different countries, cultures and religions.
  • Some people will look very different to your child and your family.
  • Some people will behave very differently to your child and your family.
  • Your child can respect their differences and expect that they will respect yours.

Earning respect

Earning respect from yourself is probably harder than earning respect from others.

  • If you aim to be an honest, caring person who accepts that everyone is different, always tries hard and is willing to share and help others, then living up to your aims can be very difficult.
  • Don’t give yourself too hard a time if you sometimes make mistakes. Mistakes are what we learn from.
  • Earning respect from others is easy if you live by the values we talked about at the beginning of this topic. People will soon know that you are the kind of person who can be trusted to do the right thing, behave in a caring way and respect others’ rights to be themselves.

What are good manners?

Courtesy, politeness or having good manners are all about respecting others and yourself. Good manners is about considering the feelings of other people, and being the kind of person that others will like and respect.

In the ‘olden days’ children were taught about the Golden Rule – “Always do to others as you would wish them to do to you if you were in their place.”

This is still a good way to behave nowadays. If you are respectful to others, then you are more likely to be treated with respect by them.

If you show good manners everywhere you go, then you are more likely to encourage others to behave in the same way towards you.

Look at the following ideas from kids and see if you can think why they chose these examples of good manners.

What good manners look like at home

  • Being helpful to others in your home.
  • Saying ‘please’ and ‘thank you’.
  • Sharing and not grabbing and keeping good things to yourself.
  • Respecting other people’s property and their rooms.
  • Helping the family by doing your chores.
  • Cleaning up after yourself.

Good manners at the dining table

  • Wait until everyone has been served before you eat.
  • Use your knife to cut and your fork to put the food in your mouth.
  • Chew food with your mouth closed.
  • Ask for things to be passed to you, don’t lean over the table.
  • If you need to blow your nose, excuse yourself and go out of the room first.
  • Don’t grab everything you want first – help others to get their food and be prepared to share.
  • Don’t talk with your mouth full. It is not a good look!
  • Switch your mobile phone to silent and don’t check it either.

Good manners at school

  • Saying good morning/afternoon if you are walking past an adult who you know.
  • Asking if you can borrow something, not just taking.
  • Returning things that you have borrowed.
  • Waiting your turn before you speak.
  • Saying ‘excuse me,’ rather than pushing past someone.
  • Holding the door open for the person coming in, especially if he is carrying something.
  • Respecting your own and other people’s property, especially school property.
  • Saying ‘please’ and ‘thank you’.

Good manners when you are out

If you are out with other kids:

  • Respect other people.
  • Be polite to others.
  • Don’t use bad language in public – it is offensive to others.
  • Let an older person have your seat on buses, trains and trams if there is nowhere for them to sit.
  • Queue up quietly and don’t push.
  • Put your rubbish into bins, don’t leave it for someone else to clean up.
  • Have fun but don’t be so loud that you attract the wrong kind of attention.
  • Respect property.
  • Don’t make fun of anyone – everyone has feelings.
  • Don’t run in shopping centers or where there are other people.
  • Spend time talking and listening to the people you are with – don’t talk on your cellphone when you are with other people.

If you are out with your parents or other adults:

  • Use your good manners so that you don’t embarrass anyone.
  • Introduce any friends you meet to the people you are with.
  • Say ‘please’ and ‘thank you’.
  • Don’t be a ‘canna’. (“canna have this?” and “canna have that?”)

What is bullying?

Bullying is when children:

  • tease other children over and over again
  • ignoring other children or leaving them out of games or activities
  • say mean things or call other children names
  • spread nasty stories about other children
  • hit and push other children
  • take other children’s things.

If children join in with bullying or encourage someone else to behave like this, it’s also bullying.

If friends or peers disagree or even argue, or if someone says something mean once, it can be unpleasant and even nasty. But it isn’t bullying. Bullying is mean and hurtful behavior that happens over and over again.

Bullying can happen face to face. It can also happen online – for example, if children send harassing texts or post negative comments about others online. This is cyberbullying.

Children should never be left to sort out bullying on their own. They can be seriously hurt by it. It’s important for you to stop bullying quickly, before it damages a child’s confidence.

These are some ideas from kids on how to deal with bullies:

  • Ask a teacher to watch out for bullies and catch them.
  • Ask a friend to help you tell them to stop.
  • Try to act like you are not being hurt by their nasty words.
  • Tell teachers, parents, counselors and anyone else you think may help you, until the bullying is dealt with.
  • Use the ‘Harassment steps’ at your school. If you don’t know what they are, ask your teacher.
  • Don’t give the bullies put-downs, give them build-ups (eg. ignore if they are being nasty and say something positive “I think that you’re too smart to be doing this.”)
  • Get all the other people who are being bullied and go together to tell someone.
  • Act normal around bullies – don’t let them see if you’re scared.
  • Get together with others and put bullying on the agenda for your class meeting. Don’t mention names, say ‘someone’ or ‘what if someone…’ and ask for ideas on dealing with bullying from the class.
  • If you are being bullied at home tell mum or dad, or other adults in your family, and keep telling until it stops.

Signs of bullying

Your child might tell you that she’s being bullied. For example, she might say that other children are teasing her, making fun of her, putting her down, laughing at her, calling her names, ignoring her or threatening her.

If your child doesn’t say anything but you’re worried, here are some signs to look out for.

Physical signs of bullying may include:

  • bruises, cuts and scratches
  • torn clothes
  • missing property
  • poor eating or sleeping
  • bedwetting
  • complaints about headaches or tummy aches.

Requests for money or other items

The person doing the bullying might be demanding money or things like lunch box treats from your child.

School or preschool problems

Your child might:

  • not want to go to preschool or school
  • stay close to teachers during breaks
  • start sitting alone
  • have difficulty asking or answering questions in class, or have trouble with schoolwork or homework
  • stop taking part in school activities.

Social changes

Your child might avoid social events that he used to enjoy, like parties. Or you might notice that he’s:

  • being excluded at lunch and recess
  • losing contact with classmates after school
  • being chosen last for teams and games.

Emotional changes

Your child might seem unusually anxious, nervous, upset, unhappy, down, teary, angry, withdrawn and secretive. These changes might be more obvious at the end of weekends or holidays, when your child has to go back to school.

These signs don’t necessarily mean your child is being bullied. They could be signs of other issues, like depression. If you’re concerned, speak to your doctor or other health professional.

There’s no single way to tell whether your child is being bullied. The way your child reacts to bullying will depend on how bad the bullying is, as well as your child’s personality.

Worried your child is being bullied

It can be hard to know for sure whether your child is being bullied. But if your child is being bullied, talking about the bullying is one of the best ways to help and protect her. When you’re talking with your child about school, try to keep the conversation relaxed and friendly, and avoid bombarding your child with questions. Just give your child your full attention, ask him simple questions, and listen to the answers. You could try saying things like, ‘So what happened next?’ and ‘What did you do then?’ This approach can help your child open up to you.

To find out more about what’s going on, you could try some of these conversation starters for children aged 4-6 years:

  • Who did you play with today? Is there anyone you don’t like to play with? Why?
  • What sort of games did you play? Did you enjoy them?
  • Are you looking forward to going to school tomorrow?

Or try these conversation starters for children aged 7-8 years:

  • What did you do at lunchtime today?
  • Is there anyone at school you don’t like? Why?
  • Are you looking forward to going to school tomorrow?

What to do with bullying?

  • Find someone you trust and go and tell them what is happening to you.
  • If the harassment is happening at school, then tell a teacher or school counselor and ask what can be done about it. Your school probably has a policy on harassment/bullying and there are steps to follow in the rules of that policy. If you say nothing then nothing will be done. This is not ‘dobbing’ (telling tales) Bullying is wrong and everyone must speak up about it to stop it.
  • It is not your fault that you are being harassed/bullied and you have the right to feel safe.
  • Bullies need to be caught and stopped because they can make the lives of many others miserable as well as yours.
  • Tell your parents or caregivers, who will talk to the school for you if you are scared about what the bully may do.
  • Tell your friends what is happening to you and ask for their support.
  • If you are being harassed on the way to school, try going a different way or walking with a group of others.
  • If you are being chased, run up to any door and knock loudly. Bullies are afraid of being caught and would probably run away if they thought they were going to be caught.
  • Bashing people up is assault and is a criminal offence. Let the bully know that your parents know and can report it to school and to the police.
  • It is really important to tell someone! Keep on telling until something is done to make you feel safe again.

Although often bullies just pick on anyone, there are some things you can do that sometimes help keep bullies away. Here are some ideas on how you can become the kind of person that bullies may be less likely to want to pick on.

Take a good look at yourself in the mirror and answer these questions:

  • Do I look confident?
  • Do I look like a regular kid? (Of course kids are different in lots of different ways, but I know how important it is to kids to feel they are seen to be part of the group.)
  • Do I stand tall?
  • Do I hold my head high? (Or do I look miserable, as though life has got on top of me?)

If the answer is no to any of these questions, then now is the time to put some work in on yourself.

People who become famous athletes, musicians, actors, and dancers or who are really good at whatever job they do have one thing in common: They practise! You can practise too.

Things you can practise

  • Practise acting confident, eg. walking head-up, looking and smiling at people as you go, saying hello to anyone you know who looks back at you.
  • Practise looking your best. If you look neat, clean and tidy, and make the most of your appearance, you immediately feel good about yourself and you feel more confident.
  • Practise using a strong voice – not shouting.

Think back to a situation where you were bullied. How could you have handled it?

  • Practise what you could say or do if that happens again.
  • Practise making friends in and out of school. (Look up our topic Friendship if you need some ideas.)
  • Practise being assertive. This means standing up for your rights.
  • Practise thinking about the worst thing that the bully might do to you and what you could do – then stop worrying about it. It is unlikely to happen to the ‘new’ assertive you.
  • Practise a game or skill until you’re really good at it. You could make new friends, gain respect from others and feel great about yourself.
  • Practise collecting powerful friends. Watch the people you hang around with. Bullies are unlikely to pick on you if you have a group of friends who are strong and support you.
    Ask someone who is bigger, older or popular with other kids if you can hang out with them for a while. (If you can’t think of anyone, ask your teacher to help you find someone.) Don’t ask that person to fight for you though. You don’t want to be in the middle of a ‘war’!
  • Practise talking your way out of strife, eg. “OK everyone knows you can beat me, I know too, so it’s really a waste of time isn’t it?” (Get your parents or a friend to help you. They can pretend to be the bully and you can practise different things to say, in a strong voice.)
  • Practise thinking ahead. Avoid places where you come close to the bully.
  • If you’re being harassed for money or food treats, make sure that you don’t have any left when you are likely to come across the bully. Practise saying that you don’t get them anymore as mum has told the teacher she doesn’t want to provide food/money for other people.
  • Practise liking yourself. Tell yourself what a great kid you are. List all the great things you can do.
  • Practise all of these things every day. Keep a diary of what you do and what you try to do. Look at it every Sunday to check how you did last week and make your list of things to try for the next week.
  • Don’t give up!

Remember, correct practice makes perfect, more practice makes perfect every time. That is what people who become famous believe and if it’s good enough for them it sure is good enough for the rest of us! But it can be hard to do on your own and easier with help from mum or dad or a teacher.

Your child bullying others

If your child is hurting other children physically or emotionally and is doing it over and over again, this is bullying. Stepping in early is the key to helping your child learn how to get along with others and avoid bullying behavior in the future.

Bullying is:

  • teasing other children over and over again
  • ignoring other children or leaving them out of games or activities
  • saying mean things or calling other children names
  • spreading nasty stories about other children
  • hitting and pushing other children
  • taking other children’s things.

If children join in with bullying or encourage someone else to behave like this, it’s also bullying.

Bullying can happen face to face. It can also happen online – this is cyberbullying.

If your child is behaving in these ways with the intention of hurting other children physically or hurting their feelings, it might be time to talk with him about bullying. It’s best to do something about bullying sooner rather than later, it’s really important to get her the helps she needs to stop. You have the most influence on your child’s bullying behavior while he’s young – the younger he is, the more likely he is to change the way he acts. This can help your child avoid becoming a victim of bullying himself/herself. It can also help her avoid problems with antisocial behavior, workplace harassment, child abuse, sexual harassment and substance abuse later in life.

Signs that your child is bullying other kids

If your child is bullying, someone will probably tell you – a teacher, another child’s parents, or one of your child’s siblings.

Other signs of your child bullying include your child:

  • talking about other children in an aggressive or negative way
  • having money, toys or other things that don’t belong to her.

Neither of these signs means your child is definitely bullying, but you might want to talk to your child’s teacher to find out if there have been any problems at school.

What to do about your child bullying

Working on bullying at home

It’s important to tell your child that his bullying behavior is not OK. Try to be calm about it, but make sure he knows that you want it to end.

Here’s how to start:

  • Explain to your child what bullying is. Talk with your child about what she’s doing and why she might be doing it. Listen to her, and try to avoid blame.
  • Help your child understand how his behavior affects others – for example ‘Would you like someone to do that to you?’ or ‘How do you think that made the other person feel?’
  • Keep an eye on your child’s use of the internet and mobile phones.

Working on bullying with the school

It’s also important to talk to the school (or club or organization where the bullying is happening) about its policy or guidelines for bullying. They’ll use these to decide the consequences for your child.

If you support the school or organization’s decision, it sends a strong message to your child that bullying behavior is not OK. You can also ask what you can do from home to support the decision, and then check in with the school or organization regularly.

Thinking about why the bullying is happening

You could also look for reasons for the bullying. This might help you work out whether there’s something that you can change to help stop the bullying. For example:

  • Is your child being bullied herself? Some children bully because they themselves have been bullied. Listen to your child for signs that she might be a victim of bullying.
  • Is your child joining in bullying to avoid being bullied himself? Talk to the school or club about how your child can avoid being involved in bullying.
  • Is your child seeing bullying at home or in other settings, or in TV programs or YouTube videos? Sometimes bullying happens because children see others doing it.
  • Is your child bullying to feel more important or in control? Some children bully because they have low self-esteem.
  • Is your child misunderstanding messages about ‘standing up for herself’? Sometimes positive comments about being aggressive or assertive can encourage children to bully.

What to do if your child continues to bully

If this isn’t the first time your child has bullied, and you’ve already tried the suggestions above, you might need to take further steps.

If the bullying is happening at school or a club, working with the organization will give you the best chance of changing your child’s behavior.

Behavior contract

A ‘behavior contract’ is made between you, the school or other organization, and your child. It lets your child know that you’re all working together. The contract can include things like what will happen if your child bullies and what will happen if she stops bullying. You could also include things she could do instead of bullying.

As part of the contract, you might get your child to write an apology letter to the child he has been bullying.

Counseling

Your child might need counseling to help her stop bullying and develop more positive ways of relating to other children. Counseling can really help if your child is having trouble with self-esteem, dealing with anger or controlling her impulses.

If the bullying is happening at school, the school might offer counseling or refer you to someone else.

How to prevent bullying in the future

Preventing bullying is about teaching children how to get on well with others by showing empathy, respect and care for others.

The best way to do this is by being a role model for your child, and making sure that your child always sees you treating others with respect and kindness.

Building your child’s self-esteem can help. To do this, you could let your child try lots of different activities, and encourage and support him in anything he likes. It might be sports, art, music, drama or something entirely different.

As part of building your child’s self-esteem, try giving your child lots of positive attention. Children who get this kind of attention are less likely to bully. Children who feel unloved or who experience violence in their families are more likely to bully.

Discipline can help too. This means setting limits and using consequences for your child’s behavior, and reinforcing the good behavior when it happens.

And if you want your child to learn how to resolve conflicts without bullying, your child needs to see you managing your own conflicts constructively.

read more

Teaching kids responsibility

teaching kids responsibility

Teaching children responsibility

Responsibility is a broad term which means many different things, including:

  • being dependable so people know they can count on you,
  • keeping one’s word and agreements,
  • meeting one’s commitments,
  • doing something to the best of one’s ability,
  • being accountable for one’s behavior,
  • accepting credit when you do things right and acknowledging mistakes,
  • being a contributing member of one’s family, community and society.

Being responsible is a key to children’s success both in school and in the larger world when they grow up. Your ultimate aim is to give your child autonomy in more important areas, like going out unsupervised or making decisions about future study or employment.

Your teenager’s brain continues to mature into the early 20s. In particular, the decision-making part of the brain is still developing, and your child is still learning to control impulses. Teenagers, especially younger teenagers, might be less capable of understanding the consequences of their behavior.

Many people think that adolescence is always a difficult time, and that all teenagers have bad moods and behave in challenging ways. In fact, some studies show that only 5-15% of teenagers go through extreme emotional turmoil, become rebellious, or have major conflicts with their parents. Good family relationships help teenagers develop the skills they need for adulthood.

It’s normal for family life with teenagers to have its ups and downs. But if you and your partner find you’re seriously struggling at any stage, it’s a very good idea to seek help from friends and family, or speak to your doctor for advice.

Teenagers who have stable, warm, trusting and open relationships with their parents are better equipped to develop independence and grow into responsible adults. They’re also more likely to be successful at handling risky situations like smoking, alcohol and other drug use, and sexual activity.

Parents often confuse obedience with responsibility. Most parents would love their children to do what the parent asks, to follow directions and to not question their authority, which are understandable and important goals when raising children. However, this is not responsibility. These behaviors would be classified as obedience.

Over time, most parents want children to accept ownership for a task or chore – the children do it because it needs to be done and accept that it is their obligation to do it. Over time, they may even initiate doing a task “because it needs to be done” – not because they are being told to do it. This attitude would be called responsibility.

Responsibility and teenagers

During the teenage years, children’s need for responsibility and autonomy gets stronger, it’s an important part of their path to young adulthood. To become capable adults, teenagers need to learn to make good decisions on their own.

The process of helping children take responsibility and make decisions is a key task for parents. You have an important role in training and supporting your child to be ready for more responsibility. This means you need to plan when and in what areas to let your child start making decisions.

How quickly you hand over responsibility to your child is up to you. It depends on things like your own comfort level, your family and cultural traditions, and your child’s maturity.

Ideally, you and your child should both feel comfortable with the shift of responsibility and the pace of change. Too much or too soon might leave you both feeling overwhelmed. Too little or too slow might end up with your child feeling impatient or rebellious.

Achieving independence is an essential part of your child’s journey to adulthood. To make this journey successfully, children need freedom to try new things. But they still need your guidance and support too.

How to start shifting responsibility

Shifting responsibility to your child is a gradual process. It starts with letting your child make her own choices in some areas, or asking her to take on responsibility for certain things. You might not like all your child’s choices, but learning to be responsible helps your child develop skills for life.

When you’re thinking about whether to give your child more responsibility or to ask him to take on more responsibility, you have three options – yes, no and maybe.

The ‘YES’ option

This is for issues or activities that you feel your child:

  • is ready to take on – for example, walking or riding to school by herself
  • should be expected to take on – for example, cooking a family meal once a week or paying for her own clothes from her pocket money
  • should be up to your child – choosing her own hair cut or clothes.

When you put something in the ‘yes’ basket, you’re saying that you’ll accept your child’s decision, even if it’s not what you would prefer, or you’ll expect him to take on the task.

If your child handles the responsibility in a way you like, you can show your approval. If you don’t like the decision, stand back and try not to step in, unless you think your child is in danger. These are opportunities for your child to learn from experience.

The ‘NO’ option

You might say ‘no’ to decisions that relate to potentially dangerous activities.

For example, these might involve things teenagers aren’t yet legally allowed to decide for themselves, like drinking alcohol. Or they might be things that could have a negative impact on other members of the family – for example, if your child’s decision would cost a lot of money.

Making the ‘no’ option work is about good communication and setting clear limits on behaviour. For example, the way you say ‘no’ matters. Giving the impression you absolutely forbid something might not be as helpful as saying, ‘I am not going to agree to this at this stage because …’.

The ‘MAYBE’ option

This is the grey area. You and your child might be able to negotiate a way to turn a ‘no’ into a ‘yes,’ depending on the circumstances. This might involve letting your child try something new to see how it goes – for example, letting your child go to the skate park with her friends one afternoon a week.

Negotiating is where the growth happens. When you turn a ‘no’ or ‘maybe’ into a ‘yes’, your child gets the chance to show you that he’s ready for more responsibility.

Deciding when you and your child are ready to shift responsibility

Every child is different. You might need to experiment to work out when and in what areas your child is ready for more responsibility.

A good way to start is to use family meetings to give your child a real voice in important decisions. This helps your child feel valued. It’s also a good way for you to learn more about how she deals with choices.

Here are some other things to consider:

  • Level of maturity. Some teenagers are more mature than others, and their ability to act responsibly varies from situation to situation. Think about your child’s skills when deciding whether he’s ready for responsibility. For example, a teenager who asks to go to the city with friends might be allowed to go if he has been responsible when going out with friends at other times.
  • Learning from experience. Teenagers need the opportunity to work some things out for themselves. If there is no immediate danger, life can be an effective teacher too. This approach also has the benefit of giving you more time to manage and enjoy your own life. It gives your child the chance to show you how responsible she can be too.
  • Legality. With drinking, smoking and education or employment, for example, there are legal issues to think about, as well as your child’s health and wellbeing. These things need to stay in the ‘no’ category, regardless of what other teenagers do and other parents allow.
  • Level of risk. Teenagers don’t always think about long-term consequences, and they sometimes want to do things that put their safety and wellbeing at risk. You might decide that going to an all-night party involves more risk than benefit, but going to a late movie screening might be fine.
  • Impact on others. If your child’s choices are unfair or hurtful to others, you might choose to keep some control. For example, if your child chooses to play loud music late at night, you might not let him make that decision if it disturbs other members of the family. Ground rules like ‘music gets turned down after 9 pm’ also help when your child wants to make choices that affect others.
  • Your family values. Are you willing to let your child make decisions or behave in ways that clash with your values? For example, parents who believe kindness and tolerance are important probably won’t let their child behave disrespectfully towards others.
  • Looking after yourself. Parents also set boundaries to protect their own rights and needs. You might say ‘no’ if your child’s request is unreasonable or places an unfair burden on you – for example, driving children around all day, or paying for lots of expensive equipment.

Potential problems with shifting responsibility

  • Too little. If you don’t let your child have any responsibility, she has no chance to make decisions and learn through experience.
  • Too much. When responsibility comes too fast, teenagers might end up making bad decisions and undermining their confidence by doing things they’re not quite ready for. If you and your teenager aren’t sure about a new responsibility, you could use problem-solving to work out whether your child is ready for it.

When rules are broken

Staying connected to your child is the best way to ensure that rules you’ve agreed on are respected. But most teenagers will challenge the rules at some point. It’s one of the things that teenagers do as part of testing boundaries. You might want to decide and agree on consequences for when rules are broken.

When decisions go bad

Decision-making is a learning experience for your child. Not all of his decisions will be good ones. Problem-solving can help you work with your child to make better decisions and learn from mistakes.

Managing conflicts as your child gains independence

Young people are working out their own identities, and finding where they fit in the world. Your child is likely to want more control over things like socializing, behavior and appearance. As part of this process, your child might test boundaries and question people she sees as authority figures especially you.

This might look like a recipe for conflict, but it doesn’t have to be. A positive approach to managing conflict with teenagers can strengthen your relationship as well as help your child develop important skills for independence.

Problem-solving with teenagers

Everybody needs to solve problems every day. But you’re not born with the skills you need to do this, you have to develop them.

When solving problems, it’s good to be able to:

  • listen and think calmly
  • consider options and respect other people’s opinions and needs
  • find constructive solutions, and sometimes work towards compromises.

These are skills for life – they’re highly valued in both social and work situations.

When teenagers learn skills and strategies for problem-solving and sorting out conflicts by themselves, they feel better about themselves. They’re more independent and better placed to make good decisions on their own.

Problem-solving steps

When you’re working on a problem with your child, it’s a good idea to do it when everyone is calm and can think clearly – this way, your child will be more likely to want to find a solution. Arrange a time when you won’t be interrupted, and thank your child for joining in to solve the problem. Often you can solve problems by talking and compromising. Sometimes you might not be able to find a solution that makes you both happy. But by compromising, you should be able to find a solution you can both live with.

The following six steps for problem-solving are useful when you can’t find a solution. You can use them to work on most problems – both yours and your child’s. If you show your child how these work at home, he’s more likely to use them with his own problems or conflicts with others. You can use the steps when you have to sort out a conflict between people, and when your child has a problem involving a difficult choice or decision.

NOTE: Try to use these skills and steps when you have your own problems to solve or decisions to make. If your child sees you actively dealing with problems using this approach, he might be more likely to try it himself.

1. Identify the problem

The first step in problem-solving is working out exactly what the problem is. This helps make sure you and your child understand the problem in the same way. Then put it into words that make it solvable. For example:

  • ‘I noticed that the last two Saturdays when you went out, you didn’t call us to let us know where you were.’
  • ‘You’ve been using other people’s things a lot without asking first.’
  • ‘You’ve been invited to two birthday parties on the same day and you want to go to both.’
  • ‘You have two big assignments due next Wednesday.’

Focus on the issue, not on the emotion or the person. For example, try to avoid saying things like, ‘Why don’t you remember to call when you’re late? Don’t you care enough to let me know?’ Your child could feel attacked and get defensive, or feel frustrated because she doesn’t know how to fix the problem.

You can also head off defensiveness in your child by being reassuring. Perhaps say something like, ‘It’s important that you go out with your friends. We just need to find a way for you to go out and for us to feel you’re safe. I know we’ll be able to sort it out together’.

2. Think about why it’s a problem

Help your child describe what’s causing the problem and where it’s coming from. It might help to consider the answers to questions like these:

  • Why is this so important to you?
  • Why do you need this?
  • What do you think might happen?
  • What’s the worst thing that could happen?
  • What’s upsetting you?

Try to listen without arguing or debating – this is your chance to really hear what’s going on with your child. Encourage him to use statements like ‘I need … I want … I feel …’, and try using these phrases yourself. Be open about the reasons for your concerns, and try to keep blame out of this step.

3. Brainstorm possible solutions to the problem

Make a list of all the possible ways you could solve the problem. You’re looking for a range of possibilities, both sensible and not so sensible. Try to avoid judging or debating these yet.

If your child has trouble coming up with solutions, start her off with some suggestions of your own. You could set the tone by making a crazy suggestion first – funny or extreme solutions can end up sparking more helpful options. Try to come up with at least five possible solutions together.

Write down all the possibilities.

4. Evaluate the solutions to the problem

Look at the solutions in turn, talking about the positives and negatives of each one. Consider the pros before the cons – this way, no-one will feel that their suggestions are being criticized.

After making a list of the pros and cons, cross off the options where the negatives clearly outweigh the positives. Now rate each solution from 0 (not good) to 10 (very good). This will help you sort out the most promising solutions.

The solution you choose should be one that you can put into practice and that will solve the problem.

If you haven’t been able to find one that looks promising, go back to step 3 and look for some different solutions. It might help to talk to other people, like other family members, to get a fresh range of ideas.

5. Put the solution into action

Once you’ve agreed on a solution, plan exactly how it will work. It can help to do this in writing, and to include the following points:

  • Who will do what?
  • When will they do it?
  • What’s needed to put the solution into action?

You could also talk about when you’ll meet again to look at how the solution is working.

Your child might need some role-playing or coaching to feel confident with his solution. For example, if he’s going to try to resolve a fight with a friend, he might find it helpful to practise what he’s going to say with you.

6. Evaluate the outcome of your problem-solving process

Once your child has put the plan into action, you need to check how it went and help her to go through the process again if she needs to.

Remember that you’ll need to give the solution time to work, and note that not all solutions will work. Sometimes you’ll need to try more than one solution. Part of effective problem-solving is being able to adapt when things don’t go as well as expected.

Ask your child the following questions:

  • What has worked well?
  • What hasn’t worked so well?
  • What could you or we do differently to make the solution work more smoothly?

If the solution hasn’t worked, go back to step 1 of this problem-solving process and start again. Perhaps the problem wasn’t what you thought it was, or the solutions weren’t quite right.

When conflict is the problem

During adolescence, you might clash with your child more often than you did in the past. You might disagree about a range of issues, especially your child’s need to develop independence. It can be hard to let go of your authority and let your child have more say in decision-making. But she needs to do this as part of her journey towards being a responsible young adult.

You can use the same problem-solving steps to handle conflict. When you use these steps for conflict, it can reduce the likelihood of future conflict.

For example, let’s imagine that you and your child are in conflict over a party at the weekend.

You want to:

  • take and pick up your child
  • check that an adult will be supervising
  • have your child home by 11 pm.

Your child wants to:

  • go with friends
  • come home in a taxi
  • come home when she’s ready.

How do you reach an agreement that allows both of you to get some of what you want?

The problem-solving strategy described above can be used for these types of conflicts. By putting time and energy into developing your child’s problem-solving skills, you’re sending the message that you value your child’s input into decisions that affect her life. This can enhance your relationship with your child.

1. Identify the problem

Put the problem into words that make it workable. For example:

  • ‘You want to go to a party with your friends and come home in a taxi.’
  • ‘I’m worried there will be a lot of kids drinking at the party, and you don’t know whether any adults will be present.’
  • ‘When you’re out, I worry about where you are and want to know you’re OK. But we need to work out a way for you to be able to go out with your friends, and for me to feel comfortable that you’re safe.’

2. Think about why it’s a problem

Find out what’s important for your child and explain what’s important from your perspective. For example, you might ask, ‘Why don’t you want to agree on a specific time to be home?’ Then listen to your child’s point of view.

3. Brainstorm possible solutions

Be creative and aim for at least four solutions each. For example, you might suggest picking your child up, but he can suggest what time it will happen. Or your child might say, ‘How about I share a taxi home with two friends who live nearby?’

4. Evaluate the solutions

Look at the pros and cons of each solution, starting with the pros. It might be helpful to start by crossing off any solutions that aren’t acceptable to either of you. For example, you might both agree that your child taking a taxi home alone is not a good idea.

You might prefer to have some clear rules about time – for example, your child must be home by 11 pm unless otherwise negotiated.

Be prepared with a back-up plan in case something goes wrong, like if the designated driver is drunk or not ready to leave. Discuss the back-up plan with your child.

5. Put the solution into action

Once you’ve reached a compromise and have a plan of action, you need to make the terms of the agreement clear. It can help to do this in writing, including notes on who will do what, when and how.

6. Evaluate the outcome

After trying the solution, make time to ask yourselves whether it worked and whether the agreement was fair.

What is independence for teenagers?

Teenagers are still working themselves out. They don’t always know who they are. You and your child are both learning how to balance growing independence with parental guidance. It’s OK if things aren’t perfect all the time.

It’s likely that the independence your child wants and the amount of independence you want to give will change as your child goes through the teenage years. Be prepared to adjust and keep negotiating as you move together along the learning curve.

To become a capable adult, your child must learn to:

  • depend on you less and take on more responsibility
  • make decisions and solve problems
  • work out life values
  • form her own identity.

But it’s common for parents and teenagers to disagree about independence – how much a young person should have and when. It’s natural to worry that if you give your child too much independence too early, your child might get involved in risky behavior. And it’s normal to want to keep your child safe.

But your child needs to make some mistakes, to explore and have new experiences. This will help him learn life’s lessons and continue to shape his brain’s development.

So how do you strike a balance between your child’s needs and your own concerns?

A positive relationship with your child is a great start. It also helps to have open and positive communication in your family.

Raising independent teenagers

Show your child lots of love and support

Your love and support are essential for your child’s self-esteem. Young people who feel good about themselves often have more confidence to discover who they are and what they want to do with their lives.

Your child might not always want physical affection from you. But you can show your love and support by:

  • taking a genuine interest in your child’s interests, hobbies and friends
  • making time to listen when your child needs to talk
  • giving your child space and privacy
  • regularly saying, ‘I love you’.

Respect your child’s feelings and opinions

Try to tune into your child’s feelings. It might help to remember that your child could be confused and upset by the physical, social and emotional changes of adolescence. Your child needs your emotional guidance and stability during this time.

Taking your child’s opinions and ideas seriously gives an important boost to her self-esteem. Your child’s opinions might be different from yours, and more like those of her peers. This might be hard to handle, but exploring opinions and ideas is one of the ways your child works out where she fits in the world. And if you have a difference of opinion, it’s a good chance for you to talk about how people often have different perspectives and that’s OK.

Talking about your own opinions and feelings calmly can help to keep the lines of communication open, and model positive ways of relating to others.

Establish clear and fair family rules

Clear family rules about behavior, communication and socializing will help your child understand where the limits are and what you expect. Rules will also help you be consistent in how you treat your child. Once the rules are in place, apply them consistently.

Your family rules are likely to change as your child develops. As children get more mature, they can make a bigger contribution to the rules and the consequences for breaking them. Involving your child in developing rules helps him to understand the principles behind them. Every family has different rules. You can talk with your child about this and explain that his friends might have different rules, or a different number of rules.

If you set the limits too strictly, your child might not have enough room to grow and try new experiences. This period is a learning curve for both of you. Be prepared for some trial and error.

Treat your child in a way that’s appropriate for her stage

Younger teenagers might think they’re ready to make their own decisions, but they often haven’t developed the decision-making skills they need to handle significant responsibility without your help. It can be a good idea to explain to your younger child why younger and older children are given different amounts and types of responsibilities.

Help your child develop decision-making skills

When your child needs to make a decision, a problem-solving approach can help her develop independent decision-making skills. This involves:

  • finding out about different options
  • talking about the pros and cons of different actions
  • weighing up the pros and cons to make the best decision
  • brainstorming what to do if things don’t go according to plan
  • giving your child feedback on how she handles the process.

You can also include your child in family decision-making. This is another chance to boost your child’s self-esteem, and show that you value his input.

When it comes to big decisions that affect your child, try to make those decisions with your child, not for her. These might be decisions about school, further study, staying out late and so on.

Provide safe opportunities for your child to exercise independence

Activities that are safe and supported, but that give your child freedom and time away from you, can help your child:

  • learn new skills and test new abilities
  • take positive risks
  • foster a sense of belonging
  • build resilience.

For example, there might be a youth group or sports club in your area that your child would like to be involved in. When your child is old enough, a part-time job is a great way for him to develop independence.

Independence in children with additional needs

If you have a child with additional needs, your child’s growing independence might seem like an extra challenge. For these teenagers, reaching full independence might take a bit longer than for other children. Achieving independence can be harder if children have spent many years being dependent on others, being cared for and having decisions made for them. But encouraging your child to become gradually more independent is good for both of you.

For children with chronic health needs, there’ll come a time when you’ll begin to share responsibilities with your child, like responsibility for managing medications. Knowing when and how to do this can be challenging. If you’re trying to work out whether your child is ready to take on some of these responsibilities, consider whether your child can:

  • solve problems
  • make planned decisions, rather than impulsive ones
  • understand the possible consequences of actions
  • recognize when advice or guidance is needed – and accept it
  • care about and plan for the future.

For younger children, it’s important to explain these issues clearly. This is better than saying, ‘You’re too young to look after things by yourself’.

You, your child and the health professionals managing your child’s care will all be involved in deciding when and how your child will begin to independently manage health decisions. Speak to a health professional about any concerns you might have.

Staying connected with your teenage child

As teenagers become more independent, they often spend more time away from home. It’s natural for teenagers to explore relationships with friends and other people outside their families. It might also feel like your teenage child is less interested in talking to you. But your child still needs a strong relationship with you to feel safe and secure as she meets the challenges of adolescence.

Staying connected with your teenage child is about building closeness in your relationship by being available and responsive to your child. It’s more than just spending time around each other – after all, family members can sometimes share the same physical space without really connecting.

Connecting can be casual, which involves using frequent everyday interactions to build closeness. Or connecting can be planned – this is when you schedule time to do things together that you both enjoy.

If you stay connected with your child, you’ll be in a good position to pick up on any problems that your child might be having. Your child is also more likely to come to you with problems.

Casual connecting with your child

Casual connecting is a way of using everyday interactions to build closeness and positive relationships. The best opportunities for casual connecting are when your child starts a conversation with you – this generally means he’s in the mood to talk.

Tips for casual connecting:

  • Stop what you’re doing and focus on the moment. Even for just a few seconds, give your child your full attention. Connecting works best when you send the message that right now, your child is the most important thing to you. When you stop what you’re doing and really listen to your child, you’re telling her that she’s important, respected and worth your time.
  • Look at your child while she’s talking to you. Really listen to what she’s saying. This sends the message that what she has to say is important to you.
  • Show interest. Encourage your child to expand on what he’s saying, and explore his views, opinions, feelings, expectations or plans.
  • Listen without judging or correcting. Your aim is to be with your child, not to give advice or help unless she asks for it.
  • Just be there – for example, you might be in the kitchen when your child is in his bedroom. Teenagers benefit just from knowing that you’re available.

You can also actively try to create opportunities for casual connecting, but don’t push it if your child doesn’t want to talk. Trying to force a conversation can lead to conflict and leave the two of you worse off.

Planned connecting with your child

Planned connecting involves scheduling time to do things with your child that you both enjoy. Busy lives and more time apart can make it difficult to spend fun time together. That’s why you need to plan it. Teenagers aren’t always enthusiastic about spending time with their parents, but it’s worth insisting that they do – at least sometimes.

Tips for planned connecting:

  • Schedule time together. You need to find a time that suits you both. Initially, it can help to keep the time short.
  • Let your child choose what you’ll do, and follow his lead. This will motivate him to want to spend time with you.
  • Concentrate on enjoying your child’s company. Try to be an enthusiastic partner and actively cooperate with what your child is doing – the activity itself is less important than shared fun and talking with your child.
  • Be interested and accepting, rather than correcting your child or giving advice. It’s not easy to give up the teaching and coaching role, but this is a time for building and improving your relationship. So if you see a mistake or an easier way to do something, let it go without comment.
  • Keep trying and stay positive. At first, your child might not be as keen as you to take part in these activities, but don’t give up. Keep planned times brief to begin with, and your child will come to enjoy this time with you.

Overcoming obstacles to connecting

Your child avoids spending time with you

Making the most of everyday opportunities to connect – like chatting while you’re driving – can help you get over this hurdle. If your child is reluctant to spend scheduled time with you, you could try the following:

  • Keep it brief to begin with – try a cup of coffee at a favorite café after school, for example.
  • Let your child choose the activity – even if you do have to sit through a teenage romantic comedy or action movie!
  • Don’t give up – it might take a little while but the more time you spend together, the more you can both relax into it.

Your child refuses to talk with you about what she’s doing

You and your child might feel closer if you make the most of casual conversations during the day. Every little chat is an opportunity to listen and talk in a relaxed, positive way.

You feel you’re the only one who’s making an effort

If you’re kind and considerate with your child, this can help create goodwill and positive feelings. Often, simple things make a big difference – for example, saying please, giving hugs, pats on the back, knocking before entering a bedroom, cooking a favorite meal, providing treats or surprise fun activities.

This approach creates a more positive environment, even if your child isn’t joining in. Make a point of doing kind things, even when you don’t feel like it. If you wait to feel positive before you act positively, you might never do it.

And when you feel like you’re the one doing all the work, try to remember that this phase will usually pass.

Parenting teenagers

Now that your child is a teenager, the demands on your time and energy are different from when your child was younger. In the early years, you needed to feed, bath and comfort your little one. Now she’s older and looking after herself more and more. But your child still needs your practical help and active involvement. For example, your child might be involved in a wide range of social and extracurricular activities so you need to take him from one thing to another. At the same time, you might be working more hours or involved in other activities yourself.

Along with practical demands on your time there might be some new emotional challenges. For example, the onset of puberty can bring feelings of insecurity for your child and worry for you. You might also feel concerned about your child’s social and emotional changes and friendship choices. And then there are the emotional ups and downs of adolescence.

So parenting teenagers can sometimes be hard work, which means that it’s just as important to take good care of yourself now as it was when your child was younger. Looking after your physical and mental wellbeing can help you stay calm and consistent, and deal better with any stress and conflict that come up.

Keeping your relationship strong while parenting teenagers

For parents with partners, keeping your relationship strong is important. Nurturing your relationship with your partner helps you to be the best you can be as a parenting team. When you’re parenting teenagers, it’s important to make sure you’re meeting your own needs, as well as the needs of your family. A healthy parent is an effective one!

Here are some suggestions from parents about keeping partner relationships strong while parenting teenagers:

  • Talk together about your feelings and experiences as the parents of a teenage child, making sure to really listen to what each other is saying.
  • Show affection, admiration and appreciation for your partner.
  • Spend time talking with your partner – something as simple as making time to discuss your day with each other can be a good idea.
  • Find time for just for the two of you each week. This could be doing all kinds of things – playing sport, going for an after-dinner walk together, having a regular coffee date, playing cards or games, or whatever you enjoy as a couple.
  • Make time for fun experiences as a couple. For example, if your child is old enough, he might be able to spend the weekend at a friend’s house or with grandparents while you have a mini-break.
  • Spend time together at home. For example, you could make a date to have a special dinner, watch a favourite movie or put on your favourite music while your child is in her room or has a friend visiting.
  • Staying positive and keeping things in perspective might help you get through some of the ups and downs of parenting teenagers. If you’re having a bad day, or a fight with your child, you could try asking yourself, ‘Do we really need to fight about this? Can I let this one go?’. When you let go of the small issues, you save your energy for more important issues like your child’s health, safety and wellbeing.
  • Positive self-talk can also help you feel less stressed and happier. For example, if your child offers to help someone out, you might say to yourself, ‘Nice – I’m glad I’ve taught my child to think about others like that’. It’s time to congratulate yourself on all the good work you’ve done to get your child to this stage.
  • Family rituals can build family togetherness and wellbeing. They can help you all feel positive about your family relationships. And rituals help teenagers feel loved and part of the family. No matter how bored they might seem, teenagers find rituals comforting. Examples might include a regular Sunday night dinner, regular family outings or religious ceremonies.
  • Physical activity is important for many parts of your life, and 30 minutes a day is what you need to stay physically and mentally healthy. It could just be a half-hour walk or an exercise class, but if you’ve got more time as your child gets older, you could think about the sports you used to play, or ask friends if they want to play tennis or go for a bike ride. If you’re looking for something new, you could try relaxing activities like yoga, meditation, mindfulness, muscle relaxation or deep breathing exercises.

Conflict management with teenagers

As your child is older, you might find you clash with your child more often than you did in the past. It’s normal for you to disagree, but it’s also important to find ways of dealing with conflict. For example, you might disagree about things like what your child wears, what he does with his time, or whether he follows your cultural traditions. And when you use conflict management strategies yourself, you can help your child learn these important life skills too.

Some conflict is normal and healthy, as your child becomes an independent and responsible young adult. Also, you and your child are individuals with different opinions and views, so you can expect to disagree sometimes. But too much conflict isn’t a good thing, so you need conflict management strategies and skills.

Dealing with conflict with your child can help to reduce family stress levels. It can also make your relationship with your child stronger. And if you deal with conflict in effective ways, you help your child learn some important life skills.

Conflict can often be about small things. So even if you dislike your child’s dyed hair, think about whether it’s really worth arguing about. You might want to save your energy for important things like safety.

Getting ready to deal with conflict

These tips can help you get ready to deal with conflict with your child:

  • Try to think back to your feelings and experiences as a young person. This can help you relate to your child.
  • Remember that teenage brain development means your child might not be able to see the risks and consequences of a situation. Your child might not be able to see things from your perspective either.
  • Try to be flexible about little issues. This might mean your child is more willing to listen and discuss bigger issues.
  • Go easy on yourself and don’t expect to be perfect – you’re human too. If you overreact or lose your self-control a bit, just say sorry and start again when you can.
  • Avoid dealing with conflict when you and your child are feeling upset or angry. Wait until you feel calm instead.
  • Prepare what you’re going to say, and think about the words you want to use.
  • Try to make sure that not every conversation with your child is about difficult issues. Spend some time enjoying each other’s company if you can.

Tips for talking through conflict

  • Stay calm, stop what you’re doing, make eye contact, listen, and treat your child with respect.
  • Let your child have her say. Be open to hearing your child’s point of view. When she has finished, you can talk.
  • Be open about your feelings. This can help your child understand why you want him to do or not do something. For example, ‘I feel worried about your safety when I don’t know where you are’, or ‘I feel that it’s important for our family to celebrate some of our cultural traditions’.
  • Explain your view simply and briefly, making it clear that your main concern is for your child’s wellbeing, now and in the future. For example, ‘I need to make sure you’re safe if you’re out at night. It helps if you tell me where you’re going and who you’re with’.
  • If you can, be prepared to negotiate with your child and compromise. When you compromise, you demonstrate problem-solving skills. For example, your child might want to paint her bedroom black, and you hate the idea. A compromise might be painting one wall black or two walls in a dark color.
  • If you have to say ‘no’, try to do it in a calm, understanding and respectful way. For example, ‘I understand that you want a tattoo. But you’re 13 and you’ve got a lot of time to think about it. So right now, the answer is no’.

Dealing with conflict aftermath

Despite your best efforts, it might take a while for you and your child to calm down after a conflict. Also, your child might feel really disappointed if you’ve said no to something. These tips can help you both feel better and move forward.

  • Help your child to calm down by showing your understanding, letting him express his disappointment, or giving him space if he needs it.
  • Look after yourself – talking to someone you trust can help you feel better about the situation.

When your child avoids conflict

Your child might try to avoid conflict by doing things ‘behind your back’ or lying to you.

If you want an open and honest relationship where you and your child can talk about tough topics, you need to be ready to manage your own feelings and reactions when you hear something you don’t like. It can help to plan for difficult conversations about things like broken curfews, alcohol and other drug use, cyberbullying and so on.

Handling anger in conflict management

As part of conflict management with teenagers, you might need to be ready to deal with anger from your child.

It might help to know that teenagers are still learning how to express feelings and views. Your child might feel she needs to express her views very strongly for them to be heard. Teenagers are also learning how to handle strong feelings.

If your child gets angry or uses an angry tone with you, here are some things that can help:

  • Stay calm.
  • Take a break to let things calm down, if staying calm is hard.
  • Let your child know you’re listening.
  • Show your child that you care about his thoughts and feelings.
  • Try to stick to the issue you’re in conflict about, rather than getting onto past events or other issues.

After you’ve heard what your child has to say and you’ve shown understanding, you can try these steps:

  • Take your time to express your feelings, thoughts and wishes as best you can.
  • Keep it simple and short – this can encourage your child to listen.
  • Try to negotiate a decision that you can both live with, or at least try to be clear about why you can’t agree.

If your child is angry at you about something you did that hurt her, show that you understand how it affected her, say you’re sorry, and then try to ensure the same thing doesn’t happen again.

If you feel angry, take some time to pin down what the feeling is about – even if you’re in the middle of a conversation with your child. You might even need to take a break so you can work out how you’re going to deal with your feelings. This isn’t always easy and takes practice, so be kind to yourself and your child as you learn better ways of dealing with conflict.

Handling violence

There is a difference between conflict and violence. Conflict, disagreement and some anger are OK – but violence is NOT okay.

Teenagers are still learning about what’s OK and what isn’t. They might still be learning where the line is between conflict and violence – for example, in fights with siblings. You can help with this.

But if your child is damaging property, yelling or swearing excessively, hitting or making threats to harm something or someone, you need to set clear boundaries. It’s important to show him that he has crossed the line and his behavior isn’t acceptable.

If your child is showing early signs of violent behavior, it can help to:

  • give her a clear message that the behavior is not OK
  • tell her that you won’t speak with her while she’s in that state
  • let her know that you’re willing to talk to her and work things out together when she has calmed down
  • let her know that that there will be consequences for the behavior
  • make sure your own behavior is respectful, and that you’re managing your own emotions and modelling self-control.

If your child has experienced violence from another adult or child, he might need professional help to feel safe, to deal with what he has experienced, and to learn new ways to behave. If you find it hard to control your own anger or violence, you might also find professional help useful. A school counselor, family relationships counselor or your doctor might be good places to start.

Negotiating with teenagers

Negotiating with your child is about trying to find common ground and a win-win solution. It can be hard to let go of your authority and let your teenage child have more say in decision-making. But your child needs to do this as part of her journey towards becoming an independent, responsible young adult. If you use effective negotiation techniques, negotiating can help your child learn to think through what he wants and needs and then communicate this in a reasonable way. It also helps him understand other viewpoints, make good decisions, follow through with those decisions, and learn from the consequences of his decisions.

Before a negotiation

Sometimes you might know that a negotiation is coming. For example, your child might have been talking about a party her friends are going to. In this situation, you can get ready. You could discuss the issue beforehand with your partner or a friend, or write down what you want to say.

But sometimes you might not be ready for the negotiation, or you might need time to think about what you will and won’t compromise on. For example, your child might say, ‘I want to go to the movies on Saturday night’. Or if your child is older or more assertive, your child might say, ‘I’m going to the movies tonight’.

If this happens, it’s OK to set a time to talk later. But make sure it’s soon. This will help your child trust that you’ll keep your word. It also tells him that coming to a compromise is important to you.

NOTE: When you’re using these negotiation techniques with your child, if there are two parents in the family, it helps to support each other’s views and show a ‘united’ front. This gives you a stronger position and keeps the negotiation simpler. You might need to negotiate with each other to come to a joint decision first.

Negotiation techniques to use with your child

Successful negotiating with teenagers has a lot to do with the negotiation techniques you use. Here are some negotiation techniques to use with your child.

Talking and listening during a negotiation

  • Use a calm, warm and firm voice to set the tone. The idea is to avoid getting into a conflict with your child. For example, you could say, ‘Let’s talk about this’.
  • Actively listen to your child’s views first without interrupting. For example, ‘So you’re saying that you really want to dye your hair pink for the dress-up party, even though it will stay that color for a long time. You also know that it might wreck your hair a bit’.
  • Express your views, and ask your child to tell you more about hers. For example, ‘I want you to have fun and see your friends, but I also need to know where you’ll be and that you’ll be safe. So tell me more about the bike ride’.
  • Take a break if things get tense. For example, ‘I need some time out, so let’s work this out after dinner’.

Reaching a decision you can both accept

  • Be clear about what is and isn’t negotiable. Understanding your child’s personality and maturity will help you decide on this. The level of trust you have in your child based on past events is also important. For example, ‘I don’t want you to travel home from the cinema on your own. How about I pick you up?’
  • Think of a range of options. For example, ‘I don’t want you to paint your room black because it makes the house feel too dark. Is there another color you’d be happy with, or perhaps you could just paint one wall black? Do you have any other ideas?’
  • Show that you’re willing to compromise and that you want to agree on something that you can both accept. For example, ‘I know you want to keep checking social media, but I’m concerned about you getting your homework done and getting enough sleep. How much social media time do you think is OK after you allow time for homework and sleep?’
  • Be firm about your non-negotiables. For example, ‘It doesn’t matter what other people are doing. I’ll pick you up after the movie finishes’.

When you’ve reached a decision: next steps

  • Clearly state the decision that you and your child have agreed on. For example, ‘OK. You can go to the party with your friends. I’ll pick you up at 11 pm’. Your child might be unhappy with the decision. Give him time to accept it without trying to convince him of its benefits.
  • Discuss and agree on the consequences if the agreement is broken. For example, ‘We’ve agreed that you can paint one wall in your room black. We’ve also agreed that if you paint any more than that, you’ll have to buy the white paint yourself and paint the walls white again. OK?’
  • End on a positive note even if the negotiation wasn’t perfect. For example, ‘Thanks for talking that through with me. I appreciate that we were able to work things out in the end. It shows me that you’re a mature person’.

Using your authority when negotiating

As your child develops, using your authority and influence in a respectful and positive way will help keep your relationship strong and open. As your child moves into older adolescence, it’s still important to use your authority to protect your child’s safety and wellbeing. For example, it’s OK for you to stand firm on knowing where your child is going, when she’ll be coming home and when she needs to call you about changes to arrangements.

You might find that your child is challenging your authority more as he gets older. For example, he might say, ‘I am going to do that and you can’t stop me’. The way you respond might depend on your child’s age.

For example, if your child is 12 years old, you might say, ‘I’m still your parent and I make the decisions, but I want to help you get what you want too. Let’s talk more and try to work it out’.

But if your child is 16 years old, you might say, ‘I want to support you in doing what you want, but I’m still responsible for your safety. So I need to know where you’re going and who you’re with. Can we talk more about this to see if we can find a solution we’re both happy with?’

Your own style of parenting can also influence how you negotiate with your child.

read more

When can baby go in pool

when can baby go in pool

When can baby go in pool?

Babies can go into water or a swimming pool from birth. However, they can’t regulate their temperature like adults, so it’s very important to make sure your baby doesn’t get too cold. And never leave your baby unattended near water. Babies can drown in just 5 cm of water. Babies can also pick up an infection from water. Therefore, it’s generally best to wait until your baby is around 2 months old before you take them swimming. Baby swimming lessons usually start at around 6 months of age. If your baby is younger than 6 months, make sure the pool is heated to about 89.6 °F (32° C). A large public pool would be too cold for a baby under 6 months.

Newborn babies can’t swim – they have to learn, just like they learn to walk. But most babies do enjoy being in water and their reflexes mean they will be able to do primitive swimming strokes. You don’t have to wait until your baby is immunized to take them swimming. Always remain within arm’s reach of any child who can’t swim well.

New mothers should not go swimming until at least 6 weeks after the birth, or when they have stopped bleeding.

Water and pool safety

To stay safe around water, your child needs close and and constant adult supervision. It’s also vital to teach your child about water hazards as well as how to swim.

Water safety for kids:

It’s important to always stay with your child and watch him whenever he’s near water, even when he can swim.

Supervision means constant visual contact with your child and keeping her within arm’s reach at all times. You should be in a position to respond quickly, whether you’re at the beach or the swimming pool, near dams, rivers and lakes, or at home near the bath or spa. Hold your child’s hand when you’re near waves or paddling in rivers.

Supervision is not an occasional glance while you nap, read or do household chores. It’s not watching your children playing outside while you’re inside. It’s always best for an adult, not an older child, to supervise.

You should also teach your child about water safety and how to swim. Many children can learn to swim by the time they’re four or five.

First aid is an essential skill for the entire family to learn. If you know how to do CPR and what to do in an emergency, it could save your child’s life.

Water safety around the house

The majority of drowning deaths in the United States result from a child falling or wandering into the water, particularly into a backyard pool. But a young child can drown in as little as 5 cm of water.

Here are some tips to prevent drowning and improve water safety around your house:

  • All pools and spas must be fenced. Remove any objects from your yard that could be used to climb over the swimming pool fence.
  • Remove any containers with water in them from around the house and make sure your child can’t get to any bodies of water, including the bath, on his own.
  • Use a nappy bucket with a tight-fitting lid and keep the bucket closed, off the floor and out of your child’s reach.
  • Always empty the baby bath as soon as you’re finished with it so older siblings can’t climb in.
  • Empty sinks, tubs, buckets, baths and paddling pools when you’re finished with them.
  • Secure covers to ponds and birdbaths and cover other water features with wire mesh, or keep them empty until your child is at least five years old.
  • Keep aquariums and fishbowls out of reach of small children. If you have an inflatable pool that can hold more than 30 cm of water, pool fencing laws apply.

Water safety around dams, creeks, ponds and tanks

Children don’t always understand, apply or remember rules, especially when they’re distracted by play. So a securely fenced, safe play area can be an effective barrier between small children and water hazards.

A secure play area can prevent your child from wandering near dams, creeks or other bodies of water, and gaining access to hazards like farm machinery, horses and farm vehicles. A ‘safe play’ area, plus family rules and supervision, is the most effective way to prevent serious injury and death to small children on rural properties.

Here are tips to improve water safety around your property:

  • Fence off the area between the house and any bodies of water.
  • Teach your child to not go near the dam, creek or water tank without you.
  • Secure a toddler-proof lid over any water tanks.
  • Fence off, drain or seal ponds if your child or visiting children are less than five years old.
  • Make sure there are no trellises, ladders, windows or trees that your child could climb to get into the water tank.

Water safety around beaches, lakes and rivers

Here are tips to improve water safety near the ocean, lakes or rivers:

  • Always stay with your child when she’s playing in or near the sea, lakes or rivers. Hold your toddler’s hand near waves and when she’s paddling in rivers.
  • Take your child only to patrolled beaches where surf lifesavers are present, and swim only between the red and yellow flags.
  • Teach your school-age child what to do if he needs help – stay calm, float and raise an arm to signal to a lifeguard or lifesaver.

Where can my baby swim?

It’s best to get your baby used to the water at home in the bath. You don’t have to put them under the water – just let them get to enjoy floating (while you hold them) and the feel of the water on their skin.

From about 2 months you can take them into a heated pool, but don’t keep them in the water for more than 10 minutes at first. If they start to shiver, take them out and wrap them in a towel. Babies under 12 months shouldn’t stay in a pool for more than 30 minutes.

It’s OK to take your baby into a river, lake or the ocean from 2 months, but it’s very important to make sure they don’t get cold. Choose a spot where the water is warm and clean. Watch out for currents that prevent you from holding them properly. And don’t let your baby drink the water.

Young children should not go into hot spas. Spas are only suitable for children over 16.

Swimming lessons

Baby swim classes are designed to get your baby used to the water, help them learn swimming strokes, and to teach them safety and how to survive in the water. Usually swim lessons involve a small group of parents and babies who learn through fun activities and play. You can find swimming classes in your area by asking at your local pool.

According to the American Academy of Pediatrics, a couple of small studies have found that swimming lessons for children ages 1 to 4 may lower the risk of drowning. But swimming lessons aren’t a reliable way to protect your child and they aren’t recommended for children younger than 1. There’s simply no substitute for adult supervision when it comes to pool safety.

And some kids may not be developmentally ready for swim lessons until they are at least 4 years old. Whether swimming lessons are right for your child depends on how often she’s around water and her physical abilities.

If you decide to enroll your child in a swimming class, find a program that follows the national YMCA guidelines for swim instruction. Among other things, these guidelines advise instructors not to submerge young children and encourage parents to participate in lessons.

And as soon as you start bringing your child to the pool or lake, begin teaching simple water safety rules including:

  • Don’t go near water without an adult, and use the buddy system in the water.
  • Never dunk another child.
  • Don’t run on the pool deck or boat dock.
  • Always jump in feet first.

Even children who aren’t talking yet are able to understand a lot more than they can say. Teaching water safety early makes sure your child is familiar with the basics of water safety as she gets older and learns to swim.

Water and pool safety precautions

There are lots of risks for babies and young children around water. Babies can drown in just 5 cm of water. To keep them safe, never, ever leave young children unattended near water. It is a good idea to learn resuscitation for babies before you take them swimming. You can learn this by doing a first aid course.

If you have a pool or spa it is important to make sure they are fenced.

It is also important to be careful when using floatation devices such as rubber rings – they can make the baby tip over so that their head goes underwater.

Babies can get ill from bacteria or viruses in water that hasn’t been treated properly. Try not to let them swallow any water, use swim nappies, and don’t take them swimming if they have diarrhea.

To keep your child safe in the pool or at a lake, you may want to wait until your baby can hold up her head on her own (usually by 4 or 5 months) before taking her swimming in a pool or lake. When your child is old enough to go into the water with you, follow these steps for staying safe:

  • Be prepared and take an infant/child CPR course.
  • Any time you’re near water, have your child wear a personal flotation device that fits properly and is approved by the U.S Coast Guard. Don’t rely on inflatable toys (like water wings) to keep your child safe in the water.
  • Don’t dunk a baby underwater. Although infants may naturally hold their breath, they’re just as likely to swallow water. That’s why babies are more susceptible to the bacteria and viruses in pool water and lakes that can cause gastroenteritis and diarrhea.
  • Before you decide to swim at a public pool or lake, make sure it has lifeguards on duty, is equipped with rescue equipment in good condition, and has a readily accessible phone for emergencies. Take your cell phone along with you too.
  • If you’re swimming in your home pool, bring your phone outside so you won’t be tempted to run into the house to answer a call.
  • At home, remove toys from the water and deck of your pool so they don’t entice your child to play in or around the pool when you’re not looking.
  • If you have a permanent pool, make sure it’s completely enclosed with a fence that’s at least 4 feet high. It should also have a self-closing, self-latching gate that opens away from pool. Always lock the gate after each use, and make sure there’s nothing your child can climb on to get over the pool’s fence.
  • For home pools and spas, make sure the drain has an anti-entrapment cover or other drain safety system, such as an automatic pump shut off. Pool drains have been named one of the top five hidden home hazards by the U.S. Consumer Product Safety Commission. The suction from a pool drain can be strong enough to hold even an adult underwater, pulling on the hair or on the body and forming a seal. Missing or faulty covers often cause the problem, and an upgrade may save a life.
  • Drain inflatable or plastic wading pools after each use, and store in an upright position.

Swimming pool water and illness

Most swimming pools are clean. But sometimes, particularly if a pool is very busy or hasn’t been properly treated with pool chemicals, germs can multiply.

Germs in swimming pools can cause illnesses like infections of the ear, eye, skin and chest, as well as gastroenteritis. Also, strong chemicals in pool water can sometimes cause eye and skin irritations.

Germs can get into pool water through:

  • skin, sweat, urine, poop, saliva and open sores
  • dirt, food and other solids that end up in the pool.

This can happen quite easily. For example, if you’ve had diarrhea, germs can still be on your skin even if you’ve cleaned your bottom and hands really well. So if you get into a swimming pool, germs can go from your skin into the water.

Also, babies or non-toilet trained children are very likely to poo in the water when they’re swimming. If they’ve had runny poo, germs from their poo can get in the water, even if they’re wearing a swimming nappy. Or if you change a sick child’s nappy near a swimming pool, germs from the nappy can get into the water even if the child doesn’t.

Swimming pool hygiene, keeping pools clean and safe

Here are some simple tips to help keep swimming pools fun and safe for everyone.

For all swimmers

  • Don’t get in the pool if you have diarrhea, or have just gotten over diarrhea.
  • Try not to get water in your mouth, and don’t swallow pool water.
  • Wash your hands with soap and water after using the toilet or changing a nappy.
  • Shower before you get in the pool and when you get out.

For parents of young children

  • Make sure your child has a clean bottom before your child gets into the pool.
  • Use well-fitted swimming nappies to help stop poo from getting into the water, but note that these nappies aren’t leak proof. They can delay but not stop the germs getting into the water.
  • Change swimming nappies regularly to stop nappy contents getting into the water.
  • Keep nappy changes away from the pool area. With lots of water splashing about, it’s easy for germs to end up in the pool.
  • For toilet-trained children, try to prevent toilet accidents in the pool by making sure your child has regular toilet visits.

If a public pool has been properly treated with pool chemicals, most germs in the pool will be killed.

But when a public pool is very busy – for example, on a hot summer day – germs can get into even the cleanest pool. More people mean more germs and more dirt in the water.

If you want to know how clean and safe a pool is to use when it’s busy, ask the pool staff about the latest pH measurement. They should be able to explain it to you.

If there’s a poo accident in a public pool, get out and let the pool staff know straight away. If you or your child gets sick after using a public pool, contact the pool staff so they can monitor potential disease outbreaks.

Keeping home swimming and wading pools clean

Because home wading pools are mostly used by babies and young children, they’re most likely to have germs that come from poo. Also wading pool water isn’t usually treated with pool chemicals.

You can reduce the risk of your young child getting sick from using a wading pool by:

  • trying to keep pool water out of your child’s mouth – young children are more likely to swallow pool water than other swimmers
  • always emptying the wading pool at home once you’ve finished using it. Leaving water in the wading pool is a drowning risk as well as a germ risk.

Home swimming pools need regular treatment and monitoring to keep them clean and safe for swimming. You can start by:

  • using pool chemicals strictly according to manufacturer’s instructions
  • testing the water’s pH and chlorine levels regularly
  • checking that the water is clear and that you can see the bottom of the pool.

If there’s a poop accident in your pool, get everyone out straight away. If it’s a wading pool, empty the water out and scrub the pool with disinfectant. Rinse the pool and then dry it in the sun for at least four hours before using it again. If it’s a swimming pool, follow the cleaning and treatment instructions that come with your pool chemicals.

You can get advice about swimming pool hygiene from pool chemical suppliers or pool maintenance companies, as well as the Environmental Health Officer.

Swimming clothes for babies

Before you take your baby swimming, you will need:

  • swim nappies (take some spare)
  • a towel
  • change mat
  • nappy bag
  • a snack or bottle for afterwards

If you are swimming outside, make sure your baby is protected from the sun with clothing that blocks out ultraviolet light.

Drowning and drowning prevention

Drowning can occur quickly and quietly, without any warning noises.

Drowning is one of the major causes of death for children under five years. Babies and toddlers are top-heavy, which puts them at higher risk of drowning. If a baby falls into even shallow water, she can’t always lift herself out.

In United States, children under five drown in:

  • swimming pools
  • baths and spa baths
  • rivers, creeks and streams
  • beaches
  • dams, lagoons and lakes.

Children also drown in less obvious locations, like nappy buckets, water tanks, water features and fish ponds – even pets’ water bowls.

For every drowning, approximately seven other children are hospitalized from non-fatal drowning incidents. Some of these result in severe brain damage.

read more