Uncategorized

Potty training

potty training

Toilet training

The best time to begin toilet training or potty training is when your child is ready to learn. All children learn to use the potty or toilet at a different stage in their life. Using a potty is a new skill for your child to learn. Most children start to show an interest in moving on to a potty or toilet at about two years old. Trying to toilet train too early or getting impatient with the process, can cause your child to become stressed, and may lead to them avoiding going to the toilet. The key is to stay positive and calm, and wait for signs that your child is ready. It’s best to take it slowly and go at your child’s pace. Being patient with them will help them get it right, even if you sometimes feel frustrated.

Children are able to control their bladder and bowels when they’re physically ready and when they want to be dry and clean. Every child is different, so it’s best not to compare your child with others.

Most children are ready to start toilet training from around 2 or 3 years of age, although night time training often takes much longer. By that time, most children are feeling confident and comfortable enough for successful toilet training – but not all are.

Children need to go at their own pace, not that set by parents or day care centers. Your child’s behavior is often a better guide than their age.

Instead of using age, look for signs that your child may be ready to start heading for the potty. You can try to work out when your child is ready. There are a number of signs that your child is starting to develop bladder control:

  • they follow simple instructions
  • they know when they’ve got a wet or dirty nappy
  • they get to know when they’re peeing and may tell you they’re doing it
  • they keep a diaper dry for 2 hours or more
  • the gap between wetting is at least an hour (if it’s less, potty training may fail, and at the very least will be extremely hard work for you)
  • they show they need to pee by fidgeting or going somewhere quiet or hidden
  • they know when they need to urinate and may say so in advance
  • they understand and use words about using the potty
  • they make the connection between the urge to pee or poop and using the potty
  • they get to the potty, sit on it for enough time, and then get off the potty
  • they pull down diapers, disposable training pants, or underpants
  • they show an interest in using the potty or wearing underpants

Most children begin to show these signs when they’re between 18 and 24 months old, though some may not be ready until later than that. And boys often start later and take longer to learn to use the potty than girls.

Toilet training requires patience. Girls are usually trained faster than boys, but not always.

Bear in mind that most children can control their bowels before their bladder.

  • by age 1, most babies have stopped doing poop at night
  • by age 2, some children will be dry during the day, but this is still quite early
  • by age 3, 9 out of 10 children are dry most days – even then, all children have the odd accident, especially when they’re excited, upset or absorbed in something else
  • by age 4, most children are reliably dry during the day

It usually takes a little longer for children to learn to stay dry throughout the night. Although most learn this between the ages of 3 and 5, up to 1 in 5 children aged 5 sometimes wet the bed.

Even when trained, many children still don’t have full night time bladder control until about 5 years of age, or in some cases, several years later.

Often, children are 3-4 years old before they’re dry at night. One in 5 five-year-olds and 1 in 10 six-year-olds still uses nappies overnight. And bedwetting is very common in school-age children. If your child wets the bed, there are things you can do about it when you and your child are ready.

During the day, children often get caught up in what they are doing and forget to take potty breaks. Expect accidents, and don’t punish or shame your child for them. Toilet training works best when there is no pressure.

potty training tips

When to see a doctor

It’s worth keeping an eye out for possible health problems connected with toilet training. Signs to look for include:

  • a big increase or decrease in the number of poops or urine
  • poops that are very hard to pass
  • unformed or very watery poops
  • blood in the poop or urine (sometimes appears as cloudy urine)
  • pain when your child goes to the toilet.

If you feel there might be a problem or you’re worried about how your child is adapting to toilet training, check with your doctor.

What is toilet training?

Toilet training helps children:

  • recognize the need to go to the toilet
  • control the need to go to the toilet
  • communicate the need to go to the toilet
  • complete the toilet sequence as far as they are able.

The goal of toilet training is for a child who is able to:

  • pull their underwear down
  • get onto the toilet
  • sit on the toilet
  • have a pee/poop
  • wipe themselves
  • get off the toilet
  • pull their underwear up
  • flush toilet
  • wash and dry hands.

How long does toilet training take?

Teaching a toddler to use the potty isn’t an overnight task. It often takes between 3 and 6 months, but can take more or less time for some children. If you start too soon, the process tends to take longer. And it can take months to even years to master staying dry at night.

Why is my child taking a long time to learn to use the toilet?

If your child takes a long time to learn to use the toilet:

  • Try to get clothes that are easy to wear, change, and wash.
  • Items such as large size nappies, waterproof mattress covers, and covers for duvets and pillows may be available from the continence service, when your child is three or four– ask your health care provider. If not, you can get them from larger chemists.
  • If your child is older, it is often you as their parents who understand their needs, and you may be able to devise your own strategies.
  • Do not despair. Try to speak with other parents for support, advice and tips.

Common toilet training problems

Many kids who’ve been using the potty have some trouble during times of stress. For example, a 2- or 3-year-old dealing with a new sibling may start having accidents.

But if your child was potty-trained and is regularly having problems, talk with your doctor.

Talk to your doctor if you have any questions about toilet training or your child is 4 years or older and is not yet potty trained.

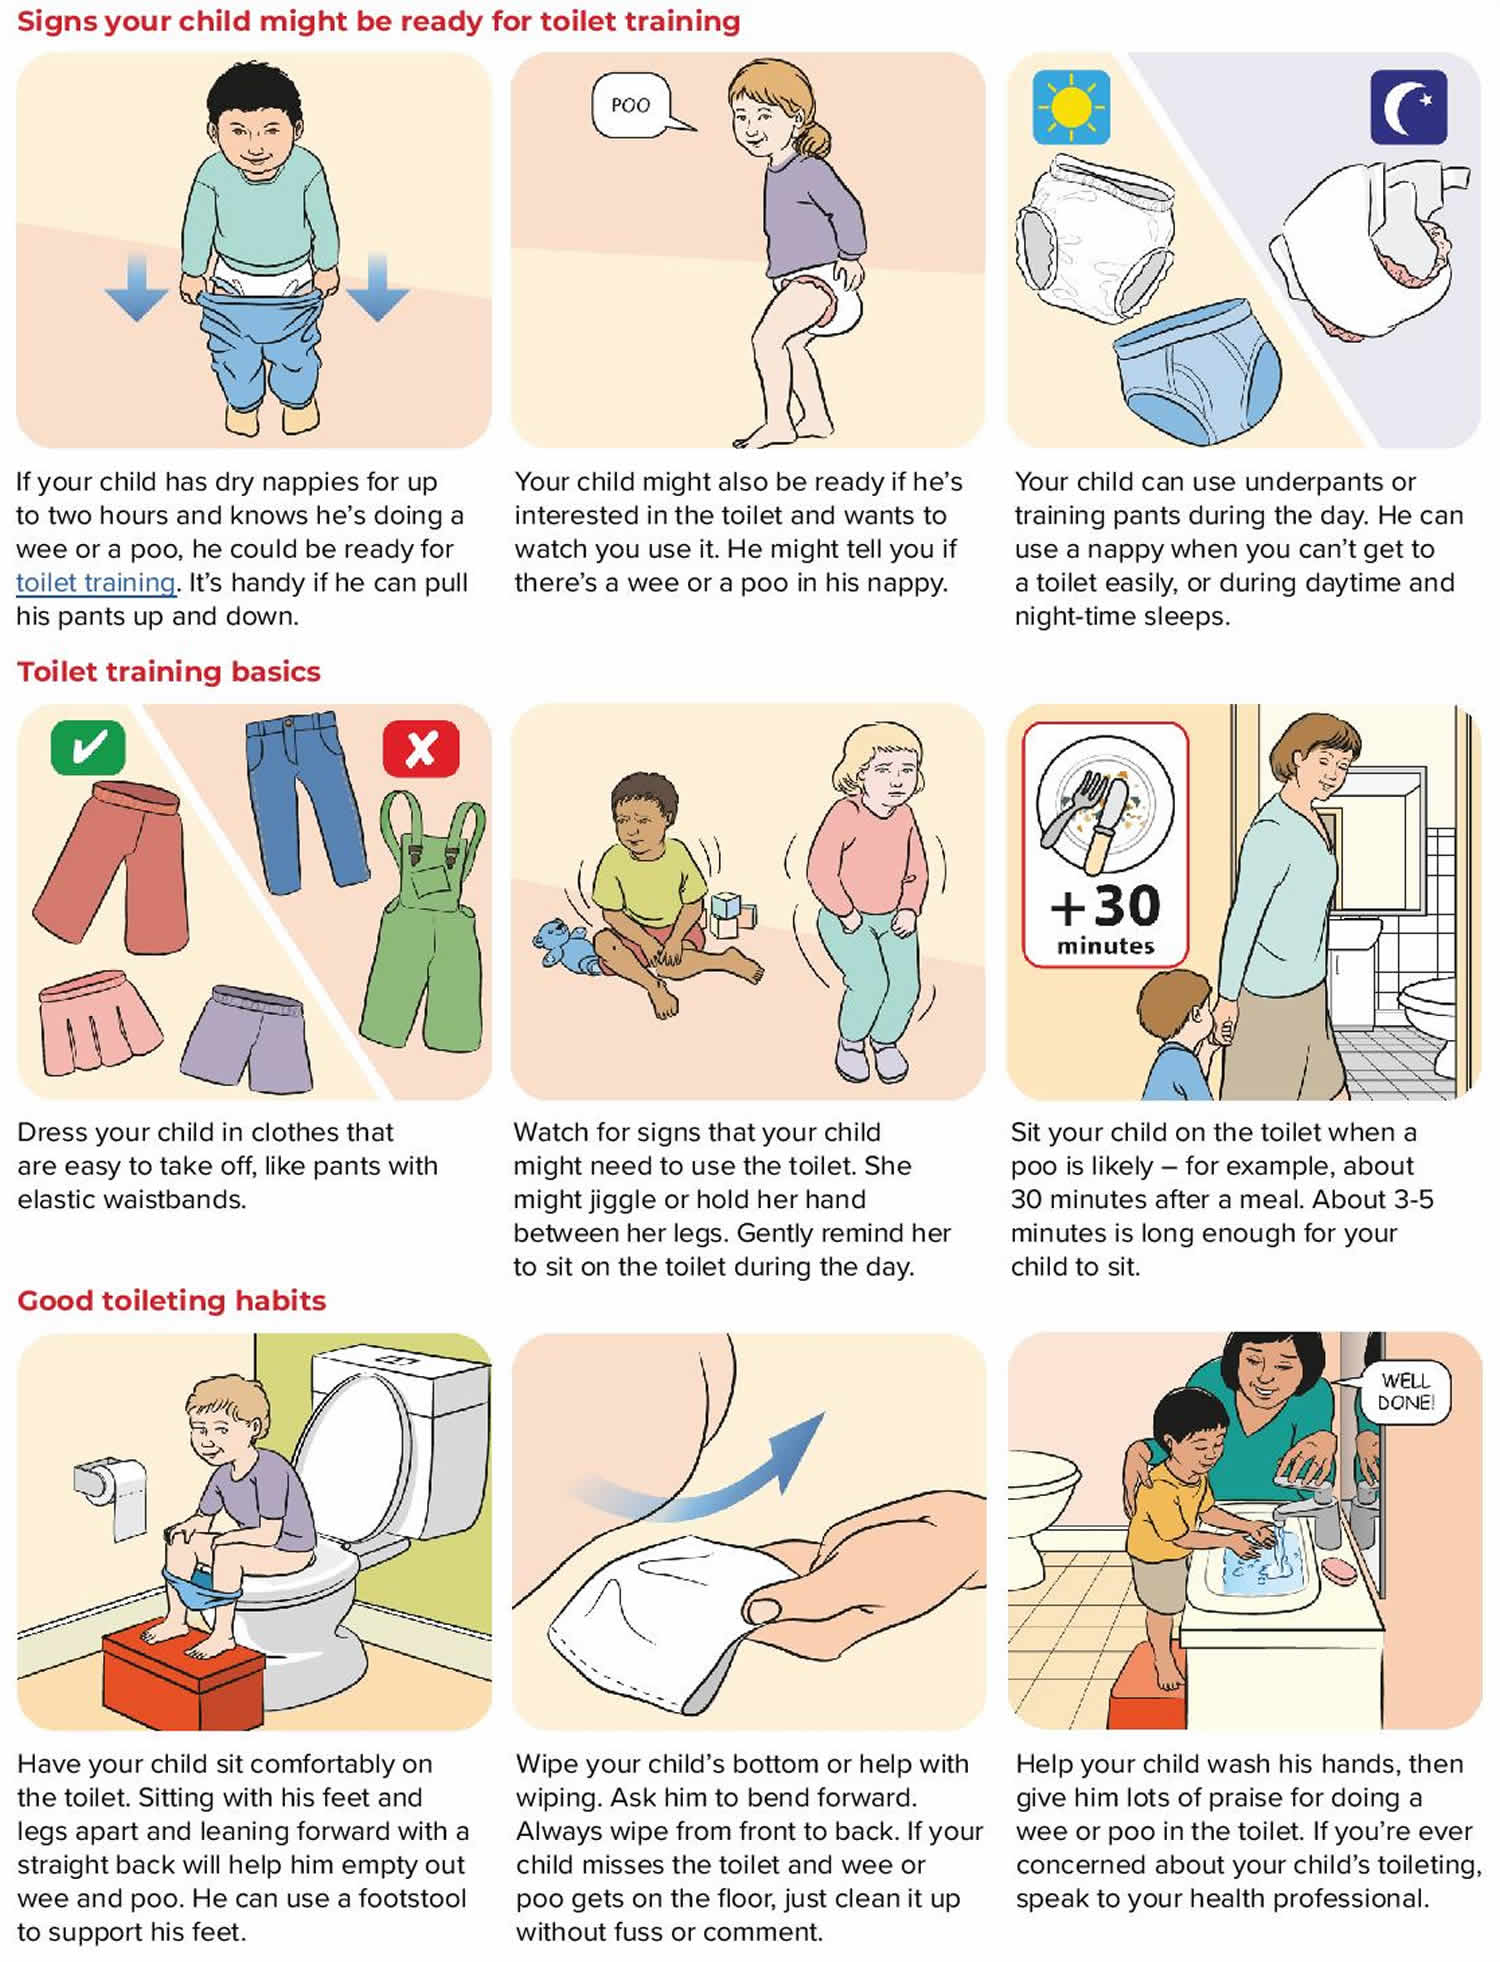
Signs that your child is ready for potty training

You might see signs that your child is ready for toilet training from about two years on. Some children show signs of being ready as early as 18 months, and some might be older than two years.

Your child is showing signs of being ready for potty training if they:

  • are walking and can sit for short periods of time
  • are becoming generally more independent when it comes to completing tasks, including saying ‘no’ more often
  • are becoming interested in watching others go to the toilet – this can make you uncomfortable, but it’s a good way to introduce things
  • have dry nappies for up to two hours at a time – this shows they can store urine in their bladder (which automatically empties in younger babies or newborns)
  • tell you with words or gestures when they have done a poop or urinate in their nappy – if they can tell you (either with words or facial expressions) before it happens, they’re ready for toilet training
  • begin to dislike wearing a nappy, perhaps trying to pull it off when it’s wet or soiled
  • want their nappy changed when it is wet or dirty
  • have regular, soft, well-formed bowel movements
  • can pull their pants up and down
  • can get to the potty on their own
  • can follow simple instructions like ‘Give the ball to daddy’
  • show understanding about things having their place around the home.

Not all these signs need to be present when your child is ready. A general trend will let you know it’s time to start.

What if my child does not show these signs?

If your child’s condition means that s/he is not showing any of these signs you should discuss it with one of the professionals involved with your child’s care. This could be your family doctor, community nurse, occupational therapist or pediatrician. You will need support from the professionals who deal with your child on a day to day basis and it is important to work together on ways of addressing the issue.

When to start potty training

Look for signs that your child is ready to use the potty or toilet (see above the signs that your child is ready for potty training). Remember, you cannot force your child to use a potty. If they’re not ready, you will not be able to make them use it. In time, they will want to use one – most children will not want to go to school in nappies any more than you would want them to. In the meantime, the best thing you can do is to encourage the behavior you want.

Most parents start thinking about potty training when their child is between 2 and 2 and a half, but there’s no perfect time. Some people find it easier to start in the summer, when there are fewer clothes to take off and washed clothes dry more quickly.

Try potty training when there are no great disruptions or changes to your child’s or your family’s routine. It’s important to stay consistent, so you do not confuse your child.

If you go out, take the potty with you, so your child understands that you’d like them to urinate or poop in the potty every time they need to go. Check that any other people who look after your child can help with potty training in the same way as you.

Potty training is usually fastest if your child is at the last stage before you start the training. If you start earlier, be prepared for a lot of accidents as your child learns.

They also need to be able to sit on the potty and get up from it when they’re done, and follow your instructions.

Getting ready for potty training

If you think your child is showing signs of being ready for toilet training, the first step is to decide whether you want to train using a potty or the toilet.

  • There are some advantages to using a potty – it’s mobile and it’s familiar, and some children find it less scary than a toilet. Try to find out your child’s preference and go with that. Some parents encourage their child to use both the toilet and potty.
  • Second, make sure you have all the right equipment. For example, if your child is using the toilet you’ll need a step for your child to stand on. You’ll also need a smaller seat that fits securely inside the existing toilet seat, because some children get uneasy about falling in.
  • Third, it’s best to plan toilet training for a time when you don’t have any big changes coming up in your family life. Changes might include going on holiday, starting day care, having a new baby or moving house. It can be a good idea to plan toilet training for well before or after these changes.

Also, toilet training might go better if you and your child have a regular daily routine. This way, the new activity of using the toilet or potty can be slotted into your normal routine.

Here are some tips for getting ready:

  • Teach your child some words for going to the toilet – for example, ‘pee’, ‘poop’ and ‘I need to go’.
  • When you change your child’s nappy, put wet and dirty nappies in the potty – this can help your child understand what the potty is for.
  • Let your child try sitting on the potty or the small toilet seat to get familiar with the new equipment.
  • Let your child watch you or other trusted family members using the toilet, and talk about what you’re doing.
  • Once or twice a day you might want to start putting trainer pants on your child. This helps your child understand the feeling of wetness.
  • Make sure your child is eating plenty of fiber and drinking lots of water so your child doesn’t get constipated. Constipation can make toilet training harder.

Using a potty will be new to your child, so get them used to the idea gradually. Talk about your child’s nappy changes as you do them, so they understand urine and poop and what a wet nappy means. If you always change their nappy in the bathroom when you’re at home, they will learn that’s the place where people go to the toilet. Helping you flush the toilet and wash their hands is also a good idea.

Leave a potty where your child can see it and explain what it’s for. Children learn by watching and copying. If you’ve got an older child, your younger child may see them using it, which will be a great help. It helps to let your child see you using the toilet and explain what you’re doing. Using your child’s toys to show what the potty is for can also help.

You could see if your child is happy to sit on the potty for a moment, just to get used to it, when you’re changing their nappy, especially when you’re getting them dressed for the day or ready for bed at night.

Once you start, toilet training might take days, weeks or months. The key is to not push your child, and let your child learn at their own pace. Your child will get the hang of it in time. And if your child doesn’t cooperate or seem interested in toilet training right now, just wait until they want to try again.

Potty types

The two basic potty options are:

  1. a standalone, toddler-size potty chair with a bowl that can be emptied into the toilet
  2. a toddler-size seat that can be placed on top of a toilet seat that will let your child feel more secure and not fear falling in. If you choose this, get a stepping stool so your child can reach the seat comfortably and feel supported while having a bowel movement.

It’s usually best for boys to first learn to use the toilet sitting down before learning to pee standing up. For boys who feel awkward — or scared — about standing on a stool to pee in the toilet, a potty chair may be a better option.

You may want to get a training potty or seat for every bathroom in your house. You may even want to keep a potty in the trunk of your car for emergencies. When traveling long distances, be sure to take a potty seat with you and stop every 1 to 2 hours. Otherwise, it can take too long to find a restroom.

Training pants

Disposable training pants are a helpful step between diapers and underwear. Because kids’ nighttime bladder and bowel control often lags behind their daytime control, some parents like using training pants at night. Others prefer that their child use training pants when they’re out and about. Once the training pants remain dry for a few days, kids can make the switch to wearing underwear.

But some people think that disposable training pants might make kids think it’s OK to use them like diapers, thus slowing the toilet-teaching process.

Ask your doctor if your child would benefit from using disposable training pants as a transitional step.

Before starting

Choose a time when you can spend a lot of time with your child, when your child seems happy and there are no major distractions or stressful events like starting nursery, moving house, moving from a cot to a bed. Make sure the time you choose fits in with you as well – perhaps at a time when there is someone else to help you if this is possible.

It may take some time for your child to learn, so make sure that toilet training can be carried out in the other places your child visits such as the playgroup, nursery, or school.

Tips before starting:

  • Look at the times your child is most likely to use the toilet, for example after meals, when she/he wakes up from a sleep. It is worth making a chart for a few weeks to establish any patterns. The chart can be very simple where you note the times when the child urinate or poops
  • Plan a routine you can stick to, until it becomes established
  • Make sure the potty or toilet is comfortable for your child and your child can sit on it without any fear of falling off. Your child should be able to place his/her feet flat on the floor or foot step
  • There are various toilet seats and steps available from retail outlets. It is worth looking at the range and deciding what would be good for your child
  • If your child has difficulty in sitting, an occupational therapist should be able to help with equipment and check whether the toilet needs to be adapted so it is more comfortable for your child
  • Make sure you change your child in the toilet so that they get used to the toilet as a place where urination and poop happens
  • Try and make the bathroom as welcoming as possible. You could put stickers on the walls to make it an exciting place to be.

How to start potty training

It’s a good idea to start toilet training on a day when you have no plans to leave the house. Keep the potty in the bathroom. If that’s upstairs, keep another potty downstairs so your child can reach the potty easily wherever they are. The idea is to make sitting on the potty part of everyday life for your child.

Encourage your child to sit on the potty after meals, because digesting food often leads to an urge to do a poop. Having a book to look at or toys to play with can help your child sit still on the potty.

If your child regularly does a poop at the same time each day, leave their nappy off and suggest that they go in the potty. If your child is even the slightest bit upset by the idea, just put the nappy back on and leave it a few more weeks before trying again.

Encouraging them to use the potty to pee will help build their confidence for when they are ready to use it to poop.

As soon as you see that your child knows when they’re going to pee, encourage them to use their potty. If your child slips up, just mop it up and wait for next time. It takes a while for them to get the hang of it.

If you do not make a fuss when they have an accident, they will not feel anxious and worried, and are more likely to be successful the next time. Put them in clothes that are easy to change and avoid tights and clothes with zips or lots of buttons.

Your child will be delighted when they succeed. A little praise from you will help a lot. It can be quite tricky to get the balance right between giving praise and making a big deal out of it. Do not give sweets as a reward, but you could try using a sticker chart.

TIPS: Try to stay calm if toilet training seems to take longer than you expect. Stay positive about your child’s achievements, because your child will get there eventually. Too much tension or stress can lead to negative feelings and might result in your child avoiding going to the toilet.

Timing

  • Sit your child on the potty at times when pooping often happen, like 30 minutes after eating or after having a bath. This doesn’t work for all children – true toilet training begins when your child is aware of doing a pee or poop and is interested in learning the process.
  • Look out for signs that your child needs to go to the toilet. Cues include changes in posture, passing wind, going quiet or moving to a different room by themselves.
  • If your child doesn’t do a pee or poop after 3-5 minutes of sitting on the potty or toilet, take your child off. It’s best not to make your child sit on the toilet for long periods of time, because this will feel like punishment.

There are some times when you may want to put off starting toilet training, such as:

  • when traveling
  • around the birth of a sibling
  • changing from the crib to the bed
  • moving to a new house
  • when your child is sick (especially if diarrhea is a factor)

Encouraging and reminding your child

  • Praise your child for trying (even if progress is slow), especially when they’re successful. You could say, ‘Well done for sitting on the potty’. This lets your child know they’re doing a good job. Gradually reduce the amount of praise as your child masters each part of the process.
  • At different stages throughout the day (but not too often), ask your child if they need to go to the toilet. Gentle reminders are enough – it’s best if your child doesn’t feel pressured.
  • If your child misses the toilet, try not to get frustrated. Children don’t usually have accidents on purpose, so just clean up without any comments or fuss.

Pants and clothing

  • Stop using nappies (except at night and during daytime sleeps). Start using underpants or training pants all the time. You can even let your child choose some underpants, which can be an exciting step.
  • Dress your child in clothes that are easy to take off – for example, trousers with elastic waistbands, rather than full body suits. In warmer weather, you might like to leave your child in underpants when you’re at home.

Hygiene

  • Wipe your child’s bottom until your child learns how. Remember to wipe from the front to the back, particularly with girls.
  • Teach your son to shake his penis after a pee to get rid of any drops. Early in toilet training it sometimes helps to float a ping pong ball in the toilet for your son to aim at. Or he might prefer to sit to do a pee, which can be less messy.
  • Teach your child how to wash hands after using the toilet. This can be a fun activity that your child enjoys as part of the routine.

Potty training pants and pull-ups

Your child is more likely to understand toilet use if they’re no longer wearing a nappy. Disposable or washable potty training pants also called pull-ups can be handy when you start potty training and can give children confidence when it’s time to swap nappies for “grown-up” pants. They do not soak up urine as well as disposable nappies, so your child will find it easier to tell when they are wet.

Pull-ups are very popular and are marketed as helpful for toilet training. It isn’t clear that they actually help. But you can try them to help your child get used to wearing underwear.

Training pants are absorbent underwear worn during toilet training. They’re less absorbent than nappies but are useful for holding in bigger messes like accidental poop. Training pants should be a step towards normal pants, rather than a replacement for nappies. Encourage your child to keep their training pants dry by using the potty. Once your child is wearing training pants, dress your child in clothes that are easy to take off quickly.

Generally, cloth training pants are less absorbent than pull-ups and can feel a little less like a nappy. Pull-ups might be handier when you’re going out.

Wearing training pants is a big move for your child. If you celebrate it, the transition will be easier. Talk about how grown-up your child is and how proud you are.

If your child is not ready to stop wearing nappies and it’s hard for them to know when they’ve done a pee, you can put a piece of folded kitchen paper inside their nappy. It will stay wet and should help your child learn that urinating makes you feel wet.

Out and about while toilet training

It’s easier to stay home for a few days when you start toilet training, but you’ll probably have to go out at some stage.

Wherever you’re going, it’s a good idea to check where the nearest toilet is. If you’re going to a local shopping center, ask your child if they need to go when you get there. This can help get your child familiar with the new area.

It’s best to take a spare change of underpants and clothes for your child when you’re out, until your child is very confident about using the toilet. It’s also a good idea to carry plastic bags for wet or soiled clothes.

If your child goes to a child care service or to friends’ or relatives’ houses without you, let people know that your child is toilet training. This way they can help your child use the toilet or potty in the way that you do at home.

Night-time potty training

Focus on getting your child potty trained during the day before you start leaving their nappy off at night. If your child’s nappy is dry or only slightly damp when your child wakes for a few mornings in a row, they may be ready for night-time potty training.

Ask your child to use the potty last thing before they go to bed and make sure it’s close by, so they can use it if they need to pee in the night. There are bound to be a few accidents, so a waterproof sheet to protect your child’s mattress is a good idea.

Just like daytime potty training, it’s important to praise your child for success. If things are not going well, stick with nappies at night for a while longer and try again in a few weeks’ time.

Using the toilet instead of the potty

Some children start using the toilet instead of the potty earlier than others. A child’s trainer seat that clips onto the toilet can help make your child feel safer and more confident on the toilet. A step for your child to rest their feet on gets your child in a good position for doing a poop.

If you have a boy, encourage them to sit down to urinate. If they also need a poop, sitting down will encourage them to go.

Once you start toilet training

Be patient don’t expect instant results.

  • Do not restrict fluid intake – plenty of drinks should be given so that the need to go to the toilet becomes familiar.
  • Ensure your child has a healthy diet with plenty of fiber for example brown bread, fruit, wholegrain – to help their bowel movements to be soft and easy to pass.
  • Take your child to the toilet at the times you expect they may need to go – refer to the chart you have made.
  • Avoid taking your child toilet frequently. If they have just used the toilet, they will not need to visit for at least one hour.
  • Keep to the planned routine as much as you can.
  • Do not show any signs of concern – it will make your child feel anxious.

Remember there are several steps in the whole process and each one needs to be reached – they may not all happen at once.

  • If your child is reluctant to sit still, you could sing some songs or read a book with them just for a few minutes to get your child used to sitting on the potty or toilet. Never keep your child on the potty or toilet for more than five minutes.
  • If your child is older and too big for a potty and still not showing interest in using the toilet then make sure they visit the toilet area regularly. You may need to put a favorite book, picture or toy next to the toilet or play a favorite piece of music to encourage them to come into the room.
  • Make sure all toileting needs occur in the toilet or bathroom so that your child associates the changing of nappies/pants with the toilet area.
  • Praise your child first for showing an interest in the potty or toilet, then for using the potty – every small step should be rewarded with praise or stickers.
  • Make sure your child sees you washing your hands after wiping them so it becomes part of the process of using the toilet.
  • Let your child get used to the routine of washing his/her hands after being on the potty or toilet.

Setbacks and accidents while toilet training

Learning to do pees and poops in the toilet takes time. You can expect accidents and setbacks – these are all just part of the process.

If your child gets upset because of an accident, reassure your child that it doesn’t matter and there’s no need to worry.

Here are ideas to help avoid accidents:

  • Pay attention if your child says they need the toilet straight away. They might be right!
  • If you’re sure your child hasn’t done a poo or pee in a while, remind your child that they might need to go. Your child might be so caught up in what they’re doing that they don’t realise they need to go until it’s too late.
  • Check if your child wants to go to the toilet during a long playtime or before an outing. If they don’t want to go, that’s fine.
  • Try to make sure the potty or toilet is always easy to get to and use.
  • Ask your child to pee just before going to bed.

How to toilet train your child

Dress your child in clothes that are easy to get off and on.

Start by putting a potty chair in your child’s play area. Put your child on the potty seat when they give a signal that they need to go to the toilet. If you are using the toilet, buy a toddler toilet seat with a smaller hole that fits inside the big toilet seat. Put a step there so they can climb up by themselves and rest their feet while they are sitting. Boys can pee standing up or sitting.

Notice when your child is about to urinate or poop. Guide them to the potty or toilet. Stay calm and relaxed. Sit with your child and read to them while they sit on the potty (5 minutes is long enough). Praise and hug your child for sitting quietly and trying to use the potty or toilet, even when they are not successful.

When they have finished, wipe your child’s bottom. Teach girls to wipe from front to back.

When they have used the potty or toilet on their own a few times, you can allow your child to pick out their ‘big boy’ or ‘big girl’ underwear. Make sure you take your child’s potty chair with you when traveling, for consistency.

Potty training with a child with disability

Some children with a long-term illness or disability find it more difficult to learn to use a potty or toilet. This can be challenging for them and for you, but it’s important not to avoid potty training for too long. It is important to speak to a doctor to check for physical problems if your child is having difficulty in learning to use the toilet.

Most children start to show an interest in moving on to a potty or toilet at about two years old. If your child has a physical or learning disability they may not be ready to start until they are older. They may need longer to learn to use the potty or toilet.

Some children, particularly those with profound and multiple difficulties may not be able to use the toilet on their own, but will need to have a toileting program which will ensure their needs are treated with respect. Ask your doctor or community nurse for advice.

All children are different and the way they learn to use the toilet may be linked with the specific condition they have. It is a good idea to get in touch with the relevant support groups to get advice from people who have more experience.

Smearing

Some children with learning disabilities smear their feces after going to the toilet. There can be various reasons for this. It could be a child has simply not understood the process of wiping with toilet paper properly. Others enjoy the feel of the texture of the feces and providing them with an alternative activity such as play dough can resolve the situation. Some will use it as a way of getting attention, or because they have learnt they are rewarded for such behavior by being given a nice warm bath. Children can also behave in this way because they are extremely upset and agitated.

If your child smears:

  • try to stay calm
  • avoid giving them lots of attention as a result of their behavior
  • reinforce good behavior by giving them lots of praise when they carry out other activities well
  • try to see if there is a pattern to their behavior, as it might help you understand why they are doing it
  • seek advice from a professional such as a nurse, doctor, occupational therapist or psychologist on dealing with it
  • set a period of time to try any strategies and if nothing happens, wait for a while before starting again.
read more

Caffeine in pregnancy

caffeine in pregnancy

Is caffeine safe during pregnancy?

Caffeine is a widely consumed stimulant, which can be consumed in several forms (e.g. coffee, energy drinks, etc.), is one of the most commonly used psychoactive substance worldwide 1). Recent data from nationally representative samples indicate about 89% of American adults consume caffeinated products daily with virtually no difference between men and women in how frequently the products are used 2). Caffeine is a naturally occurring alkaloid substance found in numerous plant species with coffee beans, tea leaves, cocoa beans, and kola nuts are the primary natural sources of this compound 3). Caffeine is added to numerous foods and beverages (e.g., soft drinks and energy drinks). Chocolate and cocoa 4) are also sources of caffeine, as are certain dietary supplements 5) and medications 6).

Maternal caffeine intake has repeatedly been linked to babies being born small for gestational age (SGA) 7). Moderate prenatal caffeine exposure (< 200 mg/day) does not seem to impair neonatal health, although prenatal caffeine exposure is associated with the child being born small for gestational age (SGA) and small for gestational age (SGA) is strongly associated with impaired neonatal health 8). However, no significant associations between maternal caffeine intake and neonatal health were found. Evidence from rodent studies demonstrated that in utero caffeine exposure triggered cardiometabolic defects on both the immediate offspring and subsequent generations. Further studies are needed regarding caffeine’s long-term effects and multigenerational influence in humans 9). High levels of caffeine in pregnancy can result in babies having a low birthweight, which can increase the risk of health problems in later life. Too much caffeine can also cause a miscarriage. So, if you’re pregnant, limit the amount of caffeine you have to 200 milligrams (mg) a day. This is about the same as 2 mugs of instant coffee.

The amount of caffeine found in some foods and drinks is as follows:

  • 1 mug of instant coffee: 100mg
  • 1 mug of filter coffee: 140mg
  • 1 mug of tea: 75mg
  • 1 can of cola: 40mg
  • 1 can (250ml) of energy drink: up to 80mg – larger cans may contain up to 160mg
  • 1 bar (50g) of plain chocolate: most products on the UK market contain less than 25mg
  • 1 bar (50g) of milk chocolate: most products on the UK market contain less than 10mg

In a day, you will almost reach your 200mg caffeine limit if you have:

  • 2 mugs of tea and 1 can of cola
  • 1 mug of instant coffee and 1 can (250ml) of energy drink

Reducing your caffeine intake

  • Try water, fruit juice, or decaffeinated tea or coffee. Limit the amount of energy drinks you have, as they can be high in caffeine.
  • If you occasionally exceed the recommended limit, don’t worry. The risks are quite small.
  • Always talk to your doctor before taking any medicines in pregnancy, including cold and flu remedies.

What is the relationship between usual caffeine consumption and pregnancy outcomes?

There is a consistent evidence from observational studies indicating that caffeine intake in pregnant women is not associated with risk of preterm delivery. Higher caffeine intake (especially >=300 mg/day ) is associated with a small increased risk of miscarriage, stillbirth, low birth weight, and small for gestational age births. However, these data should be interpreted cautiously due to potential recall bias in the case-control studies and confounding by smoking and pregnancy signal symptoms.

Regular use of large amounts of caffeine have been associated with reduced fertility in both women and men 10). A meta-analysis of studies involving approximately 50,000 pregnant women in total suggested a slightly elevated rate of spontaneous abortion amongst women who drank more than 150 mg of caffeine per day during pregnancy 11). Stefanidou 12) reported a dose-response relationship between caffeine ingestion and recurrent miscarriage. After controlling for confounders, the odds ratio for recurrent miscarriage increased with increased daily caffeine intake in the periconceptional period and in early gestation. A prospective Danish study found a slight elevated rate of stillbirth amongst pregnant women who had consumed more than eight cups of coffee a day 13). A follow-up study by the same authors demonstrated that women who drank more than eight cups of coffee per day were at increased risk of a fetal death 14).

Key Findings

Consumption of caffeine from various sources was associated with a significantly increased risk of spontaneous abortion and low birth weight 15). Control for confounders such as maternal age, smoking, and ethanol use was not possible.

Two studies assessed observational studies on the association of caffeine intake with adverse pregnancy outcomes 16), 17). The pregnancy outcomes included miscarriage, pre-term birth, stillbirth, small for gestational age and low birth-weight. The most recent study by Greenwood et al. 18) quantified the association between caffeine intake and adverse pregnancy outcomes from 60 publications from 53 separate cohort and case-control studies. The evidence covered a variety of countries with caffeine intake categories that ranged from non-consumers to those consuming >1,000mg/day. They found that an increment of 100 mg caffeine was associated with a 14% increased risk of miscarriage, 19% increased risk of stillbirth, 10% increased risk of SGA, and 7% increased risk of low birth weight. There was no significant increase in risk of preterm delivery. The magnitude of these associations was relatively small within the range of caffeine intakes of the majority women in the study populations, and the associations became more pronounced at higher range (>=300 mg/day). The authors also note the substantial heterogeneity observed in the meta-analyses shows that interpretation of the results should be cautious. In addition, the results from prospective cohort studies and case-control studies were mixed together. Since coffee consumption is positively correlated with smoking, residual confounding by smoking may have biased the results toward a positive direction 19).

The other studies did not cover all of the above pregnancy outcomes, but for those adverse outcomes covered, the results were in agreement with Greenwood et al., Maslova 20) reviewed 22 studies (15 cohort and 7 case-control studies) and found no significant association between caffeine intake and risk of pre-term birth in either case-control or cohort studies. For all of the observational studies assessed across the three studies, most studies did not adequately adjust for the pregnancy signal phenomenon, i.e. that nausea, vomiting, and other adverse symptoms are associated with a healthy pregnancy that results in a live birth, whereas pregnancy signal symptoms occur less frequently when the result is miscarriage. Coffee consumption decreases with increasing pregnancy signal symptoms, typically during the early weeks of pregnancy, and this confounds the association. Greenwood et al. 21) state that this potential bias is the most prominent argument against a causal role for caffeine in adverse pregnancy outcomes. Only one randomized controlled trial of caffeine/coffee reduction during pregnancy has been conducted to date. The study found that a reduction of 200 mg of caffeine intake per day did not significantly influence birth weight or length of gestation. The trial did not examine other outcomes.

A number of studies have demonstrated an increased rate of cryptorchidism, anal atresia and cleft lip/palate amongst infants whose mothers consumed caffeine during pregnancy; however, these studies were limited by retrospective exposure assessment, small sample size and failure to adjust for other potential confounders including maternal smoking and alcohol consumption 22). A study by Schmidt 23) identified an association between infant neural tube defect (NTD) risk and polymorphisms in a fetal and maternal gene involved in caffeine metabolism. The authors suggested that risk of neural tube defects may be increased in genetically susceptible individuals with caffeine consumption.

The data relating to the effects of caffeine on fetal growth in utero are mixed. Numerous studies 24), 25), 26) have suggested a link between intrauterine growth restriction (IUGR) or low infant birth weight and caffeine consumption in pregnancy. A meta-analysis from 1998, which included approximately 50,000 pregnant women, suggested a slightly increased risk of having a baby with intrauterine growth restriction (IUGR), if the mother had consumed more than 150 mg of caffeine per day 27). More recent studies have also found a positive correlation between caffeine intake and low birth weight 28) found reduced infant birth weight with maternal daily caffeine intake of more than 540 mg, whilst Sengpiel 29) reported that maternal caffeine intake of more than 200 mg to 300 mg/day increased the odds for having a small for gestational age infant. Other studies have suggested that effects of maternal caffeine consumption on birth weight are restricted to male offspring only 30), or to infants of women who are rapid caffeine metabolizers 31). However, a review of the literature in 2000 demonstrated no evidence of an effect of even moderate to high caffeine consumption on in utero growth 32) and another concluded that low infant birth weight cannot be clearly attributed to caffeine and cannot be separated from effects of other exposures such as maternal smoking and alcohol consumption 33).

Regular coffee consumption during pregnancy has recently been associated with childhood acute leukemia in the offspring in a single study, with the risk increasing linearly with daily intake 34).

A New Zealand study 35) reported that the babies of women who consumed greater than 400 mg of caffeine per day during pregnancy were 1.65 times more likely to die of sudden infant death syndrome than the babies of women who consumed less caffeine. The New Zealand study 36) also found that infants born to women who consumed high quantities of caffeine whilst pregnant were more likely to experience sleep apnea (difficulty breathing during sleep).

Summary

There is insufficient robust scientific evidence on which to provide a specific recommendation regarding the amount of caffeine that can be consumed during pregnancy without causing harm to the fetus. The data regarding caffeine consumption during pregnancy are contradictory. An association between caffeine intake and increased miscarriage risk, and possibly fetal demise has been reported but remains unproven. Similarly, various structural anomalies have been reported following caffeine exposure in utero but a causal association or consistent embryopathy has not been demonstrated.

Maternal caffeine consumption of less than 150 mg caffeine a day in pregnancy does not appear to affect fetal growth, and although an adverse effect on birth weight has been reported at higher doses by some, these data are inconsistent with respect to identifying a threshold dose for this effect. Single studies have suggested a possible association with childhood acute leukemia and hyperactivity, but these findings remain to be confirmed.

Pregnant women who consume more than 200 mg of caffeine daily (about two cups of brewed coffee) should reduce their caffeine consumption whilst pregnant. Health professionals advise individuals to reduce their caffeine consumption gradually, for example by replacing one caffeinated drink with a non-caffeinated alternative each day, in order to avoid withdrawal symptoms. Decaffeinated varieties are an option which contains little or no caffeine.

Energy drinks are not recommended during pregnancy as they may contain high levels of caffeine, and other ingredients not recommended for pregnant women.

What is Caffeine ?

Caffeine (1,3,7-trimethylxanthine) is an adenosine and benzodiazepine receptor antagonist, phosphodiesterase inhibitor, and central nervous system stimulant 37), 38). Caffeine is a pharmacologically active component of many foods, beverages, dietary supplements, and drugs; it is also used to treat very ill newborns afflicted with apnea (temporary cessation of breathing) 39). Caffeine occurs naturally in some plant leaves, seeds, and fruits, where it serves as an herbicide, insect repellant, and even attractant for pollination 40). This botanically sourced compound is the most commonly consumed stimulant worldwide 41). Caffeine enters the human food chain through plant-derived foods such as coffee beans, tea leaves, guarana, cocoa beans, and kola nuts 42). In healthy adults, a caffeine intake of ≤400 mg/day is considered safe; acute clinical toxicity begins at 1 g, and 5 to 10 g can be lethal 43).

Caffeine is the world’s most popular drug, and coffee is possibly the second most valuable product after oil. The common dietary sources of caffeine are coffee, chocolate, tea, and some soft drinks. The amount of caffeine in food products varies, depending on the serving size, the type of product and the preparation method 44). Up to 90% of Americans of all ages consume some caffeine daily with more than 50% consuming coffee daily 45). More than 50% average 300mg caffeine per day, with an average daily dosage for all consumers of about 200mg. One report estimates nearly 95% of Brazil’s population consumes caffeine daily, whereas only about 63% of Canadian adults do so. The average dietary caffeine consumption in some Scandinavian countries is more than 400 mg per person per day. It is not hard to reach 200-300mg of caffeine daily since a standard eight-ounce cup of coffee made by the American drip method contains between 125mg and 250mg of caffeine. A 12-ounce can of Coca-Cola contains 34mg. Also, the usual ‘cup’ of coffee for many individuals is often actually 12 or even 16 ounces and sometimes more.

Most people consume caffeine from drinks. The amounts of caffeine in different drinks can vary a lot, but it is generally:

  • An 8-ounce cup of coffee: 95-200 mg
  • A 12-ounce can of cola: 35-45 mg
  • An 8-ounce energy drink: 70-100 mg
  • An 8-ounce cup of tea: 14-60 mg

Caffeine has many effects on your body’s metabolism

  • Caffeine stimulates your central nervous system, which can make you feel more awake and give you a boost of energy.
  • Caffeine is a diuretic, meaning that it helps your body get rid of extra salt and water by urinating more.
  • Caffeine increases the release of acid in your stomach, sometimes leading to an upset stomach or heartburn.
  • Caffeine may interfere with the absorption of calcium in the body.
  • Caffeine increases your blood pressure.

Within one hour of eating or drinking caffeine, it reaches its peak level in your blood. You may continue to feel the effects of caffeine for four to six hours.

For most people, it is not harmful to consume up to 400mg of caffeine a day. If you do eat or drink too much caffeine, it can cause health problems, such as:

  • Restlessness and shakiness
  • Insomnia. Most adults need seven to eight hours of sleep each night. But caffeine, even in the afternoon, can interfere with this much-needed sleep. Chronically losing sleep — whether it’s from work, travel, stress or too much caffeine — results in sleep deprivation. Sleep loss is cumulative, and even small nightly decreases can add up and disturb your daytime alertness and performance. Using caffeine to mask sleep deprivation can create an unwelcome cycle. For example, you may drink caffeinated beverages because you have trouble staying awake during the day. But the caffeine keeps you from falling asleep at night, shortening the length of time you sleep.
  • Headaches
  • Dizziness
  • Rapid or abnormal heart rhythm
  • Stomach upset
  • Dehydration
  • Anxiety
  • Dependency, so you need to take more of it to get the same results.

Some people are more sensitive to the effects of caffeine than others. If you’re susceptible to the effects of caffeine, just small amounts — even one cup of coffee or tea — may prompt unwanted effects, such as restlessness and sleep problems. How you react to caffeine may be determined in part by how much caffeine you’re used to drinking. People who don’t regularly drink caffeine tend to be more sensitive to its negative effects. Other factors may include genetics, body mass, age, medication use and health conditions, such as anxiety disorders.

Do not underestimate the power or potency of caffeine. An abrupt decrease in caffeine may cause withdrawal symptoms, such as headaches, fatigue, irritability and difficulty focusing on tasks. Fortunately, these symptoms are usually mild and resolve after a few days. Caffeine dependency can occur after as little as seven days of exposure. 100mg per day can sustain dependency. In fact, many individuals can avoid caffeine withdrawal symptoms by as little as 25mg—the equivalent of about two tablespoons of most “gourmet” coffees. Carefully controlled studies show that caffeine doses as low as about 10mg can be reliably noticed by particularly sensitive people. These studies also show that more than 30 percent of people can feel the effects of 18mg or less.

Studies of caffeine dependency and tolerance show that daily caffeine users are actually more motivated to consume it to avoid withdrawal symptoms, than to experience the lift that its stimulant properties may provide. Caffeine’s combination of a punishing syndrome of withdrawal, along with a rewarding sense of wakefulness, has made coffee, tea, and chocolate, some of humanity’s best-loved foods. One might say that caffeine-producing plants have succeeded in motivating humans to cultivate them widely and with very great care.

Not everyone consuming daily caffeine is equally likely to develop dependency and withdrawal syndrome. Studies indicate that genetics make some people more likely than others. Scientists do not know whether the inherited tendency to experience caffeine withdrawal syndrome relates to the genetic factors that cause migraine. In summary, caffeine may lead to the development of medication-overuse headache (so-called “rebound” headache). As such, patients should limit caffeine use as recommended for other acute medications for migraine. This use should not exceed two days per week. Removing caffeine alone is rarely enough to solve the problem. For patients with high daily caffeine intake, this reduction in use should be achieved over a gradual taper of days or even weeks to limit the impact of withdrawal syndrome.

References   [ + ]

read more

Clogged milk ducts

clogged-milk-ducts

Blocked milk duct

Blocked milk ducts also known as clogged milk ducts is an area or segment of the breast where milk flow is obstructed (milk stasis) causing a tender lump or spot in the breast of breastfeeding mothers. If a sore lump appears in your breast but you otherwise feel well, you probably have a blocked milk duct instead of mastitis (breast infection). This lump may be the result of a clogged milk duct, which can happen if there’s an abrupt change in the feeding schedule, inadequate draining of the breast, not varying nursing positions, or wearing clothes or bras that are too tight. Milk ducts also known as lactiferous ducts, are small tubes inside the breast that carry milk through to the nipples (see Figure 1). A blocked milk duct causes tender or painful lumps as a result of milk building up in the breast behind a duct. Occasionally, a mother with a blocked duct may notice a white spot on her nipple too.

Breast engorgement is when your breasts become swollen and get too full of milk. Breast engorgement is a painful condition affecting large numbers of women in the early postpartum period. Your breasts may feel hard, tight and painful. It is normal for your breasts to become larger, heavier, and a little tender when they begin making milk. Sometimes, this fullness may turn into breast engorgement, when your breasts feel very hard and painful. Breast engorgement is the result of the milk building up. Breast engorgement usually happens during the third to fifth day after giving birth. But it can happen at any time, especially if you have an oversupply of milk or are not feeding your baby or expressing your milk often. Breast engorgement can happen in the early days when you and your baby are still getting used to breastfeeding. It can take a few days for your milk supply to match your baby’s needs. Breast engorgement can also happen when your baby is older and not feeding so frequently, perhaps when they start having solid foods.

If breast engorgement continues, it can lead to a blocked milk duct. You may feel a small, tender lump in your breast.

Frequent feeding from the affected breast may help. If possible, position your baby with their chin pointing towards the lump so they can feed from that part of the breast.

Ducts carry the milk from deep in the breast to the nipple openings. Sometimes these ducts can become blocked. Milk builds up behind the blockage, a lump forms and your breast begins to feel sore. Your breast may become engorged in one area and might also look red. Mastitis is an inflammation of the breast which is usually caused by a blocked milk duct that hasn’t cleared, or a damaged nipple. Infection may or may not be present.

The most important part of treatment is frequent milk removal by breastfeeding or expressing (eight or more times each 24 hrs).

Figure 1. Normal breast (female)

Normal breast

What is mastitis?

Mastitis is infection in the breast. Mastitis can happen when you have a plugged duct that is not relieved, you miss or delay breastfeeding or if your breasts become engorged. Mastitis makes your breast feel painful and inflamed, and can make you feel very unwell with flu-like symptoms. You may feel a tender or painful hard spot in your breast that’s warm to the touch. The area may be red. You may have a fever, chills, aches or pain.

If you have mastitis, you’ll probably have at least 2 of these symptoms:

  • a breast that feels hot and tender
  • a red patch of skin that’s painful to touch
  • a general feeling of illness, as if you have flu
  • feeling achy, tired and tearful
  • a high temperature (fever)

If you don’t deal with the early signs of mastitis, it can turn into an infection and you’ll need to take antibiotics. This can happen suddenly, and can get worse quickly. It’s important to carry on breastfeeding as this will help to speed your recovery.

If you think you’re developing a blocked duct or mastitis, try the following:

  • Check your baby’s positioning and attachment. Ask your midwife, health visitor or a breastfeeding specialist to watch a feed.
  • Let your baby feed on the tender breast first.
  • Don’t stop nursing your baby even if your breast is sore. The infection doesn’t harm the baby. Breastfeeding more often can help clear the infection. Or use a breast pump to express milk from the infected breast.
  • If the affected breast still feels full after a feed, or your baby can’t feed for some reason, express your milk by hand.
  • Warmth can help the milk flow, so a warm towel on your breast or a warm bath or warm shower, can help.
  • Get as much rest as you can. Go to bed if you can.
  • Take acetaminophen (paracetamol) or ibuprofen to relieve the pain.
  • If you’re no better within 12 to 24 hours or you feel worse, contact your doctor.
  • If you’re in severe pain or have a fever, see your doctor. You may need antibiotics, which will be fine to take while breastfeeding.
  • If your doctor prescribes an antibiotic to treat the infection, take it exactly as your doctor tells you to. Take all the medicine until it’s gone. Your provider makes sure the antibiotic is safe for your baby. Don’t start or stop taking any medicine during breastfeeding without your provider’s OK.

Remember, stopping breastfeeding will make your symptoms worse, and may lead to a breast abscess.

What is breast abscess?

If a mastitis infection isn’t treated, it can lead to a breast abscess (a collection of pus in the breast), which may need an operation to drain it.

Breast abscess can also develop if the mastitis doesn’t respond to frequent feeding plus a course of antibiotics.

You’ll have an ultrasound scan of your breast to check for an abscess.

The pus can be drained from an abscess with either:

  • a needle – this might need to be done a few times, and you may have to go back to hospital each time
  • a small cut in your skin

Your skin will be numbed before this is done. You can usually go home the same day and may be given antibiotics to take at home.

The abscess should heal completely in a few days or weeks.

You can carry on breastfeeding after an abscess has been drained.

What is breast engorgement

Breast engorgement is when your breasts become swollen and get too full of milk. Breast engorgement is a painful condition affecting large numbers of women in the early postpartum period. Your breasts may feel hard, tight and painful. It is normal for your breasts to become larger, heavier, and a little tender when they begin making milk. Sometimes, this fullness may turn into breast engorgement, when your breasts feel very hard and painful. Breast engorgement is the result of the milk building up. Breast engorgement usually happens during the third to fifth day after giving birth. But it can happen at any time, especially if you have an oversupply of milk or are not feeding your baby or expressing your milk often. Breast engorgement can happen in the early days when you and your baby are still getting used to breastfeeding. It can take a few days for your milk supply to match your baby’s needs. Breast engorgement can also happen when your baby is older and not feeding so frequently, perhaps when they start having solid foods.

Surgical enlargement of breasts (augmentation mammoplasty) may also predispose to breast engorgement 1). Breast engorgement should be differentiated from normal breast fullness, often called physiological breast engorgement 2), occurring between day two to three postpartum, in which secretory activation of the breast is triggered by the delivery of the placenta (progesterone withdrawal) and subsequent rise in prolactin levels 3). Increased milk production and interstitial tissue edema ensue resulting in visibly larger, warmer and slightly uncomfortable breasts. In women with normal breast fullness, milk flow from the breast is not hindered and with frequent, efficient breastfeeding, discomfort resolves within a few days.

Breast engorgement, on the other hand, is a distressing and debilitating condition affecting between 15% and 50% of women 4). Breast engorgement may lead to premature weaning, cracked nipples, mastitis and breast abscess.

Breast engorgement can also cause:

  • Breast swelling
  • Breast tenderness
  • Warmth
  • Redness
  • Throbbing
  • Flattening of the nipple
  • Low-grade fever

Breast engorgement can lead to plugged ducts or a breast infection, so it is important to try to prevent it before this happens.

When breast engorgement was described as part of an inflammatory process (any mixture of redness, pain, fever, breast tension and resistance in breast tissue), 75% of women in a Swedish study experienced symptoms within eight weeks postpartum 5). Some level of breast tenderness during the first five days after birth was experienced by 72% of women in a study by Hill and Humenick 6). Breast engorgement symptoms occur most commonly between the second and fifth days postpartum 7), peaking at day five 8), but may occur as late as day 14 9) and are usually diffuse, bilateral and may be associated with a low‐grade fever. Complications are common and include sore/damaged nipples, mastitis, abscess formation, decreased milk supply 10), premature introduction of breast milk substitutes, and premature cessation of breastfeeding 11). Difficulty in feeding the baby occurs in up to 82% of mothers with breast engorgement 12).

If your baby isn’t well attached to the breast it may be hard for them to take your milk when your breast is engorged. The nipple can become a little over-stretched and flattened, and possibly painful.

Breast engorgement can still happen once you have learnt the skill of positioning and attachment, usually when your baby hasn’t fed for a while.

Your baby usually knows when they need a feed, for how long and from which breast. Early signs (cues) that your baby is ready to feed can include:

  • moving their eyes rapidly
  • putting their fingers into their mouth
  • rooting (turning to one side with their mouth open as if seeking the breast)
  • becoming restless

Crying is the very last sign that your baby needs feeding. Feeding them before they cry often leads to a much calmer feed. Keeping your baby close so you can watch and learn their early feeding cues will help.

Most of the time the discomfort goes away once you start breastfeeding regularly. Here are some ways to help with breast engorgement:

  • Try not to miss or go a long time between feedings. Don’t skip night feedings.
  • Express a small amount of milk with a breast pump or by hand before breastfeeding.
  • Take a warm shower or put warm towels on your breasts. If your engorgement is really painful, put cold packs on your breasts.
  • Tell your provider if your breasts stay swollen.
  • Ask your midwife, doctor or a breastfeeding specialist for help immediately to help your baby drain your breasts more effectively.

Milk ejection reflex

Each time you express milk or sit down to breastfeed your baby, you may notice a sensation in your breasts called the ‘milk ejection’ reflex. In the early days, this takes a few minutes to appear, but later on it will occur within a few seconds. Milk ejection feels different to different women. You may have tingling or prickling in your breasts and nipples, or a feeling as if the milk is rushing in to fill them. Some mothers describe a slight pain and some mums have no sensations at all, but notice that milk starts to drip from both breasts.

What to do when you have oversupply of breast milk?

An overfull breast can make breastfeeding stressful and uncomfortable for you and your baby.

What you can do:

  • Breastfeed on one side for each feeding. Continue to offer that same breast for at least two hours until the next full feeding, gradually increasing the length of time per feeding.
  • If the other breast feels unbearably full before you are ready to breastfeed on it, hand express for a few moments to relieve some of the pressure. You can also use a cold compress or washcloth to reduce discomfort and swelling.
  • Feed your baby before he or she becomes overly hungry to prevent aggressive sucking.
  • Burp your baby often if he or she is gassy so there is more room in baby’s tummy for milk.

Clogged milk duct causes

The milk-making glands in your breasts are divided up into segments, rather like an orange (see Figure 1).

Narrow tubes called lactiferous ducts carry the milk from each segment to your nipple.

If one of the segments isn’t drained properly during a feed (perhaps because your baby isn’t attached properly), this can lead to a blocked duct.

You may feel a small, tender lump in your breast. And this needs relieving as soon as possible, and your baby may be able to help. If possible, place your baby with his/her chin pointing towards the lump so she/he can feed from that part of the breast.

Avoid wearing tight clothes or bras so your milk can flow freely from every part of your breast.

Other things that may help include:

  • frequent feeding from the affected breast
  • warm flannels or a warm shower to encourage the flow
  • gently massaging the lump towards your nipple while your baby feeds

It’s important to deal with a blocked duct quickly as, if left, it could lead to mastitis.

Clogged milk duct prevention

Keeping pressure off your breasts will help prevent clogged ducts. You can do this by wearing clothing that is not restrictive (avoid tight tops, bras, or underwire bras; if necessary, switch to a larger bra size, or go without a bra for a while); by changing your nursing position so that your baby drains the milk from all areas of the breast equally; and by not sleeping on your stomach.

If you notice dried milk plugging the openings in your nipples, wash them gently with warm water after each breastfeeding session. Continued difficulties with clogged ducts may signal a problem with your baby’s latching on or with your nursing position. Arrange for a visit with your pediatrician or lactation specialist to correct these problems.

How can I prevent blocked milk ducts?

  • Feed your baby often.
  • Ensure correct positioning and attachment.
  • Frequent drainage of the breast.
  • Alter your position during breast feeds to include underarm position, cradle position or lying on your side.
  • Check for a white ‘spot’ on the nipple as this may be blocking the milk duct.
  • Avoid tight tops or bras or anything that puts pressure on your breasts.
  • Rest as much as you can, eat well and stay healthy.

Avoid

  • Sudden long gaps between breastfeeds or expressing for your baby.
  • Tight or restrictive clothing such as a bra.
  • Pressing or holding one area of the breast too tightly, especially close to the nipple.

Clogged milk duct symptoms

A painful red lump or swollen spot on the breast. You might also see a white spot on your nipple which is another sign that a duct may be blocked.

Blocked milk duct symptoms

  • Local symptoms
    • A reddened area or segment of the breast which becomes tender, hard and painful
    • Occasionally, there can be localized tenderness or pain without an obvious lump
    • May occur with a painful white blob/spot on the nipple
  • Systemic symptoms
    • Occasionally, a low-grade fever may be present, usually less than 101.3 °F (38.5 °C)

Mastitis

  • Local symptoms
    • A reddened area or segment of the breast which becomes tender, hard and painful
    • Occasionally, there can be localized tenderness or pain without an obvious lump
    • Usually more intense pain/heat/swelling than a blocked duct
    • There may be red streaks extending outward from the affected area
  • Systemic symptoms
    • Fever of 101.3 °F (38.5 °C) or greater
    • Flu-like symptoms including joint aches, pains and lethargy. Often rapid onset of symptoms

It’s important to start treatment as soon as you feel a lump or sore spot on your breast

Clogged milk duct treatment

A clogged duct should be dealt with immediately since it can lead to a breast infection. The best initial treatment for a clogged duct is to continue nursing, taking care to drain the breast as much as possible with each feeding. (If you suddenly stop breastfeeding, your breast will probably become engorged, which could make the condition worse and lead to an infection.)

Before each feeding, gently massage the breast, beginning on the outside and working your way toward the nipple, paying particular attention to the firm area. Breastfeed as often and as long as possible, offering your baby the sore breast first if you can tolerate it, because your baby will nurse most vigorously on the first breast, thus draining it more effectively.

Try switching positions to allow better drainage. Express milk from that breast after each feeding if your baby has not completely relieved breast fullness. Apply comfortably warm, moist towels on the affected breast several times a day (or take several warm baths or showers), gently massaging the area around the clogged duct down toward the nipple.

If the lump on your breast remains for more than a few days, if it increases in size or redness, or if you develop a fever or significant discomfort, make an appointment to see your doctor.

Management of blocked milk ducts:

  • Start treatment as soon as you feel a lump or sore spot.
  • Rest as much as possible.
  • The most important part of treatment is frequent milk removal by breastfeeding or expressing (eight or more times each 24hrs).
  • Feed frequently from the affected side first.
  • Keep the affected breast as empty as possible by feeding from that side as often as you can.
  • Applying warmth for up to a few minutes to the affected breast before a feed can help with milk flow.
  • Feed from the affected breast first, when baby is sucking vigorously.
  • Milk supply from the affected breast may decrease temporarily. This is normal – extra feeding or expressing will return your milk supply to normal.
  • Your breast milk may taste salty due to increased sodium and chloride content. If your baby is breastfeeding, they may fuss due to this change in taste. If your baby is being fed by a naso-gastric tube they will not notice any difference.
  • Check that your baby is attached well and can get the milk easily.
  • Relax to help your let-down reflex work well.
  • Gentle massage of the lump toward the nipple during feeds. This may assist the let-down reflex.
  • Change feeding positions to help empty the breast.
  • Hand express if needed, after feeds.
  • You may express strings of thickened or fatty looking milk.
  • Cold packs after a feed may help relieve pain and inflammation.
  • If there is a white spot on your nipple – soak the nipple with a warm moist cloth and rub or scratch off the spot with a sterile needle to allow the duct to open and the milk to flow again.
  • Use paracetamol or anti-inflammatory tablets according to directions until the lump clears.
  • If the lump has not cleared after the next breastfeed, therapeutic ultrasound treatment (by a physiotherapist) of the affected breast may help clear blocked ducts.
  • It is important the breast is well drained within 20 minutes of having the ultrasound treatment. This may be either by breastfeeding or expressing the breast.
  • See your doctor if you cannot clear the lump in a few days, or sooner if you develop a fever or feel unwell.

After the mastitis has resolved, it is common for the affected area to feel bruised or remain reddened for a week or so afterwards.

Management before feeding or expressing

Apply warmth to the breast just before a feed (for up to 10minutes) or try expressing to help trigger a let-down. Warmth can be provided by a warm shower or a well-covered heat pack.
Gentle massage may also help trigger a let-down.
Hand express if needed to soften the areola to help your baby latch well.

Management during feeding or expressing

Start feeding or expressing on the sore breast first, but if too painful, start feeding or expressing on the less-sore side until your milk let-down occurs and then change sides.
Ensure your baby is latching well and ask for assistance if you are experiencing any difficulties.
Continue to massage your breast during feeding/expressing.

Management after feeding or expressing

If your baby has not drained the breast well during the feed, continue to massage and express until the breast feels well-drained.
If your baby has not been feeding effectively, you can feed this additional milk to your baby.
Cold packs can be applied to the affected breast for up to 10 minutes to reduce pain and inflammation.

Pain medication

A non-steroidal anti-inflammatory drug such as ibuprofen provides the most-effective reduction in symptoms such as pain and inflammation. Acetaminophen (paracetamol) can be taken in conjunction with ibuprofen. Use as directed.

Antibiotics

  • Antibiotics are not needed to treat a blocked milk duct.
  • If you have been unable to relieve the symptoms of a blocked duct after 12-24 hours, or if you develop a fever, you should see your GP for further management.
  • If antibiotics are required, it is usually still safe to continue breastfeeding or expressing milk for your baby. Check with your doctor or pharmacist.
  • Consider taking a probiotic to reduce the risk of thrush.

Tips to avoid further problems

  • Do not wear bras or other clothing that is too tight.
  • Avoid sleeping on your stomach.
  • Do not go for long periods without either breastfeeding or expressing.
  • Rest when you are able.
  • Drink adequate fluids.
  • Ensure correct attachment.
  • Ensure the breast pump is positioned correctly.
  • Regularly examine your breasts for lumps and massage these while feeding or expressing.
  • Breastfeed as often as your baby needs (normally eight-to-12 times in 24hrs).

You should not try weaning if you have a blocked duct or are suffering mastitis. You must continue to remove milk from your breasts at this time in order to reduce the risk a breast abscess.

How to breastfeed

Breastfeeding positioning and attachment

If breastfeeding feels a bit awkward at first, don’t worry. Breastfeeding is a skill that you and your baby learn together, and it can take time to get used to.

There are lots of different positions you can use to breastfeed. You just need to check the following points:

  • Are you comfortable? It’s worth getting comfortable before a feed. Use pillows or cushions if necessary. Your shoulders and arms should be relaxed.
  • Are your baby’s head and body in a straight line? (It’s hard for your baby to swallow if their head and neck are twisted.)
  • Are you holding your baby close to you, facing your breast? Supporting their neck, shoulders and back should allow them to tilt their head back and swallow easily.
  • Always bring your baby to the breast rather than leaning forward to ‘post’ your breast into your baby’s mouth, as this can lead to poor attachment.
  • Your baby needs to get a big mouthful of breast. Placing your baby with their nose level with your nipple will encourage them to open their mouth wide and attach to the breast well.
  • Avoid holding the back of your baby’s head, so that they can tip their head back. This way your nipple goes past the hard roof of their mouth and ends up at the back of their mouth against the soft palate.

Breastfeeding positions

Some moms find that the following positions are helpful ways to get comfortable and support their babies while breastfeeding. You can also use pillows under your arms, elbows, neck, or back to give you added comfort and support. Keep trying different positions until you are comfortable. What works for one feeding may not work for the next feeding.

Clutch or “football” hold: useful if you had a C-section, or if you have large breasts, flat or inverted nipples, or a strong let-down reflex. This hold is also helpful for babies who like to be in a more upright position when they feed. Hold your baby at your side with the baby lying on his or her back and with his or her head at the level of your nipple. Support your baby’s head by placing the palm of your hand at the base of his or her head.

Cross-cradle or transitional hold: useful for premature babies or babies with a weak suck because this hold gives extra head support and may help the baby stay latched. Hold your baby along the area opposite from the breast you are using. Support your baby’s head at the base of his or her neck with the palm of your hand.

Cradle hold: an easy, common hold that is comfortable for most mothers and babies. Hold your baby with his or her head on your forearm and his or her body facing yours.

Laid-back hold (straddle hold): a more relaxed, baby-led approach. Lie back on a pillow. Lay your baby against your body with your baby’s head just above and between your breasts. Gravity and an instinct to nurse will guide your baby to your breast. As your baby searches for your breast, support your baby’s head and shoulders but don’t force the latch.

Side-lying position: useful if you had a C-section, but also allows you to rest while the baby breastfeeds. Lie on your side with your baby facing you. Pull your baby close so your baby faces your body.

breastfeeding positions

breastfeeding positions

How to breastfeed twins, triplets or more

breastfeeding positions for multiple babies

How to latch your baby on to your breast

  1. Hold your baby close to you with their nose level with the nipple.
  2. Wait until your baby opens their mouth really wide with their tongue down. You can encourage them to do this by gently stroking their top lip.
  3. Bring your baby on to your breast.
  4. Your baby will tilt their head back and come to your breast chin first. Remember to support your baby’s neck but not hold the back of their head. They should then be able to take a large mouthful of breast. Your nipple should go towards the roof of their mouth.

Getting a good latch

Getting your baby to “latch on” properly can take some practice. You can try different breastfeeding holds to help your baby get a good latch.

The steps below can help your newborn latch on to the breast to start sucking when he or she is ready. Letting your baby begin the process of searching for the breast may take some of the pressure off you and keeps the baby calm and relaxed. This approach to learning to breastfeeding is a more relaxed, baby-led latch. Sometimes called biological nurturing, laid-back breastfeeding, or baby-led breastfeeding, this style of breastfeeding allows your baby to lead and follow his or her instincts to suck.

Keep in mind that there is no one way to start breastfeeding. As long as the baby is latched on well, how you get there is up to you.

  • Create a calm environment first. Recline on pillows or other comfortable area. Be in a place where you can be relaxed and calm.
  • Hold your baby skin-to-skin. Hold your baby, wearing only a diaper, against your bare chest. Hold the baby upright between your breasts and just enjoy your baby for a while with no thoughts of breastfeeding yet.
  • Let your baby lead. If your baby is not hungry, she will stay curled up against your chest. If your baby is hungry, she will bob her head against you, try to make eye contact, and squirm around. Learn how to read your baby’s hunger signs.
  • Support your baby, but don’t force the latch. Support her head and shoulders as she searches for your breast. Avoid the temptation to help her latch on.
  • Allow your breast to hang naturally. When your baby’s chin hits your breast, the firm pressure makes her open her mouth wide and reach up and over the nipple. As she presses her chin into the breast and opens her mouth, she should get a deep latch. Keep in mind that your baby can breathe at the breast. The nostrils flare to allow air in.

If you have tried the “baby-led” approach and your baby is still having problems latching on, try these tips:

  • Tickle the baby’s lips with your nipple to encourage him or her to open wide.
  • Pull your baby close so that the baby’s chin and lower jaw moves in to your breast.
  • Watch the baby’s lower lip and aim it as far from the base of the nipple as possible so that the baby takes a large mouthful of breast.

Step by Step Guide in Getting your baby into position

Breastfeeding – Step 1. Hold your baby’s whole body close with their nose level with your nipple.

Breastfeeding - Step 1

Breastfeeding – Step 2. Let your baby’s head tip back a little so that their top lip can brush against your nipple. This should help your baby to make a wide open mouth.

Breastfeeding - Step 2

Breastfeeding – Step 3. When your baby’s mouth opens wide, their chin should be able to touch your breast first, with their head tipped back so that their tongue can reach as much breast as possible.

Breastfeeding - Step 3

Breastfeeding – Step 4. With your baby’s chin firmly touching your breast and their nose clear, their mouth should be wide open. You should see much more of the darker nipple skin above your baby’s top lip than below their bottom lip. Your baby’s cheeks will look full and rounded as they feed.

Breastfeeding - Step 4

What are signs of a good latch?

Signs your baby is well attached to your breast

  • The latch feels comfortable to you and does not hurt or pinch.
  • Your baby’s chest rests against your body. Your baby does not have to turn his or her head while drinking.
  • Your baby has a wide mouth and a large mouthful of breast.
  • The baby’s tongue is cupped under the breast, so you might not see the baby’s tongue.
  • You hear or see your baby swallow. Some babies swallow so quietly that a pause in their breathing may be the only sign of swallowing.
  • You see the baby’s ears “wiggle” slightly.
  • Your baby’s lips turn outward like fish lips, not inward. You may not even be able to see the baby’s bottom lip.
  • Your baby’s chin is touching your breast, their lower lip is rolled down (you can’t always see this) and their nose isn’t squashed against your breast.
  • You don’t feel any pain in your breasts or nipples when your baby is feeding, although the first few sucks may feel strong.
  • You can see more of the dark skin around your nipple (areola) above your baby’s top lip than below their bottom lip, depending on the size of your areola and the size of your baby’s mouth.

What are some common breastfeeding latch problems?

Below are some common latch problems and how to deal with them.

  • You’re in pain. Many moms say their breasts feel tender when they first start breastfeeding. A mother and her baby need time to find comfortable breastfeeding positions and a good latch. If breastfeeding hurts, your baby may be sucking on only the nipple, and not also on the areola (the darker skin around the nipple). Gently break your baby’s suction to your breast by placing a clean finger in the corner of your baby’s mouth. Then try again to get your baby to latch on. To find out if your baby is sucking only on your nipple, check what your nipple looks like when it comes out of your baby’s mouth. Your nipple should not look flat or compressed. It should look round and long or the same shape as it was before the feeding.
  • You or your baby feels frustrated. Take a short break and hold your baby in an upright position. Try holding your baby between your breasts with your skin touching his or her skin (called skin-to-skin). Talk or sing to your baby, or give your baby one of your fingers to suck on for comfort. Try to breastfeed again in a little while.
  • Your baby has a weak suck or makes tiny sucking movements. Your baby may not have a deep enough latch to suck the milk from your breast. Gently break your baby’s suction to your breast by placing a clean finger in the corner of your baby’s mouth. Then try to get your baby to latch on again. Talk with a lactation consultant or pediatrician if you are not sure if your baby is getting enough milk. But don’t worry. A weak suck is rarely caused by a health problem.
  • Your baby may be tongue-tied. Babies with a tight or short lingual frenulum (the piece of tissue attaching the tongue to the floor of the mouth) are described as “tongue-tied.” The medical term is ankyloglossia. These babies often find it hard to nurse. They may be unable to extend their tongue past their lower gum line or properly cup the breast during a feed. This can cause slow weight gain in the baby and nipple pain in the mother. If you think your baby may be tongue-tied, talk to your doctor.

How to tell if your baby is getting enough milk

  • Your baby will appear content and satisfied after most feeds.
  • They should be healthy and gaining weight (although it’s normal for babies to lose a little weight in the first days after birth). Talk to your midwife or health visitor if you are concerned your baby is not gaining weight and is unsettled during or after breast feeds.
  • After the first few days, your baby should have at least six wet nappies a day.
  • After the first few days, they should also pass at least two soft yellow poos (stools) every day.

How often you should feed your baby

How often babies feed varies. As a very rough guide, your baby should feed at least eight times or more every 24 hours during the first few weeks.

It’s fine to feed your baby whenever they are hungry, when your breasts feel full or if you just want to have a cuddle.

It’s not possible to overfeed a breastfed baby.

When your baby is hungry they may:

  • get restless
  • suck their fist or fingers
  • make murmuring sounds
  • turn their head and open their mouth (rooting)

It’s best to try and feed your baby during these early feeding cues as a crying baby is difficult to feed.

How to tell if your baby is getting enough milk

When you first start breastfeeding, you may be concerned your baby is not getting enough milk. You can’t always tell how much a breastfed baby is drinking.

It’s very rare that women don’t make enough breast milk for their babies, but it may take a little while before you feel confident your baby is getting what they need.

Your baby will generally let you know, but wet and dirty nappies are a good indication, as well as hearing your baby swallow.

If you need some reassurance your baby is getting enough milk, it’s a good idea to get a midwife, health visitor or breastfeeding specialist to watch your baby feed.

Try to carry on breastfeeding if you can. Introducing bottles of formula milk can fill up your baby’s stomach so they no longer want to breastfeed as frequently. This then reduces the stimulation for you to make more milk.

Signs your baby is getting enough milk

  • Your baby starts feeds with a few rapid sucks followed by long, rhythmic sucks and swallows with occasional pauses.
  • You can hear and see your baby swallowing.
  • Your baby’s cheeks stay rounded, not hollow, during sucking.
  • They seem calm and relaxed during feeds.
  • Your baby comes off the breast on their own at the end of feeds.
  • Their mouth looks moist after feeds.
  • Your baby appears content and satisfied after most feeds.
  • Your breasts feel softer after feeds.
  • Your nipple looks more or less the same after feeds – not flattened, pinched or white.
  • You may feel sleepy and relaxed after feeds.

Other signs your baby is feeding well

  • Your baby gains weight steadily after the first two weeks – it’s normal for babies to lose some of their birth weight in the first two weeks.
  • They appear healthy and alert when they’re awake.
  • From the fourth day, they should do at least two soft, yellow poos (stools) every day for the first few weeks.
  • From day five onwards, wet nappies should start to become more frequent, with at least six heavy, wet nappies every 24 hours. In the first 48 hours, your baby is likely to have only two or three wet nappies.

It can be hard to tell if disposable nappies are wet. To get an idea, take a nappy and add two to four tablespoons of water. This will give you an idea of what to look and feel for.

Things that can affect your milk supply

  • Poor attachment and positioning.
  • Not feeding your baby often enough.
  • Drinking alcohol and smoking while breastfeeding – these can both interfere with your milk production.
  • Previous breast surgery, particularly if your nipples have been moved.
  • Having to spend time away from your baby after the birth – for example, because they were premature: Frequent gentle hand expression will help.
  • Illness in you or your baby.
  • Giving your baby bottles of formula or a dummy before breastfeeding is well established.
  • Using nipple shields – although this may be the only way to feed your baby with damaged nipples and is preferable to stopping feeding.
  • Some medications, including dopamine, ergotamine and pyridoxine.
  • Anxiety, stress or depression.
  • Your baby having a tongue tie that restricts the movement of their tongue.

With skilled help, lots of these problems can be sorted out. If you have concerns about how much milk your baby is getting, it’s important to ask for help early. Speak to your midwife, health visitor or a breastfeeding specialist. They can also tell you where you can get further support.

References   [ + ]

read more

Pregnancy weight gain

weight gain during pregnancy

Pregnancy weight gain

Pregnancy is a time of changes within the body. Every woman gain some weight during pregnancy due to the growth of the baby, placenta and fluid around the baby (amniotic fluid), but limiting the amount of extra weight you gain will improve your health and your baby’s, both now and in the future. Gaining the right amount of weight during pregnancy can help protect your health and the health of your baby. Eating a healthy, balanced diet can help you have a healthier pregnancy and manage your weight gain.

How much weight you will put on during your pregnancy depends on your weight before you become pregnant. Weight gain in pregnancy varies greatly. Most pregnant women gain between 22 lb and 26 lb (10kg to 12.5kg), putting on most of the weight after week 20. Much of the extra weight is due to your baby growing, but your body will also be storing fat, ready to make breast milk after your baby is born.

Putting on too much or too little weight can lead to health problems for you or your unborn baby.

Managing your weight in pregnancy is not about dieting or trying to lose weight. It’s about looking after yourself and your baby by eating healthily and staying active.

If you gain too little weight during pregnancy, you’re more likely than other women to have a premature baby or a baby with low birthweight. A premature baby is born too early, before 37 weeks of pregnancy. Low birthweight means your baby is born weighing less than 5 pounds, 8 ounces (2.5 kilograms).

If you gain too much weight during pregnancy, you’re more likely than other women to:

  • Have a premature baby. Premature babies may have health problems at birth and later in life, including being overweight or obese. Being obese means you have an excess amount of body fat.
  • Have a baby with fetal macrosomia. This is when your baby is born weighing more than 8 pounds, 13 ounces (4 kilograms). Having a baby this large can cause complications, like problems during labor and heavy bleeding after birth. This also increases your child’s risk of becoming obese in childhood and early adult life
  • Have high blood pressure with complications in pregnancy (pre-eclampsia)
  • Have diabetes during pregnancy (gestational diabetes)
  • Need a cesarean birth (C-section). This is surgery in which your baby is born through a cut that your health care provider makes in your belly or uterus.
  • Have trouble losing weight after your baby’s birth. This can increase your risk for health conditions like diabetes, high blood pressure, heart disease and some cancers later in life.

However, not gaining enough weight during pregnancy can increase your chances of having a premature (preterm) birth, or a small for age baby.

Weight gain during pregnancy during pregnancy key points:

  • Every pregnant woman gains weight differently so there are no official guidelines for how much weight you should gain. The most important thing is to keep your weight gain to a safe and healthy level for you and your baby.
  • It’s best to start pregnancy at a healthy weight. Talk to your doctor to find out a healthy weight for you before you get pregnant.
  • Gaining too much or too little weight during pregnancy can be harmful to you and your baby.
  • Don’t ever try to lose weight during pregnancy as this is not healthy for you or your baby. Some women may even lose weight during the first few months, especially if they have morning sickness, and that is absolutely normal.
  • You only need about 200 to 300 extra calories a day during pregnancy to support your baby’s growth and development.
  • Only some of the weight you gain in pregnancy will be body fat. The other things causing weight gain will include:
    • your baby
    • the placenta
    • the amniotic fluid (the water surrounding your baby)
    • your growing breasts
    • the increased blood you need
    • natural fluid retention.
  • Staying active is important while you’re pregnant, as it’ll prepare your body for labor and birth. Keep up your normal daily activity or exercise, unless you have been advised by your midwife or doctor not to exercise.

Figure 1. Body mass index (BMI) chart

BMI chart adults

Why is it important to manage my weight now I’m pregnant?

If you manage your weight by eating well and staying active, it can help you have a healthier pregnancy and a safer birth. It will also mean you reduce the risks of some health problems for you and your baby.

Gaining too much weight during pregnancy

Putting on too much weight can affect your health and increase your blood pressure. But pregnancy isn’t the time to go on a diet, as it may harm the health of the unborn child. It’s important that you eat healthily.

Gaining too much weight can increase your risk of complications.

These include:

  • gestational diabetes: too much glucose (sugar) in your blood during pregnancy can cause gestational diabetes, which increases your risk of having a large baby
  • pre-eclampsia: a rise in blood pressure can be the first sign of pre-eclampsia; although most cases are mild and cause no trouble, it can be serious

Gaining too little weight during pregnancy

Gaining too little weight can cause problems such as premature birth and a baby with a low birth weight (less than 2.5kg or 5.5lb at birth).

It can also mean your body isn’t storing enough fat.

Lack of weight gain can be related to your diet and weight before you become pregnant.

But some naturally slim women stay slim while they’re pregnant and have healthy babies.

What is Body Mass Index?

The body mass index (BMI) or Quetelet index is a value derived from the mass (weight) and height of an individual. The body mass index (BMI) is defined as the body mass divided by the square of the body height, and is universally expressed in units of kg/m2, resulting from mass in kilograms and height in meters.

The body mass index (BMI) is an attempt to quantify the amount of tissue mass (muscle, fat, and bone) in an individual, and then categorize that person as underweight, normal weight, overweight, or obese based on that value. Commonly accepted body mass index ranges are:

  • A) Underweight: under 18.5 kg/m2
  • B) Normal weight: 18.5 to 25 kg/m2
  • C) Overweight: 25 to 30 kg/m2
  • D) Obese: over 30 to 39.9 kg/m2
  • E) Severely Obese: over 40 kg/m2

BMI is considered an important measure for understanding population trends. For individuals, it is one of many factors that should be considered in evaluating healthy weight, along with waist size, body fat composition, waist circumference, blood pressure, cholesterol level and blood sugar.

The World Health Organization defines overweight as a body mass index equal to or more than 25 – 29.9 kg/m2 and obesity as a BMI equal to or more than 30.

Adults with a body mass index of 35 or higher and an obesity-related condition (e.g., diabetes) and adults with a BMI of 40 kg/m2 or higher are considered severely obese.

Moreover, your Body Mass Index (BMI) does not take into account your age, gender or muscle mass. Nor does it distinguish between lean body mass and fat mass. As a result, some people, such as heavily muscled athletes, may have a high BMI even though they don’t have a high percentage of body fat. In others, such as elderly people, body mass index may appear normal even though muscle has been lost with aging.

To calculate your body mass index, you divide your body weight in kilograms by your height in meter squared (commonly expressed as kg/m2), see the body mass index formula below.

body-mass-index-formulaAlternatively, you can use the Figure 1 chart above to help you. Find your height, then go across the chart till you are in the column headed by your weight (kg). The number in the cell is your BMI (rounded to the nearest whole number). The color of the cell indicates which recommendations are right for you.

To find out about your body mass index (BMI), you can also use a FREE online BMI calculators from the Centers for Disease Control and Prevention (CDC) :

What is normal weight gain during pregnancy?

There are no official guidelines for how much weight women should gain in pregnancy because everyone is different. How much weight you should you gain during pregnancy depends on your health and your body mass index (BMI) before you get pregnant. BMI is a measure of body fat based on your height and weight. The most important thing is to keep your weight gain to a safe and healthy level for you and your baby.

Your health care provider uses your body mass index (BMI) before pregnancy to figure out how much weight you should gain during pregnancy. If you’re pregnant with one baby or twins, use the Tables 1 to 3 below to find your recommended weight gain based on your BMI before pregnancy. If you’re pregnant with triplets or more, talk to your provider about the amount of weight you should gain during pregnancy.

If you’re overweight or obese and are gaining less than the recommended amounts, talk to your doctor. If your baby is still growing well, your weight gain may be fine.

Gaining weight slowly and steadily is best. Don’t worry too much if you don’t gain any weight in the first trimester (first 12 weeks or pregnancy) or if you gain a little more or a little less than you think you should in any week. You may have some growth spurts—this is when you gain several pounds in a short time and then level off. Don’t ever try to lose weight during pregnancy.

If you’re worried about your weight gain, talk to your health care provider.

Table 1. Normal weight gain in pregnancy

Normal weight gain in pregnancy

Table 2. Recommendations for total weight gain during pregnancy, by pre-pregnancy or early pregnancy (less than 10 weeks) BMI

Pre-pregnancy or early pregnancy (less than 10 weeks) BMI (kg/m2) Total weight gain range
Underweight (<18.5) 27.5 to 39.7 lbs (12.5 kg–18 kg)
Healthy weight (18.5 – 24.9) 25.4 to 35.3 lbs (11.5 kg–16 kg)
Overweight (25.0 – 29.9) 15.4 to 25.4 lbs (7 kg–11.5 kg)
Obese (≥ 30.0) 11.0 to 19.8 lbs (5 kg–9 kg)

How much weight should I gain in pregnancy?

Everyone is different, but the amount of weight that you should gain during pregnancy depends on your pre-pregnancy body mass index (BMI). This is your weight (measured) in kilograms divided by your height (measured) in meters squared (see the formula above). You can ask your health provider to help you with this, especially if you do not have accurate scales at home.

For example: if you are 1.68 m tall and weigh 82 kg, your BMI is 29 kg/m², which is Overweight category.

In the first trimester (first 12 weeks), most women do not need to gain much weight (usually less than 4.4 pounds or 2 kg) – which is just as well for those who have morning sickness early in pregnancy. Some women even lose a small amount of weight. If this happens to you, you do not need to be concerned as long as you start to gain weight steadily in the second and third trimesters of your pregnancy.

The Table 2 above can be used as a guide to help you work out how much weight you should gain during your pregnancy. Regardless of your BMI at the start of pregnancy, you can still have a healthy weight gain during pregnancy.

Most women do not gain much weight during the first trimester of pregnancy (between a half and 2 kilograms). The rate of weight gain can vary during the rest of your pregnancy and may not be the same every week.

If you’re having twins

It is especially important to gain the right amount of weight when you’re expecting twins because your weight affects the babies’ weight. And because twins are often born before the due date, a higher birth weight is important for their health. It is important you work with your health care provider to determine what’s right for you.

Consider these general guidelines for pregnancy weight gain if you’re carrying twins:

Table 3. Recommendations for total weight gain during pregnancy, by pre-pregnancy or early pregnancy (less than 10 weeks) BMI

Pre-pregnancy or early pregnancy BMI (kg/m2) Recommended weight gain
Healthy weight (BMI 18.5 to 24.9) 37.5 to 55.1 lbs (17 kg–25 kg)
Overweight (BMI 25 to 29.9) 30.9 to 50.7 lbs (14 kg–23 kg)
Obese (BMI 30 or more) 24.3 to 41.9 lbs (11 kg–19 kg)

Where do I gain the weight during pregnancy?

If you’re at a healthy weight before pregnancy and gain 30 pounds (13.6 kilograms) during pregnancy, here’s where you carry the weight:

  • Baby = 7.5 pounds (3.4 kilograms)
  • Amniotic fluid = 2 pounds (907 grams). Amniotic fluid surrounds the baby in the womb.
  • Blood = 4 pounds (1.81 kilograms)
  • Body fluids = 4 pounds (1.81 kilograms)
  • Breasts = 2 pounds (907 grams)
  • Fat, protein and other nutrients = 7 pounds (3.17 kilograms)
  • Placenta = 1.5 pounds (680 grams). The placenta grows in your uterus (also called womb) and supplies the baby with food and oxygen through the umbilical cord.
  • Uterus = 2 pounds (907 grams). The uterus is the place inside you where your baby grows.

What is the average weight gain during pregnancy?

Most women put on between 22 lbs (10kg) and 28 lbs (12.5kg) during their pregnancy.

Your healthy weight gain during pregnancy may depend on the weight you were before you got pregnant. There are no official guidelines but the American College of Obstetricians and Gynecologists say that:

  • women who are underweight (BMI under 18.5) are recommended to put on between 28-40 lbs (13-18kg)
  • women in the normal weight range (BMI of 18.5-24.9) are recommended to put on between 25-35lbs (11-16kg)
  • women who are overweight (BMI between 25 and 29.9) are recommended to put on between 15-25lbs (7-11kg)
  • women who are affected by obesity (BMI of 30 or more), are recommended to put on between 11-20 lbs (5-9kg).

The recommended weight gain for women expecting twins is:

  • women in the normal weight range (BMI of 18.5-24.9) are recommended to put on between 37-54 lbs (16.8-24.5kg)
  • women who are overweight (BMI between 25 and 29.9) are recommended to put on between 31-50 lbs (14.1-22.7kg)
  • women who are affected by obesity (BMI of 30 or more), are recommended to put on between 25-42 lbs (11.3-19.1kg).

Try not to get too concerned about these guidelines. The most important thing is to keep your weight gain to a safe and healthy level for you and your baby.

Your doctor or midwife will be able to advise and reassure you about what is right for you. If you are underweight or overweight, you should get extra care and support during your pregnancy.

How do I manage my weight gain during pregnancy?

While it is ideal to be a healthy weight before becoming pregnant (ie, a BMI between 18.5 and 24.9 kg/m²), scientists know that this doesn’t always happen. If you are outside the healthy weight range, you can still help your baby by gaining weight within the recommended range for your BMI category.

For most women, if you have always been active, continuing to exercise at the same level during pregnancy is safe and healthy.

If you are not used to being active, try doing some gentle exercise for about 15 minutes a day, three times a week before building up slowly to 30 minutes a day. Remember, you’re not trying to get as fit as possible, you just need to stay physically active. You can do most types of exercises in pregnancy so there are lots of things you can try.

If doing physical activities is difficult, just try not to stay sitting down for long periods of time. Try to walk as much as you can and make small changes to increase your daily physical activity. For example, take the stairs instead of the lift at work, or get off the bus a stop earlier.

Talk to your midwife or doctor about how you can monitor your weight, and for advice about eating and being active during your pregnancy. They are there to help and won’t judge you.

How can I track my weight gain during pregnancy?

Your doctor checks your weight at each prenatal care visit. Use the weight-gain tracking chart to track your weight yourself.

Figure 2. Weight-gain tracking chart

Weight-gain tracking chart

Is it safe to lose weight when pregnant?

Dieting to lose weight during pregnancy is not recommended.

Who should manage their weight during pregnancy?

Everyone. But it’s especially important to manage your weight during pregnancy if your body mass index (BMI) was 30 or higher, or lower than 18.5 before you became pregnant. Use our BMI calculator to find out what your current body mass index is.

Healthy weight gain tips for healthy women

Here are some tips to help you manage healthy weight gain during pregnancy:

  • Pregnancy is not about ‘eating for two’. In the first 12 weeks of pregnancy, you can eat the same amount as you usually would. It is important you eat healthy food.
  • After the 12th week, and if you are a healthy weight, the extra food you need each day is about the same as a wholegrain cheese and tomato sandwich, or a wholegrain peanut butter sandwich and a banana. If you are overweight or obese, the extra food you need is about the same as 1 slice of wholegrain bread or 2 apples.
  • Drink water rather than sweetened drinks or fizzy drinks.
  • Drink low-fat or extra-calcium milk instead of full-fat milk.
  • Choose wholegrain bread instead of white bread.
  • Eat a healthy breakfast every day, such as wheat biscuits or porridge with low-fat milk, or 2 slices of wholegrain toast.
  • Have at least 4 servings of vegetables and 2 servings of fruit every day. Buy vegetables and fruits that are in season, or buy frozen vegetables to help reduce cost, wastage and preparation time. Tinned fruit in juice are also a good option.
    • Examples of a vegetable or fruit serving:
      • half a cup of peas, broccoli or carrots
      • 1 medium-sized potato, banana, orange or apple
      • 1 large kiwifruit.
    • If vegetable/fruit juice or dried fruit is consumed, it contributes a maximum of only 1 serving of the total recommended number of daily servings for fruit/vegetables.
  • Prepare and eat meals at home. Have takeaways no more than once a week.
  • Choose healthy snacks such as unsweetened or low-sugar, low-fat yogurt, fruit, cheese and crackers, home-made popcorn, a glass of trim milk, a few unsalted nuts (e.g., 6 or 7 almonds) or a small wholegrain sandwich.
  • Aim to do at least 30 minutes of moderate intensity activity 5 or more days a week, e.g., brisk walking or swimming (or as advised by your doctor, midwife or physiotherapist). The ‘talk test’ is a simple way to estimate intensity: as a guide, you should be able to carry out a conversation but not sing while doing moderate intensity activity.

Foods to avoid in pregnancy

Most foods and drinks are safe to have during pregnancy. But there are some things you should be careful with or avoid.

When you’re pregnant, it’s also important to avoid food-borne illnesses, such as listeriosis and toxoplasmosis, which can be life threatening to an unborn baby and may cause birth defects or miscarriage.

Foods to steer clear of include:

  • Soft, unpasteurized cheeses (often advertised as “fresh”) such as feta, goat, Brie, Camembert, and blue cheese. Soft cheeses including imported soft cheeses may contain listeria. You would need to avoid soft cheeses such as Brie, Camembert, Roquefort, Feta, Gorgonzola, and Mexican style cheeses that include Queso Blanco and Queso Fresco unless they clearly state that they are made from pasteurized milk. All soft non-imported cheeses made with pasteurized milk are safe to eat.
  • Unpasteurized milk, juices, and apple cider. Unpasteurized milk may contain listeria. Make sure that any milk you drink is pasteurized.
  • Raw eggs or foods containing raw eggs, including mousse and tiramisu. Raw eggs or any foods that contain raw eggs should be avoided because of the potential exposure to salmonella. Some homemade Caesar dressings, mayonnaise, homemade ice cream or custards, and Hollandaise sauces may be made with raw eggs. If the recipe is cooked at some point, this will reduce the exposure to salmonella. Commercially manufactured ice cream, dressings, and eggnog is made with pasteurized eggs and do not increase the risk of salmonella. Restaurants should be using pasteurized eggs in any recipe that is made with raw eggs, such as Hollandaise sauce or dressings.
  • Raw or undercooked meats, fish, or shellfish. Uncooked seafood and rare or undercooked beef or poultry should be avoided during pregnancy because of the risk of contamination with coliform bacteria, toxoplasmosis, and salmonella.
  • Pate. Refrigerated pate or meat spreads should be avoided because they may contain the bacteria listeria. Canned pate or shelf-safe meat spreads can be eaten.
  • Raw shellfish. The majority of seafood-borne illness is caused by undercooked shellfish, which include oysters, clams, and mussels. Cooking helps prevent some types of infection, but it does not prevent the algae-related infections that are associated with red tides. Raw shellfish pose a concern for everybody, and they should be avoided altogether during pregnancy.
  • Processed meats such as hot dogs and deli meats (these should be thoroughly cooked). Deli meats have been known to be contaminated with listeria, which can cause miscarriage. Listeria has the ability to cross the placenta and may infect the baby, which could lead to infection or blood poisoning and may be life-threatening. If you are pregnant and you are considering eating deli meats, make certain that you reheat the meat until it is steaming.
  • Fish that are high in mercury, including shark, swordfish, king mackerel, marlin, orange roughy, tuna steak (bigeye or ahi), and tilefish. Mercury consumed during pregnancy has been linked to developmental delays and brain damage. A sample of these types of fish includes shark, swordfish, king mackerel, and tilefish. Canned, chunk light tuna generally has a lower amount of mercury than other tuna, but still should only be eaten in moderation.
  • Smoked seafood. Refrigerated, smoked seafood often labeled as lox, nova style, kippered, or jerky should be avoided because it could be contaminated with listeria. (These are safe to eat when they are in an ingredient in a meal that has been cooked, like a casserole.) This type of fish is often found in the deli section of your grocery store. Canned or shelf-safe smoked seafood is usually fine to eat.
  • Fish exposed to Industrial Pollutants. Avoid fish from contaminated lakes and rivers that may be exposed to high levels of polychlorinated biphenyls. This is primarily for those who fish in local lakes and streams. These fish include bluefish, striped bass, salmon, pike, trout, and walleye. Contact the local health department or the Environmental Protection Agency to determine which fish are safe to eat in your area. Remember, this is regarding fish caught in local waters and not fish from your local grocery store.
  • Unwashed vegetables. Vegetables are safe, and a necessary part of a balanced diet. However, it is essential to make sure they are washed to avoid potential exposure to toxoplasmosis. Toxoplasmosis may contaminate the soil where the vegetables were grown.

If you’ve eaten these foods at some point during your pregnancy, try not to worry too much about it now; just avoid them for the remainder of the pregnancy. If you’re really concerned, talk to your doctor.

Cheese, milk and other dairy

  • What you can eat
    • all hard cheeses such as Cheddar, Stilton and parmesan
    • soft pasteurised cheeses such as cottage cheese, mozzarella, feta, cream cheese, paneer, ricotta, halloumi, goats’ cheese without a white coating on the outside (rind) and processed cheese spreads
    • thoroughly cooked soft unpasteurized cheeses, until steaming hot
    • thoroughly cooked soft cheeses with a white coating on the outside, until steaming hot
    • thoroughly cooked soft blue cheeses, until steaming hot
    • pasteurized milk, yogurt, cream and ice cream
  • What to avoid
    • mold-ripened soft cheeses with a white coating on the outside, such as brie, Camembert and chevre (unless cooked until steaming hot)
    • soft blue cheeses such as Danish blue, Gorgonzola and Roquefort (unless cooked until steaming hot)
    • any unpasteurized cow’s milk, goats’ milk or sheep’s milk
    • any foods made from unpasteurized milk, such as soft goats’ cheese
    • NOTE:
      • Unpasteurized dairy products may contain listeria. This bacteria can causes an infection called listeriosis.
      • There’s a small chance listeriosis can lead to miscarriage, stillbirth, or make your newborn baby very unwell.
      • Soft cheeses with a white coating on the outside have more moisture. This can make it easier for bacteria to grow.

Meat and poultry

  • What you can eat
    • meats such as chicken, pork and beef, as long as they’re well-cooked with no trace of pink or blood; be especially careful with poultry, pork, sausages and burgers
      cold, pre-packed meats such as ham and corned beef
  • What to be careful with
    • cold cured meats, such as salami, pepperoni, chorizo and prosciutto (unless cooked thoroughly)
  • What to avoid
    • raw or undercooked meat
    • liver and liver products
    • all types of pâté, including vegetarian pâté
    • game meats such as goose, partridge or pheasant
  • NOTE:
    • There’s a small risk of getting toxoplasmosis if you eat raw and undercooked meat, which can cause miscarriage.
    • Cured meats are not cooked, so they may parasites in them that cause toxoplasmosis.
    • Liver and liver products have lots of vitamin A in them. This can be harmful to an unborn baby.
    • Game meats may contain lead shot.

Eggs

  • What you can eat
    • eggs as long as the whites and yolks are cooked thoroughly until solid
  • What to avoid
    • raw or partially cooked eggs
    • duck, goose or quail eggs, unless cooked thoroughly until the whites and yolks are solid
  • NOTE:
    • Salmonella is unlikely to harm your unborn baby, but you could get food poisoning.
    • If you eat eggs or not from hens, make sure the whites and yolks are cooked thoroughly.

Fish

  • What you can eat
    • cooked fish and seafood
    • smoked fish such as smoked salmon and trout
    • raw or lightly cooked fish in sushi, if the fish has been frozen first
    • cooked shellfish, such as mussels, lobster, crab, prawns, scallops and clams
    • cold pre-cooked prawns
  • What to limit
    • you should eat no more than 2 portions of oily fish a week, such as salmon, trout, mackerel or herring
    • you should eat no more than 2 tuna steaks (about 140g cooked or 170g raw) or 4 medium-size cans of tuna (about 140g when drained) per week

Tuna does not count as an oily fish

You can have 2 tuna steaks, or 4 medium-size cans of fish, as well as 2 portions of oily fish.

  • What to avoid
    • swordfish
    • marlin
    • shark
    • raw shellfish
  • NOTE:
    • You should limit tuna because it has more mercury in it than other fish. If you eat too much mercury, it can be harmful to your unborn baby.
    • You should limit oily fish because they can have pollutants such as dioxins and polychlorinated biphenyls in them. If you eat too much of these, they can be harmful to your unborn baby.
    • You should avoid raw shellfish because they can have harmful bacteria, viruses or toxins in them. These can make you unwell and give you food poisoning.

Figure 2. EPA and FDA advice on eating fish and shellfish (you can use this chart to help you choose which fish to eat, and how often to eat them, based on their mercury levels. The “Best Choice” have the lowest levels of mercury)

advice on eating fish and shellfish

Footnote: This advice is geared toward helping women who are pregnant or may become pregnant – as well as breastfeeding mothers and parents of young children – make informed choices when it comes to fish that is healthy and safe to eat.

[Sources 1), 2) ]

How do to use the chart

Fish are a high quality protein source, and lower mercury fish are a good choice for everyone. This advice is specifically for women who are pregnant, might become pregnant or are breastfeeding, and for young children, but everyone can follow this advice.

  • Use the chart to help you choose which fish to eat each week. Eating a variety of fish is better for you and your child than eating the same type every time.
  • You can eat 2 to 3 servings a week of fish in the “Best Choices” category, based on a serving size of four ounces, in the context of a total healthy diet.
  • You can eat 1 serving a week of fish in the “Good Choices” category.
  • You should NOT eat fish in the “Choices to Avoid” category or feed them to young children. However, if you do, eat fish with lower mercury levels in the following weeks.
  • Eat a variety of fish.
  • Serve 1 to 2 servings of fish a week to children, starting at age 2.
  • If you eat fish caught by family or friends, check for fish advisories. If there is no advisory, eat only one serving and no other fish that week. Some fish caught by family and friends, such as larger carp, catfish, trout and perch, are more likely to have fish advisories due to mercury or other contaminants. State advisories will tell you how often you can safely eat those fish.

How can some fish be in more than one category?

There are different types (or species) of tuna, such as albacore, bigeye, and yellowfin. Some types of tuna that are bigger or live longer tend to have higher mercury levels, and that is why they are in different categories. So, canned light tuna is in the “Best Choices” category. Albacore (or white) tuna and yellowfin tuna are in the “Good Choices” category, and bigeye tuna is in the “Choices to Avoid.” In addition, fish of the same species that are caught in different geographic locations can vary in mercury content. For example, tilefish are in two categories because tilefish in the Gulf of Mexico have higher mercury levels than those in the Atlantic Ocean

Why are some fish not on the chart?

If you are looking for a species of fish that is not on the chart, such as mussels, that means the EPA and the FDA did not have enough reliable mercury data to include it. The agencies are planning to update the chart as they get more data.

What is a serving?

For adults, a typical serving is 4 ounces of fish, measured before cooking. Our advice is to eat 2 to 3 servings of a variety of cooked fish, or about 8 to 12 ounces, in a week.

How can I tell how much 4 ounces is?

Four ounces is about the size and thickness of an adult’s palm.

What happens if I eat less fish than the 2 to 3 servings a week you recommend?

You could miss out on the high quality protein, minerals and vitamins present in fish that are beneficial to overall health. Simply try to eat the recommended amount from a variety of fish in the following weeks. Our advice is provided as a general guideline for how much fish to eat weekly.

What happens if I eat more than 3 servings of fish in a week?

Try to vary the fish you eat. If you eat more than 3 servings in a week and some include fish with higher mercury levels, try to eat fish with lower mercury levels in the following weeks.

Should I make any changes to the advice based on my weight?

The advice provided here is intended as a general guideline. Women who weigh less than the average (165 pounds) may wish to eat smaller portions or to eat two servings of fish a week instead of three.

Nutrition for expectant moms

Eating well-balanced meals is important at all times, but it is even more so when you are pregnant. There are essential nutrients, vitamins, and minerals that your developing baby needs.

Scientists know that your diet can affect your baby’s health — even before you become pregnant. For example, research shows that folic acid helps prevent neural tube defects (including spina bifida) during the earliest stages of fetal development. So it’s important to get plenty of it before you become pregnant and during the early weeks of your pregnancy.

Doctors encourage women to take folic acid supplements before and throughout pregnancy (especially for the first 28 days). Be sure to ask your doctor about folic acid if you’re considering becoming pregnant.

Calcium is another important nutrient. Because your growing baby’s calcium demands are high, you should increase your calcium consumption to prevent a loss of calcium from your own bones. Your doctor will also likely prescribe prenatal vitamins for you, which contain some extra calcium.

Your best food sources of calcium are milk and other dairy products. However, if you have lactose intolerance or dislike milk and milk products, ask your doctor about a calcium supplement. (Signs of lactose intolerance include diarrhea, bloating, or gas after eating milk or milk products. Taking a lactase capsule or pill or using lactose-free milk products may help.) Other calcium-rich foods include sardines or salmon with bones, tofu, broccoli, spinach, and calcium-fortified juices and foods.

Doctors don’t usually recommend starting a strict vegan diet when you become pregnant. However, if you already follow a vegan or vegetarian diet, you can continue to do so during your pregnancy — but do it carefully. Be sure your doctor knows about your diet. It’s challenging to get the nutrition you need if you don’t eat fish and chicken, or milk, cheese, or eggs. You’ll likely need supplemental protein and may also need to take vitamin B12 and D supplements.

To ensure that you and your baby receive adequate nutrition, consult a registered dietitian for help with planning meals.

Here are some of the most common nutrients you need and the foods that contain them:

Nutrient Needed for Best sources
Protein cell growth and blood production lean meat, fish, poultry, egg whites, beans, peanut butter, tofu
Carbohydrates daily energy production breads, cereals, rice, potatoes, pasta, fruits, vegetables
Calcium strong bones and teeth, muscle contraction, nerve function milk, cheese, yogurt, sardines or salmon with bones, spinach
Iron red blood cell production (to prevent anemia) lean red meat, spinach, iron-fortified whole-grain breads and cereals
Vitamin A healthy skin, good eyesight, growing bones carrots, dark leafy greens, sweet potatoes
Vitamin C healthy gums, teeth, and bones; assistance with iron absorption citrus fruit, broccoli, tomatoes, fortified fruit juices
Vitamin B6 red blood cell formation; effective use of protein, fat, and carbohydrates pork, ham, whole-grain cereals, bananas
Vitamin B12 formation of red blood cells, maintaining nervous system health meat, fish, poultry, milk
(Note: vegetarians who don’t eat dairy products need supplemental B12.)
Vitamin D healthy bones and teeth; aids absorption of calcium fortified milk, dairy products, cereals, and breads
Folic acid blood and protein production, effective enzyme function green leafy vegetables, dark yellow fruits and vegetables, beans, peas, nuts
Fat body energy stores meat, whole-milk dairy products, nuts, peanut butter, margarine, vegetable oils
(Note: limit fat intake to 30% or less of your total daily calorie intake.)

7 tips for eating well in pregnancy

These 7 simple tips will help you have a healthy diet during pregnancy. Now is not the time to diet. Diets can harm your baby by depriving them of food groups. But managing your weight by eating well and keeping active is good for you and your baby.

  1. Don’t eat for two. First things first, the whole ‘eating for two’ thing is a myth. During pregnancy you don’t need to consume any extra calories for your baby, until the final trimester. At that point you need an extra 200 calories only.
  2. Choose low glycemic index foods (low GI foods). Choose foods that release their energy slowly, rather than give you an energy spike, which ends with a crash (think sugary things like biscuits, cakes). Instead try: multigrain or granary bread, basmati rice, potatoes – new, boiled, baked – and eat the skin, sweet potatoes and wholemeal pasta.
  3. Breakfast like a king. Don’t skip breakfast. People who eat breakfast are better able to manage their weight. Choose sugar-free wholegrain cereals. Try and get some of your 5 a day in if possible by adding fruit. During pregnancy, it can also help ease morning sickness by boosting your blood sugar levels and is likely to stop you overeating later in the day.
  4. Stay active. Another pregnancy myth is that exercise might harm your baby. It won’t. Staying active will benefit both you and your baby, and help get your body ready for labour.
  5. Healthy food swaps. When you get a craving for sweet foods, it’s easy to reach for a comforting slice of cake. That’s fine as a special treat once in a while, but you and your baby will benefit from some more nutritious calories.
  6. Drink water. Your body needs extra fluids to keep up with the demands of pregnancy. Water is the best choice, but if you need to mix it up try to avoid sugary drinks like cola and stick to one glass of fruit juice a day. High in natural sugar, fruit juice can make your blood sugar levels fall and rise rapidly. Choose fresh juice with pulp, and avoid shop-bought juices with added sugar, or ‘made from concentrate’. Calcium is great for you and your baby, but when drinking milk, choose semi-skimmed, not full-fat.
  7. Eating smaller meals throughout the day can help in all sorts of ways. It can:
    • prevent nausea and sickness
    • help with indigestion and heartburn
    • make you feel more comfortable as the baby gets bigger
    • keep sudden pregnancy cravings under control.

Returning to pre-pregnancy weight

Gaining the right amount of weight during pregnancy through a mixture of good eating and activity choices will make returning to your pre-pregnancy weight easier.

If you were overweight or obese before becoming pregnant but established good eating and activity habits during pregnancy, continuing to do so after your baby is born will help support gradual weight loss. This will not adversely affect the ability to breastfeed or the quantity or quality of your breast milk.

The greatest amount of weight loss usually occurs in the first 3 months after birth and then continues at a slow and steady rate until 6 months after birth. Breastfeeding helps you return to your pre-pregnancy weight as some of the weight you gain during pregnancy is used as fuel to make breast milk.

Future pregnancies

If you are planning another pregnancy, it is a good idea to establish healthy eating and activity patterns and try to reach a healthy weight before becoming pregnant. For some, this will be a matter of returning to your pre-pregnancy weight or close to it.

Retaining excess weight over subsequent pregnancies increases your risk of developing diabetes and heart disease later in life.

Speak to your lead maternity carer for more advice.

Don’t forget to take an 800 mcg tablet of folic acid each day if you are trying to become pregnant.

References   [ + ]

read more

Diastasis recti

diastasis recti

What is diastasis recti

Diastasis recti also known as abdominal muscle separation or divarication, is a separation between the left and right side of the rectus abdominis muscle along the linea alba 1). The rectus abdominis muscle covers the front surface of your belly area. Some women find their stomach muscles weaken and separate during and after pregnancy.

During pregnancy, the growing uterus stretches the muscles in the abdomen. This can cause the two large parallel bands of muscles that meet in the middle of the abdomen (rectus abdominis muscles) to become separated by an abnormal distance — a condition called diastasis recti abdominis.

Diastasis recti might cause a bulge in the middle of your abdomen where the two muscles separate. Diastasis recti might be noticeable only when the abdominal muscles are tense, such as when you move from lying down to sitting up. Diastasis recti can weaken the abdominal muscles, causing lower back pain and making it difficult to lift objects or do other routine daily activities.

You might be more likely to develop diastasis recti as a result of pregnancy if you have carried multiples or a large baby to term and are of small stature and fit or are age 35 or older.

The amount of separation varies from one woman to another. Diastasis recti happens because your growing womb (uterus) pushes the muscles apart, making them longer and weaker.

Most women don’t notice any problems as their stomach muscles separate in pregnancy. But you might notice a bulge developing down the front of your bump, above and below your belly button.

After you have had your baby, you can check the size of the diastasis recti separation with this simple technique:

  • Lie on your back with your legs bent and your feet flat on the floor.
  • Raise your shoulders off the floor slightly and look down at your tummy. Using the tips of your fingers, feel between the edges of the muscles, above and below your belly button. See how many fingers you can fit into the gap between your muscles.
  • Do this regularly to check that the gap is gradually decreasing.

The separation between your stomach muscles will usually go back to normal by the time your baby is eight weeks old. If the gap is still obvious at eight weeks, the muscles may still be long and weak. This can put you at risk of back problems.

If you think you have diastasis recti, talk to your health care provider. Your doctor can refer you to a physiotherapist, who will give you some specific exercises to do.

Regular pelvic floor and deep stomach muscle exercises can help to reduce the size of the separation between your stomach muscles. It’s also important to stand up tall and be aware of your posture now you’re no longer pregnant.

If abdominal muscle weakness associated with diastasis recti is interfering with your daily activities, surgery might be recommended to repair the muscle separation. If you’re bothered by the bulge in your abdomen, you might also consider surgery for cosmetic reasons.

Figure 1. Rectus abdominis muscles

Rectus abdominis muscles

Rectus abdominis muscles

Does diastasis recti go away by itself?

Diastasis recti usually goes away after the birth of the baby in about 8 weeks. That said, up to 1 in 3 women still report problems with diastasis recti abdominis 12 months after the birth of their baby.

What causes diastasis recti?

Pregnant women may develop the condition because of increased tension on the abdominal wall. Diastasis recti is more common in women who have had more than one child, are aged over 35 or who are having twins or triplets (or more). Diastasis recti can also occur in a small-statured woman who is having a larger-than-average baby. To date, there is no consensus about risk factors for development of diastasis recti during pregnancy and in the postpartum period 2). Older age, multiparity, caesarean section, gestational weight gain, high birth weight, multiple pregnancy, and child care have been proposed 3). There is also scant knowledge on the consequences of diastasis recti 4). It has been hypothesized that diastasis recti, in addition to being a cosmetic concern for many women, may reduce low back and pelvic stability, cause low back and pelvic girdle pain, and be related to pelvic floor dysfunctions such as urinary incontinence, anal incontinence, and pelvic organ prolapse 5).

Diastasis recti is also common in newborns. It is seen most often in premature and African American infants.

Diastasis recti prevention during pregnancy

Strengthening your core muscles before you get pregnant or in the early stages of pregnancy might help prevent diastasis recti.

It’s best to avoid putting excess strain on your abdominal muscles while pregnant. Avoid sit-ups or planks. Try to avoid constipation and if you have a cough, get it treated.

Diastasis recti symptoms

A diastasis recti looks like a ridge, which runs down the middle of the belly area. It stretches from the bottom of the breastbone to the belly button. It increases with muscle straining. If you have diastasis recti after the birth of your baby, you may be able to see a gap between the two bands of abdominal muscles. You can see this gap more clearly if you lie flat on your back and lift your head up. You might also notice a physical bulge in the middle of your stomach, especially when your abdominal muscles are active. Some women with diastasis recti also get lower back pain, as the separation prevents the stomach muscles from supporting the back.

Diastasis recti is commonly seen in women who have multiple pregnancies. This is because the muscles have been stretched many times. Extra skin and soft tissue in the front of the abdominal wall may be the only signs of this condition in early pregnancy. In the later part of pregnancy, the top of the pregnant uterus can be seen bulging out of the abdominal wall. An outline of parts of the unborn baby may be seen in some severe cases.

In infants, diastasis recti is most easily seen when the baby tries to sit up. When the infant is relaxed, you can often feel the edges of the rectus muscles.

Diastasis recti test

After you have had your baby, you can check the size of the diastasis recti separation with this simple technique:

  • Lie on your back with your legs bent and your feet flat on the floor.
  • Raise your shoulders off the floor slightly and look down at your tummy. Using the tips of your fingers, feel between the edges of the muscles, above and below your belly button. See how many fingers you can fit into the gap between your muscles.
  • Do this regularly to check that the gap is gradually decreasing.

How is diastasis recti diagnosed?

Your doctor, midwife or physiotherapist can check how big your diastasis recti is by measuring it with their fingers or a measuring tape, or by doing an ultrasound.

Diastasis recti treatment

It’s important to stop the separation from getting worse. Try these tips:

  • Avoid lifting anything heavier than your baby.
  • Roll onto your side when getting out of bed or sitting up.
  • Choose gentle exercises (rather than intense ones) that strengthen the deeper stomach muscles.
  • Skip activities and movements that can make abdominal separation worse, such as sit-ups (crunches), oblique curls and some yoga poses (ask your yoga teacher for advice).

You can also wear a supportive brace or compression underwear to help support your back and resolve the muscle separation.

There is a good chance that with time and care, the rectus abdominis muscles will come back together. If that doesn’t work as well as you’d like, surgery after you’ve had your baby is an option.

Surgery often involves using stitches to repair the abdominal wall and reduce the gap between the rectus abdominis muscles. This can improve quality of life and muscle strength, especially when separation is wider than 3 cm.

Diastasis recti exercises

Deep stomach exercises can help you tone up your stomach muscles:

  1. Lie on your side with your knees slightly bent
  2. Let your tummy relax and breathe in gently
  3. As you breathe out, gently draw in the lower part of your stomach like a corset, narrowing your waistline
  4. Squeeze your pelvic floor muscles at the same time
  5. Hold for a count of 10, breathing normally, then gently release
  6. Repeat up to 10 times

Diastasis recti surgery

There is no consensus on the surgical technique or indications for the treatment of diastasis recti 6). Different options have been proposed such as conventional surgery, with abdominoplasty or laparoscopic approach. The most common surgical technique used is by the way of an abdominoplasty in patients with excess abdominal skin and subcutaneous cellular tissue 7). However, a mini-invasive approach presents as an alternative procedure to the most commonly used surgical technique for diastasis recti treatment. For this endoscopic approach, the patient is positioned in supine position with both legs open and the surgeon is located between them. A 10 mm incision is made in the suprapubic midline and a space is created between the subcutaneous cellular tissue and the superficial aponeurosis with blunt dissection. A 10 mm trocar is introduced for the optic and then 5 mm trocars are placed under direct vision on each side of the midline by around 5 cm. 12 mmHg CO2 was used to maintain a correct work space. Under endoscopic vision the supra-aponeurotic space is dissected exposing the linea alba and superficial aponeurosis until we reach the umbilical region. The umbilicus was desinserted above the hernia sac, reintroducing it into the intra-abdominal compartment. Dissection continued until reaching the subcostal incisional hernia. Where the hernia is also dissected. The plication of the aponeurosis of the recti muscles was done with two continuous non-absorbable barbed sutures from the subxiphoid to suprapubic region. Then, a polypropylene of 15 cm × 10 cm mesh prosthesis was introduced in the supra-aponeurotic space (onlay) and fixed with securestrap. Finally, the umbilicus was reinserted to its normal position to the plicated fascia with an intracorporeal knotting.

References   [ + ]

read more

Inducing labor

inducing labor

Inducing labor

Labor also called childbirth is the process of your baby leaving the uterus (womb). Labor usually starts naturally on its own, but sometimes it needs to be started artificially. This is called induced labor. Inducing labor also called labor induction is when your health care provider gives you medicine or uses other methods to make labor start – the stimulation of uterine contractions during pregnancy before labor begins on its own to achieve a vaginal birth. Most women will go into labor naturally by 42 weeks, but sometimes it may be best to induce labor. Your health care provider might recommend inducing labor for various reasons, primarily when there’s concern for a mother’s health or a baby’s health.

Inducing labor can include breaking your water (amniotic sac), to make your labor start. The amniotic sac also called bag of waters is the sac inside your uterus (womb) that holds your growing baby. The sac is filled with amniotic fluid. Contractions are when the muscles of your uterus get tight and then relax. Contractions help push your baby out of your uterus.

Your doctor may recommend inducing labor if your health or your baby’s health is at risk or if you’re 2 weeks or more past your due date. For some women, inducing labor is the best way to keep mom and baby healthy.

If there are medical reasons to schedule induction, talk to your doctor about waiting until at least 39 weeks of pregnancy. This gives your baby the time she needs to grow and develop before birth. Inducing labor should be for medical reasons only.

Inducing labor can take a few hours or a few days. It depends on how your body responds to your treatment.

Are there any reasons why I wouldn’t be offered a labor induction?

Labor induction isn’t appropriate for everyone. Labor induction might not be an option if:

  • You’ve had a prior Cesarean section or C-section with a classical incision or major uterine surgery
  • The placenta is blocking your cervix (placenta previa)
  • Your baby is lying buttocks first (breech) or sideways (transverse lie)
  • You have an active genital herpes infection
  • The umbilical cord slips into your vagina before delivery (umbilical cord prolapse)

If you’ve had a prior C-section and have labor induced, your health care provider will avoid certain medications to reduce the risk of uterine rupture.

Your baby is breech

If your baby is breech and you want to deliver vaginally, it’s important that your labor progresses steadily, so induction isn’t usually recommended. Instead, you’ll be offered an emergency cesarean if there are any issues during labor.

You’ve had a fast labor before

If you’ve given birth quickly before also known as precipitate labor, you may be tempted to ask for an induction if you’re worried you may give birth before a midwife reaches you. But it’s unlikely you’ll be offered an induction for this reason. Also, there’s no evidence that induction will prevent your labor from being fast.

Your baby is big

Unless there are any other issues, your healthcare professional won’t induce you because they suspect your baby is large for their gestational age. This is because accurately assessing your unborn baby’s weight is difficult.

Intrauterine growth restriction

If your unborn baby has intrauterine growth restriction (also known as fetal growth restriction) induction isn’t recommended. This is because there is a risk that the baby may die before or after birth.

Why would I need labor induction?

Your doctor might recommend inducing labor for various reasons, primarily when there’s concern for a mother’s health or a baby’s health. For example:

  • You’re approaching two weeks beyond your due date, and labor hasn’t started naturally (postterm pregnancy)
  • Your water has broken, but labor hasn’t begun (prelabor rupture of membranes)
  • You have an infection in your uterus (chorioamnionitis)
  • Your baby has stopped growing at the expected pace (fetal growth restriction)
  • There’s not enough amniotic fluid surrounding the baby (oligohydramnios)
  • You have diabetes
  • You have a high blood pressure disorder
  • Your placenta peels away from the inner wall of the uterus before delivery — either partially or completely (placental abruption)
  • You have a medical condition such as kidney disease or obesity.

Can I wait for labor to begin naturally?

Nature typically prepares the cervix for delivery in the most efficient, comfortable way. However, if your health care provider is concerned about your health or your baby’s health or your pregnancy continues two weeks past your due date, inducing labor might be the best option.

Why the concern after two weeks? When a pregnancy lasts longer than 42 weeks, amniotic fluid might begin to decrease and there’s an increased risk of having a baby significantly larger than average (fetal macrosomia). There’s also an increased risk of C-section, fetal inhalation of fecal waste (meconium aspiration) and stillbirth.

Can I request an elective labor induction?

Elective labor induction is the initiation of labor for convenience in a person with a term pregnancy who doesn’t medically need the intervention. For example, if you live far from the hospital or birthing center or you have a history of rapid deliveries, a scheduled induction might help you avoid an unattended delivery. In such cases, your health care provider will confirm that your baby’s gestational age is at least 39 weeks or older before induction to reduce the risk of health problems for your baby.

Can I do anything to trigger labor on my own?

Probably not. Techniques such as exercising or having sex to induce labor aren’t backed by scientific evidence. Also, avoid herbal supplements, which could harm your baby.

Is labor induction painful?

No, the induction process itself is not painful, but you might feel some slight discomfort. You may be kept in hospital if you have prostaglandins (although some hospitals may offer you to go home), and you will be kept in if you’re having your waters broken.

Your birth partner may be able to stay with you , although this depends on hospital policy and your birth partner may need to leave for a while. You could bring a book, magazine or iPad with you to pass the time. When you pack your hospital bag to come in for an induction, pack it as you would for the birth of the baby.

Induced labors can be more painful than labors that start on their own. But you should have access to the same pain relief as you would with a natural labor.

What if the labor induction doesn’t work?

If you don’t go into labor after an induction, your doctor or midwife will talk to you about your options. You may be offered another induction or a cesarean section.

How do I decide if I want a labor induction?

It is up to you whether you have the labor induction or not and you should be supported in whatever decision you make.

Before you are offered the labor induction procedure, you should be offered a membrane sweep. This makes it more likely that you’ll go into labor naturally and won’t need an induction.

To help you decide, your doctor or midwife should give you more information about:

  • why you’re being offered an induction
  • when, where and how the induction will be carried out
  • what support and pain relief is available
  • what other options are available
  • what the risks and benefits are
  • what your options are if induction doesn’t work.

Don’t be afraid to ask any questions and take some time to think about your options. You may find it helpful to talk to your partner, family or trusted friends before making a decision.

Ways to induce labor

Your health care provider uses one or more of these treatments to induce labor:

  • Separating the amniotic sac from the wall of the uterus also called membrane stripping or sweeping the membranes. Your doctor gently puts a gloved finger through your cervix and separates the amniotic sac from your uterus. The cervix is the opening to the uterus that sits at the top of the vagina. You can have this procedure done in your doctor’s office. You may have some cramping or spotting. Membrane stripping releases endogenous prostaglandins, which can induce labor, and by doing so, eliminate the need for formal induction. To perform membrane stripping, the clinician performs a vaginal exam and places a finger into cervical os in a circular movement to separate the inferior portion of membranes from the lower uterine segment. A Cochrane review 1) found that membrane stripping results in an increased number of women entering spontaneous labor within 48 hours and decreases the need for induction. There was no difference in risk of maternal or neonatal infection. Potential side effects include patient discomfort during the procedure, vaginal bleeding, rupture of membranes and contractions following the procedure.
  • Ripening the cervix. Your doctor gives you medicine called prostaglandins to help soften and thin your cervix so it will open during labor. You may get the medicine by mouth or it may be put in your vagina. You get the medicine at a hospital. Your doctor also may use a medicine called laminaria in your vagina. It absorbs moisture and expands to help open the cervix. Or your doctor may use an instrument called a Foley bulb. This is a thin tube with a balloon at the end. Your doctor inserts it in the vagina to widen the cervix.
  • Giving you medicines to start contractions. Doctors often use a medicine called oxytocin to induce labor. This medicine is the man-made form of a hormone that helps start contractions. At the hospital, your provider gives you oxytocin through an IV (a needle into a vein). It may make you have really strong contractions. Ask your doctor about pain medicine you may want to have during labor. Contractions begin after 3 to 5 minutes, and oxytocin reaches a steady level in plasma by 40 minutes. Oxytocin side effects include uterine tachysystole and fetal heart rate abnormalities 2). Fetal heart rate and contractions should be monitored during oxytocin administration 3). A Cochrane review 4) compared the effectiveness of low versus high-dose oxytocin for induction of labor. There was no difference in time to delivery or cesarean delivery rate between the two groups. There was a significant increase in uterine tachysystole in the high-dose group, but the consequences of this were not clearly identified. The review was unable to recommend either a low or high-dose protocol over the other. An oxytocin checklist was developed for oxytocin administration focusing on uterine contractions and fetal heart rate rather than specific infusion rates or dosing. Outcomes were compared before and after initiation of the checklist protocol. The maximum infusion rate of oxytocin was lower in the checklist protocol group. There was no difference in time in labor between groups. Furthermore, the cesarean delivery rate was lower and newborn outcomes improved in the checklist protocol group 5).
  • Breaking your water also called rupturing the membranes or amniotomy. Your doctor uses a small hook that looks like a knitting needle to break the amniotic sac that holds your baby. This shouldn’t be painful, but you may feel a warm gush of fluid. A Cochrane review 6) found that there was not sufficient data regarding amniotomy as a method for labor induction to draw a conclusion on its safety and efficacy.

There’s no guarantee that an induction will work. There’s also some evidence that if your labor is induced, you may be slightly more likely to need instruments such as forceps or ventouse to help your baby to be born safely.

How to induce labor naturally

Although none of these methods have been backed up by research, some women have tried these ideas when they’ve been past their due date:

  • Sex. Your partner’s semen contains natural prostaglandins that may stimulate labor. Don’t worry, having sex during pregnancy is safe and will not make you go into labor early. But don’t have sex if your waters have broken because there’s an increased risk of infection.
  • Stimulating your nipples. Nipple or breast stimulation stimulates uterine contractions, likely by increasing oxytocin levels. A Cochrane review 7) found that when compared to no intervention, more women entered labor by 72 hours with nipple stimulation; however, this was only significant for women who had a favorable cervix initially. Additionally, there was a decrease in post-partum hemorrhage among women who performed nipple stimulation. There were no cases of uterine tachysystole. However, a trend towards an increase in perinatal death amongst women who used nipple stimulation was noted. More information is needed regarding the safety of this method before recommendations about its use can be endorsed.
  • Keeping active with lots of walking.

Don’t listen to anyone who tells you that castor oil will help – it won’t. It will just make you feel sick and may give you diarrhea and stomach cramps that aren’t labor pains.

What are medical reasons for inducing labor?

To determine if labor induction is necessary, your doctor will evaluate several factors, including your health, your baby’s health, your baby’s gestational age, weight and size, your baby’s position in the uterus, and the status of your cervix.

Your doctor may recommend inducing labor if:

  • Your pregnancy lasts longer than 41 to 42 weeks (postterm pregnancy). After 42 weeks, the placenta may not work as well as it did earlier in pregnancy. The placenta grows in your uterus (womb) and supplies your baby with food and oxygen through the umbilical cord.
  • Your placenta is separating from your uterus (placental abruption).
  • Your water breaks before labor begins. This is called premature rupture of membranes also called PROM.
  • You have health problems, like diabetes, high blood pressure or preeclampsia or problems with your heart, lungs or kidneys. Gestational diabetes is when your body has too much sugar (called glucose) in your blood that develops during pregnancy. This can damage organs in your body, including blood vessels, nerves, eyes and kidneys. High blood pressure is when the force of blood against the walls of the blood vessels is too high and stresses your heart. Preeclampsia is a serious blood pressure condition that can happen after the 20th week of pregnancy or after giving birth also called postpartum preeclampsia.
  • Your baby has a stopped growing (fetal growth restriction). The estimated weight of your baby is less than the 10th percentile for gestational age.
  • Your baby has oligohydramnios. This means your baby doesn’t have enough amniotic fluid.
  • You have Rhesus disease (Rh disease) and it causes problems with your baby’s blood.
  • You have an infection in your uterus (chorioamnionitis).

Your baby is late

Usually, babies arrive anywhere between 37 and 42 weeks of pregnancy. But if your baby is very late (if you are pregnant for more than 42 weeks), the placenta may not be working as well as it used to and the risk of stillbirth increases. In this case, you’ll be offered an induction between 41 and 42 weeks of pregnancy. Being overdue (also known as a prolonged pregnancy) is the most common reason for an induction.

Your labor doesn’t start after your waters break

You may be offered an induction if you’re more than 34 weeks pregnant and your waters break, but labor doesn’t start on its own after 24 hours. This is because your waters breaking increases your baby’s risk of infection.

If your pregnancy is uncomplicated, you may also be offered expectant management. This is when your midwife or doctor monitor you and your baby, and your pregnancy progresses naturally as long as it is safe.

If you’re more than 37 weeks pregnant, you may be offered an induction within 24 hours of your waters breaking. If you don’t want an induction, your midwife will put together a plan for monitoring you.

If your waters break before 34 weeks, you’ll only be offered an induction if there are other factors that suggest it’s the best thing to do. For example, if you have an infection or there are concerns about the baby’s health. If your baby is born earlier than 37 weeks, they may be at risk of problems related to being premature.

You or your baby has a health problem

You may be offered an induction if you have a condition that means it’ll be safer to have your baby sooner. This could include:

  • type 1 or type 2 diabetes
  • gestational diabetes
  • pre-eclampsia
  • intrahepatic cholestasis of pregnancy (ICP)
  • pregnancy-induced hypertension.

If your healthcare professional thinks that being induced is the best option for you and your baby, they should talk to you about this. They can help you assess the benefits and any potential risks so you can make an informed decision.

What are the risks of inducing labor?

Labor induction isn’t for everyone. For example, it might not be an option if you have had a prior C-section with a classical incision or major uterine surgery, your placenta is blocking your cervix (placenta previa), or your baby is lying buttocks first (breech) or sideways (transverse lie) in your uterus.

Inducing labor also carries various risks, including:

  • Your due date may not be exactly right. Sometimes it’s hard to know exactly when you got pregnant. If you schedule an induction and your due date is off, your baby may be born too early. If your pregnancy is healthy, wait for labor to begin on its own. If you need to schedule an induction for medical reasons, ask your provider if you can wait until at least 39 weeks.
  • Oxytocin and medicines that ripen the cervix can cause abnormal or excessive contractionss, which can diminish your baby’s oxygen supply and lower your baby’s heart rate. This can lower your baby’s heart rate. Your doctor carefully monitors your baby’s heart rate when inducing labor. If your baby’s heart rate changes, your doctor may stop or reduce the amount of medicine you’re getting.
  • You and your baby are at higher risk of infection. The amniotic sac normally protects your baby and your uterus from infection. If labor takes a while to start after your membranes rupture, infections are more likely. Some methods of labor induction, such as rupturing your membranes, might increase the risk of infection for both mother and baby.
  • There may be problems with the umbilical cord. If the amniotic sac is broken, the cord may slip into the vagina before your baby does. This is called umbilical cord prolapse. It’s more likely to happen if your baby is breech. This is when your baby’s bottom or feet are facing down before birth instead of being head-down. Umbilical cord prolapse can cause the umbilical cord to get squeezed during birth. If this happens, your baby doesn’t get enough oxygen, which can be life-threatening.
  • Failed induction. Induction may not work so you may need a C-section (cesarean birth). C-section is surgery in which your baby is born through a cut that your provider makes in your belly and uterus. About 75 percent of first-time mothers who are induced will have a successful vaginal delivery. This means that about 25 percent of these women, who often start with an unripened cervix, might need a C-section. Your health care provider will discuss with you the possibility of a need for a C-section.
  • You may have a uterine rupture. This is when the uterus tears during labor. It happens rarely, but it can cause serious bleeding. If you’ve had a C-section in a prior pregnancy or major uterine surgery, you’re at higher risk of uterine rupture because a C-section leaves a scar in the uterus. An emergency C-section is needed to prevent life-threatening complications. Your uterus might need to be removed.
  • You may be at higher risk of serious bleeding after birth called postpartum hemorrhage. Inducing labor increases the chances that your uterine muscles don’t contract the right way after you give birth (uterine atony), which can lead to bleeding after delivery.

Inducing labor is a serious decision. Work with your health care provider to make the best choice for you and your baby.

What are the risks of scheduling labor induction for non-medical reasons?

Scheduling labor induction also called elective labor induction, is the initiation of labor for convenience in a person with a term pregnancy who doesn’t medically need the intervention. Elective labor inductions might be appropriate in some instances. For example, if you live far from the hospital or birthing center or you have a history of rapid deliveries, a scheduled induction might help you avoid an unattended delivery. In such cases, your health care provider will confirm that your baby’s gestational age is at least 39 weeks or older before induction to reduce the risk of health problems for your baby.

Scheduling labor induction may cause problems for you and your baby because your due date may not be exactly right. Sometimes it’s hard to know exactly when you got pregnant. If you schedule labor induction and your due date is off by a week or 2, your baby may be born too early. Babies born early (called premature babies) may have more health problems at birth and later in life than babies born on time. This is why it’s important to wait until at least 39 weeks to induce labor.

If your pregnancy is healthy, it’s best to let labor begin on its own. If your provider talks to you about inducing labor, ask if you can wait until at least 39 weeks to be induced. This gives your baby’s lungs and brain all the time they need to fully grow and develop before he’s born.

If there are problems with your pregnancy or your baby’s health, you may need to have your baby earlier than 39 weeks. In these cases, your provider may recommend an early birth because the benefits outweigh the risks. Inducing labor before 39 weeks of pregnancy is recommended only if there are health problems that affect you and your baby.

If your doctor recommends inducing labor, ask these questions:

  • Why do you need to induce my labor?
  • Is there a problem with my health or the health of my baby that may make inducing labor necessary before 39 weeks? Can I wait to have my baby closer to 39 weeks?
  • How will you induce my labor?
  • What can I expect when you induce labor?
  • Will inducing labor increase the chance that I’ll need to have a c-section?
  • What are my options for pain medicine?

Labor induction process

Labor induction is done in a hospital or birthing center, where you and your baby can be monitored and labor and delivery services are readily available. However, some steps might be taken prior to admission.

Labor induction procedure

There are various methods for inducing labor. Depending on the circumstances, your health care provider might:

  • Ripen your cervix. Sometimes synthetic prostaglandins, which are typically placed inside the vagina, are used to thin or soften (ripen) the cervix. After prostaglandin use, your contractions and your baby’s heart rate will be monitored. In other cases, a small tube (catheter) with an inflatable balloon on the end is inserted into the cervix. Filling the balloon with saline and resting it against the inside of the cervix helps ripen the cervix.
  • Rupture the amniotic sac. With this technique, also known as an amniotomy, your health care provider makes a small opening in the amniotic sac with a plastic hook. You might feel a warm gush of fluid when the sac opens, also known as your water breaking. An amniotomy is done only if the cervix is partially dilated and thinned and the baby’s head is deep in the pelvis. Your baby’s heart rate will be monitored before and after the procedure. Your health care provider will examine the amniotic fluid for traces of fecal waste (meconium).
  • Use an intravenous medication. In the hospital, your health care provider might intravenously give you a synthetic version of oxytocin (Pitocin) — a hormone that causes the uterus to contract. Oxytocin is more effective at speeding up (augmenting) labor that has already begun than it is as a cervical ripening agent. Your contractions and your baby’s heart rate will be continuously monitored.

Keep in mind that your doctor might also use a combination of these methods to induce labor.

How long it takes for labor to start depends on how ripe your cervix is when your induction starts, the induction techniques used and how your body responds to them. If your cervix needs time to ripen, it might take days before labor begins. If you simply need a little push, you might be holding your baby in your arms in a matter of hours.

After the labor induction procedure

In most cases, labor induction leads to a successful vaginal birth. If labor induction fails, you might need to try another induction or have a C-section.

If you have a successful vaginal delivery after induction, there might be no implications for future pregnancies. If the induction leads to a C-section, your health care provider can help you decide whether to attempt a vaginal delivery with a subsequent pregnancy or to schedule a repeat C-section.

References   [ + ]

read more

Signs of labor

signs of labor

Signs of labor

Labor also called childbirth, is the process of your baby leaving the uterus (womb).

Labor is divided into three stages:

  1. Labor
  2. Pushing and birth
  3. Delivery of the placenta

Every woman’s labor is different. And your labor may be different each time you have a baby. But there are patterns to labor that are true for most women. Learning about the stages of labor and what happens during each one can help you know what to expect once labor begins.

You’re in labor when you have regular contractions that cause your cervix to change. Contractions are when the muscles of your uterus get tight and then relax. Contractions help push your baby out of your uterus. Your cervix is the opening to the uterus that sits at the top of the vagina. When labor starts, your cervix dilates (opens up).

As you get closer to your due date, learning the signs of labor can help you feel ready for labor and birth. If you have any signs of labor, call your doctor.

As you approach your due date, you will be looking for any little sign that labor is about to start. You might notice that your baby has “dropped” or moved lower into your pelvis. This is called “lightening.” If you have a pelvic exam during your prenatal visit, your doctor might report changes in your cervix that you cannot feel, but that suggest your body is getting ready. For some women, a flurry of energy and the impulse to cook or clean, called “nesting,” is a sign that labor is approaching.

Some signs suggest that labor will begin very soon. Call your doctor or midwife if you have any of the following signs of labor. Call your doctor even if it’s weeks before your due date — you might be going into preterm labor. Your doctor or midwife can decide if it’s time to go to the hospital or if you should be seen at the office first.

You know you’re in true labor when:

  • You have strong and regular contractions. A contraction is when the muscles of your uterus tighten up like a fist and then relax. Contractions help push your baby out. When you’re in true labor, your contractions last about 30 to 70 seconds and come about 5 to 10 minutes apart. They’re so strong that you can’t walk or talk during them. You have contractions get stronger and closer together over time with increasingly shorter intervals.
  • You feel pain in your belly and lower back (backache). This pain doesn’t go away when you move or change positions.
  • You have a bloody (brownish or reddish) mucus discharge. This is called bloody show, when the plug of mucus from your cervix (entrance to your womb, or uterus) comes away. Losing your mucus plug usually means your cervix is dilating (opening up) and becoming thinner and softer (effacing). Labor could start right away or may still be days away.
  • Your water breaks (rupture of membranes). Your baby has been growing in amniotic fluid (the bag of waters) in your uterus. When the bag of waters breaks, you may feel a big rush of water. Or you may feel just a trickle.
  • You have an urge to go to the toilet, which is caused by your baby’s head pressing on your bowel

​If you think you’re in labor, call your doctor, no matter what time of day or night. Your doctor can tell you if it’s time to head for the hospital. To see for sure that you’re in labor, your health care provider measures your cervix.

Remember, no one knows for sure what triggers labor, and every woman’s experience is unique. Sometimes it’s hard to tell when labor begins.

Don’t hesitate to call your health care provider if you’re confused about whether you’re in labor. Preterm labor can be especially sneaky. If you have any signs of labor before 37 weeks — especially if you also experience vaginal spotting — consult your health care provider.

If you arrive at the hospital in false labor, don’t feel embarrassed or frustrated. Think of it as a practice run. The real thing is likely on its way.

Did my water break?

It’s not always easy to know. If your water breaks, it could be a gush or a slow trickle of amniotic fluid. Rupture of membranes is the medical term for your water breaking. Let your doctor know the time your water breaks and any color or odor. Also, call your doctor if you think your water broke, but are not sure. An easy test can tell your doctor if the leaking fluid is urine (many pregnant women leak urine) or amniotic fluid. Often a woman will go into labor soon after her water breaks. When this doesn’t happen, her doctor may want to induce (bring about) labor. This is because once your water breaks, your risk of getting an infection goes up as labor is delayed.

What are early signs of labor?

You may be close to starting labor if:

  • Your baby drops or moves lower into your pelvis. This is called lightening. It means that your baby is getting ready to move into position for birth. It can happen a few weeks or even just a few hours before your labor begins.
  • You have an increase in vaginal discharge that’s clear, pink or slightly bloody. This is called show or bloody show. It can happen a few days before labor starts or at the beginning of labor.
  • At a prenatal checkup, your health care provider tells you that your cervix has begun to efface (thin) and dilate (open). Before labor, your cervix is about 3.5 to 4 centimeters long. When it’s fully dilated (open) for labor, it’s 10 centimeters. Once labor starts, contractions help open your cervix.
  • You have the nesting instinct. This is when you want to get things organized in your home to get ready for your baby. You may want to do things like cook meals or get the baby’s clothes and room ready. Doing these things is fine as long as you’re careful not to overdo it. You need your energy for labor and birth.

If you have any of these signs, you may start labor soon. Learn the signs of labor so you know when to call your doctor.

Thinning of the cervix (effacement)

Before labor, the lower part of your uterus called the cervix is typically 3.5 cm to 4 cm long. As labor begins, your cervix softens, shortens and thins (effacement). You might feel uncomfortable, but irregular, not very painful contractions or nothing at all.

Effacement is often expressed in percentages. At 0 percent effacement, the cervix is at least 2 centimeters (cm) long, or very thick. Your cervix must be 100 percent effaced, or completely thinned out, before a vaginal delivery.

Opening of the cervix (dilation)

Another sign of labor is your cervix beginning to open (dilate). Your health care provider will measure the dilation in centimeters from zero (no dilation) to 10 (fully dilated).

At first, these cervical changes can be very slow. Once you’re in active labor, expect to dilate more quickly.

Increase in vaginal discharge

During pregnancy, a thick plug of mucus blocks the cervical opening to prevent bacteria from entering the uterus. During the late third trimester, this plug might be pushed into your vagina. You might notice an increase in vaginal discharge that’s clear, pink or slightly bloody. This might happen several days before labor begins or at the start of labor.

If vaginal bleeding is as heavy as a normal menstrual period, however, contact your health care provider immediately. Heavy vaginal bleeding could be a sign of a problem.

Nesting or spurt of energy

You might wake up one morning feeling energetic, eager to fill the freezer with prepared meals, set up the crib and arrange your baby’s outfits according to color. This urge is commonly known as the nesting instinct.

Nesting can begin at any time during pregnancy but for some women it’s a sign that labor is approaching. Do what you must, but don’t wear yourself out. Save your energy for the harder work of labor ahead.

Feeling the baby has dropped lower

Lightening is the term used to describe when the baby’s head settles deep into your pelvis. This might cause a change in the shape of your abdomen. This change can happen anywhere from a few weeks to a few hours before labor begins.

Your water breaks (rupture of membranes)

The amniotic sac is a fluid-filled membrane that cushions your baby in the uterus. At the beginning of or during labor, your membranes will rupture also known as your water breaking.

When your water breaks you might experience an irregular or continuous trickle of small amounts of watery fluid from your vagina or a more obvious gush of fluid. If your water breaks — or if you’re uncertain whether the fluid is amniotic fluid, urine or something else — consult your health care provider or head to your delivery facility right away. You and your baby will be evaluated to determine the next steps.

Once your amniotic sac is no longer intact, timing becomes important. The longer it takes for labor to start after your water breaks — if it hasn’t started already — the greater you or your baby’s risk of developing an infection. Your health care provider might stimulate uterine contractions before labor begins on its own (labor induction).

Contractions when labor pains begin

During the last few months of pregnancy, you might experience occasional, sometimes painful, contractions — a sensation that your uterus is tightening and relaxing. These are called Braxton Hicks contractions.

To tell the difference between Braxton Hicks contractions and the real thing, consider these questions:

  • Are the contractions regular? Time your contractions from the beginning of one to the beginning of the next. Look for a regular pattern of contractions that get progressively stronger and closer together. False labor contractions will remain irregular.
  • How long do they last? Time how long each contraction lasts. True contractions last about 30 to 70 seconds.
  • Do the contractions stop? True contractions continue regardless of your activity level or position. With false labor, the contractions might stop when you walk, rest or change position.

What are false labor and Braxton-Hicks contractions?

Not all contractions mean you’re in labor. You may have contractions on and off before true labor starts. These contractions are called false labor or Braxton-Hicks contractions. They soften and thin the cervix to help your body get ready for labor and birth. You may feel them in the weeks right before your due date. Learning the differences between true labor contractions and false labor contractions can help you know when you’re really in labor.

It can be hard to tell the difference between true labor and false labor. When you first feel contractions, time them. Write down how much time it takes from the start of one contraction to the start of the next. Make a note of how strong the contractions feel. Keep a record of your contractions for 1 hour. Walk or move around to see if the contractions stop when you change positions.

Table 1. True labor versus false labor (Braxton-Hicks contractions)

True labor versus false labor

What are stages of labor?

Stages of labor include the whole process of labor, from your first contractions (stage 1) to pushing (stage 2) to delivery of the placenta (stage 3) after your baby is born. When regular contractions begin, the baby moves down into the pelvis as the cervix both effaces (thins) and dilates (opens). How labor progresses and how long it lasts are different for every woman. But each stage features some milestones that are true for every woman.

Learning about the stages of labor can help you know what to expect during labor and birth.

What happens in the first stage of labor?

The first stage of labor is the longest stage. The first stage is divided into three parts: early labor, active labor and transition to stage 2 of labor. For first-time moms, it can last from 12 to 19 hours . It may be shorter (about 14 hours) for moms who’ve already had children. It’s when contractions become strong and regular enough to cause your cervix to dilate (open) and thin out (efface). This lets your baby move lower into your pelvis and into your birth canal (vagina). This stage of labor ends when you are 10 centimeters dilated.

The first stage begins with the onset of labor and ends when the cervix is fully opened. It is the longest stage of labor, usually lasting about 12 to 19 hours. Many women spend the early part of this first stage at home. You might want to rest, watch TV, hang out with family, or even go for a walk. Most women can drink and eat during labor, which can provide needed energy later. Yet some doctors advise laboring women to avoid solid food as a precaution should a cesarean delivery be needed. Ask your doctor about eating during labor. While at home, time your contractions and keep your doctor up to date on your progress. Your doctor will tell you when to go to the hospital or birthing center.

At the hospital, your doctor will monitor the progress of your labor by periodically checking your cervix, as well as the baby’s position and station (location in the birth canal). Most babies’ heads enter the pelvis facing to one side, and then rotate to face down. Sometimes, a baby will be facing up, towards the mother’s abdomen. Intense back labor often goes along with this position. Your doctor might try to rotate the baby, or the baby might turn on its own.

As you near the end of the first stage of labor, contractions become longer, stronger, and closer together. Many of the positioning and relaxation tips you learned in childbirth class can help now. Try to find the most comfortable position during contractions and to let your muscles go limp between contractions. Let your support person know how he or she can be helpful, such as by rubbing your lower back, giving you ice chips to suck, or putting a cold washcloth on your forehead.

Sometimes, medicines and other methods are used to help speed up labor that is progressing slowly. Many doctors will rupture the membranes. Although this practice is widely used, studies show that doing so during labor does not help shorten the length of labor.

Your doctor might want to use an electronic fetal monitor to see if blood supply to your baby is okay. For most women, this involves putting two straps around the mother’s abdomen. One strap measures the strength and frequency of your contractions. The other strap records how the baby’s heartbeat reacts to the contraction.

The most difficult phase of this first stage is the transition. Contractions are very powerful, with very little time to relax in between, as the cervix stretches the last, few centimeters. Many women feel shaky or nauseated. The cervix is fully dilated when it reaches 10 centimeters.

Figure 1. First stage of labor 

first stage of labor

Footnote: Most babies’ heads enter the pelvis facing to one side, and then rotate to face down.

Early labor

For most first-time moms, early labor lasts about 6 to 12 hours. You can spend this time at home or wherever you’re most comfortable. During early labor:

  • You may feel mild contractions that come every 5 to 15 minutes and last 60 to 90 seconds.
  • You may have a bloody show. This is a pink, red or bloody vaginal discharge. If you have heavy bleeding or bleeding like your period, call your doctor right away.

What you can do in early labor:

This is a great time for you to rely on your doula or labor support person. Try the methods you learned about in childbirth education classes about how to relax and cope with pain. During early labor:

  • Rest and relax as much as you can.
  • Take a shower or bath.
  • Go for a walk.
  • Change positions often.
  • Make sure you’re ready to go to the hospital.
  • Take slow, relaxing breaths during contractions.

Active labor

This is when you head to the hospital! Active labor usually lasts about 4 to 8 hours. It starts when your contractions are regular and your cervix has dilated to 6 centimeters. In active labor:

  • Your contractions get stronger, longer and more painful. Each lasts about 45 seconds and they can be as close as 3 minutes apart.
  • You may feel pressure in your lower back, and your legs may cramp.
  • You may feel the urge to push.
  • Your cervix will dilate up to 10 centimeters.
  • If your water hasn’t broken, it may break now.
  • You may feel sick to your stomach.

What you can do in active labor:

  • Make sure the hospital staff has a copy of your birth plan.
  • Try to stay relaxed and not think too hard about the next contraction.
  • Move around or change positions. Walk the hallways in the hospital.
  • Drink water or other liquids. But don’t eat solid foods.
  • If you’re going to take medicine to help relieve labor pain, you can start taking it now. Your choice about pain relief is part of your birth plan.
  • Go to the bathroom often to empty your bladder. An empty bladder gives more room for your baby’s head to move down.
  • If you feel like you want to push, tell your doctor. You don’t want to start pushing until your doctor checks your cervix to see how dilated it is.

Transition to the second stage of labor

This can be the toughest and most painful part of labor. It can last 15 minutes to an hour. During the transition:

  • Contractions come closer together and can last 60 to 90 seconds. You may feel like you want to bear down.
  • You may feel a lot of pressure in your lower back and rectum. If you feel like you want to push, tell your doctor.

What happens in the second stage of labor?

In the second stage of labor, your cervix is fully dilated and ready for childbirth. It usually lasts 20 minutes to two hours. The second stage is the most work for you because your doctor wants you to start pushing your baby out. This stage can be as short as 20 minutes or as long as a few hours. It may be longer for first-time moms or if you’ve had an epidural. And epidural is pain medicine you get through a tube in your lower back that helps numb your lower body during labor. It’s the most common kind of pain relief used during labor. The second stage ends when your baby is born.

The second stage involves pushing and delivery of your baby. You will push hard during contractions, and rest between contractions. Pushing is hard work, and a support person can really help keep you focused. A woman can give birth in many positions, such as squatting, sitting, kneeling, or lying back. Giving birth in an upright position, such as squatting, appears to have some benefits, including shortening this stage of labor and helping to keep the tissue near the birth canal intact. You might find pushing to be easier or more comfortable one way, and you should be allowed to choose the birth position that feels best to you.

When the top of your baby’s head fully appears (crowning), your doctor will tell you when to push and deliver your baby. Your doctor may make a small cut, called an episiotomy, to enlarge the vaginal opening. Most women in childbirth do not need episiotomy. Sometimes, forceps (tool shaped like salad-tongs) or suction is used to help guide the baby through the birth canal. This is called assisted vaginal delivery. After your baby is born, the umbilical cord is cut. Make sure to tell your doctor if you or your partner would like to cut the umbilical cord.

During the second stage of labor:

  • Your contractions may slow down to come every 2 to 5 minutes apart. They last about 60 to 90 seconds.
  • You may get an episiotomy. This is a small cut made at the opening of the vagina to help let the baby out. Most women don’t need an episiotomy.
  • Your baby’s head begins to show. This is called crowning.
  • Your doctor guides your baby out of the birth canal. She may use special tools, like forceps or suction, to help your baby out.
  • Your baby is born, and the umbilical cord is cut. Instructions about who’s cutting the umbilical cord are in your birth plan. What you can do:
  • Find a position that is comfortable for you. You can squat, sit, kneel or lie back.
  • Push during contractions and rest between them. Push when you feel the urge or when your doctor tells you.
  • If you’re uncomfortable or pushing has stopped, try a new position.

Figure 2. Second stage labor

Second stage labor

Footnote: The baby twists and turns through the birth canal.

What happens in the third stage of labor?

The third stage involves delivery of the placenta (afterbirth). The third stage is the shortest stage, lasting five to 30 minutes. The placenta grows in your uterus and supplies your baby with food and oxygen through the umbilical cord. Contractions will begin five to 30 minutes after birth, signaling that it’s time to deliver the placenta. You might have chills or shakiness. Labor is over once the placenta is delivered. Your doctor will repair the episiotomy and any tears you might have. Now, you can rest and enjoy your newborn.

During the third stage of labor:

  • You have contractions that are closer together and not as painful as earlier. These contractions help the placenta separate from the uterus and move into the birth canal. They begin 5 to 30 minutes after birth.
  • You continue to have contractions even after the placenta is delivered. You may get medicine to help with contractions and to prevent heavy bleeding.
  • Your doctor squeezes and presses on your belly to make sure the uterus feels right.
  • If you had an episiotomy, your doctor repairs it now.
  • If you’re storing your umbilical cord blood, your doctor collects it now. Umbilical cord blood is blood left in the umbilical cord and placenta after your baby is born and the cord is cut. Some moms and families want to store or donate umbilical cord blood so it can be used later to treat certain diseases, like cancer. Your instructions about umbilical cord blood can be part of your birth plan.
  • You may have chills or feel shaky. Tell your doctor if these are making you uncomfortable.

What you can do:

  • Enjoy the first few moments with your baby.
  • Start breastfeeding. Most women can start breastfeeding within 1 hour of their baby’s birth.
  • Give yourself a big pat on the back for all your hard work. You’ve made it through childbirth!

What happens after my baby is born?

Congratulations! It’s time to hold your baby! Right after birth your doctor places your baby skin-to-skin on your chest and covers him with a blanket. Holding your baby skin-to-skin helps your baby stay warm as he gets used to being outside the womb. It’s also a great way to get started breastfeeding. You can start breastfeeding even within an hour of your baby’s birth. Even if you don’t plan to breastfeed, hold your baby skin-to-skin so you get to know each other right away. Your baby will welcome your gentle touch, and this closeness can help you and your baby bond.

After birth, your body starts to change to help you heal. Your doctor takes your temperature and checks your heart and blood pressure to make sure you’re doing well. If you had anesthesia during labor, your doctor makes sure you’re recovering without any complications.

What is preterm labor?

Preterm and premature mean the same thing — early. Preterm labor is labor that begins too early, before 37 weeks of pregnancy. Preterm labor can lead to premature birth. Premature birth is when your baby is born early, before 37 weeks of pregnancy. Your baby needs about 40 weeks in the womb to grow and develop before birth. Babies born before 37 weeks of pregnancy are called premature. Premature babies (babies born before 37 weeks of pregnancy) can have health problems at birth and later in life. If you’re not to 37 weeks of pregnancy and you have signs or symptoms of preterm labor, call your doctor. Getting help quickly is the best thing you can do. About 1 in 10 babies is born prematurely each year in the United States.

What are the signs and symptoms of preterm labor?

Signs of a condition are things someone else can see or know about you, like you have a rash or you’re coughing. Symptoms are things you feel yourself that others can’t see, like having a sore throat or feeling dizzy.

If you have any of these signs or symptoms before 37 weeks of pregnancy, you may be having preterm labor:

  • Change in your vaginal discharge (watery, mucus or bloody) or more vaginal discharge than usual
  • Pressure in your pelvis or lower belly, like your baby is pushing down
  • Constant low, dull backache
  • Belly cramps with or without diarrhea
  • Regular or frequent contractions that make your belly tighten like a fist. The contractions may or may not be painful.
  • Your water breaks.

What should I do if I think I’m having preterm labor?

If you have even one sign or symptom of preterm labor, call your health care provider right away. If you have preterm labor, getting help quickly is the best thing you can do.

When you see your provider, he may do a pelvic exam or a transvaginal ultrasound to see if your cervix has started to thin out and open for labor. Your cervix is the opening to the uterus (womb) that sits at the top of the vagina (birth canal). A transvaginal ultrasound is done in the vagina instead of on the outside of your belly. Like a regular ultrasound, it uses sound waves and a computer to make a picture of your baby. If you’re having contractions, your provider monitors them to see how strong and far apart they are. You may get other tests to help your provider find out if you really are in labor.

If you’re having preterm labor, your doctor may give you treatment to help stop it or to help improve your baby’s health before birth. Talk to your provider about which treatments may be right for you.

What causes preterm labor and premature birth?

Scientists don’t always know for sure what causes preterm labor and premature birth. Sometimes labor starts on its own without warning. Even if you do everything right during pregnancy, you can still give birth early.

Scientists do know some things may make you more likely than others to have preterm labor and premature birth. These are called risk factors. Having a risk factor doesn’t mean for sure that you’ll have preterm labor or give birth early. But it may increase your chances. Talk to your doctor about what you can do to help reduce your risk.

Because many premature babies are born with low birthweight, many risk factors for preterm labor and premature birth are the same as for having a low-birthweight baby. Low birthweight is when a baby is born weighing less than 5 pounds, 8 ounces.

These three risk factors make you most likely to have preterm labor and give birth early:

  1. You’ve had a premature baby in the past.
  2. You’re pregnant with multiples (twins, triplets or more).
  3. You have problems with your uterus or cervix now or you’ve had them in the past. Your uterus (also called the womb) is where your baby grows inside you.

Medical risk factors before pregnancy for preterm labor and premature birth

  • Being underweight or overweight before pregnancy. This can include having an eating disorder, like anorexia or bulimia.
  • Having a family history of premature birth. This means someone in your family (like your mother, grandmother or sister) has had a premature baby. If you were born prematurely, you’re more likely than others to give birth early.
  • Getting pregnant again too soon after having a baby. For most women it’s best to wait at least 18 months before getting pregnant again. Talk to your provider about the right amount of time for you.

Medical risk factors during pregnancy for preterm labor and premature birth

Having certain health conditions during pregnancy can increase your risk for preterm labor and premature birth, including:

  • Connective tissue disorders, like Ehlers-Danlos syndromes (EDS) and vascular Ehlers-Danlos syndrome (vEDS). Connective tissue is tissue that surrounds and supports other tissues and organs. Ehlers-Danlos syndromes can cause joints to be loose and easy to dislocate; skin to be thin and easily stretched and bruised; and blood vessels to be fragile and small. It also can affect your uterus and intestines. Vascular Ehlers-Danlos syndrome is the most serious kind of Ehlers-Danlos syndromes because it can cause arteries and organs (like the uterus) to rupture (burst). Ehlers-Danlos syndromes and vascular Ehlers-Danlos syndrome are genetic conditions that can be passed from parent to child through genes.
  • Diabetes. Diabetes is when your body has too much sugar (called glucose) in your blood.
  • High blood pressure and preeclampsia. High blood pressure (also called hypertension) is when the force of blood against the walls of the blood vessels is too high. This can stress your heart and cause problems during pregnancy. Preeclampsia is a kind of high blood pressure some women during or right after pregnancy. If not treated, it can cause serious problems and even death.
  • Infections, including sexually transmitted infections (STIs) and infections of the uterus, urinary tract or vagina
  • Intrahepatic cholestasis of pregnancy. This is the most common liver condition that happens during pregnancy.
  • Thrombophilias. These are conditions that increase your risk of making abnormal blood clots.

Other medical risk factors during pregnancy include:

  • Getting late or no prenatal care. Prenatal care is medical care you get during pregnancy.
  • Not gaining enough weight during pregnancy. This can include having an eating disorder, like anorexia or bulimia.
  • Bleeding from the vagina in the second or third trimester
  • Preterm premature rupture of the membranes (also called PPROM). Premature rupture of membranes (also called PROM) is when the amniotic sac around your baby breaks (your water breaks) before labor starts. PPROM is when this happens before 37 weeks of pregnancy. If you have any fluid leaking from your vagina, call your provider and go to the hospital.
  • Being pregnant after in vitro fertilization (IVF). IVF is a fertility treatment used to help women get pregnant.
  • Being pregnant with a baby who has certain birth defects, like heart defects or spina bifida. Birth defects are health conditions that are present at birth. They change the shape or function of one or more parts of the body. Birth defects can cause problems in overall health, how the body develops or how the body works. Spina bifida is a birth defect of the spine.

Risk factors in your everyday life for preterm labor and premature birth:

  • Smoking, drinking alcohol, using street drugs or abusing prescription drugs
  • Having a lot of stress in your life.
  • Low socioeconomic status. Socioeconomic status is a combination of things like your education, your job and your income (how much money you make).
  • Domestic violence. This is when your partner hurts or abuses you. It includes physical, sexual and emotional abuse.
  • Working long hours or having to stand a lot
  • Exposure to air pollution, lead, radiation and chemicals in things like paint, plastics and secondhand smoke. Secondhand smoke is smoke from someone else’s cigarette, cigar or pipe.

Age and race as risk factors for preterm labor and premature birth

Being younger than 17 or older than 35 makes you more likely than other women to give birth early. In the United States, black women are more likely to give birth early. Almost 17 percent of black babies are born prematurely each year. Just more than 10 percent of American Indian or Alaska Native and Hispanic babies are born early, and less than 10 percent of white and Asian babies. We don’t know why race plays a role in premature birth; researchers are working to learn more about it.

Can I reduce my risk for preterm labor and premature birth?

Yes, you may be able to reduce your risk for early labor and birth. Some risk factors are things you can’t change, like having a premature birth in a previous pregnancy. Others are things you can do something about, like quitting smoking.

Here’s what you can do to reduce your risk for preterm labor and premature birth:

  • Get to a healthy weight before pregnancy and gain the right amount of weight during pregnancy. Talk to your doctor about the right amount of weight for you before and during pregnancy.
  • Don’t smoke, drink alcohol use street drugs or abuse prescription drugs. Ask your doctor about programs that can help you quit.
  • Go to your first prenatal care checkup as soon as you think you’re pregnant. During pregnancy, go to all your prenatal care checkups, even if you’re feeling fine. Prenatal care helps your doctor make sure you and your baby are healthy.
  • Get treated for chronic health conditions, like high blood pressure, diabetes, depression and thyroid problems. Depression is a medical condition in which strong feelings of sadness last for a long time and interfere with your daily life. It needs treatment to get better. The thyroid is a gland in your neck that makes hormones that help your body store and use energy from food.
  • Protect yourself from infections. Talk to your provider about vaccinations that can help protect you from certain infections. Wash your hands with soap and water after using the bathroom or blowing your nose. Don’t eat raw meat, fish or eggs. Have safe sex. Don’t touch cat poop.
  • Reduce your stress. Eat healthy foods and do something active every day. Ask family and friends for help around the house or taking care of other children. Get help if your partner abuses you. Talk to your employer about how to lower your stress at work.
  • Wait at least 18 months between giving birth and getting pregnant again. Use birth control until you’re ready to get pregnant again. If you’re older than 35 or you’ve had a miscarriage or stillbirth, talk to your provider about how long to wait between pregnancies. Miscarriage is the death of a baby in the womb before 20 weeks of pregnancy. Stillbirth is the death of a baby in the womb after 20 weeks of pregnancy.
read more

Cesarean section

cesarean-section

What is cesarean section

A cesarean section, or C-section, is an operation to deliver your baby through a cut made in your abdomen and womb (uterus). The cut is usually made across your abdomen, just below your bikini line. A cesarean is a major operation that carries a number of risks, so it’s usually only done if it’s the safest option for you and your baby. After the baby is removed from the womb, the uterus and abdomen are closed with stitches that later dissolve 1).

In the United States, almost one in three women has their babies this way. Cesarean section is now the most common surgery performed in the United States, with over 1 million women delivered by cesarean every year 2). The cesarean delivery rate rose from 5% in 1970 to 31.9% in 2016 3). Though there are continuing efforts to reduce the rate of cesarean sections, experts do not anticipate a significant drop for at least a decade or two 4). While it confers risks of both immediate and long-term complications, for some women, cesarean delivery can be the safest or even the only way to deliver a healthy newborn.

Some C-sections are planned, but many are done when unexpected problems happen during delivery. Reasons for a C-section may include:

  • Health problems in the mother
  • The mother carrying more than one baby
  • The size or position of the baby
  • The baby’s health is in danger
  • Labor is not moving along as it should

The cesarean section surgery is relatively safe for mother and baby. Still, it is major surgery and carries risks. It also takes longer to recover from a C-section than from vaginal birth. It can raise the risk of having difficulties with future pregnancies. Some women may have problems attempting a vaginal birth later. Still, many women are able to have a vaginal birth after cesarean section.

Most cesareans are carried out under spinal or epidural anaesthetic. This mean you’ll be awake, but the lower part of your body is numbed so you won’t feel any pain.

During the cesarean section procedure:

  • a screen is placed across your body so you can’t see what’s being done – the doctors and nurses will let you know what’s happening
    a cut about 10-20cm long will usually be made across your lower tummy and womb so your baby can be delivered
  • you may feel some tugging and pulling during the procedure
  • you and your birth partner will be able to see and hold your baby as soon as they’ve been delivered

The whole operation normally takes about 40-50 minutes.

Occasionally a general anaesthetic, where you’re asleep, may be used, particularly if the baby needs to be delivered more quickly.

Figure 1. Cesarean section scar

Cesarean section scar

C-section recovery time

Recovering from a cesarean usually takes longer than recovering from a vaginal delivery. You might need to stay in hospital for three or four days, compared with one or two days for a vaginal birth.

You may experience some discomfort in your tummy for the first few days, and you’ll be offered painkillers to help with this.

When you go home, you’ll need to take things easy at first. You may need to avoid some activities such as driving for six weeks or so.

The wound in your tummy will eventually form a scar. This may be red and obvious at first, but it should fade with time and will often be hidden in your pubic hair.

Future pregnancies after a cesarean section

If you have a baby by cesarean section, it doesn’t necessarily mean that any babies you have in the future will also have to be delivered this way.

Most women who have had a cesarean section can safely have a vaginal delivery for their next baby, known as vaginal birth after cesarean section.

However, you may need some extra monitoring during labor just to make sure everything is progressing well.

Some women may be advised to have another cesarean section if they have another baby. This depends on whether a cesarean section is still the safest option for them and their baby.

Reasons for cesarean section

A cesarean section may be recommended as a planned (elective) procedure or done in an emergency if it’s thought a vaginal birth is too risky. For example, a cesarean delivery is often the recommended approach if a woman has had a prior classical cesarean scar or previous uterine rupture. However, due to the potential complications of cesarean birth, much study has been done looking for ways to reduce the cesarean rate.

Planned cesareans aren’t usually done before the 39th week of pregnancy.

There has been an emphasis decreasing the number of first-time cesarean births, as many women who have one cesarean birth will ultimately have the remainder of their children via cesarean section. She may choose another cesarean birth for various reasons or she may not be a candidate for a subsequent vaginal birth. For example, if a woman has an unfavorable cervix at term, cervical ripening with medications such as misoprostol is not recommended due to an increased risk of uterine rupture with those agents. In the 2011 article “Safe Prevention of the Primary Cesarean Delivery” 5), the authors addressed the most commonly documented indications for first-time cesarean deliveries (labor dystocia, abnormal fetal heart rate pattern, malpresentation of the fetus, multiple gestations, and suspected fetal macrosomia), and mitigation of how these factors.

One study in 2007 6) looked at what level of additional fetal risk a woman or her caregiver considered to be acceptable to achieve a vaginal delivery and to avoid a cesarean section. They concluded that both the pregnant patients and those taking care of them had a low tolerance for risk. It is understandable and justifiable for a woman to have high expectations for the outcome of her delivery. The goal of reducing cesarean rates may be difficult to achieve, considering this hesitance to expose the fetus to risk.

A cesarean may be carried out because:

  • Breech presentation: your baby is in the breech position (feet first) and your doctor has been unable to turn them by applying gentle pressure to your tummy, or you would prefer they didn’t try this
  • You have a low-lying placenta (placenta previa)
  • You have pregnancy-related high blood pressure (pre-eclampsia)
  • You have certain infections, such as a first genital herpes infection occurring late in pregnancy or untreated HIV
  • Your baby isn’t getting enough oxygen and nutrients – sometimes this may mean the baby needs to be delivered immediately
  • Your labor isn’t progressing or there’s excessive vaginal bleeding
  • Failure of labor to progress—contractions may not open the cervix enough for the baby to move into the vagina.
  • Concern for the baby—For instance, the umbilical cord may become pinched or compressed or fetal monitoring may detect an abnormal heart rate.
  • Multiple pregnancy—you’re pregnant with twins, a cesarean birth may be necessary if the babies are being born too early, are not in good positions in the uterus, or if there are other problems. The likelihood of having a cesarean birth increases with the number of babies a woman is carrying.
  • A very large baby. Larger infants are at risk for complications during delivery. These include shoulder dystocia, when the infant’s head is delivered through the vagina but the shoulders are stuck 7). Women with gestational diabetes, especially if their blood sugar levels are not well controlled, are at increased risk for having large babies.
  • Maternal infections, such as human immunodeficiency virus (HIV) or herpes, that could be passed to the baby during vaginal birth. Cesarean delivery could help prevent transmission of the virus to the infant.
  • Sometimes the placenta is not formed or working correctly, is in the wrong place in the uterus, or is implanted too deeply or firmly in the uterine wall. These issues can cause problems, such as preventing needed oxygen and nutrients from reaching the fetus or causing vaginal bleeding 8).
  • Maternal medical conditions, such as diabetes mellitus or high blood pressure

Maternal indications for Cesarean section 9):

  • Prior cesarean delivery
  • Maternal request
  • Pelvic deformity or cephalopelvic disproportion
  • Previous perineal trauma
  • Prior pelvic or anal/rectal reconstructive surgery
  • Herpes simplex or HIV infection
  • Cardiac or pulmonary disease
  • Cerebral aneurysm or arteriovenous malformation
  • Pathology requiring concurrent intraabdominal surgery
  • Perimortem cesarean

Uterine and anatomic indications for Cesarean birth 10):

  • Abnormal placentation (such as placenta previa, placenta accreta)
  • Placental abruption
  • Prior classical hysterotomy
  • Prior full-thickness myomectomy
  • History of uterine incision dehiscence
  • Invasive cervical cancer
  • Prior trachelectomy
  • Genital tract obstructive mass
  • Permanent cerclage

Fetal indications for Cesarean birth 11):

  • Nonreassuring fetal status (such as abnormal umbilical cord Doppler study) or abnormal fetal heart tracing
  • Umbilical cord prolapse
  • Failed operative vaginal delivery
  • Malpresentation
  • Macrosomia
  • Congenital anomaly
  • Thrombocytopenia
  • Prior neonatal birth trauma

If there’s time to plan the procedure, your midwife or doctor will discuss the benefits and risks of a cesarean compared with a vaginal birth.

Is a cesarean birth necessary if I have had a previous cesarean birth?

Women who have had a cesarean birth before may be able to give birth vaginally. The decision depends on the type of incision used in the previous cesarean delivery, the number of previous cesarean deliveries, whether you have any conditions that make a vaginal delivery risky, and the type of hospital in which you have your baby, as well as other factors. Talk to your obstetrician–gynecologist (ob-gyn) or other health care professional about your options.

Can I request cesarean birth?

Some women choose to have a cesarean for non-medical reasons. If you ask your midwife or doctor for a cesarean when there aren’t medical reasons, they will explain the overall benefits and risks of a cesarean compared with a vaginal birth.

Regardless of the type of delivery, unless there is a medical necessity, delivery should not occur before 39 weeks of pregnancy (called “full term”).

If you’re anxious about giving birth, you should be offered the chance to discuss your anxiety with a healthcare professional who can offer support during your pregnancy and labor.

If after discussion and support you still feel that a vaginal birth isn’t an acceptable option, you’re entitled to have a planned cesarean.

Cesarean section procedure

Cesarean sections are carried out in hospital. You may be asked to come in for an appointment a few days beforehand, and you might need to stay in hospital for a few days afterwards.

Preoperative appointment

If there’s time to plan your cesarean, you’ll be given an approximate date for it to be carried out.

You’ll also be asked to attend an appointment at the hospital in the week before the procedure is due to be performed.

During this appointment:

  • you can ask any questions you have about the procedure
  • a blood test will be carried out to check for a lack of red blood cells (anemia)
  • you’ll be given some medication to take before the procedure – this may include antibiotics, anti-sickness medication (anti-emetics) and medication to reduce the acidity of your stomach acid (antacids)
  • you’ll be asked to sign a consent form

You’ll need to stop eating and drinking a few hours before the procedure – your doctor or midwife will tell you when.

Cesarean section preparation

You’ll be asked to change into a hospital gown when you arrive at the hospital on the day of the procedure.

Before you have a cesarean delivery, a nurse will prepare you for the operation. An intravenous line (IV) will be put in a vein in your arm or hand. This allows you to get fluids and medications during the surgery. Your abdomen will be washed, and your pubic hair may be clipped or trimmed. You will be given medication to prevent infection.

A thin, flexible tube called a catheter will be inserted into your bladder to empty it while you’re under the anaesthetic, and a small area of pubic hair will be trimmed if necessary. Keeping the bladder empty decreases the chance of injuring it during surgery.

You’ll be given the anaesthetic in the operating room. You will be given either general anesthesia, an epidural block, or a spinal block. If general anesthesia is used, you will not be awake during the delivery. An epidural block numbs the lower half of the body. An injection is made into a space in your spine in your lower back. A small tube may be inserted into this space so that more of the drug can be given through the tube later, if needed. A spinal block also numbs the lower half of your body. You receive it the same way as an epidural block, but the drug is injected directly into the spinal fluid. This means you’ll be awake during the delivery and can see and hold your baby straight away.

It also means your birth partner can be with you.

General anaesthetic – where you’re asleep – is used in some cases if you can’t have a spinal or epidural anaesthetic.

What happens during cesarean surgery

During the cesarean section procedure:

  • you lie down on an operating table, which may be slightly tilted to begin with
  • a screen is placed across your tummy so you can’t see the operation being done
  • a 10-20cm cut is made in your tummy and womb – the skin incision may be transverse (horizontal or “bikini”) cut just below your bikini line although sometimes a vertical cut below your bellybutton may be made
  • the muscles in your abdomen are separated and may not need to be cut. Another incision will be made in the wall of the uterus. The incision in the wall of the uterus also will be either transverse or vertical.
  • your baby is delivered through the opening, the umbilical cord will be cut, and then the placenta will be removed– this usually takes 5-10 minutes and you may feel some tugging at this point
  • your baby will be lifted up for you to see as soon as they’ve been delivered, and they’ll be brought over to you
  • you’re given an injection of the hormone oxytocin once your baby is born to encourage your womb to contract and reduce blood loss
  • your womb is closed with dissolvable stitches, and the cut in your tummy is closed either with dissolvable stitches, or stitches or staples that need to be removed after a few days

The whole procedure usually takes around 40-50 minutes.

Before cesarean section, the pubic hair may be removed or not. Those advocating for hair removal claim a decrease in surgical site contamination and infection. However, a Cochrane review 12) did not show lower infection rates with hair removal. Therefore, hair removal should only occur if it provides improved visualization. If opting for hair removal, it should be with clippers rather than razors. Women should also be discouraged from shaving their pubic area as they approach their due dates or schedule cesarean dates. Shaving with a razor may cause microscopic skin breaks that are associated with more surgical site infections compared to clipping 13).

The initial skin incision can be made either in a suprapubic transverse or midline vertical fashion. A vertical midline incision is considered to provide faster access to the abdominal cavity, and it disrupts fewer tissue layers and vessels, leading to many citations as the preferred method to perform an emergency cesarean 14). A vertical incision may also allow visualization away from known severe adhesive disease. In the case of a planned cesarean hysterectomy for a morbidly adherent placenta, a vertical incision may provide more surgical exposure, as well as access to the hypogastric arteries. However, a transverse skin incision is the most commonly used and is preferable in most cases due to improved wound healing and patient tolerability. Because most clinicians are more adept at low-transverse cesarean entry, this technique is often utilized even in emergency scenarios. Unplanned cesarean hysterectomies can take place through a low-transverse incision. Patient habitus may lead some surgeons to place a transverse skin incision higher on the abdomen, rather than underneath the pannus, though research is not yet definitive on this technique 15).

A Pfannenstiel skin incision is slightly curved and is located 2 to 3 centimeters or 2 fingerbreadths above the symphysis pubis 16). The midportion of the incision is within the hair-bearing area of the mons. The hair should be removed in this case. A Joel-Cohen incision, in contrast, is straight rather than curved. It is 3 cm below the line connecting the anterior superior iliac spines, making it more cephalad than a Pfannenstiel skin incision 17).

The subcutaneous layer is next, and it can be dissected bluntly or sharply. Blood vessels course through this layer, so care should be taken to minimize blood loss by limiting sharp dissection to the midline until the fascia is reached, then bluntly dissecting laterally. Alternatively, judicious use of cautery can maintain hemostasis if blood vessels are transected.

The fascia is then incised in the midline with the scalpel, and this incision is extended laterally either sharply or bluntly. The fascia may then be dissected off the underlying rectus muscles. To accomplish this dissection, both the superior and inferior aspects of the fascia are sequentially grasped with a clamp (such as a Kocher), and dissection can be accomplished with a combination of blunt technique as well as sharply using scissors or cautery. Care is necessary not to damage the underlying rectus muscles. Although, in some clinical scenarios, the rectus muscles may be deliberately cut to provide better surgical access.

One small randomized control trial investigated dissection compared to non-dissection of the fascia from the rectus muscles. Nondissection was associated with a slower decline in hemoglobin levels postoperatively and less pain on a visual analog scale 18). However, surgical time and difficulty of delivery of the fetus were not evaluated. Therefore, this study may not be sufficient impetus to change surgical technique 19).

After separating the rectus muscles in the midline, entry into the abdominal cavity is achieved through opening the peritoneum. The surgeon can do this either sharply or bluntly. If utilizing sharp entry, care should be taken to avoid injury to underlying structures such as the bowel. Once the entry is achieved, the peritoneal incision is usually extended bluntly. Care is necessary to prevent injury to the bladder during the extension of the peritoneal incision.

A bladder blade is often placed at this point to provide visualization of the lower uterine segment. Alternatively, a self-retaining retractor is an option. The bladder flap can be created at this point if so desired; the peritoneum overlying the bladder and lower uterine segment is grasped and incised, and the bladder is dissected off the lower uterus sharply or bluntly. Surgeons choosing to create a bladder flap do so out of a desire to decrease surgical injury to the bladder, especially during repair of the uterine incision 20). However, in several trials, the omission of a bladder flap decreased operative time and did not increase complications such as hematuria, pain, or urinary tract infection 21). Bladder injury is rare, and studies have been underpowered to detect whether the omission of the bladder flap changes the incidence of bladder injury 22). In clinical scenarios where the risk of an inferior hysterotomy extension is high, such as a cesarean in a patient who has been complete and pushing, and bladder flap may be indicated even if not routinely done.

With adequate visualization, whether or not a bladder flap has been created, the uterine incision can now be made. The uterus incision can be either transverse or vertical. For most cesareans, a low transverse incision is preferable. Compared to a classical incision, and low transverse incision causes less bleeding, is easier to repair, and causes less adhesion formation 23). There may be some instances where a classical incision is indicated, however. For example, a fetus in a transverse lie with the back down may require a classical incision. If the lower uterine segment is underdeveloped and therefore does not provide room for an adequate transverse incision, a classical hysterotomy may be necessary to provide atraumatic delivery of the fetus 24). This scenario may occur in early preterm gestations. In some clinical scenarios, such as in severe adhesive disease, the lower uterine segment may not be accessible, and the surgeon must adapt.

A low vertical hysterotomy may be an option if a problematic extraction of a fetus is anticipated, especially in the case of breech presentation. A low transverse incision can also be extended vertically to create a “T,” “U,” or “J” incision to provide additional room. A patient who has had a transverse or low vertical uterine incision may be a candidate for a trial of labor in subsequent pregnancies, whereas a prior classical or “T” incision are indications for repeat cesarean delivery 25).

Before making the hysterotomy, the uterus can be palpated to identify any lateral rotation. Making the hysterotomy in the midline rather than more laterally can help the surgeon to avoid damaging the uterine vessels, especially if making a transverse incision. The incision is made carefully with a scalpel in shallow strokes, sometimes in combination with blunt dissection, taking care not to injure the fetus. If the patient has been pushing, making the incision high in the surgical field nevertheless creates a low transverse incision and decreases the risk of extension into lateral vessels, the lower uterus, or the cervix.

Upon achieving uterine entry, the uterine incision can be extended laterally either bluntly with fingers or sharply with bandage scissors. Blunt extension of the uterine incision is preferred if possible, as a sharp extension is associated with increased maternal morbidity and blood loss 26). A blunt cephalad-caudad extension of the hysterotomy, compared to a blunt transversal extension, decreases unintended extension and significant blood loss 27). Thus, a blunt extension of the hysterotomy in a cephalad-caudad fashion is preferred.

If the uterine myometrium is thick, as in earlier gestations or a classical hysterotomy, the bandage scissors may be necessary. An inadequate hysterotomy may increase the risk of difficult fetal extraction, which, in turn, may lead to an increase in neonatal morbidity or mortality. Safe delivery of the fetus is the ultimate goal of cesarean delivery, regardless of the details of the technique.

Delivery of the fetus in the vertex presentation is achieved by inserting a hand into the uterine cavity and elevating the fetal head into the hysterotomy. If the head cannot be elevated, an assistant may provide additional elevation from below via a hand in the patient’s vagina. Alternatively, a vacuum cup or a single forceps blade may be utilized to elevate the fetal head. After elevating the fetal head into the incision, the bladder blade is removed, and fundal pressure is applied to expel the fetus out of the uterus. The surgeon continues to guide the head gently during the process, and the surgical assistant may be instrumental in providing most of the fundal pressure. If fundal pressure is inadequate, or if it cannot be adequately achieved (such as significant maternal obesity), a vacuum cup can be applied to the fetal head for an assisted delivery. Forceps can also be placed at the time of cesarean delivery. The usual rules apply when utilizing vacuum or forceps, even in cesarean delivery.

If the fetus is in the breech presentation, the surgeon identifies the fetal lie by palpation inside the uterine cavity. There are several techniques for delivering a breech fetus, either by grasping the feet or the hips to bring the fetus into the hysterotomy. The fetus can be delivered to the level of the shoulders with gentle traction, sometimes with the assistance of a surgical towel around the fetus. The bilateral arms are sequentially swept down and delivered. Fundal pressure is then utilized to help flex and deliver the fetal head. The Mauriceau Smellie Veit maneuver may also be used to flex the fetal head; this involves placing the first and third fingers of one hand on fetal cheekbones, placing the second finger in the fetal mouth, and pulling the jaw down. The application of Piper forceps is rarely needed to deliver the fetal head.

After delivery of the fetus, the umbilical cord is doubly clamped and cut. Cord clamping may delay if the maternal and fetal status allow, and if the surgeon desires. A systematic review of delayed umbilical cord clamping in preterm infants showed a reduction of in-hospital mortality, a reduced incidence of low Apgar scores at 1 minute but not 5 minutes, no change in other outcome measures (intubation, intraventricular hemorrhage, necrotizing enterocolitis, etc.), and a potential risk for induced polycythemia and hyperbilirubinemia 28). One randomized control trial investigating delayed cord clamping in elective cesarean deliveries showed an increase in neonatal hematocrit without an increased need for phototherapy 29).

After cutting the umbilical cord, cord blood can be collected if necessary or desired. The placenta is then delivered; this can be accomplished via manual removal or spontaneously via cord traction and fundal massage. Due to data showing a reduction in operative blood loss and a decrease in infections if spontaneous placental delivery is the chosen option, this technique is preferable if the clinical scenario allows 30). After delivering the placenta, the uterus gets cleaned with moist laparotomy sponges.

For the repair of the hysterotomy, the uterus can be exteriorized or left in situ. Research has demonstrated similar rates of febrile complications and similar surgical time with the two techniques so that the decision can depend on surgeon preference 31). As for the repair itself, a delayed absorbable suture is used in a running fashion, taking care to incorporate the corners of the incision while avoiding the lateral vessels. A running closure decreases operating time and blood loss compared to interrupted closure 32).

Closure of the hysterotomy in one or two layers has been investigated. Short-term outcomes such as infectious morbidity, pain, blood transfusion, and hospital readmission were not different between the two techniques.[19] Data is mixed regarding whether a single-layer closure decreases operative time and operative blood loss 33). For women desiring a future trial of labor, there is evidence showing an improved residual myometrial thickness and scar healing and decreased uterine rupture in subsequent pregnancies if utilizing a two-layer closure 34). An unlocked closure technique may also be preferable to a locked technique 35).

Once the uterus is closed, and hemostasis assured, the posterior cul-de-sac is cleared of blood and clot using laparotomy sponges and/or suction. This step may be omitted if the uterus has not been exteriorized. With the uterus returned to the abdomen, the abdomen again gets cleared of blood and clot. The assistance of various retractors may provide exposure of the paracolic gutters. Intrabdominal irrigation before closure has been shown to increase nausea during the surgery and did not improve the return of gastrointestinal function or incidence of infectious morbidity 36). With the bladder blade reinserted, the hysterotomy repair is again visualized and made hemostatic if necessary. The bladder blade is again removed.

The peritoneum can be reapproximated at this time. Closure of the peritoneum adds operative time, and it may increase postoperative fever and length of hospital stay 37). The decision to close this layer often hinges on the surgeon’s interpretation of the literature regarding whether closure decreases adhesion formation. Unfortunately, this data is mixed, and therefore, it is the surgeon’s prerogative to balance the risks and benefits to the patient 38).

Before the closure of the fascia, the rectus muscles and the subfascial tissues are inspected to ensure hemostasis. The rectus muscles can be reapproximated in advance of fascial closure. Some surgeons believe that suturing the muscles reduces the risk of subsequent diastasis recti and decreases the incidence of intra-abdominal adhesion formation 39). Conversely, reapproximating the muscles leads to increased postoperative pain 40). Given time, the surgeon could involve the patient herself in shared decision making regarding this technique.

The fascia is then closed using delayed-absorbable suture in a running nonlocking fashion. Historically, the fascia has been closed by some in an interrupted fashion 41), but this technique is no longer widely used. Using a monofilament rather than a braided suture may decrease the risk of infection and should be considered in patients at higher risk of developing this complication 42). Monofilament suture may also decrease the risk of subsequent hernia formation 43). Regarding the closure of the entire incision using a single suture versus using two sutures that meet in the midline, no data favors one or the other 44).

The subcutaneous tissues are then irrigated, and hemostasis is assured. Interestingly, wound irrigation has not been shown to decrease infection rates 45). However, it may help to visualize better any areas requiring cautery. Closure of the subcutaneous space is recommended if the thickness if 2 cm or more, as this decreases the risk of hematoma, seroma, wound infection, and wound separation 46). On the other hand, drain placement in the subcutaneous space is not a recommendation 47).

Skin closure may be accomplished using a variety of methods, the most common being surgical staples or subcuticular suture. There are also subcuticular absorbable staples and adhesive glues on the market. Research has shown both suture and staples to be similar with regards to cosmesis 48). Though the data is conflicting, studies show subcuticular suture closure to be superior to staples regarding wound separation and wound infection 49). Again, monofilament suture may provide less of a nidus for infection than a braided suture.

Cesarean section techniques

The four main cesarean section techniques are:

  1. Pfannenstiel-Kerr method
  2. Joel-Cohen method
  3. Misgav-Ladach method
  4. Modified Misgav-Ladach method

The cesarean section is a complicated procedure.During the surgery itself, several techniques are utilizable at each step or tissue layer. Many factors contribute to a surgeon’s decisions on technique. As with any aspect of medical practice, basing those decisions on evidence is recommended.

The following is a summary of the four general operative methods 50):

Figure 2. Cesarean section techniques

Cesarean section techniques

Pfannenstiel-Kerr method

  • Pfannenstiel skin incision
  • Sharp dissection of the subcutaneous layer
  • Sharp extension of the fascial opening
  • Sharp entry into the peritoneum
  • Sharp superficial then blunt entry into the uterus
  • Manual removal of the placenta
  • Single-layer interrupted closure of the uterus
  • Closure of the peritoneum
  • Interrupted closure of the fascia
  • Continuous suture of the skin

Joel-Cohen method

  • Joel-Cohen skin incision
  • Blunt dissection of the subcutaneous layer
  • Blunt extension of the fascial opening
  • Blunt entry into the peritoneum
  • Sharp superficial then blunt entry into the uterus
  • Spontaneous removal of the placenta
  • Single-layer interrupted closure of the uterus
  • Non-closure of the peritoneum
  • Interrupted closure of the fascia
  • Continuous suture of the skin

Misgav-Ladach method

  • Joel-Cohen skin incision
  • Blunt dissection of the subcutaneous layer
  • Blunt extension of the fascial opening
  • Blunt entry into the peritoneum
  • Sharp superficial then blunt entry into the uterus
  • Manual removal of the placenta
  • Single-layer running closure of the uterus
  • Non-closure of the peritoneum
  • Continuous closure of the fascia
  • Mattress suture closure of the skin

Modified Misgav-Ladach method

  • Pfannenstiel skin incision
  • Blunt dissection of the subcutaneous layer
  • Blunt extension of the fascial opening
  • Blunt entry into the peritoneum
  • Sharp superficial then blunt entry into the uterus
  • Spontaneous removal of the placenta
  • Single-layer running closure of the uterus
  • Closure of the peritoneum
  • Continuous closure of the fascia
  • Continuous suture of the skin

Cesarean section recovery

You’ll usually be moved from the operating room to a recovery room straight after the cesarean section procedure. If you are awake for the surgery, you can probably hold your baby right away.

Once you’ve started to recover from the anaesthetic, the medical staff will make sure you’re well and continue to observe you every few hours. Your blood pressure, pulse rate, breathing rate, amount of bleeding, and abdomen will be checked regularly.

If you are planning on breastfeeding, be sure to let your doctor know.

Having a cesarean delivery does not mean you will not be able to breastfeed your baby. You should be able to begin breastfeeding right away.

You’ll be offered:

  • painkillers to relieve any discomfort
  • treatment to reduce the risk of blood clots – this may include compression stockings or injections of blood-thinning medication, or both
  • food and water as soon you as you feel hungry or thirsty
  • help with breastfeeding your baby if you want it – read more about the first few days of breastfeeding

The catheter will usually be removed from your bladder around 12-18 hours after the procedure, once you’re able to walk around.

You may be in hospital for a few days after a cesarean section, and may need to take things easy for several weeks.

Recovering in hospital

The average stay in hospital after a cesarean is around three or four days. You may be able to go home sooner than this if both you and your baby are well.

While in hospital:

  • you’ll be given painkillers to reduce any discomfort
  • you’ll have regular close contact with your baby and can start breastfeeding
  • you’ll be encouraged to get out of bed and move around as soon as possible. The first few times you get out of bed, a nurse or other adult should help you.
  • you can eat and drink as soon as you feel hungry or thirsty
  • a thin, flexible tube called a catheter will remain in your bladder for at least 12 hours
  • your wound will be covered with a dressing for at least 24 hours

A hospital stay after a cesarean birth usually is 2–4 days. The length of your stay depends on the reason for the cesarean birth and on how long it takes for your body to recover.

When you’re well enough to go home, you’ll need to arrange for someone to give you a lift as you won’t be able to drive for a few weeks.

When you go home, you may need to take special care of yourself and limit your activities.

Looking after your wound

The abdominal incision will be sore for the first few days. Your midwife should also advise you on how to look after your wound.

Your doctor can prescribe pain medication for you to take after the anesthesia wears off. A heating pad may be helpful. There are many different ways to control pain. Talk with your ob-gyn or other health care professional about your options.

You’ll usually be advised to:

  • gently clean and dry the wound every day
  • wear loose, comfortable clothes and cotton underwear
  • take painkillers if the wound is sore – see controlling pain
  • watch out for signs of infection – see when to get medical advice

Non-dissolvable stitches or staples will usually be taken out by your midwife after five to seven days.

Your cesarean section scar

The wound in your tummy will eventually form a scar.

This will usually be a horizontal scar about 10-20cm long, just below your bikini line.

In rare cases, you may have a vertical scar just below your belly button.

The cesarean section scar will probably be red and obvious at first, but it should fade with time and will often be hidden in your pubic hair.

Controlling pain and bleeding

Most women experience some discomfort for the first few days after a cesarean, and for some women the pain can last several weeks.

You should be given regular painkillers to take at home, for as long as you need them.

Paracetamol is usually recommended for mild pain, co-codamol for moderate pain, and a combination of co-codamol and ibuprofen for more severe pain.

You may also have some vaginal bleeding. Use sanitary pads rather than tampons to reduce the risk of spreading infection into the vagina, and get medical advice if the bleeding is heavy.

What should I expect during recovery?

While you recover, the following things may happen:

  • Mild cramping, especially if you are breastfeeding
  • Bleeding or discharge for about 4–6 weeks
  • Bleeding with clots and cramps
  • Pain in the incision

To prevent infection, for a few weeks after the cesarean birth you should not place anything in your vagina or have sex. Allow time to heal before doing any strenuous activity. Call your Obstetrician–Gynecologist or other health care professional if you have a fever, heavy bleeding, or the pain gets worse.

If you experience severe mood swings, loss of appetite, overwhelming fatigue and lack of joy in life shortly after childbirth, you might have postpartum depression. Contact your health care provider if you think you might be depressed, especially if your signs and symptoms don’t fade on their own, you have trouble caring for your baby or completing daily tasks, or you have thoughts of harming yourself or your baby.

The American College of Obstetricians and Gynecologists recommends that postpartum care be an ongoing process rather than just a single visit after your delivery. Have contact with your health care provider within the first three weeks after delivery. Within 12 weeks after delivery, see your health care provider for a comprehensive postpartum evaluation. During this appointment your health care provider will check your mood and emotional well-being, discuss contraception and birth spacing, review information about infant care and feeding, talk about your sleep habits and issues related to fatigue and do a physical exam. This might include a check of your abdomen, vagina, cervix and uterus to make sure you’re healing well. In some cases, you might have the checkup earlier so that your health care provider can examine your C-section incision. Use this visit to ask questions about your recovery and caring for your baby.

Returning to your normal activities

Try to stay mobile and do gentle activities, such as going for a daily walk, while you’re recovering to reduce the risk of blood clots. Be careful not to overexert yourself.

You should be able to hold and carry your baby once you get home. But you may not be able to do some activities straight away, such as:

  • driving
  • exercising
  • carrying anything heavier than your baby
  • having sex

Only start to do these things again when you feel able to do so and don’t find them uncomfortable. This may not be for six weeks or so.

Ask your midwife for advice if you’re unsure when it’s safe to start returning to your normal activities. You can also ask your doctor at your six-week postnatal check.

When to see your doctor

When to get medical advice

Contact your midwife or Obstetrician–Gynecologist straight away if you have any of the following symptoms after a cesarean:

  • severe pain
  • leaking urine
  • pain when peeing
  • heavy vaginal bleeding
  • your wound becomes more red, painful and swollen
  • a discharge of pus or foul-smelling fluid from your wound
  • a cough or shortness of breath
  • swelling or pain in your lower leg

These symptoms may be the sign of an infection or blood clot, which should be treated as soon as possible.

Cesarean section complications

A cesarean section is generally a very safe procedure, but like any type of surgery it carries a certain amount of risk of complications. The maternal mortality rate in the USA is approximately 2.2 per 100,000 cesarean deliveries 51). Though this is overall low, it is significantly greater than for vaginal delivery. The maternal mortality for a vaginal birth is approximately 0.2 per 100,000 52).

It’s important to be aware of the possible complications, particularly if you’re considering having a cesarean for non-medical reasons.

The level of risk will depend on things such as whether cesarean section procedure is planned or carried out as an emergency, and your general health.

If there’s time to plan your cesarean section, your doctor or midwife will talk to you about the potential risks and benefits of the procedure.

Possible complications include:

  • infection of the wound or womb lining
  • blood clots in the legs, pelvic organs, or lungs
  • excessive bleeding
  • damage to nearby areas, such as the bowel or the bladder or the tubes that connect the kidneys and bladder (ureter)
  • temporary breathing difficulties in your baby
  • accidentally cutting your baby when your womb is opened

As with any delivery and with surgery in general, there is a risk of excessive bleeding during and after a cesarean section. Bleeding (hemorrhage) is the leading cause in the United States of serious maternal morbidity 53). Certain conditions preceding a cesarean, such as prolonged labor or fetal macrosomia or polyhydramnios, may increase the risk of uterine atony and subsequent hemorrhage. Intraoperative conditions such as the need for significant adhesiolysis or extension of the hysterotomy laterally into the uterine vessels could also lead to excessive blood loss. Hemorrhage during delivery may then lead to the need for blood product transfusion, which itself has risks of complications. Sheehan syndrome is a known complication of hemorrhage at delivery 54). Approximately ten percent of maternal mortality in the United States is secondary to obstetric hemorrhage 55).

As previously discussed, there is a significant risk of infection after cesarean delivery. In addition to postpartum hemorrhage, wound infection and endometritis are the other most common complications that occur after a cesarean section. In a study 56) examining the efficacy of vaginal cleansing, postoperative endometritis was reduced from 8.7% to 3.8% with cleansing. A study 57) investigating adjunctive azithromycin saw a decrease in wound infection from 6.6% to 2.4% with the additional antibiotic, and serious adverse events decreased from 2.9% to 1.5%. However, given that over a million women have a cesarean every year, these percentages still represent a significant number of women suffering from infectious complications.

In data reported in 2010, the overall risk of infectious morbidity was 3.2% in elective repeat cesarean deliveries as compared to 4.6% in women undergoing a trial of labor 58). This same data reported elective repeat cesareans to have a blood transfusion rate of 0.46%, a surgical injury rate of 0.3 to 0.6%, and a hysterectomy rate of 0.16% 59). Thromboembolism and anesthetic complications can also occur.

While the cesarean section often has the perception of being safer for the fetus, there are risks to fetal delivery in this fashion. The risk of fetal trauma during cesarean is approximately 1%, including skin laceration, fracture of the clavicle or skull, facial or brachial plexus nerve damage, and cephalohematoma 60). Overall, these risks are lower than in vaginal deliveries. With regards to the neonate, there are risks of respiratory complications as well as higher rates of asthma and allergy in those born via cesarean compared to vaginal delivery 61). In 2010 transient tachypnea of the newborn was reported in 4.2% of elected repeat cesareans, and the need for bag-and-mask ventilation was 2.5% 62).

In addition to short-term and surgical risks, cesarean delivery also confers long-term risk, both to the patient and to her subsequent pregnancies. As stated previously, the presence of a vertical scar on the uterus requires a woman to delivery subsequent pregnancies via cesarean. As the number of cesarean sections increases, so too do the surgical risks. Adhesion formation can make each subsequent cesarean more difficult and increase the risk of inadvertent injury. The risks of abnormal placentation also increase with each subsequent surgery. For a woman who has had one cesarean section, the risk of placenta accreta is 0.3%, while the risk increases to 6.74% with five or more cesarean deliveries 63). A morbidly adherent placenta carries with it a risk of significant hemorrhage and possible loss of fertility if a hysterectomy becomes necessary.

Risks to you

Some of the main risks to you of having a cesarean section include:

  • infection of the wound (common) – causing redness, swelling, increasing pain and discharge from the wound
  • infection of the womb lining (common) – symptoms include a fever, tummy pain, abnormal vaginal discharge and heavy vaginal bleeding
  • excessive bleeding (uncommon) – this may require a blood transfusion in severe cases or possibly further surgery to stop the bleeding
  • deep vein thrombosis (DVT) (rare) – a blood clot in your leg, which can cause pain and swelling and could be very dangerous if it travels to the lungs (pulmonary embolism)
  • damage to your bladder or the tubes that connect the kidneys and bladder (rare) – this may require further surgery
  • reaction to medications or to the anesthesia that is used

Women are now given antibiotics before having a cesarean, which should mean infections become much less common.

Risks to your baby

A cesarean doesn’t affect the risk of some of the rarest and most serious birth complications, such as an injury to the nerves in the neck and arms, bleeding inside the skull, or death.

But a cesarean section can sometimes cause the following problems in babies:

  • a cut in the skin (common) – this may happen accidentally as your womb is opened, but it’s usually minor and heals without any problems
  • breathing difficulties (common) – this most often affects babies born before 39 weeks of pregnancy; it will usually improve after a few days and your baby will be closely monitored in hospital

If you think your baby is experiencing breathing difficulties after you’ve left hospital, contact your doctor straight away.

Risks to future pregnancies

Women who have a cesarean will usually have no problems with future pregnancies.

Most women who have had a cesarean section can safely have a vaginal delivery for their next baby – known as vaginal birth after cesarean. But sometimes another cesarean may be necessary.

Although uncommon, having a cesarean can increase the risk of certain problems in future pregnancies, including:

  • the scar in your womb opening up
  • the placenta being abnormally attached to the wall of the womb, leading to difficulties delivering the placenta
  • stillbirth

Speak to your doctor or midwife if you have any concerns.

Vaginal birth after cesarean section

If you’ve delivered a baby by C-section and you’re pregnant again, you might be able to choose between scheduling a repeat C-section or attempting vaginal birth after C-section (vaginal birth after cesarean section).

For many women, vaginal birth after cesarean section is an option. In fact, research on women who attempt a trial of labor after cesarean shows that about 60 to 80 percent have a successful vaginal delivery.

Vaginal birth after cesarean section isn’t right for everyone, though. Certain factors, such as a high-risk uterine scar, can make vaginal birth after cesarean section inappropriate. Some hospitals don’t offer vaginal birth after cesarean section because they don’t have the staff or resources to handle emergency C-sections. If you’re considering vaginal birth after cesarean section, your health care provider can help you understand if you’re a candidate and what’s involved.

Why vaginal birth after cesarean section is done?

Women consider vaginal birth after cesarean section for various reasons, including:

  • Shorter recovery time. You’ll have a shorter hospital stay after a vaginal birth after cesarean section than you would after a repeat C-section. Avoiding surgery will help your energy and stamina return more quickly, as well as reduce the expense of childbirth.
  • More participation in the birth. For some women, it’s important to experience a vaginal delivery. Your labor coach and others also may be able to play a greater role.
  • Impact on future pregnancies. If you’re planning a larger family, vaginal birth after cesarean section might help you avoid the risks of multiple cesarean deliveries.

The chances of a successful vaginal birth after cesarean section are higher if:

  • You’ve had only one prior low transverse uterine incision — the most common type for a C-section
  • You and your baby are healthy and your pregnancy is progressing normally
  • The reason you had your prior C-section isn’t a factor this time
  • Your labor begins naturally on or before your due date
  • You’ve had a previous successful vaginal delivery

The chances of a successful vaginal birth after cesarean section are lower if:

  • Your pregnancy continues beyond your due date
  • You have an unusually large baby — suspected fetal macrosomia
  • You’ve had two or more cesarean sections

You’re not a candidate for vaginal birth after cesarean section if you had a uterine rupture during a previous pregnancy. Similarly, vaginal birth after cesarean section isn’t recommended if you have had a vertical incision in the upper part of your uterus (classical incision) due to the risk of uterine rupture.

Vaginal birth after cesarean section risks

Vaginal birth after cesarean section poses potentially serious risks, including:

  • Failed attempt at labor. Labor can results in a repeat C-section.
  • Uterine rupture. Rarely, the uterus might tear open along the scar line from a prior C-section. If your uterus ruptures, an emergency C-section is needed to prevent life-threatening complications, including heavy bleeding and infection for the mother and brain damage for the baby. In some cases, the uterus might need to be removed (hysterectomy) to stop the bleeding. If your uterus is removed, you won’t be able to get pregnant again.

How you prepare for vaginal birth after cesarean section

If you choose vaginal birth after cesarean section, boost your odds of a positive experience:

  • Learn about vaginal birth after cesarean section. Take a childbirth class on vaginal birth after cesarean section. Include your partner or another loved one, if possible. Also discuss your concerns and expectations with your health care provider. Make sure he or she has your complete medical history, including records of your previous cesarean section and any other uterine procedures.
  • Plan to deliver the baby at a well-equipped hospital. Close monitoring can decrease the risk of complications. Look for a facility that’s equipped to handle an emergency cesarean section.
  • Allow labor to begin naturally, if you can. Drugs to induce labor can make contractions stronger and more frequent, which might contribute to the risk of uterine rupture — especially if the cervix is tightly closed and not ready for labor.
  • Be prepared for a cesarean section. Some complications of pregnancy or delivery might require a cesarean section. For example, you might need a cesarean section if there’s a problem with the placenta or umbilical cord, your baby is in an abnormal position or your labor fails to progress.

What you can expect

If you choose vaginal birth after cesarean section, your prenatal care will be just like the care you’d receive during any other healthy pregnancy.

When you go into labor, you’ll follow the same process as any woman expecting to deliver vaginally — although you and your baby will be more closely monitored during labor. Your health care provider will be prepared to do a repeat cesarean section if needed.

References   [ + ]

read more

Braxton Hicks contractions

Braxton-Hicks-contractions

What are Braxton Hicks contractions

Braxton Hicks contractions are called false labor or “practice” contractions that are common in the last weeks of pregnancy or earlier. Many women, especially first-time mothers-to-be, think they are in labor when they’re not. These contractions are called Braxton Hicks contractions. The tightening of your uterus might startle you. Some might even be painful or take your breath away. It’s no wonder that many women mistake Braxton Hicks contractions for the real thing. So don’t feel embarrassed if you go to the hospital thinking you’re in labor, only to be sent home.

Braxton-Hicks contractions soften and thin your cervix to help your body get ready for labor and birth. You may feel them in the weeks right before your due date. You may have Braxton-Hicks contractions on and off before true labor starts. Learning the differences between true labor contractions and false labor contractions can help you know when you’re really in labor. However, it can be hard to tell the difference between true labor and false labor. When you first feel contractions, time them. Write down how much time it takes from the start of one contraction to the start of the next. Make a note of how strong the contractions feel. Keep a record of your contractions for 1 hour. Walk or move around to see if the contractions stop when you change positions.

Keep in mind that your due date is just a general idea of when your labor may start. Normal term labor can start any time between 3 weeks before and 2 weeks after this date.

So, how can you tell if your contractions are real contractions of true labor?

Time them. Use a watch or clock to keep track of the time one contraction starts to the time the next contraction starts, as well as how long each contraction lasts. With true labor, contractions become regular, stronger, and more frequent. Braxton Hicks contractions are not in a regular pattern, and they taper off and go away. Some women find that a change in activity, such as walking or lying down, makes Braxton Hicks contractions go away. This won’t happen with true labor. Even with these guidelines, it can be hard to tell if labor is real. If you ever are unsure if contractions are true labor, see your doctor.

Braxton Hicks vs Real Contractions

Usually, Braxton Hicks contractions are less regular and not as strong as true labor. Sometimes the only way to tell the difference is by having a vaginal exam to look for changes in your cervix that signal the onset of labor.

One good way to tell the difference is to time the contractions. Note how long it is from the start of one contraction to the start of the next one. Keep a record for an hour. It may be hard to time labor pains accurately if the contractions are slight. Listed in Table 1 are some differences between true labor and Braxton Hicks contractions.

Braxton Hicks contractions:

  • Are typically short
  • Are not painful
  • DO NOT come at regular intervals
  • Are not accompanied by bleeding, leaking fluid, or decreased fetal movement

In real contractions (real labor), your contractions will:

  • Come regularly and get closer together
  • Last from 30 to 70 seconds, and will get longer
  • Not stop, no matter what you do
  • Radiate (reach) into your lower back and upper belly
  • Get stronger or become more intense as time goes on
  • Make you unable to talk to other people or laugh at a joke

Table 1. Difference between Braxton Hicks and Real Contractions

Differences Between False Labor and True Labor
Type of Change Braxton Hicks contractions (False labor)
Real contractions
Are contractions regular? Braxton Hicks contractions are irregular and stay irregular. They do not get closer together over time Come at regular intervals and, as time goes on, the contractions get closer together. Each lasts about 30–70 seconds.
Change with movement Braxton Hicks contractions may stop when you walk or rest, or may even stop with a change of position Contractions continue, despite movement
Strength of contractions Usually Braxton Hicks contractions are weak and do not get much stronger (may be strong and then weak) Increase in strength steadily
Pain of contractions Usually felt only in the front Usually starts in the back and moves to the front

What do Braxton Hicks contractions feel like?

  • Braxton Hicks contractions are irregular and stay irregular. They do not get closer together over time
  • Braxton Hicks contractions may stop when you walk or rest, or may even stop with a change of position
  • Usually Braxton Hicks contractions are weak and do not get much stronger (may be strong and then weak)
  • Usually Braxton Hicks contractions only felt in the front

How long do Braxton Hicks contractions last?

Braxton Hicks contractions are irregular and stay irregular. They do not get closer together over time. Most frequently Braxton Hicks contractions occur every five or ten minutes, sometimes even twice in five minutes 1).

When do Braxton Hicks contractions start?

Braxton Hicks contractions can start as early as the third month of your pregnancy 2).

What is labor?

Labor is also called childbirth, is the process of your baby leaving the uterus (womb). You’re in labor when you have regular contractions that cause your cervix to change. Contractions are when the muscles of your uterus get tight and then relax. Contractions help push your baby out of your uterus. Your cervix is the opening to the uterus that sits at the top of the vagina. When labor starts, your cervix dilates (opens up).

As you get closer to your due date, learning the signs of labor can help you feel ready for labor and birth. If you have any signs of labor, call your health care provider.

What are stages of labor?

Labor is divided into three stages:

  1. Labor
  2. Pushing and birth
  3. Delivery of the placenta

Every woman’s labor is different. And your labor may be different each time you have a baby. But there are patterns to labor that are true for most women. Learning about the stages of labor and what happens during each one can help you know what to expect once labor begins.

What happens in the first stage of labor?

The first stage of labor is the longest stage. For first-time moms, it can last from 12 to 19 hours. It may be shorter (about 14 hours) for moms who’ve already had children. It’s when contractions become strong and regular enough to cause your cervix to dilate (open) and thin out (efface). This lets your baby move lower into your pelvis and into your birth canal (vagina). This stage of labor ends when you are 10 centimeters dilated. The first stage is divided into three parts: early labor, active labor and transition to stage 2 of labor.

Early labor

For most first-time moms, early labor lasts about 6 to 12 hours. You can spend this time at home or wherever you’re most comfortable. During early labor:

  • You may feel mild contractions that come every 5 to 15 minutes and last 60 to 90 seconds.
  • You may have a bloody show. This is a pink, red or bloody vaginal discharge. If you have heavy bleeding or bleeding like your period, call your provider right away.

What you can do in early labor:

This is a great time for you to rely on your doula or labor support person. Try the methods you learned about in childbirth education classes about how to relax and cope with pain. During early labor:

  • Rest and relax as much as you can.
  • Take a shower or bath.
  • Go for a walk.
  • Change positions often.
  • Make sure you’re ready to go to the hospital.
  • Take slow, relaxing breaths during contractions.

Active labor

This is when you head to the hospital! Active labor usually lasts about 4 to 8 hours. It starts when your contractions are regular and your cervix has dilated to 6 centimeters. In active labor:

  • Your contractions get stronger, longer and more painful. Each lasts about 45 seconds and they can be as close as 3 minutes apart.
  • You may feel pressure in your lower back, and your legs may cramp.
  • You may feel the urge to push.
  • Your cervix will dilate up to 10 centimeters.
  • If your water hasn’t broken, it may break now.
  • You may feel sick to your stomach.

What you can do in active labor:

  • Make sure the hospital staff has a copy of your birth plan.
  • Try to stay relaxed and not think too hard about the next contraction.
  • Move around or change positions. Walk the hallways in the hospital.
  • Drink water or other liquids. But don’t eat solid foods.
  • If you’re going to take medicine to help relieve labor pain, you can start taking it now. Your choice about pain relief is part of your birth plan.
  • Go to the bathroom often to empty your bladder. An empty bladder gives more room for your baby’s head to move down.
  • If you feel like you want to push, tell your provider. You don’t want to start pushing until your provider checks your cervix to see how dilated it is.

Transition to the second stage of labor

This can be the toughest and most painful part of labor. It can last 15 minutes to an hour. During the transition:

  • Contractions come closer together and can last 60 to 90 seconds. You may feel like you want to bear down.
  • You may feel a lot of pressure in your lower back and rectum. If you feel like you want to push, tell your provider.

What happens in the second stage of labor?

In the second stage of labor, your cervix is fully dilated and ready for childbirth. This stage is the most work for you because your provider wants you to start pushing your baby out. This stage can be as short as 20 minutes or as long as a few hours. It may be longer for first-time moms or if you’ve had an epidural. And epidural is pain medicine you get through a tube in your lower back that helps numb your lower body during labor. It’s the most common kind of pain relief used during labor. The second stage ends when your baby is born.

During the second stage of labor:

  • Your contractions may slow down to come every 2 to 5 minutes apart. They last about 60 to 90 seconds.
  • You may get an episiotomy. This is a small cut made at the opening of the vagina to help let the baby out. Most women don’t need an episiotomy.
  • Your baby’s head begins to show. This is called crowning.
  • Your provider guides your baby out of the birth canal. She may use special tools, like forceps or suction, to help your baby out.
  • Your baby is born, and the umbilical cord is cut. Instructions about who’s cutting the umbilical cord are in your birth plan. What you can do:
  • Find a position that is comfortable for you. You can squat, sit, kneel or lie back.
  • Push during contractions and rest between them. Push when you feel the urge or when your provider tells you.
  • If you’re uncomfortable or pushing has stopped, try a new position.

What happens in the third stage of labor?

In the third stage of labor, the placenta is delivered. The placenta grows in your uterus and supplies your baby with food and oxygen through the umbilical cord. This stage is the shortest and usually doesn’t take more than 20 minutes.

During the third stage of labor:

  • You have contractions that are closer together and not as painful as earlier. These contractions help the placenta separate from the uterus and move into the birth canal. They begin 5 to 30 minutes after birth.
  • You continue to have contractions even after the placenta is delivered. You may get medicine to help with contractions and to prevent heavy bleeding.
  • Your provider squeezes and presses on your belly to make sure the uterus feels right.
  • If you had an episiotomy, your provider repairs it now.
  • If you’re storing your umbilical cord blood, your provider collects it now. Umbilical cord blood is blood left in the umbilical cord and placenta after your baby is born and the cord is cut. Some moms and families want to store or donate umbilical cord blood so it can be used later to treat certain diseases, like cancer. Your instructions about umbilical cord blood can be part of your birth plan.
  • You may have chills or feel shaky. Tell your provider if these are making you uncomfortable.

What you can do:

  • Enjoy the first few moments with your baby.
  • Start breastfeeding. Most women can start breastfeeding within 1 hour of their baby’s birth.
  • Give yourself a big pat on the back for all your hard work. You’ve made it through childbirth!

What are the signs of labor?

You know you’re in true labor when:

  • You have strong and regular contractions. A contraction is when the muscles of your uterus tighten up like a fist and then relax. Contractions help push your baby out. When you’re in true labor, your contractions last about 30 to 70 seconds and come about 5 to 10 minutes apart. They’re so strong that you can’t walk or talk during them. They get stronger and closer together over time.
  • You feel pain in your belly and lower back. This pain doesn’t go away when you move or change positions.
  • You have a bloody (brownish or reddish) mucus discharge. This is called bloody show.
  • Your water breaks. Your baby has been growing in amniotic fluid (the bag of waters) in your uterus. When the bag of waters breaks, you may feel a big rush of water. Or you may feel just a trickle.

​If you think you’re in labor, call your health care provider, no matter what time of day or night. Your provider can tell you if it’s time to head for the hospital. To see for sure that you’re in labor, your health care provider measures your cervix.

What are signs that you may be close to starting labor?

You may be close to starting labor if:

  • Your baby drops or moves lower into your pelvis. This is called lightening. It means that your baby is getting ready to move into position for birth. It can happen a few weeks or even just a few hours before your labor begins.
  • You have an increase in vaginal discharge that’s clear, pink or slightly bloody. This is called show or bloody show. It can happen a few days before labor starts or at the beginning of labor.
  • At a prenatal checkup, your health care provider tells you that your cervix has begun to efface (thin) and dilate (open). Before labor, your cervix is about 3.5 to 4 centimeters long. When it’s fully dilated (open) for labor, it’s 10 centimeters. Once labor starts, contractions help open your cervix.
  • You have the nesting instinct. This is when you want to get things organized in your home to get ready for your baby. You may want to do things like cook meals or get the baby’s clothes and room ready. Doing these things is fine as long as you’re careful not to overdo it. You need your energy for labor and birth.

If you have any of these signs, you may start labor soon. Learn the signs of labor so you know when to call your doctor.

References   [ + ]

read more

Back pain pregnancy

back pain during pregnancy

Back pain pregnancy

Back pain during pregnancy is very common, especially in the later stages of pregnancy when pregnancy hormones loosen your ligaments, your growing baby and the weight gain during pregnancy affects your posture can all cause lower-back pain. The changes to your hormones during pregnancy cause your ligaments to relax, which can aggravate your lower spine and pelvis. The weight of your baby in your abdomen tends to pull your lower spine forward, putting a strain on your lower back, potentially causing back pain. Some studies estimate that around two-thirds of pregnant women suffer from back pain.

Pressure from the uterus can also affect your sciatic nerve, which goes from your lower back, hip and down the back of the leg. Pain along your sciatic nerve is called sciatica.

The stress on your body caused by pregnancy also puts you at greater risk of back injury. One reason why your back is at particular risk of injury is that you gain a lot of weight in your abdomen. This puts extra strain on the arch in your lower back and it can also strain the joints.

If you are unfit, overweight or if you smoke, you are more likely to experience back pain or sciatica during pregnancy. Regular exercise can reduce this risk.

Regular physical activity and exercise, like yoga or pilates, can strengthen the muscles that help protect your back from injury.

Try these tips to help ease your back pain in pregnancy:

  • bend your knees and keep your back straight when you lift or pick something up from the floor
  • avoid lifting heavy objects
  • move your feet when you turn to avoid twisting your spine
  • wear flat shoes to evenly distribute your weight
  • try to balance the weight between 2 bags when carrying shopping
  • keep your back straight and well supported when sitting at work and at home – look for maternity support pillows
  • get enough rest, particularly later in pregnancy
  • a massage or warm bath may help
  • use a mattress that supports you properly – you can put a piece of hardboard under a soft mattress to make it firmer, if necessary
  • go to a group or individual back care class

You can take acetaminophen (paracetamol) to ease your back pain while you are pregnant, unless your doctor says not to. Always follow the instructions on the packet.

When to see a doctor

If your backache is very painful or if it lasts for more than 2 weeks, talk to your doctor. They may be able to refer you to an obstetric physiotherapist at your hospital, who can give you advice and may suggest some helpful exercises.

Sometimes back pain can be a sign of premature labor or a urinary tract infection (UTI). See your doctor straight away if you also have bleeding from your vagina, painful urination or any signs of premature labor.

See your doctor as soon as possible if you have back pain and you:

  • are in your second or third trimester – this could be a sign of early labor
  • also have a fever, bleeding from your vagina or pain when you pee
  • lose feeling in one or both of your legs, your bum, or your genitals
  • have pain in one or more of your sides (under your ribs)

What causes back pain in pregnancy?

Back pain is incredibly common during pregnancy. During pregnancy, especially in the later stages, the ligaments in your body naturally become softer and stretch to prepare you for labor. This can put a strain on the joints of your lower back and pelvis, which can cause back pain.

One reason why your back is at particular risk of injury is that you gain a lot of weight in your abdomen. This puts extra strain on the arch in your lower back and it can also strain the joints.

The changes to your hormones during pregnancy cause your ligaments to relax, which can aggravate your lower spine and pelvis.

If you are unfit, overweight or if you smoke, you are more likely to experience backache or sciatica during pregnancy. Regular exercise can reduce this risk.

Medical conditions that cause back pain

Conditions that can cause back pain include:

  • a slipped (prolapsed) disc (a disc of cartilage in the spine pressing on a nerve) – this can cause back pain and numbness, tingling and weakness in other parts of the body
  • sciatica (irritation of the nerve that runs from the lower back to the feet) – this can cause pain, numbness, tingling and weakness in the lower back, buttocks, legs and feet
  • ankylosing spondylitis (swelling of the joints in the spine) – this causes pain and stiffness that’s usually worse in the morning and improves with movement
  • spondylolisthesis (a bone in the spine slipping out of position) – this can cause lower back pain and stiffness, as well as numbness and a tingling sensation

These conditions are treated differently to non-specific back pain in pregnancy.

Very rarely, back pain can be a sign of a serious problem such as:

  • a broken bone in the spine
  • an infection
  • cauda equina syndrome (where the nerves in the lower back become severely compressed)
  • some types of cancer, such as multiple myeloma (a type of bone marrow cancer)

If you see a doctor with your back pain, they’ll look for signs of these.

How to protect your back

You can protect your back during pregnancy by avoiding or changing the way you do some things. This becomes more important the further along in your pregnancy you are.

  • Avoid heavy lifting. If you have to lift something heavy, bend your knees, keep your back straight and tighten your pelvic floor and abdominal muscles. Make sure the object you are lifting stays close to your body. Allow toddlers to climb onto your lap or into the car or bath, and squat down next to them rather than picking them up.
  • Always have a good posture. Try to keep your pelvis symmetrical. Stand with your weight evenly on both legs, your back straight and your pelvis tucked under. Avoid standing for a long time.
  • Sit up straight with your bottom at the back of your chair and your feet on a stool if necessary.
  • Avoid standing or sitting for long periods
  • Avoid activities that might hurt your back. These include bending or twisting, climbing ladders, or walking up steep hills.
  • Be careful in bed. Sleep on your side with a pillow between your knees. To get out of bed, roll onto your side with your knees together. Then use your arms for support as you swing your legs onto the floor.
  • Wear shoes with low heels (not flats). These have good arch support. Avoid high heels.
  • Consider a maternity support belt.

A firm mattress can also help to prevent and relieve backache. If your mattress is too soft, put a piece of hardboard under it to make it firmer.

Some other activities that may help ease your back pain include:

  • aquarobics (gentle exercise in water)
  • acupuncture
  • massage
  • hot packs
  • regular exercise, including walking

Strengthening your back

Regular physical activity is important when you are pregnant and can protect your back. If your doctor says it’s OK, you can do some gentle exercise like walking or water exercise. Talk to a physiotherapist for specific exercises to strengthen your back.

Stretch your lower back by kneeling on all fours with your head in line with your back. Pull in your stomach and round your back. Hold the posture for a few seconds and then relax. Repeat 10 times.

Keep your tummy muscles strong with pelvic tilt exercises. Lie on your back with your knees bent and your feet flat on the ground. Tilt your pelvis and hips backwards so the curve of your back is flat to the floor. Hold for 3 to 5 seconds. You can also do this exercise standing up or sitting on a gym ball.

Strengthen your tummy muscles and pelvic floor by gently drawing in the lower part of your tummy (bellow the belly button) towards your spine. Keep breathing. Gradually lengthen the time you hold the posture. Brace these muscles whenever you lift, push or pull something heavy.

Complementary therapies such as yoga and pilates can help some women, but always talk to your doctor or midwife first.

Back pain during pregnancy treatment

There are a number of things you can do to protect yourself from back pain in pregnancy:

  • Keep an eye on your posture: straighten your lower back and gently draw your bump in. Imagine your baby being tucked into the pelvis, close to your centre of gravity.
  • Be sensible about lifting objects: always lift bending your knees rather than your back and try to avoid lifting anything heavy.
  • Wear flat or low-heeled shoes.
  • Sit up straight and with your lower back supported.
  • Use a firm mattress.
  • If you work standing, adjust the work surface to avoid stooping.

Many women find yoga and pilates helpful for back pain as well as physical aids like maternity support belts. Not all of these treatments work for everyone, so try and find one that works for you.

If you are suffering badly, you can also ask your doctor or midwife about being referred to a physical therapist.

Exercises to ease back pain in pregnancy

This gentle exercise helps to strengthen stomach (abdominal) muscles, which can ease back pain in pregnancy:

  • start on all fours (a box position) with knees under hips, hands under shoulders, fingers facing forwards and stomach muscles lifted to keep your back straight
  • pull in your stomach muscles and raise your back up towards the ceiling, letting your head and bum relax downwards gently – don’t let your elbows lock
  • hold for a few seconds then slowly return to the box position
  • take care not to hollow your back – it should always return to a straight, neutral position
  • do this slowly and rhythmically 10 times, making your muscles work hard and moving your back carefully
  • only move your back as far as you comfortably can

Stretches for lower backache:

  • sit with your bottom on your heels with your knees apart
  • lean forward towards the floor, resting your elbows on the ground in front of you
  • slowly stretch your arms forward
  • hold for a few seconds

Stretches for middle backache:

  • go down on your hands and knees
  • draw in lower abdomen
  • tuck your tail under
  • hold for a few seconds
  • gently lower your back down as far as feels comfortable

Stretches for pain in the shoulder blades and upper back:

  • sit on a firm chair
  • brace your abdominal muscles
  • interlock your fingers and lift your arms overhead
  • straighten your elbows and turn your palms upwards
  • hold for a few seconds

Doing prenatal yoga or aquanatal classes (gentle exercise classes in water) with a qualified instructor can also help build your muscles to better support your back.

  • If back pain persists, changes or becomes severe, see your doctor or midwife for advice. At any stage, if the back pain is associated with any blood loss from the vagina, seek medical advice urgently.

Treatment of back injury during pregnancy

If you injure your back while you are pregnant, simple exercises and using back support are usually enough to fix the injury. In very rare cases, pregnant women can have a serious injury such as a herniated disc. In this case you might need surgery. Back surgery is usually safe, however, both for you and your baby during pregnancy.

Many women have a pre-existing back condition before they become pregnant, such as scoliosis, spondylolisthesis or a lumbar disc condition. Sometimes your back problems get better during pregnancy, but sometimes they get worse. It’s important to mention any back problems to the medical team who are looking after you.

Talk to your doctor if you need to take medicine to control back pain. Paracetamol is one of the safest painkillers during pregnancy. Do not take aspirin or non-steroidal anti-inflammatories such as Nurofen while you are pregnant.

Your back injury should not affect labor or pain relief during labor. It is also usually possible to have an epidural if you have a back injury. Tell the hospital about your condition because there are different positions you can use to ease back pain during labor.

read more