Uncategorized

Gingivostomatitis

gingivostomatitis

What is gingivostomatitis

Gingivostomatitis is a highly contagious infection of your mouth and gums that leads to swelling and sores. These sores can develop on the tongue, under the tongue, and on the cheeks inside the mouth, as well as on the lips and gums. Gingivostomatitis main symptoms include pain, swollen gums, blisters, and sores.

Gingivostomatitis may be due to a virus or bacteria.

Gingivostomatitis may disguise other, more serious mouth ulcers.

When to contact a medical professional

See your doctor if:

  • You have mouth sores and fever or other signs of illness
  • Mouth sores get worse or do not respond to treatment within 3 weeks

Gingivostomatitis causes

Gingivostomatitis is common among children. Gingivostomatitis may occur after infection with the herpes simplex virus type 1 (HSV-1) where it is called herpetic stomatitis or herpetic gingivostomatitis. The herpes simplex virus type 1 (HSV-1) also causes cold sores.

Gingivostomatitis may also occur after infection with a coxsackie virus.

Gingivostomatitis may occur in people with poor oral hygiene.

It is important to note that many different factors can cause the irritation and sores in the mouth that are characteristic of gingivostomatitis.

The general medical term for inflammation of the mouth and lips is stomatitis. Factors that can cause stomatitis include:

  • Herpes viruses
  • Enteroviruses, such as the coxsackie virus
  • Bacteria
  • Allergies
  • Exposure to irritating chemicals or other substances
  • Dry mouth / xerostomia
  • Candida albicans infection
  • Trauma including surgery
  • Smoking tobacco
  • Toxicity of chemotherapy drugs – including methotrexate used for psoriasis and other skin disorders
  • Therapeutic radiation e.g. for oral cancer

Some of the causes of gingivostomatitis are listed in the table below.

Table 1. Causes of gingivostomatitis

Bacterial infection
  • Necrotizing periodontal disease
  • Mycoplasma infection
  • Syphilis
  • Gonorrhea
  • Rarely: actinomycosis, tuberculosis
Fungal infection
  • Candida albicans infection (oral candidiasis, thrush)
  • Rarely: Blastomycosis, cryptococcosis, zygomycosis
Viral infection
  • Herpes simplex virus infection
  • Varicella or herpes zoster infection
  • Enterovirus infection – hand foot and mouth, or herpangina
  • Epstein-Barr virus infection – infectious mononucleosis
  • Measles – Koplik spots
Systemic disorder
  • Malnutrition including iron deficiency and vitamin c deficiency (scurvy)
  • Inflammatory bowel disease
  • Behçet disease
  • Kawasaki disease
  • Erythema multiforme
  • Stevens-Johnson syndrome / toxic epidermal necrolysis
Drugs
  • Nicotine stomatitis
  • Toxicity of chemotherapy drugs
  • Methotrexate-induced stomatitis
  • Lichenoid drug eruption
Physical irritation
  • Thermal burns from hot foot or drink
  • Denture stomatitis
Contact stomatitis
  • Contact stomatitis due to irritants (acidic or sharp food) and allergies, e.g. to sesquiterpene lactones in food, toothpaste or propolis
Immunobullous disesase
  • Immunobullous disorders
  • Pemphigus vulgaris
  • Paraneoplastic pemphigus
  • Linear IgA bullous dermatosis
  • Bullous pemphigoid
  • Mucous membrane pemphigoid
  • Pemphigoid gestationis
Other
  • Chronic ulcerative stomatitis
  • Recurrent aphthous ulceration
  • Geographic tongue / migratory glossitis
  • Erosive lichen planus
  • Lupus erythematosus
  • Autoimmune progesterone dermatitis
  • Oral leukoplakia (precancerous state)

Gingivostomatitis symptoms

The symptoms can be mild or severe and may include:

  • Bad breath
  • Fever
  • General discomfort, uneasiness, or ill feeling (malaise)
  • Sores or ulcers on the inside of your cheeks or gums
  • Very sore mouth with no desire to eat or drink
  • Drooling, especially in children
  • Bad breath
  • Red patches
  • Blisters
  • Peeling
  • Swelling
  • Oral dysesthesia (numbness)
  • Burning mouth syndrome – soreness despite normal appearance

Some cases of gingivostomatitis may be subclinical, which means that the symptoms are not severe, or easy to identify and diagnose.

In other cases, some individuals may go through a period of feeling feverish and having general malaise before the sores develop.

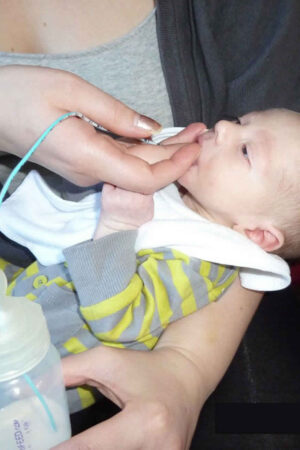
Swollen gums and sores in the mouth make eating and drinking uncomfortable. This can cause children to refuse food and drinks.

One study found that 89 percent of children with gingivostomatitis drank less than usual. To prevent dehydration and poor nutrition, adults should monitor children’s consumption and ensure they are getting enough fluids.

Adopting a diet consisting of soft foods and avoiding citrus or carbonated beverages can help. In some cases, a person can apply numbing medication to provide relief at mealtimes.

Gingivostomatitis diagnosis

Your health care provider will check your mouth for small ulcers. These sores are similar to mouth ulcers caused by other conditions. Cough, fever, or muscle aches may indicate other conditions.

Relevant investigations depend on the likely cause of gingivostomatitis and whether it is accompanied by other symptoms internally or skin rashes.

Investigations may include:

  • Bacterial swabs
  • Viral swabs
  • Tissue scrapings for mycology
  • Biopsy for histology and direct immunofluorescence
  • Blood tests
  • Patch tests to identify contact allergy

Most of the time, no special tests are needed to diagnose gingivostomatitis. However, your doctor may take a small piece of tissue from the sore to check for a viral or bacterial infection. This is called a culture. A biopsy may be done to rule out other types of mouth ulcers.

Gingivostomatitis treatment

The goal of gingivostomatitis treatment is to reduce symptoms.

Treatment for gingivostomatitis depends on the cause. If gingivostomatitis is due to allergy to a medication, the medication must be promptly stopped. However, it may be necessary to continue a causative medication when stomatitis arises as an expected adverse reaction to chemotherapy.

Infections may require specific treatment such as antibiotics for streptococcal pharyngitis, topical antifungal or oral antifungal agent for candida infection.

Nutritional deficiencies should be identified and corrected, for example, folic acid can reduce methotrexate-induced stomatitis.

Immunobullous diseases may be treated with systemic corticosteroids or other immunosuppressive treatments.

Symptomatic treatment may include:

  • Antiseptic mouthwash
  • Protective pastes
  • Local anaesthetic mouthwash or spray
  • Oral analgesics (pain killers)
  • Topical corticosteroids.

Gingivostomatitis home treatment:

  • Practice good oral hygiene. Brush your gums well to reduce the risk of getting another infection.
  • Use mouth rinses that reduce pain if your provider recommends them.
  • Rinse your mouth with salt water (one-half teaspoon or 3 grams of salt in 1 cup or 240 milliliters of water) or mouthwashes with hydrogen peroxide or Xylocaine to ease discomfort.
  • Eat a healthy diet. Soft, bland (non-spicy) foods may reduce discomfort during eating.

You may need to take antibiotics.

You may need to have the infected tissue removed by the dentist (called debridement).

Gingivostomatitis prognosis

Gingivostomatitis infections range from mild to severe and painful. The sores often get better in 2 or 3 weeks with or without treatment. Treatment may reduce discomfort and speed healing.

Herpetic gingivostomatitis

Herpetic gingivostomatitis is a herpes simplex virus or oral herpes infection of the mouth that causes sores and ulcers. These mouth ulcers are not the same as canker sores, which are not caused by a virus. Young children commonly get primary herpetic gingivostomatitis, in 90% of cases caused by herpes simplex virus type 1 (HSV-1) when they are first exposed to herpes simplex virus (HSV) 1). The first outbreak also called primary herpetic gingivostomatitis, is usually the most severe and usually seen before 6 years of age 2). Epidemiologically, there are two peaks with respect to the age at which primary herpetic gingivostomatitis occurs. The first peak occurs in children aged between 6 months and 5 years, and the second peak occurs in young adults in their early 20s 3). In rare cases, primary herpetic gingivostomatitis can occur in neonates, in adults, and even in the elderly 4). Geographical location and socio-economic status also influence the incidence of herpes simplex virus type 1 (HSV-1) infections. Hence, individuals in developing countries with a lower socio-economic status become seropositive for HSV-1 at an earlier age than their counterparts in developed countries 5).

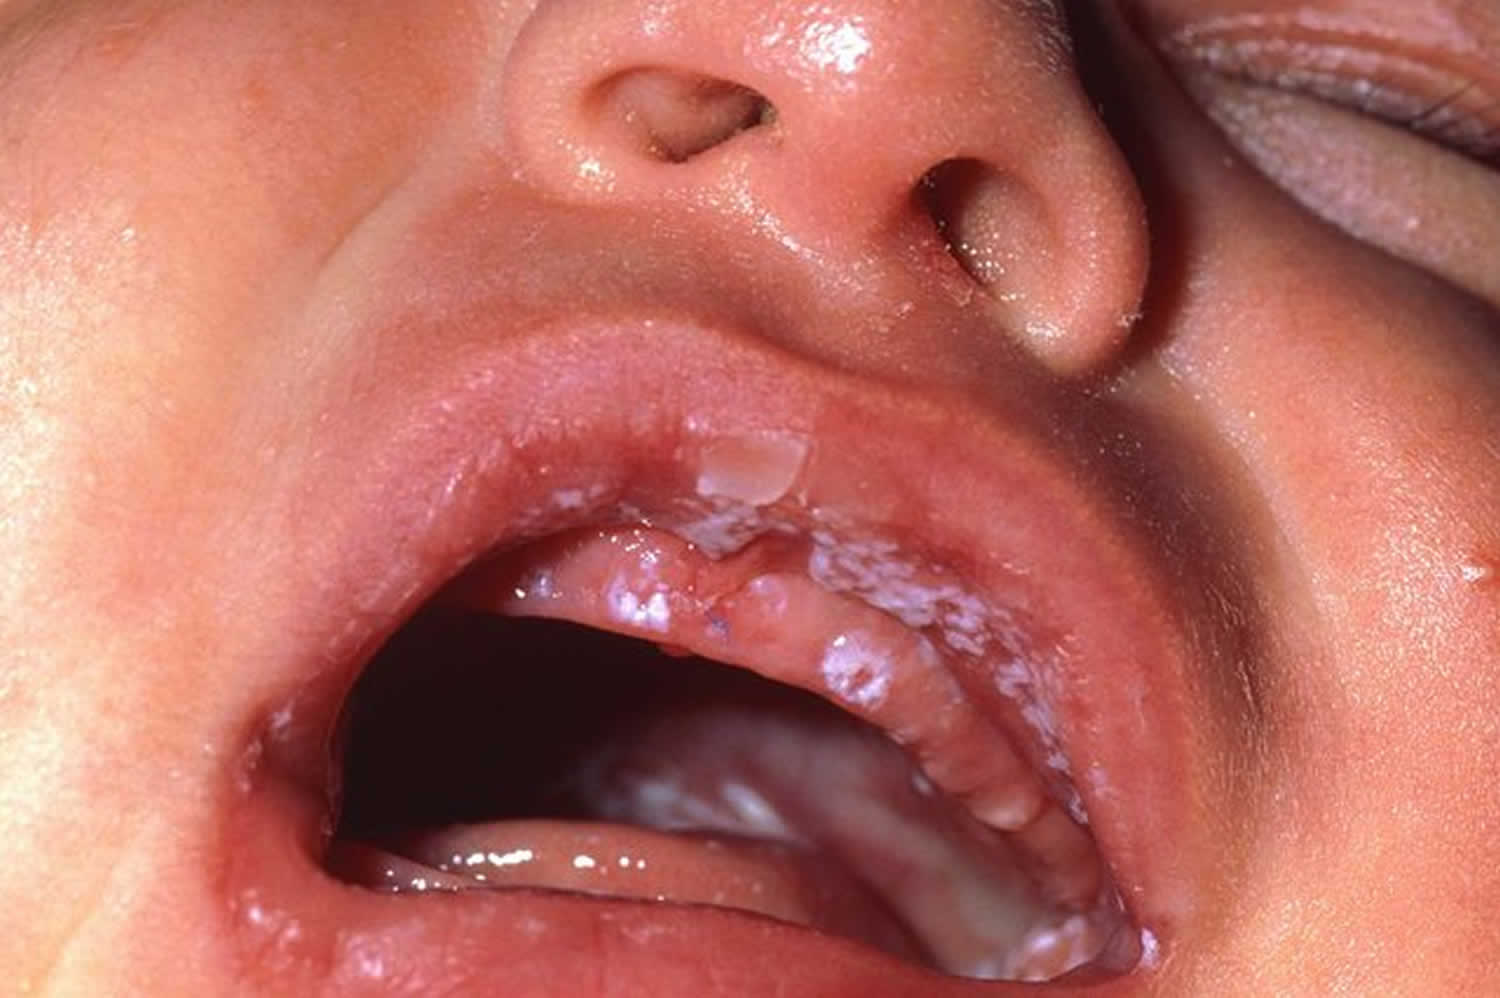
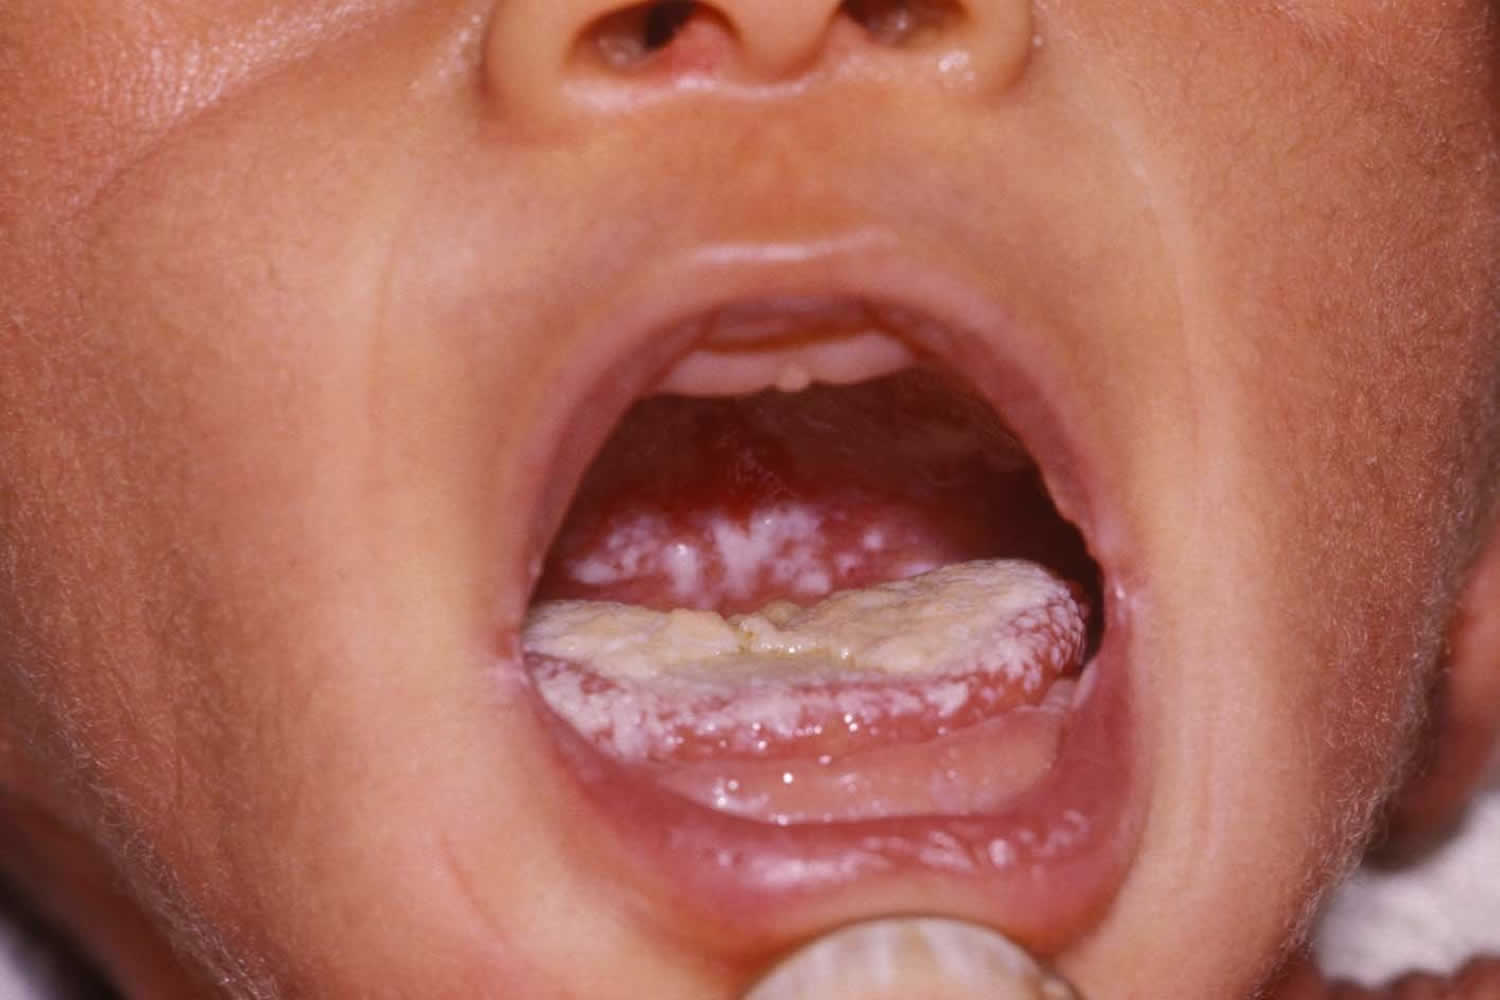
Herpes simplex virus (HSV) can easily be spread from one child to another. Prodromal symptoms, such as fever, anorexia, irritability, malaise and headache, may occur in advance of primary herpetic gingivostomatitis 6). The primary herpetic gingivostomatitis presents as numerous pin-head vesicles, which rupture rapidly to form painful irregular ulcerations covered by yellow–grey membranes. Sub-mandibular lymphadenitis, halitosis and refusal to drink are usual associated findings 7). Following resolution of the lesions, the herpes simplex virus travels through the nerve endings to the nerve cells serving the affected area, whereupon it enters a latent state. When the host becomes stressed, the herpes simplex virus replicates and migrates in skin, mucosae and, in rare instances, the central nervous system. A range of morbidities, or even mortality, may then occur, i.e., recurrent HSV infections, which are directly or indirectly associated with primary herpetic gingivostomatitis. These pathological entities range from the innocuous herpes labialis to life-threatening meningoencephalitis 8).

If you or another adult in the family has a cold sore, it could have spread to your child and caused herpetic gingivostomatitis. More likely, you won’t know how your child became infected.

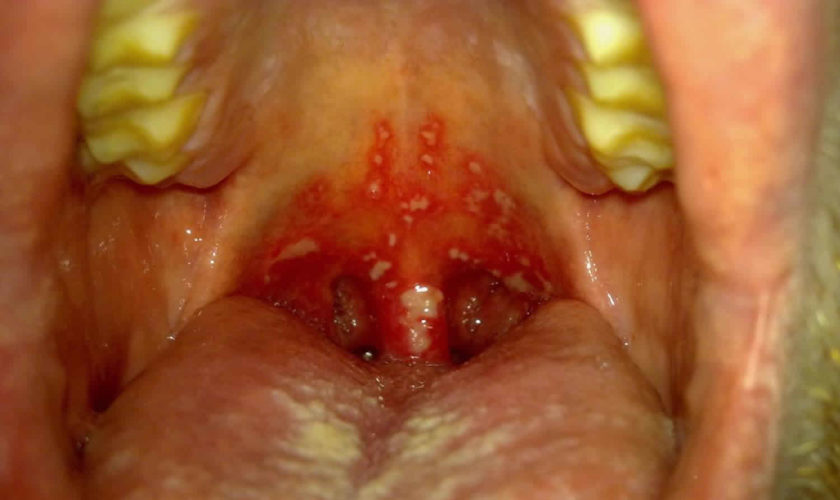
While most children will be asymptomatic, diagnosis of children with symptoms is made based on clinical presentation of red gums, mucosal hemorrhages, and clusters of small erupted vesicles throughout the mouth.

Herpetic gingivostomatitis is highly contagious and complications range from indolent cold sores to dehydration 9) and even life-threatening encephalitis 10). Among 61 children 1 to 6 years of age from a study in Israel, 89% drank less than normal, and 2 of 36 patients were unable to drink 11).

Symptomatic relief primarily involves pain management and oral fluids to prevent dehydration until the viral infection subsides. In a chart review in a US children’s hospital, 48 patients 8 months to 12 years of age were treated with fluids and analgesics; 35 of them were also given a mixture of antacid and diphenhydramine and 7 were treated with viscous lidocaine 12). Outcomes were not reported.

Acyclovir is a well established antiviral drug used effectively for the treatment of herpes simplex infections, chickenpox (shortened fever time) 13) and shingles 14). Acyclovir is also used frequently for children with immunodeficiency.

When to contact a medical professional

See your doctor if your child develops a fever followed by a sore mouth, and your child stops eating and drinking. Your child can quickly become dehydrated.

If the herpes infection spreads to the eye, it is an emergency and can lead to blindness. Call your doctor right away.

Herpetic gingivostomatitis prevention

About 90% of the population carries herpes simplex virus (HSV). There’s little you can do to prevent your child from picking up the virus sometime during childhood.

Your child should avoid all close contact with people who have cold sores. So if you get a cold sore, explain why you can’t kiss your child until the sore is gone. Your child should also avoid other children with herpetic stomatitis.

If your child has herpetic stomatitis, avoid spreading the virus to other children.

While your child has symptoms:

  • Have your child wash his/her hands often.
  • Keep toys clean and don’t share them with other children.
  • Don’t allow children to share dishes, cups, or eating utensils.
  • Don’t let your child kiss other children.

Herpetic gingivostomatitis symptoms

Symptoms may include:

  • Blisters in the mouth, often on the tongue, cheeks, roof of the mouth, gums, and on the border between the inside of the lip and the skin next to it
  • After blisters pop, they form ulcers in the mouth, often on the tongue or cheeks
  • Difficulty swallowing
  • Drooling
  • Fever, often as high as 104 °F (40 °C), which may occur 1 to 2 days before blisters and ulcers appear
  • Irritability
  • Mouth pain
  • Swollen gums

Symptoms may be so uncomfortable that your child doesn’t want to eat or drink.

Herpetic gingivostomatitis diagnosis

Your child’s health care provider can most often diagnose this condition by looking at your child’s mouth sores.

Sometimes, special laboratory tests can help confirm the diagnosis.

Herpetic gingivostomatitis treatment

Your child’s doctor may prescribe:

  • Acyclovir, a medicine your child takes that fights the virus causing the infection
  • Numbing medicine (viscous lidocaine), which you can apply to your child’s mouth to ease severe pain

Use lidocaine with care, because it can numb all feeling in your child’s mouth. This can make it hard for your child to swallow, and may lead to burns in the mouth or throat from eating hot foods, or cause choking.

There are several things you can do at home to help your child feel better:

  • Give your child cool, noncarbonated, nonacidic drinks, such as water, milk shakes, or diluted apple juice. Dehydration can occur quickly in children, so make sure your child is getting enough fluids.
  • Offer cool, bland, easy-to-swallow foods such as frozen pops, ice cream, mashed potatoes, gelatin, or applesauce.
  • Give your child acetaminophen or ibuprofen for pain. (Never give aspirin to a child under age 2. It can cause Reye’s syndrome, a rare, but serious illness.)
  • Bad breath and a coated tongue are common side effects. Gently brush your child’s teeth every day.
  • Make sure your child gets plenty of sleep and rests as much as possible.

Herpetic gingivostomatitis prognosis

Your child should recover completely within 10 days without medical treatment. Acyclovir may speed up your child’s recovery.

Your child will have the herpes virus for life. In most people, the virus stays inactive in their body. If the virus wakes up again, it most often causes a cold sore on the mouth. Sometimes, it can affect the inside of the mouth, but it won’t be as severe as the first episode.

Herpetic gingivostomatitis possible complications

The complications of primary herpetic gingivostomatitis can range from cold sores to life-threatening encephalitis 15). The most common cause of morbidity following primary herpetic gingivostomatitis is dehydration. Amir et al. 16) found that 89% of patients drank less than normal, and that two of 36 patients were unable to drink. In severe cases, hospitalization and parenteral fluid intake are recommended. Bacteremia caused by the Gram-negative bacillus Kingella kingae has been observed 17), but this complication subsided uneventfully after the administration of antibiotics.

An innocuous morbidity of primary herpetic gingivostomatitis is herpes labialis (also known as ‘cold sores’ or ‘fever blister’). This represents the most common manifestation of HSV reactivation in trigeminal ganglia, with an incidence among adults of 20–40% 18). Two or three recurrences annually are normal, but as many as 12 may occur. herpes simplex virus type 1 (HSV-1) infections recur more often than herpes simplex virus type 2 (HSV-2) infections. The vermilion border and adjacent skin of the lips are the sites affected most frequently, although the skin of the nose, chin or cheek may also be involved. Pain, tingling, burning sensation, itching, fever (fever blisters) or upper respiratory tract infection (cold sores) usually precede the onset of the disease 19). Herpes labialis is characterized by multiple small, erythematous papules that develop and form clusters of fluid-filled vesicles that rupture within 2 days. The total area involved is usually less than 100 mm2, and the lesions progress to being pustular or ulcerative, with crusting within 3–4 days 20). Pain is intense at the outset, but resolves over 4–5 days. Shedding of virus from lesions continues, with progressive healing over 2–3 days. Healing is rapid and is complete within 10 days. Remission of herpes labialis can occur; inciting factors are fever, stress and exposure to UV light 21).

‘Herpetic geometric glossitis’, characterized by linear fissures on the dorsum of the tongue, with branching dendritic lesions, represents an HSV-1 infection in immunocompromised patients 22), whereas recurrent herpetic stomatitis presents in immunocompetent individuals. The latter differs from primary herpetic gingivostomatitis in that it has a more confined enanthema. Tabaee et al. 23) described an oral recurrent HSV infection presenting as an immense tongue mass in a patient who underwent cardiac transplantation. Paradoxically, this lesion was first encountered 10 months after transplantation, although most recurrent oral HSV infections occur within the first month post-transplant 24). The lesion was initially considered to be a squamous carcinoma, so a 0.5-cm free margin excision was performed. Later, following immunostaining, the final diagnosis of HSV infection was established 25).

An even more unusual clinical entity is a recrudescent HSV infection identical to primary herpetic gingivostomatitis. Use of laboratory screening tests is mandatory in such cases in order to make the differential diagnosis 26).

Finally, there is a single report 27) postulating that recurrent HSV infection affecting the oral cavity may even manifest as a dry socket, since HSV was isolated from the socket. However, there are reservations concerning the acceptance of this pathology.

A less common presentation of HSV is herpetic whitlow (herpetic paronychia). This may occur as a result of auto-inoculation in children with orofacial herpes (i.e., children sucking their hands), and in adults in association with genital herpes 28). In the past, before the use of protective gloves, dental personnel could come into contact with HSV during the treatment of patients suffering from HSV infection. Whitlow is a noxious pathology characterized by prodromal symptoms, namely pain and burning, during the 2–20-day incubation period. Herpetic whitlow usually manifests with local swelling, erythema, and one or more small, tender vesicles. Fever and malaise may be present, especially in infants. The lesions typically contain clear fluid in the initial stages, but the fluid can become cloudy after a week by virtue of the presence of white blood cells. In contrast, bacterial paronychia presents with suppuration from the onset of the disease. The site affected most commonly is the digital pulp space, but infections of the nail folds or lateral aspects of the fingers can also be encountered. The disease subsides completely within 3 weeks 29).

Another dermatosis caused by HSV is herpes gladiatorum or ‘scrumpox’. This usually affects individuals participating in contact sports, e.g., wrestling or rugby football, or parents who have kissed areas of dermatological injury in children 30).

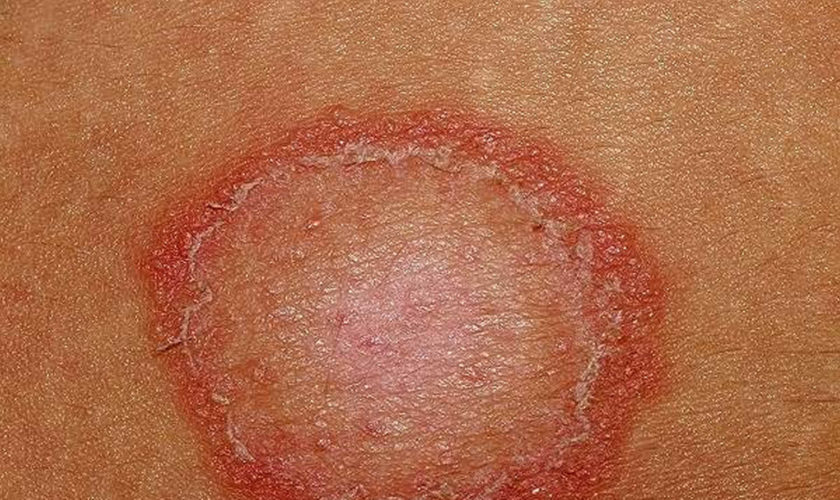
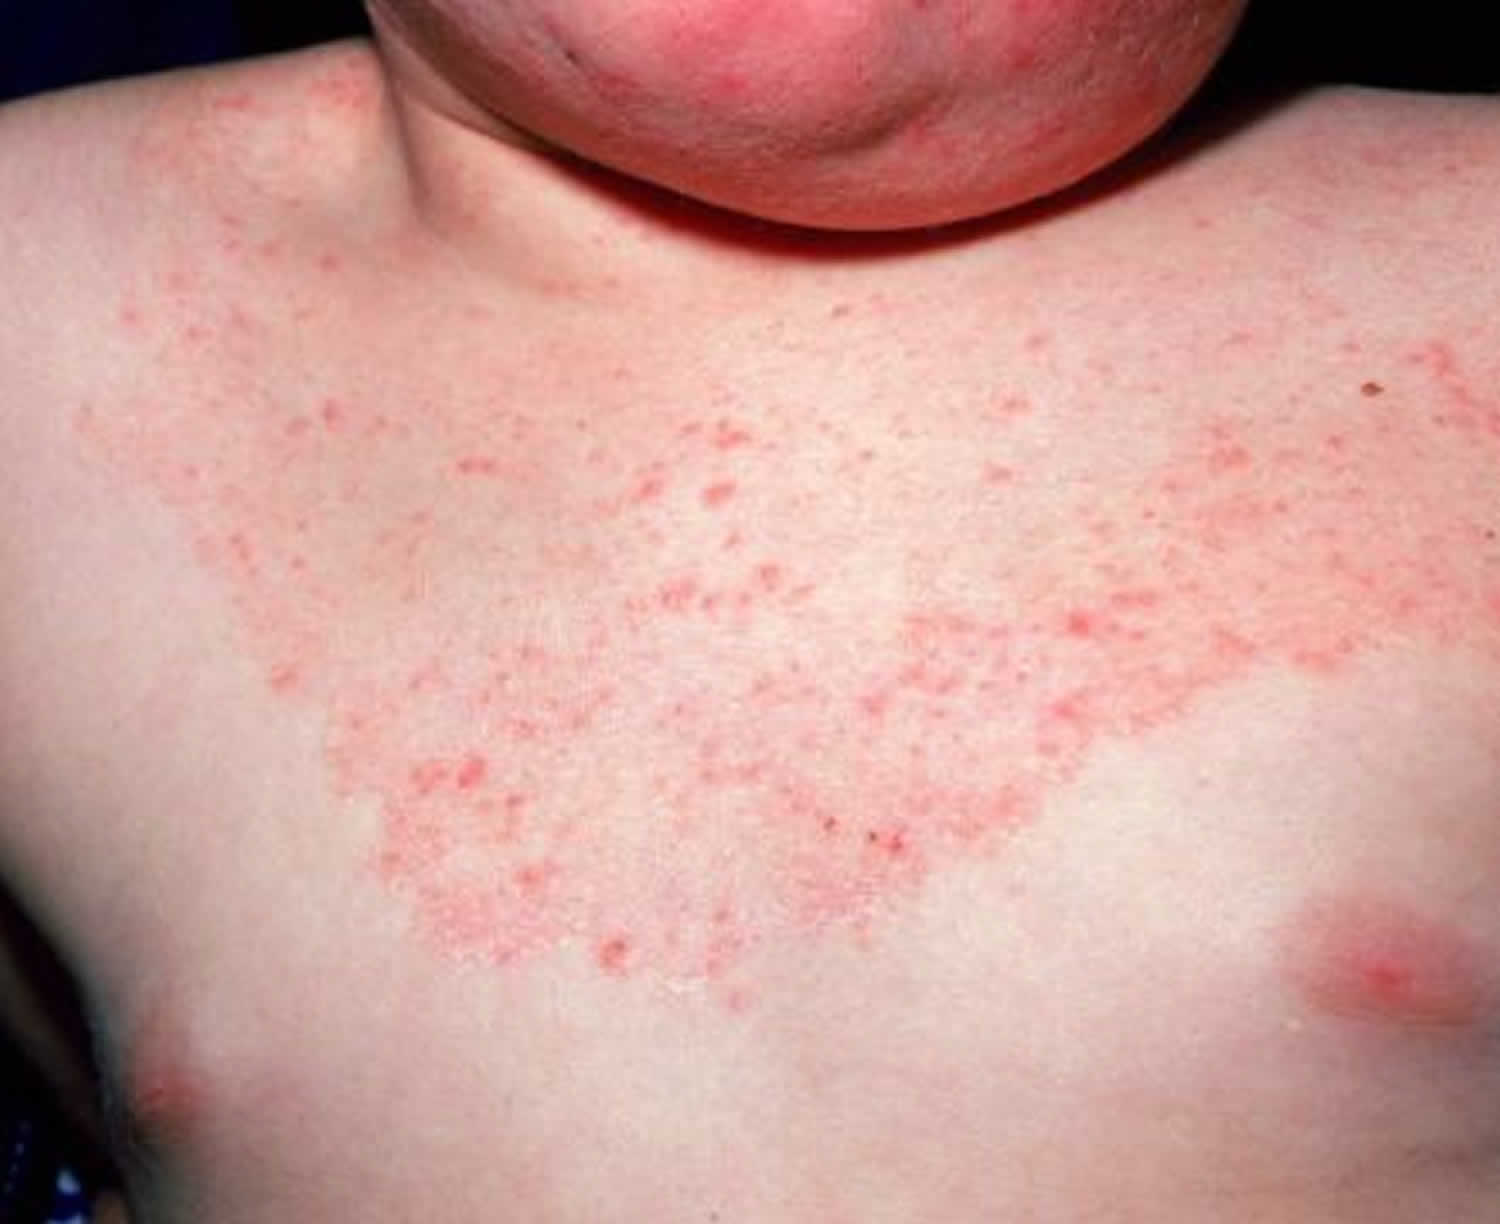
Eczema herpeticum (also known as Kaposi’s varicelliform eruption) is a skin infection affecting children and adults, in which HSV is implicated. Habif 31) considers that eczema herpeticum is an association of atopic dermatitis with HSV infection. The disease is most common in areas of active or recently healed atopic dermatitis, particularly on the face, but it can also develop in areas with pre-existing dermatoses, such as are seen in atopic dermatitis, Darier’s disease, mycosis fungoides, pemphigus folliaceous and Sezary’s syndrome, and even on normal skin. In one-third of paediatric patients with eczema herpeticum, there is a history of herpes labialis in a parent. The disease is characterised by the eruption of numerous vesicles, which gradually become pustular, and finally are rendered umbilicated. New groups of vesicles may appear during the following weeks. High fever and adenopathy become apparent 2–3 days after the eruption of vesicles. The fever resolves in 4–5 days in uncomplicated cases, and the lesions evolve in the typical manner. The prognosis is usually good, but the patient may succumb when viraemia occurs along with visceral involvement 32).

Erythema multiform is another dermatosis in which HSV is implicated. Indeed, HSV may precede erythema multiform, and post-herpetic erythema multiform is thought to be the sequel of perivascular immune complex deposition of immunoglobulin, herpes virus antigen and complement 33).

An even more severe complication of primary herpetic gingivostomatitis is ocular involvement. This can be caused by auto-inoculation from primary herpetic gingivostomatitis or herpes labialis, or via the nerve route 34). HSV infection of the eye is the most frequent cause of corneal blindness in the USA 35). Herpetic keratoconjunctivitis is associated with acute onset of pain, blurring of vision, characteristic dendritic lesions of the cornea, injection, chemosis, photophobia, lacrimation and eyelid oedema. Less commonly, advanced disease can result in ‘geographical’ or ‘amoeboid’ ulcer of the cornea. The visual acuity declines in the presence of the ulcers after several bouts of infection and, with progressive stromal involvement, opacification of the cornea may occur. Repeated individual attacks may take place for several weeks or even months. Progressive disease can result in visual loss or even rupture of the globe 36).

Herpetic stromal keratitis caused by HSV appears to be related to T-cell-dependent destruction of deep corneal tissue. The UL6 viral protein mimics the corneal antigens, so an autoreaction with corneal antigens targeting T-cells has been postulated to be a factor in this infection 37). Recently, Lundberg et al. 38) proposed a model for herpetic stromal keratitis pathogenesis in which the unmethylated CpG dinucleotides, released by degenerate stromal cells infected previously by HSV, bind to Toll-like receptor 9 of macrophages, which in turn orchestrate the Th1 response with release of cytokines and recruitment of autoreactive T-cells 39).

Herpetic oesophagitis and herpetic infection of the lower respiratory tract may result from direct extension of oropharyngeal infection, including primary herpetic gingivostomatitis 40). The former may also represent the consequence of de-novo reactivation of HSV and propagation to the oesophageal mucosa via the vagus nerve. HSV esophagitis may manifest even in immunocompetent patients, but it is more likely to occur in patients who have undergone kidney or liver transplantation, or in patients suffering from AIDS. The predominant symptoms of HSV oesophagitis are odynophagia, dysphagia, substernal pain and weight loss, while bleeding or even stricture formation may complicate the disease 41). Clinically, there are multiple oval ulcerations on an erythematous base, which may or may not have a patchy white pseudomembrane. The distal oesophagus is involved most commonly, although disseminated disease may occur when the immune system is deranged 42).

HSV pneumonitis is uncommon unless an individual is immunocompromised, and may result from extension of herpetic tracheobronchitis into lung parenchyma, whereupon focal necrotising pneumonitis usually ensues. The mortality rate in immunosuppressed patients is high (>80%) 43). Bogger-Goren 44) reported a case of acute epiglottitis in a child aged 16 months that was caused by HSV, and involvement of the peripheral nervous system or the spinal cord may also be complications resulting from primary herpetic gingivostomatitis. Nasatzky and Katz 45) reported a case of Bell’s palsy associated with HSV gingivostomatitis. It has been postulated that Bell’s palsy results from the replication of HSV in geniculate ganglia, and that axonal spread and multiplication of the reactivated virus leads to inflammation, demyelination and palsy, which usually resolve within 6–8 weeks, although sequelae may occur in some patients. It has also been suggested that the anatomical structure of the Fallopian canal may be responsible for nerve compression secondary to oedema, which can lead finally to nerve degeneration and severe facial paralysis.

Galanakis et al. 46) reported a case of transverse myelitis associated with primary herpetic gingivostomatitis in which the patient exhibited the typical signs and symptoms of transverse myelitis, such as acute weakness, acute pain in the lower extremities, lower back and abdomen, weak leg muscles and bladder dysfunction, but retained deep sensation. The patient’s history revealed that he had suffered from herpetic gingivostomatitis, and lumbar puncture, magnetic resonance imaging and serology were all consistent with transverse myelitis caused by HSV-1.

Herpetic meningoencephalitis is the most fatal complication of HSV infection. In general, herpetic encephalitis (HSE) is attributed mainly to HSV-1, whereas meningitis is ascribed to HSV-2 47). Herpetic encephalitis is considered to be the most common cause of sporadic, fatal encephalitis in the USA, and probably worldwide, as it accounts for 10–20% of all cases of viral encephalitis [97, 98], either primary or secondary. There are three patterns of viral propagation to brain parenchyma: (1) exogenously acquired virus entering the CNS via the olfactory epithelium and olfactory bulb; (2) reactivation of latent HSV in ganglia, followed by spread via trigeminal and autonomous nerve roots; and (3) blood-borne spread, especially in neonates or immunocompromised individuals. However, only Ito et al. 48) have reported herpetic encephalitis associated directly with primary herpetic gingivostomatitis. The clinical signs and symptoms of herpetic encephalitis depend on the location of the lesion. Typically, herpetic encephalitis produces focal hemorrhagic necrosis of temporal and frontal lobe structures, including limbic mesocortices, amygdala and hippocampus, although the involvement of other sites cannot be excluded 49). The clinical hallmark of herpetic encephalitis is the triad of fever, headache and altered consciousness 50). Concomitant signs and symptoms include confusion, lethargy, seizures and mental aberrations, but other symptoms may also become apparent, depending on the location of the lesion 51). The presence of neurological symptoms, e.g., altered sensorium or other focal neurological findings, distinguish herpetic encephalitis from HSV meningitis 52). Mortality rates reach 60–70% and, even after adequate medication, permanent neurological deficits will remain, with only 2.5% of surviving patients recovering normal neurological function 53).

In terms of pathogenesis, it should be emphasised that, although herpetic encephalitis has been associated with necrotic cell death resulting from virus replication and inflammatory changes/cerebral oedema secondary to the virus-induced immune response, the role of virus-induced nerve cell apoptosis should not be overlooked 54). Indeed, Perkins et al. 55) demonstrated HSV-1-induced apoptosis mediated by c-jun N-terminal kinase. Likewise, Anglen et al. 56) showed that CD8+ T-cells, which are probably the most efficient cell population active against HSV, may enhance or eliminate brain injury when they infiltrate brain tissues before or after HSV infection, respectively.

In contrast, meningitis is ascribed generally to HSV-2. Headache, asthenia, high fever, neck stiffness, nausea/vomiting, photophobia, muscle pain and radiculalgia are some of the symptoms indicative of meningitis 57). Mommeja-Marin et al. 58) reported no cases of visceral involvement, and considered that meningitis did not result from blood-borne spread ofviraemia, but probably from spread through the nerve tract, starting from sacral ganglia. Cerebrospinal fluid analysis is suggestive of viral meningitis if high levels of white blood cells, especially lymphocytes (lymphocytic pleocytosis), are detected, the protein level is normal or slightly elevated, and the glucose level is normal. PCR is necessary to establish the final diagnosis.

References   [ + ]

read more

Ringworm in babies

ringworm in babies

Ringworm in babies

Ringworm also known as tinea corporis, is tinea infection of the surface (superficial) skin with a dermatophyte fungus or ringworm fungus. Ringworm may be passed to humans by direct contact with infected people, infected animals (such as kittens or puppies), contaminated objects (such as towels or locker room floors), or the soil. Tinea infection is commonly called ringworm because some may form a ring-like pattern on affected areas of the body and spreads outward. The rash is not caused by a worm, it is caused by a dermatophyte fungus that likes moist areas, but can also live on surfaces and household items and spread by communal use of hats or hairbrushes. The fungus infects the skin, but they don’t spread inside the body.

Depending on which part of the body is affected, tinea infection is given a specific name:

  • Tinea barbae (beard)
  • Tinea capitis (head)
  • Tinea corporis (body)
  • Tinea cruris (groin)
  • Tinea faciei (face)
  • Tinea manuum (hand)
  • Tinea pedis (foot)
  • Tinea unguium (nail)

Sometimes, the name gives a different meaning:

  • Tinea versicolor is more accurately called pityriasis versicolor. This is a common yeast infection on the trunk.
  • Tinea incognita (often spelled incognito) refers to a tinea infection in which the clinical appearance has changed because of inappropriate treatment.
  • Tinea nigra is a mould infection (not a dermatophyte). It affects the palms or soles, which appear brown (on white skin) or black (on dark skin).

There are several kinds of ringworm, including:

  • Majocchi’s granuloma, a deeper fungal infection of skin, hair, and hair follicles. It is most common in women who shave their legs.
  • Tinea corporis gladiatorum, a special name given to ringworm spread by skin-to-skin contact between wrestlers.
  • Tinea imbricata, a form of ringworm seen in Central and South America, Asia, and the South Pacific.

Children most commonly get ringworm from young animals, like kittens and guinea pigs. They can also pick it up through contact with infected people and contaminated objects, including carpet, floors, clothing and towels. Soil contains ringworm fungi too. The fungus can also be spread during contact sports, like wrestling.

Ringworm can affect any skin on the body. It’s called different things depending on where it is on the body. For example, on the torso it’s called tinea corporis, on the feet it’s called tinea pedis, and on the scalp it’s called tinea capitis. Ringworm can also lead to nail infections.

Ringworm initially appears on the skin as a red ring with a clear center, scales and a lumpy or raised edge. It’s very itchy and can gradually get bigger. It sometimes spreads to other areas.

If your child’s scalp is affected, you might notice a small bald patch with some hair stubble.

Ringworm is treated using antifungal lotions or pills and the infection typically heals in about a month. Ringworm (tinea corporis) is usually treated with topical antifungal creams which you can buy over the counter at the pharmacy, but if the treatment is unsuccessful, oral antifungal medicines may be considered, including terbinafine and itraconazole.

Ringworm treatment with antifungal creams usually takes several weeks to work. Your doctor might recommend that you keep applying the cream to the affected skin for a week after the rash has disappeared. This should stop the ringworm coming back.

If antifungal creams don’t work, or the ringworm is on your child’s scalp, your doctor might prescribe antifungal tablets. These need to be taken under medical supervision. If the infection is on the scalp, your child might have bald patches for a few months after it has cleared. Don’t worry, though – the hair will grow back normally.

Encourage your child to stop scratching the affected area.

After your child starts proper ringworm treatment, wait for 48 hours before sending him back to child care, preschool or school.

It’s a good idea to treat all family members affected by ringworm.

Consult your vet for treatment if your pet has bald patches or sores, because this might be where your child has picked up the ringworm.

Ringworm key points to remember:

  • Ringworm (tinea) is a fungal infection that is highly contagious and affects the scalp, body, feet or nails.
  • Ringworm is spread by contact with a person or animal who has ringworm, or by touching an object or surface that may contain the fungus (e.g. brushes, showers or towels).
  • Antifungal medications are used to treat ringworm – early treatment is important.

Figure 1. Ringworm rash baby

ringworm rash baby

Figure 2. Tinea capitis (scalp ringworm)

scalp ringworm

When to see your doctor about ringworm

You should take your child to the doctor if:

  • there are several ringworm sores on your child’s scalp or body
  • the sores are painful
  • the rash doesn’t start to improve after a week’s treatment
  • the rash is spreading despite treatment
  • there are bald patches in your child’s hair.

What causes ringworm?

Ringworm or tinea corporis is the name used for infection of the trunk, legs or arms with a dermatophyte fungus. Ringworm is a localized inflammatory skin condition due to fungal colonization of the superficial epidermis. The most commonly implicated species is Trichophyton rubrum (T. rubrum). Infection often comes from the feet (tinea pedis) or nails (tinea unguium) originally. Microsporum canis (M. canis) from cats and dogs, and Trichophyton verrucosum, from farm cattle, are also common. Fungal organisms are transmitted to children by direct contact with those infected or through fomites. Varying location presentations include tinea capitis (scalp), tinea faciei (face), tinea pedis (feet), tinea manuum (hands), and tinea cruris (crural folds).

Majocchi granuloma is caused by organisms invading the hair follicle or shaft of hairs on skin other than the scalp with a secondary granulomatous perifolliculitis.

Disseminated tinea may be seen in patients with immunosuppression, diabetes, Cushing syndrome, and malignancy. Majocchi-like granulomas, deep ulcerated fungal infections, severe tinea capitis and corporis, and fungal nail involvement are characteristic of an inherited deficiency of CARD9 (caspase recruitment domain-containing protein 9), an inflammatory cascade-associated protein. The disorder is autosomal recessive and is most common in North African countries including Algeria, Morocco, and Tunisia. The infections usually begin in childhood and are caused by Trichophyton rubrum and Trichophyton violaceum. Lymphadenopathy, high IgE antibody levels, and eosinophilia are common, and the disorder can be fatal.

Tinea imbricata is a distinct form of tinea corporis caused by Trichophyton concentricum, which is prevalent in tropical locales such as Central and South America, the South Pacific, and Southeast Asia. This form has been reported in children as well.

Tinea indecisiva (tinea pseudoimbricata) is tinea corporis that mimics tinea imbricata. These cases are not caused by Trichophyton concentricum but rather by other Trichophyton or Microsporum species. There is usually underlying immunosuppression in patients with tinea indecisiva.

Tinea capitis

Tinea capitis is the name used for infection of the scalp with a dermatophyte fungus. Although common in children, tinea capitis is less frequently seen in adults.

Hair can be infected with Trichophyton and Microsporum fungi.

Microsporum canis is the usual dermatophyte fungus to cause tinea capitis. This fungus is zoophilic and grows naturally on an animal rather than a human. Microsporum canis tinea capitis is due to contact with an infected kitten or rarely an older cat or dog.

Other zoophilic fungi sometimes found to cause tinea capitis are:

  • Trichophyton verrucosum (originating from cattle)
  • Trichophyton mentagrophytes var. equinum (originating from horses)
  • Microsporum nanum (originating from pigs)
  • Microsporum distortum (a variant of Microsporum canis found in cats).

In the United States, Trichophyton tonsurans has also become a common cause of tinea capitis; this is passed on from one person to another as it naturally infects humans (i.e. it is anthropophilic). It frequently causes no symptoms and is commonly found in adult carriers.

Other anthropophilic fungi sometimes found to cause tinea capitis are:

  • Trichophyton violaceum especially in African patients
  • Microsporum audouinii
  • Microsporum ferrugineum
  • Trichophyton schoenleinii
  • Trichophyton rubrum
  • Trichophyton megninii
  • Trichophyton soudanense
  • Trichophyton yaoundei.

Dermatophyte fungi sometimes originate in the soil (geophilic organisms). These rarely cause tinea capitis:

  • Nannizzia gypsea
  • Microsporum fulvum.

How is ringworm in babies spread?

Ringworm infections are transmitted by contact with an infected person or animal or by contact with personal items or surfaces used by infected people, such as clothes or hairbrushes.

How to prevent ringworm infections?

Ringworm is spread by contact with infected humans, animals and contaminated objects and surfaces. Children are most likely to be infected by other people who already have ringworm, via school playgrounds, gyms, contaminated clothing, bath mats, towels, damp floors and showers.

Preventing others from coming into contact with the wound or from sharing personal use items helps to prevent transmission to others. Keeping feet covered in areas such as gyms, pools and locker rooms is also of value.

Because ringworm is very contagious, it can be difficult to prevent. However, there are ways you can help your child avoid being infected:

  • Avoid contact with infected people. Where this is not possible, wash hands thoroughly after contact, and dry them well.
  • Pets with bald spots may have ringworm, so care should be taken to avoid touching or petting them. Have any household pets evaluated by a veterinarian to make sure that they do not have a tinea infection. If the veterinarian discovers an infection, be sure to have the animal treated.
  • Avoid contact with infected pets, and wash your pets with anti-fungal solution.
  • Clothing and sheets used by infected people should be washed daily.
  • Pay special attention to drying moist areas on the body (e.g. armpits, groin, in between toes).
  • Don’t share brushes, combs, hats, clothing, linen or towels with an infected person.
  • Don’t walk in bare feet on damp floors or in communal showers.

If your child has ringworm:

  • Cover the rash with clothing or a dressing (e.g. a Band-Aid).
  • Don’t let them use communal pools or baths until you have started the appropriate treatment.
  • Wash their clothing, towels and bed linen often and with hot water.
  • Spray their shoes with anti-fungal spray if the ringworm is on their feet. This will help stop their feet being reinfected after treatment.

Who’s at risk of ringworm?

Ringworm may occur in people of all ages, of all races, and of both sexes.

Ringworm is most commonly seen in children. Other people who are more likely to develop ringworm include:

  • Women of child-bearing age who come into contact with infected children.
  • People who have another tinea infection elsewhere on their bodies: tinea capitis (scalp), tinea faciei (face), tinea barbae (beard area), tinea cruris (groin), tinea pedis (feet), or tinea unguium (fingernails or toenails).
  • Athletes, especially those involved in contact sports.
  • People in frequent contact with animals, especially cats, dogs, horses, and cattle.
  • People with weakened immune systems.
  • People who sweat heavily.
  • People who live in warmer, more humid climates.

Ringworm signs and symptoms

Rashes caused by ringworm can occur on almost any part of the body and often take the shape of a ring that is red on the outside and skin-colored in the middle. Ringworm rash appears as one or more red, scaly patches ranging in size from 1–10 cm. The border of the affected skin may be raised and may contain bumps, blisters, or scabs. Often, the central portion of the lesion is clear, leading to a ring-like shape and the descriptive name ringworm (a misnomer since the condition is not caused by a worm).

Ringworm may cause itching or burning, especially in people with weak immune systems.

The most common locations for ringworm include:

  • Neck
  • Trunk (chest, abdomen, back)
  • Arms
  • Legs

If the ringworm occurs on a part of the body that has hair, such as the scalp or on a bearded face, the hair may fall out. If nails are infected, they may become thick and discolored.

Infected areas may rarely become warm, red and tender if an abscess or cellulitis occurs. Bacterial infections may complicate the infection if it is scratched open and the bacteria, such as those that cause impetigo, can enter the wound.

Tinea capitis signs and symptoms

Tinea capitis is most prevalent between three and seven years of age. It is slightly more common in boys than girls. Infection by Trichophyton tonsurans may occur in adults.

Anthropophilic infections such as Trichophyton tonsurans are more common in crowded living conditions. The fungus can contaminate hairbrushes, clothing, towels and the backs of seats. The spores are long-lived and can infect another individual months’ later.

Zoophilic infections are due to direct contact with an infected animal and are not generally passed from one person to another.

Geophilic infections usually arise when working in infected soil but are sometimes transferred from an infected animal.

Tinea capitis may present in several ways:

  • Dry scaling — like dandruff but usually with moth-eaten hair loss
  • Black dots — the hairs are broken off at the scalp surface, which is scaly
  • Smooth areas of hair loss
  • Kerion — a very inflamed mass, like an abscess
  • Favus — yellow crusts and matted hair
  • Carrier state — no symptoms and only mild scaling (Trichophyton tonsurans).

Tinea capitis may result in swollen lymph glands at the sides of the back of the neck. Untreated kerion and favus may result in permanent scarring and bald areas.

It can also result in an id reaction, especially just after starting antifungal treatment.

Ringworm diagnosis

Your doctor might use a special light to help diagnose ringworm, or send some skin scrapings from the area to a laboratory for examination. The diagnosis of ringworm (tinea corporis) is confirmed by microscopy and culture of skin scrapings. Occasionally, the diagnosis is made on skin biopsy because of characteristic histopathological features of tinea corporis and organisms may be found in the outside layers of the skin.

Tinea capitis diagnosis

Tinea capitis is suspected if there is a combination of scale and bald patches. Wood light fluorescence is helpful but not diagnostic as it is only positive if the responsible organism fluoresces, and fluorescence is sometimes seen for other reasons.

The diagnosis of tinea capitis should be confirmed by microscopy and culture of skin scrapings and hair pulled out by the roots (see laboratory tests).

Sometimes, diagnosis is made on skin biopsy showing characteristic histopathological features of tinea capitis.

Ringworm treatment for babies

If you suspect that your child has ringworm, you might try one of the following over-the-counter antifungal creams or lotions:

  • Terbinafine
  • Clotrimazole
  • Miconazole

Apply the cream to each lesion and to the normal-appearing skin 2 cm beyond the border of the affected skin for at least 2 weeks until the areas are completely clear of lesions. Because ringworm is very contagious, have your child avoid contact sports until lesions have been treated for a minimum of 48 hours. Do not allow your child to share towels, hats, or clothing with others until the lesions are healed.

Since people often have tinea infections on more than one body part, examine your child for other ringworm infections, such as on the face (tinea faciei), in the groin (tinea cruris, jock itch), or on the feet (tinea pedis, athlete’s foot).

When to seek medical care

  • If large areas of the body are affected, or if the lesions do not improve after 1–2 weeks of applying over-the-counter antifungal creams, see your child’s doctor for an evaluation.

Treatments your doctor may prescribe

In order to confirm the diagnosis of ringworm, your child’s physician might scrape some surface skin material (scales) onto a slide and examine them under a microscope. This procedure, called a potassium hydroxide (KOH) preparation, allows the doctor to look for tell-tale signs of fungal infection.

Once the diagnosis of ringworm has been confirmed, the physician will probably start treatment with an antifungal medication. Most infections can be treated with topical creams and lotions, including:

  • Terbinafine
  • Clotrimazole
  • Miconazole
  • Econazole
  • Oxiconazole
  • Ciclopirox
  • Ketoconazole
  • Sulconazole
  • Naftifine
  • Butenafine

Rarely, more extensive infections or those not improving with topical antifungal medications may require 3–4 weeks of treatment with oral antifungal pills or syrups, including:

  • Griseofulvin
  • Terbinafine

The ringworm should go away within 4–6 weeks after using effective treatment.

Tinea capitis treatment

Tinea capitis is usually treated oral antifungal medicines, including griseofulvin, terbinafine and itraconazole.

Oral antifungal agents

Tinea capitis requires treatment with an oral antifungal agent. Griseofulvin is probably the most effective agent for infection with Microsporum canis. Scalp Trichophyton infections may successfully be eradicated using oral terbinafine, itraconazole or fluconazole for 4 to 6 weeks. However, these medications are not always successful, and it may be necessary to try another agent. Intermittent treatment may also be prescribed such as once-weekly dosages.

Treatment of carriers

If the child has an anthropophilic infection, all family members should be examined for signs of infection. Brushings of scaly areas of the scalp should be taken for mycology. Sometimes it is best for the whole family to be treated whether or not the fungal infection is proven.

It is advisable for parents of classmates and other playmates to be informed so their children may be examined and treated if necessary. In some countries, infected children are not allowed to attend school. Elsewhere children with tinea capitis can attend school providing they are receiving treatment.

Carriers may have no symptoms. Treatment of carriers is necessary to prevent the spread of infection. Antifungal shampoo twice weekly for four weeks may be sufficient, but if cultures remain positive, oral treatment is recommended.

Suitable shampoos include these ingredients:

  • 2.5% selenium sulfide
  • 1% to 2% zinc pyrithione
  • Povidone-iodine
  • 2% Ketoconazole.
read more

Thrush in babies

thrush in newborn

Oral thrush in babies

Oral thrush also known as oral candidiasis, oral moniliasis, “thrush” or oropharyngeal candidiasis, is a common and usually harmless yeast (fungal) infection of the mouth or throat (the oral cavity). Oral thrush mostly affects children under two years of age. Oral thrush is very common in the first year of life and usually isn’t anything to worry about. Sometimes it doesn’t even make babies uncomfortable. Oral thrush is a common condition, affecting around 1 in 20 babies. It is most common in babies around four weeks old, although older babies can get it too. Premature babies (babies born before 37 weeks) have an increased risk of developing oral thrush.

Oral thrush is caused by a strain of yeast fungus called Candida albicans, which lives on the skin, in the bowel and inside the mouth of most people. It doesn’t cause symptoms usually, but it can cause an infection in people with a weakened immune system. When too much Candida grows, thrush occurs. As the immune systems of newborn babies are still developing, they are more vulnerable to infection.

If a baby has oral thrush, there is a chance that the baby also has a yeast infection in the diaper area.

Babies can pass oral thrush on through breastfeeding. This can cause nipple thrush in mothers.

A mother who is breastfeeding may also need to be treated if she has a fungal infection on her breasts. This will help decrease the chance of re-infecting the infant.

The following are the most common signs and symptoms of candidiasis. However, each child may experience symptoms differently.

Signs and symptoms of thrush in babies include:

In the mouth (thrush):

  • Creamy, white spots on the tongue, gums, on the inside of the cheeks or roof of the mouth (if you gently try to wipe the spots with a clean cloth, they won’t come off)
  • There may be a white gloss on your baby’s tongue or lips
  • White patches on the cheeks or throat (these white lesions do not scrape off easily)
  • Your baby might feed for shorter periods, or seem unsettled during and between feeds

In the diaper area:

  • Very red lesions with well-defined edges (lesions may be raised)
  • Sores that have pus in them

Yeast infections in the diaper area usually have additional lesions away from the diaper area (i.e., on the stomach or thighs). A boy’s scrotum may also be affected.

The symptoms of candidiasis may resemble other dermatologic conditions or medical problems. Always consult your child’s physician for a diagnosis.

If you think your baby has thrush, make an appointment with your doctor as soon as possible. After examining the lesions, your doctor may want to take swabs from your nipple and your baby’s mouth to perform cultures of the lesions to help verify the diagnosis and to help in selecting the best treatment.

Figure 1. Thrush in babies

thrush in babies mouth

thrush in babies mouth

Footnote: A white coating on the tongue like cottage cheese – this can’t be rubbed off easily. Sometimes there are white spots in their mouth.

When to see a doctor

See a doctor if:

  • your baby is under 4 months and has signs of oral thrush
  • you do not see any improvement after 1 week of treatment with a mouth gel
  • you have difficulty or pain swallowing

If you leave oral thrush untreated, the infection can spread to other parts of the body.

Can I breastfeed if I have thrush?

Yes, carry on breastfeeding if you can. If you can’t because it’s too painful, try expressing your milk instead. You can give your baby freshly expressed milk, but throw away any leftovers – and don’t freeze it, freezing does not kill off the thrush and you could re-infect your baby. If you are in the early days of breastfeeding, it’s very important to continue breastfeeding, or expressing your milk. By pausing, or taking a break, you’ll reduce the amount of breast milk you produce.

What causes thrush?

There are over 20 species of Candida yeasts that can cause infection in humans. Thrush is most commonly caused by a fungus called Candida albicans. It occurs commonly in the neonate and infant. Older children with thrush often have another health problem that causes the condition to develop. The following are some of the factors that may increase the chance of the infant developing thrush:

  • Antibiotics. Antibiotics can cause yeast to grow, because the normal bacteria in tissues are killed off, letting the yeast grow unhampered.
  • Steroids. Steroids may decrease the child’s immune system and decrease the ability to fight normal infections.
  • Poor immune system. If the infant has a poor immune system and an inability to fight infection from another chronic disease, he or she is at an increased risk for developing thrush.

Thrush in babies prevention

In most cases, there is no known cause for oral thrush infections in babies. As almost everyone, including babies, has Candida in and on their bodies, you can’t really protect a baby from thrush. The steps below may help to prevent infection:

  • If your baby uses a dummy, sterilize all their pacifiers (dummies) regularly, as well as any toys designed to be put in their mouth, such as teething rings. It is wise not to allow anybody to wet the baby’s dummy in their own mouth.
  • If you bottle-feed your baby, sterilize the bottles and other feeding equipment regularly, especially the teats.
  • Give your baby a drink of sterilized water after a feed, to rinse away any milk left in their mouth.
  • Wash your baby’s clothes at 60 degrees Celsius to kill the fungus
  • If you are breastfeeding, wash your nipples with water and dry them thoroughly between feeds.

Stop thrush spreading

Thrush spreads easily (and can spread to other members of the family) so you’ll need to be extra careful with hygiene. Things you, and everyone else in your household should do:

  • wash hands thoroughly, especially after nappy changes
  • use separate towels
  • wash and sterilize pacifiers (dummies), teats, and any toys your baby may put in their mouth
  • change your breast pads often
  • wash all towels, baby clothes, and bras (anything that comes into contact with the infected area) at a high temperature to kill off the fungus

Oral thrush signs and symptoms

Symptoms of oral thrush can include one or more white spots or patches in and around the baby’s mouth and tongue.

These may look white or cream-colored, like curd or cottage cheese. They can also join together to make larger plaques. You may see patches:

  • on your baby’s gums
  • on their tongue
  • on the roof of their mouth (palate)
  • inside their cheeks

Unlike bits of milk, the patches do not wash or rub off easily. The tissue underneath will be red and raw. It may also bleed a little. The patches may not seem to bother your baby. But if they are sore, your baby may be reluctant to feed.

Other signs and symptoms of oral thrush in babies are:

  • a whitish sheen to their saliva
  • fussiness at the breast (keeps detaching from the breast)
  • refusing the breast
  • clicking sounds during feeding
  • poor weight gain
  • red rash in nappy area

Some babies may dribble more saliva than normal if they have an oral thrush infection.

Thrush in babies diagnosis

The diagnosis of baby thrush is made by your child’s doctor after a thorough history and physical examination. After examining the lesions, your doctor may want to take swabs from your nipple and your baby’s mouth to perform cultures of the lesions to help verify the diagnosis and to help in selecting the best treatment.

Thrush in babies treatment

Many cases of oral thrush clear up in a few days without the need for treatment. If symptoms persist or they are particularly troublesome, see your doctor. There are several antifungal gels or drops that can treat oral thrush. It is important to speak to your doctor or pharmacist before you use them as some gels are not suitable for very young babies.

Your doctor will probably prescribe antifungal drops or oral gel, which you use after each feed or meal for 10 days.

If your baby is breastfeeding, the mother’s nipples may need to be treated at the same time as the baby to prevent the infection passing back and forth.

Sometimes oral thrush goes along with thrush in the nappy area, which will need treatment at the same time.

You can still breastfeed if your child has oral thrush. Your doctor might advise you to put some antifungal cream on your nipples as well, but you should wipe this off before feeding.

Oral thrush and breastfeeding

If your baby has oral thrush and you’re breastfeeding, it’s possible for your baby to pass a thrush infection to you. The infection can affect your nipples or breasts. It’s commonly called ‘nipple thrush’, mammary candidosis or mammary candidiasis.

If you are breastfeeding and experiencing horrible sharp, shooting pains in both breasts, this could be caused by thrush. It can make breastfeeding very painful, but don’t worry – it’s easily treated.

It’s worth remembering that a thrush infection may not be the cause of nipple pain, it could be that your baby simply isn’t latching on properly. If you think this could be the case, ask your health care provider or lactation nurse for guidance.

What are the symptoms of nipple thrush?

If you are breastfeeding and have the following symptoms, it may be thrush. Make an appointment with your doctor as soon as possible. If you have thrush, you may experience the following symptoms:

  • pain in your nipples (burning, sharp, shooting pains) while you’re feeding your baby, which may continue after the feed is finished, can last up to an hour after feeds
  • cracked, flaky, itchy or sore nipples and areola (the darker area around your nipple)
  • areola that is red or shiny
  • a shooting pain, burning or itching sensations in one or both of your breasts, which may continue between feeds

It’s also possible that you may have no symptoms of infection. Symptoms of nipple thrush do not include fever or redness of your breasts. However, these can be symptoms of mastitis (infection of the breast).

It’s more likely that your baby can pass a thrush infection to you if you have had:

  • cracked nipples before because your baby was not positioned correctly when feeding, or
  • other thrush infections

It may also be more likely if you’ve been taking antibiotics. This can reduce your level of healthy bacteria, allowing the fungus that causes thrush to increase.

A nipple thrush infection is difficult to diagnose because:

  • You may have no symptoms, even if it is confirmed that your baby has oral thrush.
  • The symptoms you do have may also be found in other conditions. For example, pain in your nipples could also be caused by a bacterial infection.

However, if your nipples are sore, painful or cracked, the most likely cause is that your baby is not attaching to your breast correctly when they are feeding.

How is nipple thrush diagnosed?

After examining the lesions, your doctor may want to take swabs from your nipple and your baby’s mouth to perform cultures of the lesions to help verify the diagnosis and to help in selecting the best treatment.

If it is a thrush infection, you may be prescribed an antifungal cream or tablets. The cream needs to be applied to your nipples after every feed. If your baby has thrush, your doctor will prescribe a gel or cream to apply to the infected area.

Nipple thrush treatment

If you have no symptoms, you’re unlikely to need treatment, even if it’s confirmed that your baby has oral thrush. However, your nipples may need to be treated at the same time as the baby to prevent the infection passing back and forth.

If you do have symptoms, or if the infection is causing problems with feeding, your doctor may prescribe an antifungal cream.

If your infection is more severe, your doctor may recommend a course of antifungal tablets. If your doctor prescribes antifungal cream or tablets for you, your baby will probably be treated at the same time, to prevent re-infection. If the infection does not clear up after a few days, or if feeding problems continue, you should visit your doctor again.

read more

How to burp a baby

how to burp a baby

How to burp a baby

Burping your baby also known as winding, is an important part of feeding. Newborns might have wind if they swallow air when crying or feeding. When your baby swallows, air bubbles can become trapped in their tummy and cause a lot of discomfort. Some babies find it easy to burp, while others need a helping hand. Some babies might be unsettled during and after a feed until they’ve been burped. Burping your baby part way through a feed might help. Use the position that works best for your baby.

There are no rules on when you should burp your baby, some babies need burping during their feed, some after. Look for clues – if your baby seems uncomfortable while feeding, have a little burping break. If they seem fine while feeding, wait until they’ve finished. Your baby will let you know.

To burp a baby support your baby’s head and neck, make sure their tummy and back is nice and straight (not curled up), and repeated gentle patting on your baby’s back should do the trick. Cup your hand while patting — this is gentler on the baby than a flat palm. To prevent messy cleanups when your baby spits up or has a “wet burp,” you might want to place a towel or bib under your baby’s chin or on your shoulder.

You don’t need to spend ages burping your baby, a couple of minutes should be enough.

There are a few ways to burp your baby. Try them all out and see which works best or use a combination.

Try different positions for burping that are comfortable for you and your baby. Many parents use one of these three methods:

  1. Sit upright and hold your baby against your chest. Your baby’s chin should rest on your shoulder as you support the baby with one hand. With the other hand, gently pat your baby’s back. Sitting in a rocking chair and gently rocking with your baby while you do this may also help.
  2. Hold your baby sitting up, in your lap or across your knee. Support your baby’s chest and head with one hand by cradling your baby’s chin in the palm of your hand. Rest the heel of your hand on your baby’s chest, but be careful to grip your baby’s chin, not the throat. Use the other hand to pat your baby’s back.
  3. Lay your baby on your lap on his or her belly. Support your baby’s head and make sure it’s higher than his or her chest. Gently pat your baby’s back.

If your baby seems fussy while feeding, stop the session, burp your baby, and then begin feeding again. Try burping your baby every 2 to 3 ounces (60 to 90 milliliters) if you bottle-feed and each time you switch breasts if you breastfeed.

Try burping your baby every ounce during bottle-feeding or every 5 minutes during breastfeeding if your baby:

  • tends to be gassy
  • spits a lot
  • has gastroesophageal reflux disease (GERD)
  • seems fussy during feeding

If your baby doesn’t burp after a few minutes, change the baby’s position and try burping for another few minutes before feeding again. Always burp your baby when feeding time is over.

To help prevent the milk from coming back up, keep your baby upright after feeding for 10 to 15 minutes, or longer if your baby spits up or has GERD. But don’t worry if your baby spits sometimes. It’s probably more unpleasant for you than it is for your baby.

Sometimes your baby may awaken because of gas. Picking your little one up to burp might put him or her back to sleep. As your baby gets older, don’t worry if your child doesn’t burp during or after every feeding. Usually, it means that your baby has learned to eat without swallowing excess air.

Babies with colic (3 or more hours a day of continued crying) might have gas from swallowing too much air during crying spells, which can make the baby even more uncomfortable. Using anti-gas drops has not proven to be an effective way to treat colic or gas, and some of these medicines can be dangerous.

If your newborn is often unsettled after feeding and burping, or you’re worried for any other reason, see your doctor.

How long to burp a baby?

You don’t need to spend ages burping your baby, a couple of minutes should be enough.

Over your shoulder

Put a cloth over your shoulder. Put baby over your shoulder and support baby with your hand on the same side. With your baby’s chin resting on your shoulder, support the head and shoulder area with one hand, and gently rub and pat your baby’s back. It might help to walk around as you are doing this.

Your baby might vomit up some milk during burping. This is normal.

After burping, your baby will give you baby cues about what to do next. If baby is comfortable, it might be time for play and activities with you.

If your baby is still upset after being burped, the problem might be something other than wind. Is your baby still hungry? Does baby have a dirty nappy? Is baby unwell?

Figure 1. Over your shoulder to burp a baby

Over your shoulder to burp a baby

Sitting on your lap

Sit your baby upright on your lap facing away from you. Place the palm of your hand flat against their chest and support their chin and jaw (don’t put any pressure on the throat area). Lean your baby forwards slightly with baby’s tummy against your hand and with your free hand, gently rub or pat your baby’s back. The pressure of your hand on baby’s tummy might bring up wind.

Your baby may bring some milk up while burping, so have a burp cloth or muslin square ready (this is perfectly normal and nothing to worry about).

After burping, your baby will give you baby cues about what to do next. If baby is comfortable, it might be time for play and activities with you.

If your baby is still upset after being burped, the problem might be something other than wind. Is your baby still hungry? Does baby have a dirty nappy? Is baby unwell?

Figure 2. Sitting on your lap to burp a baby

Sitting on your lap to burp a baby

Lying across your lap

Lie your baby across your lap or your forearm face down so baby is looking sideways and is supported by your knee or hand. Supporting their chin (don’t put any pressure on the throat area), use your free hand to gently rub or pat your baby’s back with your other hand.

Your baby may bring some milk up while burping, so have a burp cloth or muslin square ready (this is perfectly normal and nothing to worry about).

After burping, your baby will give you baby cues about what to do next. If baby is comfortable, it might be time for play and activities with you.

If your baby is still upset after being burped, the problem might be something other than wind. Is your baby still hungry? Does baby have a dirty nappy? Is baby unwell?

Figure 3. Lying across your lap to burp a baby

Lying across your lap to burp a baby

What if my baby won’t burp?

If these methods don’t work and your baby shows signs of trapped wind (crying, arched back, drawing legs into tummy, clenched fists), try lying them on their back and gently massaging their tummy. Also move your baby’s legs back and forth – like they’re riding a bicycle. If this doesn’t work, talk to your health care provider, they’ll be able to advise you on the best thing to do.

Recognizing baby cues

Your baby’s body language can tell you how he or she is feeling and what he or she needs from you. All babies give cues to how they’re feeling and what they need from you. But each baby develops her own mix of signs to tell you what she wants. Eventually you’ll get to know your baby’s individual cues and what they tell you about your baby’s feelings.

And as you and your baby get to know each other, you’ll figure out the best way to respond to your baby’s individual cues too. For example, your grizzling baby might look relaxed when you smile at him, or he might seem to like it better when you sing and talk to him. This helps you know how to respond the next time he grizzles.

Your baby’s body language gives you important cues about whether he or she is:

  • tired
  • hungry
  • wide awake and ready to play
  • needing a break.

When you notice your baby’s body language and respond to it, he feels safe and secure. This helps you to build a strong relationship with your baby. And a strong relationship with you and other main caregivers is vital to your baby’s development.

Baby cues that say ‘I’m hungry’

Newborns need to feed every 2-3 hours. When your baby is hungry, she might:

  • make sucking noises
  • turn towards the breast.

You can start to look for these cues every 1-2 hours in newborns or every 3-4 hours for an older baby. When you recognize hunger signs in your baby, it’s a good idea to offer him a feed. Looking for your baby’s hunger signs is a better way to work out when to feed than waiting for a set number of hours.

Watch the video to see what hunger cues look like in real babies.

Baby cues that say ‘I’m tired’

Tired signs in babies include:

  • staring into the distance
  • jerky movements
  • yawning
  • fussing
  • sucking fingers
  • losing interest in people or toys.

Watch the video to see what these cues look like in real babies.

Baby cues that say ‘I want to play’

Older babies usually follow a ‘feed-play-sleep’ routine.

Cues that your baby is ready to play with you include:

  • eyes wide and bright
  • eye contact with you
  • smiles
  • smooth movements
  • hands reaching out to you.

When you recognize ‘ready to play’ signs in your baby, it’s a good time to smile and talk to your baby. Baby play is simple: the best toy for your baby is you, and the best baby game is playing with you.

Watch the video to see more signs that your baby is ready to play and to see these baby cues in action.

Baby cues that say ‘I need a break’

Babies who are four months and older might not always be ready for a nap after their play time. Sometimes they might want a change of pace or activity instead. So what do these baby cues look like?

If your baby wants a break from what she’s doing right now, she might:

  • turn her head away from you
  • squirm or kick.

When you recognize ‘ready for a break’ signs in your baby, it’s a good idea to give him some quiet time or a different activity. For example, if your baby turns his head away from the rattle you’re showing him, you could lie him on his back to look at his mobile for a while.

Watch the video to see more signs that your baby wants to change activity and to see these baby cues in action.

read more

The stages of labor

stages of labor

What are the stages of labor

Labor also called childbirth, is the process of your baby leaving the uterus (womb). Every woman’s labor is unique, even from one pregnancy to the next. Sometimes labor is over in a matter of hours. In other cases, labor tests a mother’s physical and emotional stamina.

You won’t know how labor and childbirth will unfold until it happens. You can prepare, however, by understanding the typical sequence of events.

Labor (childbirth) is divided into three stages:

  1. First stage: The time of the onset of true labor until the cervix is completely dilated to 10 cm. The first stage is when your contractions increase, and your cervix begins to open up (dilate). This is usually the longest stage.
  2. Second stage (pushing and birth): The period after the cervix is dilated to 10 cm until the baby is delivered. The second stage of labor is when your cervix is fully open. This is the part of labor where you help your baby move through your vagina by pushing with your contractions.
  3. Third stage (delivery of the placenta): The third stage is the delivery of the placenta and is the shortest stage. The time it takes to deliver your placenta can range from 5 to 30 minutes. The third stage is after the birth of your baby, when your womb contracts and causes the placenta to come out through the vagina.

Every woman’s labor is different. And your labor may be different each time you have a baby. But there are patterns to labor that are true for most women. Learning about the stages of labor and what happens during each one can help you know what to expect once labor begins.

You’re in labor when you have regular contractions that cause your cervix to change. Contractions are when the muscles of your uterus get tight and then relax. Contractions help push your baby out of your uterus. Your cervix is the opening to the uterus that sits at the top of the vagina. When labor starts, your cervix dilates (opens up).

As you get closer to your due date, learning the signs of labor can help you feel ready for labor and birth. If you have any signs of labor, call your doctor.

As you approach your due date, you will be looking for any little sign that labor is about to start. You might notice that your baby has “dropped” or moved lower into your pelvis. This is called “lightening.” If you have a pelvic exam during your prenatal visit, your doctor might report changes in your cervix that you cannot feel, but that suggest your body is getting ready. For some women, a flurry of energy and the impulse to cook or clean, called “nesting,” is a sign that labor is approaching.

Some signs suggest that labor will begin very soon. Call your doctor or midwife if you have any of the following signs of labor. Call your doctor even if it’s weeks before your due date — you might be going into preterm labor. Your doctor or midwife can decide if it’s time to go to the hospital or if you should be seen at the office first.

You know you’re in true labor when:

  • You have strong and regular contractions. A contraction is when the muscles of your uterus tighten up like a fist and then relax. Contractions help push your baby out. When you’re in true labor, your contractions last about 30 to 70 seconds and come about 5 to 10 minutes apart. They’re so strong that you can’t walk or talk during them. You have contractions get stronger and closer together over time with increasingly shorter intervals.
  • You feel pain in your belly and lower back (backache). This pain doesn’t go away when you move or change positions.
  • You have a bloody (brownish or reddish) mucus discharge. This is called bloody show, when the plug of mucus from your cervix (entrance to your womb, or uterus) comes away. Losing your mucus plug usually means your cervix is dilating (opening up) and becoming thinner and softer (effacing). Labor could start right away or may still be days away.
  • Your water breaks (rupture of membranes). Your baby has been growing in amniotic fluid (the bag of waters) in your uterus. When the bag of waters breaks, you may feel a big rush of water. Or you may feel just a trickle.
  • You have an urge to go to the toilet, which is caused by your baby’s head pressing on your bowel

​If you think you’re in labor, call your doctor, no matter what time of day or night. Your doctor can tell you if it’s time to head for the hospital. To see for sure that you’re in labor, your health care provider measures your cervix.

Remember, no one knows for sure what triggers labor, and every woman’s experience is unique. Sometimes it’s hard to tell when labor begins.

Don’t hesitate to call your health care provider if you’re confused about whether you’re in labor. Preterm labor can be especially sneaky. If you have any signs of labor before 37 weeks — especially if you also experience vaginal spotting — consult your health care provider.

If you arrive at the hospital in false labor, don’t feel embarrassed or frustrated. Think of it as a practice run. The real thing is likely on its way.

What is the longest stage of labor?

The first stage of labor is the longest and involves three phases:

  • Early Labor Phase –The time of the onset of labor until the cervix is dilated to 3 cm.
  • Active Labor Phase – Continues from 3 cm. until the cervix is dilated to 7 cm.
  • Transition Phase – Continues from 7 cm. until the cervix is fully dilated to 10 cm.

Each phase is characterized by different emotions and physical challenges. For first-time moms, first stage of labor can last from 12 to 19 hours. It may be shorter (about 14 hours) for moms who’ve already had children. It’s when contractions become strong and regular enough to cause your cervix to dilate (open) and thin out (efface). This lets your baby move lower into your pelvis and into your birth canal (vagina). This stage of labor ends when you are 10 centimeters dilated.

What is the first stage of labor?

The first stage of labor is your body preparing for giving birth, with signs such as your waters breaking, the start of contractions, and a ‘show’. The first stage of labor is the longest stage of labor. For first-time moms, it can last from 12 to 19 hours. The first stage of labor may be shorter (about 14 hours) for moms who’ve already had children. It’s when contractions become strong and regular enough to cause your cervix to dilate (open) and thin out (efface). This lets your baby move lower into your pelvis and into your birth canal (vagina). This stage of labor ends when you are 10 centimeters dilated. The first stage is divided into three parts: early labor, active labor and transition to stage 2 of labor.

The first stage of labor involves three phases:

  • Early Labor Phase –The time of the onset of labor until the cervix is dilated to 3 cm.
  • Active Labor Phase – Continues from 3 cm. until the cervix is dilated to 7 cm.
  • Transition Phase – Continues from 7 cm. until the cervix is fully dilated to 10 cm.

The first stage begins with the onset of labor and ends when the cervix is fully opened to 10 cm. It is the longest stage of labor, usually lasting about 12 to 19 hours. Many women spend the early part of this first stage at home. You might want to rest, watch TV, hang out with family, or even go for a walk. Most women can drink and eat during labor, which can provide needed energy later. Yet some doctors advise laboring women to avoid solid food as a precaution should a cesarean delivery be needed. Ask your doctor about eating during labor. While at home, time your contractions and keep your doctor up to date on your progress. Your doctor will tell you when to go to the hospital or birthing center.

At the hospital, your doctor will monitor the progress of your labor by periodically checking your cervix, as well as the baby’s position and station (location in the birth canal). Most babies’ heads enter the pelvis facing to one side, and then rotate to face down. Sometimes, a baby will be facing up, towards the mother’s abdomen. Intense back labor often goes along with this position. Your doctor might try to rotate the baby, or the baby might turn on its own.

As you near the end of the first stage of labor, contractions become longer, stronger, and closer together. Many of the positioning and relaxation tips you learned in childbirth class can help now. Try to find the most comfortable position during contractions and to let your muscles go limp between contractions. Let your support person know how he or she can be helpful, such as by rubbing your lower back, giving you ice chips to suck, or putting a cold washcloth on your forehead.

Sometimes, medicines and other methods are used to help speed up labor that is progressing slowly. Many doctors will rupture the membranes. Although this practice is widely used, studies show that doing so during labor does not help shorten the length of labor.

Your doctor might want to use an electronic fetal monitor to see if blood supply to your baby is okay. For most women, this involves putting two straps around the mother’s abdomen. One strap measures the strength and frequency of your contractions. The other strap records how the baby’s heartbeat reacts to the contraction.

The most difficult phase of this first stage is the transition. Contractions are very powerful, with very little time to relax in between, as the cervix stretches the last, few centimeters. Many women feel shaky or nauseated. The cervix is fully dilated when it reaches 10 centimeters.

Figure 1. First stage of labor 

first stage of labor

Footnote: Most babies’ heads enter the pelvis facing to one side, and then rotate to face down.

Regular contractions

When you have a contraction, your womb (uterus) gets tight and then relaxes. You may have had contractions throughout your pregnancy, particularly towards the end. During pregnancy, these painless tightenings are called Braxton Hicks contractions (false labor).

When you are having regular, painful contractions that feel stronger and last more than 30 seconds, labor may have started. As labor gets going (gets established) your contractions tend to become longer, stronger and more frequent.

During a contraction, the muscles in your womb contract and the pain increases. If you put your hand on your abdomen, you can feel it getting harder. When the muscles relax, the pain fades and your hand will feel the hardness ease. The contractions are pushing your baby down and opening your cervix (entrance to the womb) ready for your baby to go through.

Your midwife or doctor will probably advise you to stay at home until your contractions are frequent. When your contractions are coming every 5 minutes, it’s time to go to the hospital.

Backache

You may have either backache or the aching, heavy feeling that some women get with their monthly period.

A show

While you are pregnant, a plug of mucus is present in your cervix. Just before labor starts, or in early labor, the plug comes away and you may pass this out of your vagina. This small amount of sticky, jelly-like pink mucus is called a ‘show’.

It may come away in one blob, or in several pieces. It is pink in color because it’s blood-stained, and it’s normal to lose a small amount of blood mixed with mucus. If you’re losing more blood, it may be a sign that something is wrong, so telephone your hospital or midwife straight away.

A show indicates the cervix is starting to open, and labor may follow quickly, or it may take a few days. Some women do not have a show.

Your waters breaking

Most women’s waters break during labor, but it can also happen before labor starts. Your unborn baby develops and grows inside a bag of fluid called the amniotic sac. When it’s time for your baby to be born, the sac breaks and the amniotic fluid drains out through your vagina. This is your waters breaking.

When this happens, call your midwife or doctor, so they can ask you some questions and check your condition.

You may feel a slow trickle, or a sudden gush of water that you cannot control. To prepare for this, you could keep a sanitary towel (but not a tampon) handy if you are going out, and put a plastic sheet on your bed.

Amniotic fluid is clear and a pale straw colour. Sometimes it’s difficult to tell amniotic fluid from urine. When your waters break, the water should be clear or slightly pink. If it appears greenish or bloody, see a doctor or your hospital immediately, as this could mean you and your baby need urgent attention.

If your waters break before labor starts, phone your midwife or the hospital for advice. Without amniotic fluid your baby is no longer protected and there is a risk of infection.

Coping at the beginning of labor

At the beginning of labor:

  • You can be up and moving about if you feel like it.
  • You can drink fluids and may find isotonic drinks (some sports drinks) help keep your energy levels up.
  • You can also snack, although many women don’t feel very hungry and some feel sick.
  • As the contractions get stronger and more painful, you can try relaxation and breathing exercises — your birth partner can help by doing them with you.
  • Your birth partner can rub your back as it may help relieve the pain.

Dilation

The cervix needs to open about 10cm for a baby to pass through. This is called ‘fully dilated’. Contractions at the start of labor help to soften the cervix so that it gradually opens.

Sometimes the process of softening can take many hours before you’re in what midwives call ‘established labor’. Established labor is when your cervix has dilated to more than 3cm. If you go into hospital or your birth center before labor is established, you may be asked if you’d prefer to go home again for a while rather than spending many extra hours in hospital or the birth center. If you go home, you should make sure you eat and drink, as you’ll need the energy.

At night, try to get comfortable and relaxed. If you can, try to sleep. A warm bath or shower may help you to relax. During the day, keep upright and gently active. This helps the baby to move down into the pelvis and helps the cervix to dilate.

Once labor is established, the midwife will check you from time to time to see how you are progressing. In a first labor, the time from the start of established labor to full dilation is usually between 6 and 12 hours (about 8 hours on average). It is often quicker for subsequent pregnancies.

Your midwife will tell you to try not to push until your cervix is fully open and the baby’s head can be seen.

To help you get over the urge to push, try blowing out slowly and gently or, if the urge is too strong, in little puffs. Some people find this easier lying on their side, or on their knees and elbows, to reduce the pressure of the baby’s head on the cervix.

Fetal heart monitoring

Your baby’s heart rate will be monitored throughout labor. Your midwife will watch for any marked change in the rate, which could be a sign that the baby is distressed and that something needs to be done.

Speeding up labor

Your labor may be slower than expected if your contractions are not frequent or strong enough or because your baby is in an awkward position. If this is the case, your doctor or midwife will explain why they think labor should be sped up and may recommend the following techniques to get things moving:

  • Breaking your waters (if this has not already happened) during a vaginal examination — this is often enough to get things moving.
  • If this doesn’t work, you may be given a drip containing a synthetic version of the birth hormone oxytocin (a drug called syntocin), which is fed into a vein in your arm to encourage contractions — you may want some pain relief before the drip is started.
  • After the drip is attached, your contractions and your baby’s heartbeat will be continuously monitored with a cardiotocograph (CTG).

Early labor

For most first-time moms, early labor lasts about 6 to 12 hours. You can spend this time at home or wherever you’re most comfortable. During early labor:

  • You may feel mild contractions that come every 5 to 15 minutes and last 60 to 90 seconds.
  • You may have a bloody show. This is a pink, red or bloody vaginal discharge. If you have heavy bleeding or bleeding like your period, call your doctor right away.

When experiencing contractions, notice if they are:

  • Growing more intense
  • Following a regular pattern
  • Lasting longer
  • Becoming closer together

When your water breaks (amniotic sac rupture), note the following:

  • Color of fluid
  • Odor of fluid
  • Time rupture occurred

What to expect during early labor:

  • Early labor will last approximately 6-12 hours
  • Your cervix will efface and dilate to 3 cm
  • Contractions will last about 30-45 seconds, giving you 5-30 minutes of rest between contractions
  • Contractions are typically mild and somewhat irregular but become progressively stronger and more frequent
  • Contractions can feel like aching in your lower back, menstrual cramps, and pressure/tightening in the pelvic area
  • Your water might break – this is known as amniotic sac rupture and can happen anytime within the first stage of labor.

Tips for the support person:

  • Practice timing contractions
  • Be a calming influence
  • Offer comfort, reassurance, and support
  • Suggest simple activities that draw her focus from the labor
  • Keep up your own strength. You will need it.

What you can do in early labor:

This is a great time for you to rely on your doula or labor support person. Try the methods you learned about in childbirth education classes about how to relax and cope with pain. During early labor:

  • Rest and relax as much as you can.
  • Take a shower or bath.
  • Go for a walk.
  • Change positions often.
  • Make sure you’re ready to go to the hospital.
  • Take slow, relaxing breaths during contractions.

Active labor

This is when you head to the hospital or birth center. Your contractions will be stronger, longer and closer together. It is very important that you have plenty of support. It is also a good time to start your breathing techniques and try a few relaxation exercises between contractions.

You should switch positions often during this time. You might want to try walking or taking a warm bath. Continue to drink plenty of water and urinate periodically.

Active labor usually lasts about 3 to 8 hours. It starts when your contractions are regular and your cervix has dilated to 6 centimeters. In active labor:

  • Your contractions get stronger, longer and more painful. Each lasts about 45 seconds and they can be as close as 3 minutes apart.
  • You may feel pressure in your lower back, and your legs may cramp.
  • You may feel the urge to push.
  • Your cervix will dilate up to 10 centimeters.
  • If your water hasn’t broken, it may break now.
  • You may feel sick to your stomach.

What to expect:

  • Active labor will last about 3-8 hours
  • Your cervix will dilate from 4 cm to 7cm
  • Contractions during this phase will last about 45-60 seconds with 3-5 minutes rest in between
  • Contractions will feel stronger and longer
  • This is usually the time to head to the hospital or birth center

Tips for the support person:

  • Give the mother your undivided attention
  • Offer her verbal reassurance and encouragement
  • Massage her abdomen and lower back
  • Keep track of the contractions (if she is being monitored, find out how the machine works)
  • Go through the breathing techniques with her
  • Help make her comfortable (prop pillows, get her water, apply touch)
  • Remind her to change positions frequently (go with her on a walk or offer her a bath)
  • Provide distractions from labor such as music, reading a book or playing a simple card game
  • Don’t think that there is something wrong if she is not responding to you

What you can do in active labor:

  • Make sure the hospital staff has a copy of your birth plan.
  • Try to stay relaxed and not think too hard about the next contraction.
  • Move around or change positions. Walk the hallways in the hospital.
  • Drink water or other liquids. But don’t eat solid foods.
  • If you’re going to take medicine to help relieve labor pain, you can start taking it now. Your choice about pain relief is part of your birth plan.
  • Go to the bathroom often to empty your bladder. An empty bladder gives more room for your baby’s head to move down.
  • If you feel like you want to push, tell your doctor. You don’t want to start pushing until your doctor checks your cervix to see how dilated it is.

Transition phase

Transition to the second stage of labor can be the toughest and most painful part of labor. It can last 15 minutes to an hour. During the transition phase:

  • Contractions come closer together and can last 60 to 90 seconds. You may feel like you want to bear down.
  • You may feel a lot of pressure in your lower back and rectum. If you feel like you want to push, tell your doctor.

During the transition phase, the mother will rely heavily on her support person. This is the most challenging phase, but it is also the shortest. Try to think “one contraction at a time” (this may be hard to do if the contractions are very close together). Remember how far you have already come, and when you feel an urge to push, tell your health care provider.

What to expect:

  • The transition will last about 30 minutes to 2 hours
  • Your cervix will dilate from 8 cm to 10 cm
  • Contractions during this phase will last about 60-90 seconds with a 30 second-2 minute rest in between
  • Contractions are long, strong, intense, and can overlap
  • This is the hardest phase but also the shortest
  • You might experience hot flashes, chills, nausea, vomiting, or gas

Tips for the support person:

  • Offer lots of encouragement and praise
  • Avoid small talk
  • Continue breathing with her
  • Help guide her through her contractions with encouragement
  • Encourage her to relax between contractions
  • Don’t think that there is something wrong if she seems to be angry – it is a normal part of the transition

What is the second stage of labor?

The second stage of labor is when you actually give birth to your baby. The second stage of labor involves you pushing and the delivery of your baby. Until this point, your body has been doing all the work for you. Now that your cervix has fully dilated to 10 cm, it is time for you to help by pushing. The second stage of labor begins when your cervix is fully dilated and lasts until the birth of your baby. Your midwife will help you find a comfortable position and will guide you when you feel the urge to push.

In the second stage of labor, your cervix is fully dilated and ready for childbirth. It usually lasts 20 minutes to two hours. The second stage is the most work for you because your doctor wants you to start pushing your baby out. This stage can be as short as 20 minutes or as long as a few hours. It may be longer for first-time moms or if you’ve had an epidural. And epidural is pain medicine you get through a tube in your lower back that helps numb your lower body during labor. It’s the most common kind of pain relief used during labor. The second stage ends when your baby is born.

The second stage involves pushing and delivery of your baby. You will push hard during contractions, and rest between contractions. Pushing is hard work, and a support person can really help keep you focused. A woman can give birth in many positions, such as squatting, sitting, kneeling, or lying back. Giving birth in an upright position, such as squatting, appears to have some benefits, including shortening this stage of labor and helping to keep the tissue near the birth canal intact. You might find pushing to be easier or more comfortable one way, and you should be allowed to choose the birth position that feels best to you.

When the top of your baby’s head fully appears (crowning), your doctor will tell you when to push and deliver your baby. Your doctor may make a small cut, called an episiotomy, to enlarge the vaginal opening. Most women in childbirth do not need episiotomy. Sometimes, forceps (tool shaped like salad-tongs) or suction is used to help guide the baby through the birth canal. This is called assisted vaginal delivery. After your baby is born, the umbilical cord is cut. Make sure to tell your doctor if you or your partner would like to cut the umbilical cord.

During the second stage of labor:

  • Your contractions may slow down to come every 2 to 5 minutes apart. They last about 60 to 90 seconds.
  • You may get an episiotomy. This is a small cut made at the opening of the vagina to help let the baby out. Most women don’t need an episiotomy.
  • Your baby’s head begins to show. This is called crowning.
  • Your doctor guides your baby out of the birth canal. She may use special tools, like forceps or suction, to help your baby out.
  • Your baby is born, and the umbilical cord is cut. Instructions about who’s cutting the umbilical cord are in your birth plan. What you can do:
  • Find a position that is comfortable for you. You can squat, sit, kneel or lie back.
  • Push during contractions and rest between them. Push when you feel the urge or when your doctor tells you.
  • If you’re uncomfortable or pushing has stopped, try a new position.

Pushing and what to expect:

  • The second stage can last from 20 minutes to 2 hours.
  • Contractions will last about 45-90 seconds at intervals of 3-5 minutes of rest in between.
  • You will have a strong natural urge to push.
  • You will feel strong pressure at your rectum.
  • You are likely to have a minor bowel or urination accident.
  • Your baby’s head will eventually crown (become visible).
  • You will feel a burning, stinging sensation during crowning.
  • During crowning, you will be told by your health care provider to not push.

Pushing and what to do:

  • Get into a pushing position that uses gravity to your advantage.
  • Push when you feel the urge.
  • Relax your pelvic floor and anal area (Kegel exercises can help).
  • Rest between contractions to help regain your strength.
  • Use a mirror to view your progress (This can be very encouraging!).
  • Use all your energy to push.
  • Do not become discouraged if your baby’s head emerges and then slips back into the vagina (this process can take two steps forward and one step back).

Tips for the support person:

  • Help her to relax and be as comfortable as possible. Give her ice chips if available and provide physical support in her position.
  • Encourage, encourage, encourage!
  • Help guide her through her contractions.
  • Give verbal encouragement by telling her how well she is doing.
  • Don’t be offended if she displays anger or becomes emotional.

What your baby is doing:

While you are experiencing labor, your baby is taking certain steps to enter this world.

  1. Your baby’s head will turn to one side and the chin will automatically rest on the chest so that the back of the head can lead the way.
  2. Once you are fully dilated, your baby’s head leads the way and the head and torso begin to turn to face your back as they enter your vagina.
  3. Next, your baby’s head will begin to emerge or “crown” through the vaginal opening.
  4. Once your baby’s head is out, the head and shoulders will again turn to face your side, allowing your baby to easily slip out.

Delivery and what to expect:

Keep in mind that your baby has been soaking in a sac of amniotic fluid for nine months.

Following the contractions and passage through your very narrow birth canal, the baby will display the following characteristics:

  • Cone-shaped head
  • Vernix coating (a cheesy substance that coats the fetus in the uterus)
  • Puffy eyes
  • Lanugo (fine downy hair that covers the shoulders, back, forehead, and temple)
  • Enlarged genitals

Figure 2. Second stage labor

Second stage labor

Footnote: The baby twists and turns through the birth canal.

Find a position

Find the position that you prefer and which will make labor easier for you. You might want to remain in bed with your back propped up with pillows, or stand, sit, kneel or squat (squatting may feel difficult if you are not used to it).

If you are very tired, you might be more comfortable lying on your side rather than propped up with pillows. If you’ve had backache in labor, kneeling on all fours might be helpful.

It’s up to you. It can help if you have tried out some of these positions beforehand.

Depending on where you are giving birth, you may be able to go through some or all of labor in a bath, which can help you relax and manage the pain.

Pushing

When your cervix is fully dilated you can start to push when you feel you need to during contractions:

  • Take two deep breaths as the contraction starts, and push down.
  • Take another breath when you need to.
  • Give several pushes until the contraction ends.
  • After each contraction, rest and get your strength up for the next one.

This stage of labor is hard work, and progress is usually slow and steady, especially if you are having your first baby. Your midwife will help and encourage you all the time. Your birth partner can also give you lots of support. This stage can take up to 2 hours, so it helps to have your birthing team keeping you updated on your progress. The best thing you can do during this time is to breathe deeply, try to relax, and follow your body’s natural urges to push.

The birth

During the second stage, the baby’s head moves down the vagina until it can be seen. When the head is nearly ready to be born, the midwife will ask you to stop pushing, and to pant or puff a couple of quick short breaths, blowing out through your mouth. This is so that your baby’s head can be born slowly and gently, giving the skin and muscles of the perineum (the area between your vagina and anus) time to stretch without tearing.

The skin of the perineum usually stretches well, but it may tear. Sometimes, to avoid a tear or to speed up delivery, the midwife or doctor will inject local anaesthetic and do an episiotomy to make the opening to the vagina bigger. Afterwards, the cut or tear is stitched up to help healing. Find out about your body after the birth, including how to deal with stitches.

Once your baby’s head is born, most of the hard work is over. With one more gentle push the body is usually born quite quickly and easily. You can have your baby lifted straight onto you before the cord is cut by your midwife or birth partner.

Your baby may be born covered with a white, greasy substance known as ‘vernix’, which has acted as protection in the uterus.

Skin-to-skin contact

Skin-to-skin contact helps bonding, so it is a good idea to have your baby lifted onto you before the cord is cut so that you can feel and be close to each other straight away.

The umbilical cord is clamped and cut, the baby is dried to prevent them from getting cold, and you’ll be able to hold and cuddle your baby. Your baby may be quite messy, with some of your blood and perhaps some of the vernix on their skin. If you prefer, you can ask the midwife to wipe your baby and wrap them in a blanket before your cuddle.

Sometimes mucus has to be cleared out of a baby’s nose and mouth. Some babies need additional help to establish breathing and may be taken to a special area in the room to be given oxygen. Your baby will not be kept away from you any longer than necessary.

What is the third stage of labor?

The third stage involves delivery of the placenta (afterbirth). The third stage is the shortest stage, lasting five to 30 minutes. The placenta grows in your uterus and supplies your baby with food and oxygen through the umbilical cord. After your baby is born, the midwife may pull on the umbilical cord to deliver the placenta, and may ask you to help by gently pushing. You may be offered an injection in your thigh just as the baby is born, to speed up the delivery of the placenta. The injection contains a drug called syntocinon (a synthetic version of the hormone oxytocin), which makes the womb contract and helps to prevent heavy bleeding known as postpartum hemorrhage.

After the delivery of your baby, your health care provider will be looking for small contractions to begin again. The contractions signal that your placenta is separating from the uterine wall and is ready to be delivered. Contractions will begin five to 30 minutes after birth, signaling that it’s time to deliver the placenta. Pressure may be applied by massage to your uterus and the umbilical cord may be gently pulled. The result will be the delivery of your placenta, also referred to as the afterbirth. You might experience some severe shaking and shivering after your placenta is delivered. This is a common symptom and not a cause for concern. Labor is over once the placenta is delivered.

Your doctor or midwife will feel to make sure that your uterus is well contracted, take your blood pressure and pulse, and check if you need any stitches.

Your doctor will repair the episiotomy and any tears you might have. Now, you can rest and enjoy your newborn baby.

After completing all the stages of childbirth, you will be monitored for the next few hours to make sure that the uterus continues to contract and that bleeding is not excessive.

During the third stage of labor:

  • You have contractions that are closer together and not as painful as earlier. These contractions help the placenta separate from the uterus and move into the birth canal. They begin 5 to 30 minutes after birth.
  • You continue to have contractions even after the placenta is delivered. You may get medicine to help with contractions and to prevent heavy bleeding.
  • Your doctor squeezes and presses on your belly to make sure the uterus feels right.
  • If you had an episiotomy, your doctor repairs it now.
  • If you’re storing your umbilical cord blood, your doctor collects it now. Umbilical cord blood is blood left in the umbilical cord and placenta after your baby is born and the cord is cut. Some moms and families want to store or donate umbilical cord blood so it can be used later to treat certain diseases, like cancer. Your instructions about umbilical cord blood can be part of your birth plan.
  • You may have chills or feel shaky. Tell your doctor if these are making you uncomfortable.

What you can do:

  • Enjoy the first few moments with your baby.
  • Start breastfeeding. Most women can start breastfeeding within 1 hour of their baby’s birth.
  • Give yourself a big pat on the back for all your hard work. You’ve made it through childbirth!

What happens after my baby is born?

Your baby will like being close to you just after the birth. Skin-to-skin contact is best, as it provides warmth for your baby and encourages your baby to have his/her first feed. Right after birth your doctor places your baby skin-to-skin on your chest and covers him with a blanket. Holding your baby skin-to-skin helps your baby stay warm as he gets used to being outside the womb. It’s also a great way to get started breastfeeding. You can start breastfeeding even within an hour of your baby’s birth. It helps with breastfeeding later on and it also helps your womb to contract. Babies start sucking immediately, although maybe just for a short time. They may just like to feel the nipple in their mouth. Even if you don’t plan to breastfeed, hold your baby skin-to-skin so you get to know each other right away. Your baby will welcome your gentle touch, and this closeness can help you and your baby bond.

The time alone with your partner and your baby can be very special. Your baby will be examined by a midwife or doctor and then weighed, and possibly measured, and given identity bands with your name on it.

After birth, your body starts to change to help you heal. Your doctor takes your temperature and checks your heart and blood pressure to make sure you’re doing well. If you had anesthesia during labor, your doctor makes sure you’re recovering without any complications.

Vitamin K

You’ll be offered an injection of vitamin K for your baby, which is the most effective way of helping to prevent a rare bleeding disorder known as hemorrhagic disease of the newborn. Your midwife will have discussed this with you beforehand and sought your consent.

If you prefer that your baby doesn’t have an injection, oral doses of vitamin K are available. The oral doses are given in 3 stages over a 4-week period.

Stitches

Small tears and grazes are often left to heal without stitches because they often heal better this way. If you need stitches or other treatments, it should be possible to continue cuddling your baby. Your midwife will help with this as much as they can.

If you have had a large tear or an episiotomy, you will need stitches. If you have already had an epidural, it can be topped up. If you haven’t, you should be offered a local anaesthetic injection.

The midwife or maternity support worker will help you to wash and freshen up before leaving the labor ward to go home or to the postnatal area.

Going home

Most women stay in hospital for 1 or 2 days after they have given birth, although if you’ve had an uncomplicated vaginal birth and your baby is doing well, you can sometimes go home as soon as 6 hours after the birth. If you have had a caesarean, expect to stay in hospital for 3 to 4 days.

read more

Separation anxiety

separation anxiety

Separation anxiety

Separation anxiety is an extreme worry your child experience about something happening to mom and dad when your child is separated from mom and dad. It’s natural for your young child to feel anxious when you say goodbye. Part of a baby’s normal development is learning that separations from parents are not permanent. Young babies do not understand time, so they think a parent who walks out of the room is gone forever. Also, they have not yet developed the concept of object permanence that a hidden object is still there, it just cannot be seen. Without these concepts, babies can become anxious and fearful when a parent leaves their sight. Separation anxiety is usually at its peak between 10 and 18 months. Separation anxiety typically ends by the time a child is 3 years old. For example, toddlers who cling to mom as she’s leaving for work or wail when they’re handed to the babysitter are fairly common.

But for some children separation anxiety persists into the school years, even with a parent’s best efforts and becomes more rather than less pervasive. These children experience a continuation or reoccurrence of intense separation anxiety during their elementary (primary) school years or beyond. If separation anxiety is excessive enough to interfere with normal activities like school and friendships, and lasts for months rather than days, it may be a sign of a larger problem called separation anxiety disorder.

When kids with separation anxiety are away from caregivers they can develop extreme fears that sound melodramatic to the rest of adults, but are very real to them. For example, a child with separation anxiety might have a hard time concentrating in class because she might be afraid her father is going to have a car accident. She might be worried that her family will get hurt, or she will get hurt, or even that she might be abandoned. If a parent is five minutes late to picking her up from soccer practice, she might assume the family has left town without her.

Mobile phone technology, rather than easing anxiety, can actually exacerbate it, since now there is the expectation that you can always be in touch with each other. Many parents of kids with separation anxiety are used to getting dozens of worried text messages and phone calls throughout the day while they are at work or their child is at school, and some kids will start to panic when mom or dad doesn’t answer or is out of cell phone reception range.

Separation anxiety itself, when developmentally appropriate, is not necessarily a bad thing. Though it feels uncomfortable, anxiety can be useful because it spurs children to be more thoughtful and cautious when approaching a new situation.

At different stages of development it is normal to have problems around separation, because the world is not safe, and your child haven’t learned how to master being away from the people who take care of them. As your child develop, and as you begin to master situations and develop skills, it should get easier.

Signs of separation anxiety in babies

Babies experiencing separation anxiety fear that a parent will leave and not return. The fear may be worsened in the presence of a stranger. Typical responses of babies experiencing this normal phase of development may include the following:

  • Crying when you leave the room
  • Clinging or crying, especially in new situations
  • Awakening and crying at night after previously sleeping through the night
  • Refusal to go to sleep without parent nearby.

Separation anxiety in children

In early childhood, crying, tantrums, or clinginess are healthy reactions to separation and a normal stage of development. Separation anxiety can begin before a child’s first birthday, and may pop up again or last until a child is four years old. However, both the intensity level and timing of separation anxiety vary tremendously from child to child. A little worry over leaving mom or dad is normal, even when your child is older. You can ease your child’s separation anxiety by staying patient and consistent, and by gently but firmly setting limits.

For kids who have severe, persistent anxiety at separating, it doesn’t get easier. These kids will have an unusually hard time saying goodbye. If you think of anxiety as an alarm system which functions when you perceive a threat, kids with separation anxiety have faulty alarm systems. They have either an alarm system that’s on all the time, so they really never feel comfortable taking risks and moving forward, or they have one of these faulty alarm systems that go off every once in a while. Either way they can get locked onto a strategy of having someone there that can protect them—usually parents. This person can afford me safety, so I’m going to stay with them. Or this place is my safe place; I’m going to stay with it.

The distress these kids feel about separating prevents them from participating in age appropriate activities and learning opportunities like joining sports teams or even in some cases attending school. The anxiety takes a social toll as well—these are the nine-year-olds who still need mom to stand next to them during a birthday party or won’t consider attending a sleepover unless it is being hosted at their own home.

Over-attachment also persists at home, where children will often “shadow” one parent from room to room. Some kids with separation anxiety fear being left alone upstairs or sleeping alone in their beds. Parents tell us about kids who insist on sharing mom and dad’s bed at night or describe getting woken up “like an alarm clock” every morning at 5 or 6am when their child crawls into bed with them.

Anxiety at even the thought of separation

While younger children generally become anxious at the moment of separation, older children can experience anticipatory anxiety. These kids might also have nightmares about separating. Whether their distress is anticipatory or immediate, many kids also feel the physical symptoms of anxiety, which include headaches or stomachaches.

How can I help my child with separation anxiety?

For children with normal separation anxiety, there are steps you can take to make the process of separation anxiety easier. Children who feel secure are better able to handle separations. Cuddling and comforting your child when you are together can help him or her feel more secure.

Other ways to help your child with “normal” separation anxiety include the following:

  • Comfort and reassure your child when he or she is afraid.
  • At home, help your baby learn independence by allowing him or her to crawl to other (safe) rooms for a short period of time alone.
  • Tell your baby if you are going to another room and that you will be back; then come back.
  • Plan your separations when your baby is rested and fed, rather than before a nap or meal.
  • Introduce new people and places gradually, allowing your baby time to get to know a new care provider.
  • Do not prolong good-byes and have the sitter distract your baby or child with a toy as you leave.
  • Introduce a transitional object such as a blanket or soft toy to help ease separations.
  • For night awakenings, comfort and reassure your child by patting and soothing, but avoid letting your child get out of bed.
  • Practice separation. Leave your child with a caregiver for brief periods and short distances at first. As your child gets used to separation, you can gradually leave for longer and travel further.
  • Schedule separations after naps or feedings. Babies are more susceptible to separation anxiety when they’re tired or hungry.
  • Develop a quick “goodbye” ritual. Rituals are reassuring and can be as simple as a special wave through the window or a goodbye kiss. Keep things quick, though, so you can:
  • Leave without fanfare. Tell your child you are leaving and that you will return, then go—don’t stall or make it a bigger deal than it is.
  • Follow through on promises. For your child to develop the confidence that they can handle separation, it’s import you return at the time you promised.
  • Keep familiar surroundings when possible and make new surroundings familiar. Have the sitter come to your house. When your child is away from home, encourage them to bring a familiar object.
  • Have a consistent primary caregiver. If you hire a caregiver, try to keep them on the job long term to avoid inconsistency in your child’s life.
  • Minimize scary television. Your child is less likely to be fearful if the shows you watch are not frightening.
  • Try not to give in. Reassure your child that they will be just fine—setting consistent limits will help your child’s adjustment to separation.

Separation anxiety disorder

Separation anxiety disorder is NOT a normal stage of development, but a serious emotional problem characterized by extreme distress when a child is away from the primary caregiver. However, since normal separation anxiety and separation anxiety disorder share many of the same symptoms, it can be confusing to try to figure out if your child just needs time and understanding or has a more serious problem.

Separation anxiety disorder is defined as excessive worry and fear about being apart from family members or individuals to whom a child is most attached. The main differences between normal separation anxiety and separation anxiety disorder are the intensity of your child’s fears, and whether these fears keep them from normal activities. Children with separation anxiety disorder may become agitated at just the thought of being away from mom or dad, and may complain of sickness to avoid playing with friends or attending school. When symptoms are extreme enough, these anxieties can add up to a disorder. But no matter how fretful your child becomes when parted from you, separation anxiety disorder is treatable. There are plenty of things you can do to make your child feel safer and ease the anxiety of separation.

Children with separation anxiety disorder fear being lost from their family or fear something bad happening to a family member if they are separated from them. Symptoms of anxiety or fear about being separated from family members must last for a period of at least 4 weeks to be considered separation anxiety disorder. It is different from stranger anxiety, which is normal and usually experienced by children between 7 and 11 months of age. Symptoms of separation anxiety disorder are more severe than the normal separation anxiety that nearly every child experiences to some degree between the ages of 18 months and 3 years of age.

All children and adolescents experience some anxiety. It is a normal part of growing up. However, when worries and fears are developmentally inappropriate concerning separation from home or family, separation anxiety disorder may be present. separation anxiety disorder occurs equally in males and females. The first symptoms of separation anxiety disorder usually appear around the third or fourth grade. Typically, the onset of symptoms occurs following a break from school, such as Christmas holidays or an extended illness. Children of parents with an anxiety disorder are more likely to have an anxiety disorder.

Child psychiatrists, child psychologists, or pediatric neurologists can diagnose and treat separation anxiety disorder. These trained clinicians will integrate information from home, school, and at least one clinical visit in order to make a diagnosis. Keep in mind that children with separation anxiety disorder frequently have physical complaints that may need to be medically evaluated.

Specialists can address physical symptoms, identify anxious thoughts, help your child develop coping strategies, and foster problem solving.

When to seek professional help

Your own patience and know-how can go a long way toward helping your child with separation anxiety disorder. But some kids with separation anxiety disorder may need professional intervention. To decide if you need to seek help for your child, look for “red flags,” or extreme symptoms that go beyond milder warning signs. These include:

  • Age-inappropriate clinginess or tantrums
  • Withdrawal from friends, family, or peers
  • Preoccupation with intense fear or guilt
  • Constant complaints of physical sickness
  • Refusing to go to school for weeks
  • Excessive fear of leaving the house

If your efforts to reduce these symptoms don’t work, it may be the time to find a mental health specialist. Remember, these may also be symptoms of a trauma that your child has experienced. If this is the case, it is important to see a child trauma specialist.

Separation anxiety disorder causes

Anxiety disorders are believed to have biological, family, and environmental factors that contribute to the cause. A chemical imbalance involving 2 chemicals in the brain (norepinephrine and serotonin) most likely contributes to the cause of anxiety disorders. While a child or adolescent may have inherited a biological tendency to be anxious, anxiety and fear can also be learned from family members and others who frequently display increased anxiety around the child. A traumatic experience may also trigger anxiety.

Separation anxiety disorder occurs because a child feels unsafe in some way. Take a look at anything that may have thrown your child’s world off balance, made them feel threatened, or upset their normal routine. If you can pinpoint the root cause—or causes—you’ll be one step closer to helping your child through their struggles.

Common causes of separation anxiety disorder in children include:

  • Change in environment. Changes in surroundings, such as a new house, school, or day care situation, can trigger separation anxiety disorder.
  • Stress. Stressful situations like switching schools, divorce, or the loss of a loved one—including a pet—can trigger separation anxiety problems.
  • An over-protective parent. In some cases, separation anxiety disorder may be the manifestation of your own stress or anxiety. Parents and children can feed one another’s anxieties.
  • Insecure attachment. The attachment bond is the emotional connection formed between an infant and their primary caretaker. While a secure attachment bond ensures that your child will feel secure, understood and calm enough for optimal development, an insecure attachment bond can contribute to childhood problems such as separation anxiety.

If it seems like your child’s separation anxiety disorder happened overnight, the cause might be something related to a traumatic experience rather than separation anxiety. Although these two conditions can share symptoms, they are treated differently. By understanding the effects of traumatic stress on children, you can help your child benefit from the most fitting treatment.

Separation anxiety disorder prevention

Preventive measures to reduce the incidence of separation anxiety disorders in children are not known at this time. However, early detection and intervention can reduce the severity of the disorder, enhance the child’s normal growth and development, and improve the quality of life experienced by children or adolescents with separation anxiety disorder.

Separation anxiety disorder signs and symptoms

Children with separation anxiety disorder feel constantly worried or fearful about separation. The following are the most common signs of separation anxiety disorder. However, each child may experience symptoms differently. Many kids are overwhelmed with symptoms such as:

  • Refusal to sleep alone or reluctance to go to sleep. Separation anxiety disorder can make children insomniacs, either because of the fear of being alone or due to nightmares about separation.
  • Repeated nightmares with a theme of separation
  • Excessive distress when separation from home or family occurs or is anticipated
  • Excessive worry about the safety of a family member
  • Excessive worry about getting lost from family
  • Refusing to go to school. A child with separation anxiety disorder may have an unreasonable fear of school, and will do almost anything to stay home.
  • Fearful and reluctant to be alone
  • Frequent stomachaches, headaches, or other physical complaints
  • Muscle aches or tension
  • Excessive worry about safety of self
  • Excessive worry about or when sleeping away from home
  • Excessive “clinginess,” even when at home. Your child may shadow you around the house or cling to your arm or leg if you attempt to step out.
  • Symptoms of panic and/or temper tantrums at times of separation from parents or caregivers
  • Fear that something terrible will happen to a loved one. The most common fear a child with separation anxiety disorder experiences is the worry that harm will come to a loved one in the child’s absence. For example, the child may constantly worry about a parent becoming sick or getting hurt.
  • Worry that an unpredicted event will lead to permanent separation. Your child may fear that once separated from you, something will happen to maintain the separation. For example, they may worry about being kidnapped or getting lost.
  • Physical sickness like a headache or stomachache. At the time of separation, or before, children with separation anxiety problems often complain they feel ill.

The symptoms of separation anxiety disorder may resemble other conditions or psychiatric problems. Always consult child psychiatrists, child psychologists, or pediatric neurologists for a diagnosis. Child psychiatrists, child psychologists, or pediatric neurologists can diagnose and treat separation anxiety disorder.

Separation anxiety disorder diagnosis

A child psychiatrist or other qualified mental health professional usually diagnoses anxiety disorders in children or adolescents following a comprehensive psychiatric evaluation. Parents who note signs of severe anxiety in their child or teen can help by seeking an evaluation and treatment early. Early treatment can often prevent future problems.

Separation anxiety disorder treatment

No parents like to see their child in distress, so it can be tempting to help your child avoid the things they’re afraid of. However, that will only reinforce your child’s anxiety in the long term. Rather than trying to avoid separation whenever possible, you can better help your child combat separation anxiety disorder by taking steps to make them feel safer. Providing a sympathetic environment at home can make your child feel more comfortable. Even if your efforts don’t completely solve the problem, your empathy can only make things better.

Specific treatment for separation anxiety disorder will be determined by your child psychiatrist, child psychologist or pediatric neurologist based on:

  • Your child’s age, overall health, and medical history
  • Extent of your child’s symptoms
  • Your child’s tolerance for specific medications or therapies
  • Expectations for the course of the condition
  • Your opinion or preference

Professional treatment for separation anxiety disorder may include:

  • Talk therapy. Talk therapy provides a safe place for your child to express their feelings. Having someone to listen empathetically and guide your child toward understanding their anxiety can be powerful treatment.
  • Play therapy. The therapeutic use of play is a common and effective way to get kids talking about their feelings.
  • Counseling for the family. Family counseling can help your child counteract the thoughts that fuel their anxiety, while you as the parent can help your child learn coping skills.
  • School-based counseling. This can help your child with separation anxiety disorder explore the social, behavioral, and academic demands of school.
  • Medication. Medications may be used to treat severe cases of separation anxiety disorder. It should be used only in conjunction with other therapy.

Anxiety disorders can be effectively treated. Treatment should always be based on a comprehensive evaluation of the child and family. Treatment recommendations may include cognitive behavioral therapy for the child, with the focus being to help the child or adolescent learn skills to manage his or her anxiety and to help him or her master the situations that contribute to the anxiety. Some children may also benefit from treatment with antidepressant or antianxiety medication to help them feel calmer. Parents play a vital, supportive role in any treatment process. Family therapy and consultation with the child’s school may also be recommended.

Separation anxiety disorder treatment at home:

  • Educate yourself about separation anxiety disorder. If you learn about how your child experiences this disorder, you can more easily sympathize with their struggles.
  • Listen to and respect your child’s feelings. For a child who might already feel isolated by their disorder, the experience of being listened to can have a powerful healing effect.
  • Talk about the issue. It’s healthier for children to talk about their feelings—they don’t benefit from “not thinking about it.” Be empathetic, but also remind your child—gently—that they survived the last separation.
  • Anticipate separation difficulty. Be ready for transition points that can cause anxiety for your child, such as going to school or meeting with friends to play. If your child separates from one parent more easily than the other, have that parent handle the drop off.
  • Keep calm during separation. If your child sees that you can stay cool, they are more likely to be calm, too.
  • Support the child’s participation in activities. Encourage your child to participate in healthy social and physical activities. They’re great ways to ease anxiety and help your child develop friendships.
  • Praise your child’s efforts. Use the smallest of accomplishments—going to bed without a fuss, a good report from school—as reason to give your child positive reinforcement.

Help your child by relieving your own stress

Kids with anxious or stressed parents may be more prone to separation anxiety. In order to help your child ease their anxiety symptoms, you may need to take measures to become calmer and more centered yourself.

  • Talk about your feelings. Expressing what you’re going through can be very cathartic, even if there’s nothing you can do to alter the stressful situation.
  • Exercise regularly. Physical activity plays a key role in reducing and preventing the effects of stress.
  • Eat right. A well-nourished body is better prepared to cope with stress, so eat plenty of fruit, vegetables, and healthy fats, and try to avoid junk food, sugary snacks, and refined carbohydrates.
  • Practice relaxation. You can control your stress levels with relaxation techniques like yoga, deep breathing, or meditation.
  • Get enough sleep. Feeling tired only increases your stress, causing you to think irrationally or foggily, while sleeping well directly improves your mood and the quality of your waking life.
  • Keep your sense of humor. As well as boosting your outlook, the act of laughing helps your body fight stress in a variety of ways.

Tips for helping your child feel safe and secure

  • Provide a consistent pattern for the day. Routines provide children with a sense of security and help to eliminate their fear of the unknown. Try to be consistent with mealtimes, bedtimes and the like. If your family’s schedule is going to change, discuss it ahead of time with your child. Change is easier on kids if it’s expected.
  • Set limits. Let your child know that although you understand their feelings, there are rules in your household that need to be followed. Like routines, setting and enforcing limits helps your child know what to expect from any given situation.
  • Offer choices. If your child is given a choice or some element of control in their interaction with you, they may feel more safe and comfortable. For example, you can give your child a choice about where at school they want to be dropped off or which toy they want to take to daycare.

Easing separation anxiety disorder

For children with separation anxiety disorder, attending school can seem overwhelming and a refusal to go is commonplace. But by addressing any root causes for your child’s avoidance of school and by making changes at school, though, you can help reduce your child’s symptoms.

  • Help a child who has been absent from school return as quickly as possible. Even if a shorter school day is necessary initially, children’s symptoms are more likely to decrease when they discover that they can survive the separation.
  • Ask the school to accommodate your child’s late arrival. If the school can be lenient about late arrival at first, it can give you and your child a little wiggle room to talk and separate at your child’s slower pace.
  • Identify a safe place. Find a place at school where your child can go to reduce anxiety during stressful periods. Develop guidelines for appropriate use of the safe place.
  • Allow your child contact with home. At times of stress at school, a brief phone call—a minute or two—with family may reduce separation anxiety.
  • Send notes for your child to read. You can place a note for your child in their lunch box or locker. A quick “I love you!” on a napkin can reassure a child.
  • Provide assistance to your child during interactions with peers. An adult’s help, whether it is from a teacher or counselor, may be beneficial for both your child and the other children they’re interacting with.
  • Reward your child’s efforts. Just like at home, every good effort—or small step in the right direction—deserves to be praised.
read more

Shortness of breath pregnancy

shortness of breath during pregnancy

Shortness of breath during pregnancy

Shortness of breath in pregnancy is a common complaint found in up to 70% of healthy women in the third trimester (weeks 27 to 40) 1) and is considered a normal physiologic response to pregnancy 2), although it may occasionally be a sign of underlying heart or lung disorders. Shortness of breath of pregnancy may also occur early in pregnancy. It often improves or stabilizes as term approaches 3) and it typically does not interfere with daily activities 4). Shortness of breath also called dyspnea, is when you feel like you can’t get enough air into your lungs when you breathe. You may feel like this later in pregnancy, when your womb and the position of your baby is pressing on your diaphragm (the muscle that helps you breathe) and making it difficult for your lungs to expand. The extra weight you are carrying may also make you feel short of breath. Even if you feel shortness of breath, your baby’s getting oxygen in the womb.

Usually it’s nothing to be concerned about, but it’s best to check with your doctor, since lots of things can cause shortness of breath.

As a normal part of pregnancy, your breathing may be affected by the increase in the hormone progesterone, which causes you to breathe in more deeply. This might make you feel as if you’re working harder to get air. Breathing may also become more difficult as your enlarging uterus takes up more space, resulting in pressure against your diaphragm (the muscle below your lungs).

As your baby “drops” lower into your pelvis as you near delivery, you should start to be able to breathe a little easier. In the meantime, try to:

  • Maintain good posture when you’re sitting or standing (slouching doesn’t give your lungs enough room to expand when you breathe).
  • Prop yourself up when sleeping by putting some pillows under the upper body in a semi-sitting position. It reduces the pressure that the uterus places on the lungs.
  • Don’t overdo it, whether you’re exercising, just walking around, or doing housework. Take your time and respond to your body’s cues to slow down or stop altogether.

Other causes of shortness of breath during pregnancy include:

  • Anemia: Anemia (being low in iron) can cause shortness of breath.
  • Pre-eclampsia: This could be a cause especially if you have some of the other symptoms of pre-eclampsia.
    • These are:
      • a headache
      • blurred vision
      • upper tummy pain
      • nausea
      • vomiting
      • swelling of your hands, feet, ankles, face and/or neck
  • Pulmonary embolism: This is a life-threatening condition. Pulmonary embolism happens when a deep vein thrombosis (DVT) or clot in a vein of your lower leg moves to your lungs. You may also have chest pain, particularly when you take a deep breath in or cough. You may also notice that your heart is beating faster than usual.
  • Asthma: If you suffer from asthma, pregnancy may make your symptoms more severe. Talk to your GP urgently if you have a history of asthma and notice your shortness of breath is getting worse.
  • Lung infections and pneumonia: If you have a cough that lasts more than 2 to 3 days always see your doctor. Simple infections make you sicker in pregnancy than they normally would. This is one of the reasons why it is recommended that you receive the flu vaccine during pregnancy.

Persistent and worsening shortness of breath requires thorough investigation, and physiologic shortness of breath should remain a diagnosis of exclusion. However, many pregnant women are admitted to hospital for severe shortness of breath and exercise intolerance. They undergo multiple tests to exclude significant cardiac or respiratory disorders, which, in most cases, are not found. There is no therapy for shortness of breath if no underlying treatable cause is identified 5).

If your shortness of breath has started suddenly, is severe, seems to be worsening, or is associated with pain, coughing, wheezing, or heart palpitations, let your doctor know. These may be signs that something other than pregnancy alone is causing your shortness of breath.

When to see a doctor

See your doctor or go to the emergency department immediately if:

  • Your breathlessness is sudden or severe.
  • There’s a big change in your breathing.
  • You have a cough.
  • You have breathlessness and pain in your chest, heart palpitations or dizziness.

Shortness of breath during pregnancy causes

The mechanism of shortness of breath of pregnancy is controversial. Various causes have been suggested, including an increased mechanical compression of the lungs, displacement of the diaphragm by the gravid uterus 6), a change in perception of normal respiration, hyperventilation in response to a reduced diffusion lung capacity 7), a higher sensitivity of the central chemo reflex response to carbon dioxide (CO2) 8) and an effect of gestational hormones (progesterone and estradiol) on the drive to breath 9). However, all of the above studies focused only on respiratory causes for shortness of breath and did not consider a possible role of subtle cardiac factors.

The physiologic changes in pregnancy include an increase in blood volume, a decrease in peripheral vascular resistance during the first weeks of pregnancy, and an increase in heart rate 10). These result in an increase in systolic function, notably an increase in cardiac output, a rise in preload, a decrease in afterload, and an increase in left ventricular (LV) mass. A slight increase in LV ejection fraction (LVEF) and LV cavity dimensions have been reported 11). Few data are available on cardiac diastolic function during normal pregnancy 12) and it is not considered to have an impact of clinical significance.

Two recent developments in echocardiography enable a more accurate assessment of diastolic function: a relatively preload‐insensitive estimation of left atrial pressure using tissue Doppler imaging in conjunction with standard Doppler 13) and a technique based on 2‐dimensional (2D) speckle tracking for quantification of myocardial strain, which provides data on longitudinal and circumferential myocardial function and rotation 14). These deformation indexes were reported to be very sensitive to assess early changes in LV function 15). Thus, recently, a small decrease in LV segmental longitudinal systolic strain in late pregnancy has been described 16).

Shortness of breath during pregnancy treatment

Shortness of breath during pregnancy treatment involves identifying and treating the underlying cause of your shortness of breath.

To help make your breathing easier:

  • Don’t smoke. If you need help to quit smoking, tell your health care provider.
  • Sit or stand up straight to give your lungs room to expand. Move slowly.
  • Try to breathe clean air. Stay away from secondhand smoke (smoke from someone else’s tobacco) and other air pollutants.

References   [ + ]

read more

Pregnancy sleep

pregnancy sleep

Best way to sleep while pregnant

Pregnancy is a time when you need to pay particular attention to your health. During pregnancy, the mother’s body changes rapidly. Any health issues may impact on the development and growth of the baby. Most people know that you need a balanced diet and enough exercise, but having enough sleep is vital as well. Many pregnant women feel tired. This is most common in the first few months of pregnancy and again towards the end of pregnancy. This means that women will often need to spend more time resting or sleeping.

Along with the changes to the body that occur during pregnancy, there are also changes in sleep patterns. These are quite normal. As the pregnancy progresses, women have less deep sleep and wake up more often during the night. Sleep is less refreshing, which is why expectant mothers should spend more time in bed asleep. Sometimes an afternoon nap of an hour or two will help.

During pregnancy, you may find yourself wrestling in bed trying to get comfortable before falling asleep. When you are pregnant your body goes through a variety of changes causing your regular sleeping positions to no longer work for you.

Reasons for your discomfort may include:

  • Increased size of the abdomen
  • Back pain
  • Heartburn
  • Shortness of breath
  • Insomnia

The best sleep position during pregnancy is “sleep on side” (SOS). Even better is to sleep on your left side. Sleeping on your left side will increase the amount of blood and nutrients that reach the placenta and your baby.

Keep your legs and knees bent, and put a pillow between your legs.

  • If you find that you are having problems with back pain, use the “sleep on side” position, and try placing a pillow under your abdomen as well.
  • If you are experiencing heartburn during the night, you may want to try propping your upper body with pillows.
  • In late pregnancy, you may experience shortness of breath. Try lying on your side or propped up with pillows.

These suggestions may not sound completely comfortable, especially if you are used to sleeping on your back or stomach, but try them out. You may find that they work. Keep in mind that you may not stay in one position all night, and rotating positions is fine.

Important things to know about pregnancy and sleep

  • Having enough good sleep when you’re pregnant is important for both you and your baby.
  • If you’re pregnant, you don’t sleep as deeply and may wake up during the night. This means that you need to spend more time in bed.
  • This is especially so in the last three months of pregnancy.
  • If you start snoring while you’re pregnant, or stop breathing during sleep, you should speak with a doctor about it. It may be a sign of other medical problems that may affect your health and also that of your growing baby.

How can I improve my sleep during pregnancy?

Most expectant mothers need more sleep than usual and should try to optimize the quality of their sleep while they are pregnant. You should follow the simple tips in our Good Sleep Habits page. Sleep may be particularly bad during the third trimester. In these last 2 or 3 months, women often have frequent trips to the toilet at night, indigestion, leg movements or discomfort from the pregnant belly. There are some simple things to do that can help each of these problems:

  • To manage indigestion, raising the head of the bed or sleeping on more pillows is helpful. Antacids may be used, but in moderation.
  • To reduce the number of toilet trips during the night, be sure to go to the toilet just before going to bed and avoid drinking too much in the evening.
  • If moving your legs during sleep is a problem, you should reduce the amount of tea, coffee and other caffeine drinks that you have. This may help.
  • Obstetricians and midwives usually suggest that women try to sleep on their side during the later months of pregnancy. This may lessen discomfort and also help with the healthy growth of the baby.
  • If there is loud, frequent snoring or breathing pauses, discuss this with your doctor. Sometimes a sleep study may need to be done.

Women should look after their health to have a healthy baby. Sleep is one of the three pillars of health – you need to have a good diet, moderate exercise and enough sleep.

Is snoring linked with pregnancy?

You may start to snore during pregnancy. You don’t need to worry about this if it only occurs occasionally. But if it occurs often, is very loud or interrupts sleep, you should speak to your doctor or midwife. Snoring during pregnancy may indicate breathing problems during the night. Sometimes mothers who start snoring have also developed high blood pressure. For the health of both you and your baby, you need to look into this.

Are breathing pauses during sleep normal in pregnancy?

It is normal to have very occasional breathing pauses during the night, whether or not you are pregnant. However they may become more frequent and noticeable during pregnancy. Sometimes these breathing pauses end with a snore or gasping. The sleep disruption may cause excessive sleepiness during the day. If you or your partner have noticed breathing pauses, you should mention it to your doctor.

Are leg movements linked with pregnancy?

As pregnancy proceeds, some women (or their partners) notice that they move their legs a lot just at the time that they go to sleep. There may be small jerks and kicks, or there may be quite large movements that keep going all through the night. If this gets in the way of sleep, you should see a doctor to treat it. The symptoms usually get much better or go away after the baby is born. Some mothers-to-be also experience Restless Legs Syndrome.

How may sleep disorders affect the health of pregnant mother?

Breathing pauses, snoring and other sleep disorders can increase the health risks of pregnancy to the mother. This may include high blood pressure, diabetes or even pre-eclampsia. Mothers who don’t have enough sleep may feel anxious and depressed. This may persist after the baby is born. Acting on these problems early helps simplify treatment.

How may sleep disorders affect the health of the developing baby?

The baby might not grow normally if the mother has health problems such as high blood pressure or diabetes. If the mother has breathing pauses and variable oxygen levels during the night, the baby might be smaller and not be as healthy at the time of birth.

What sleep positions during pregnancy should I avoid?

  • Sleeping on your back: This can cause problems with backaches, breathing, the digestive system, hemorrhoids, low blood pressure and cause a decrease in circulation to your heart and your baby. This is a result of your abdomen resting on your intestines and major blood vessels (the aorta and vena cava).
  • Sleeping on your stomach: When you are farther along in your pregnancy, your abdomen undergoes physical changes and makes it more difficult for you to lay on your stomach.

First trimester pregnant

The first trimester spans the initial 12 weeks of a standard pregnancy. Within days of fertilization, the fertilized egg will grow into a larger cellular body known as a blastocyst and attach itself to the inner wall of the uterus.

This implantation will trigger a spike in the body’s level of progesterone, a natural hormone that regulates the various stages of the reproductive cycle.

Progesterone keeps the uterus muscle relaxed and boosts the body’s immune system. This hormone is considered a soporific hormone, meaning that it can induce early sleep onset. As a result, higher levels of progesterone can lead to both excessive daytime sleepiness and disrupted sleep at night. These feelings of fatigue can be strong enough that a pregnant woman may mistake them for cold or flu symptoms.

Hormonal changes may cause a pregnant woman to develop insomnia symptoms. Sleep onset insomnia refers to difficulty falling asleep at normal bedtimes, while sleep maintenance insomnia is the difficulty remaining asleep. Increased progesterone levels can lead to either type of insomnia.

Additionally, the blastocyst will apply pressure on the uterine wall, which is located near the bladder. This pressure, along with the progesterone boost, will increase urination frequency. Nighttime bathroom visits may become more frequent during the first trimester, which may impact the ability to remain asleep through the night.

The third through eighth weeks of the first trimester, known as the embryonic stage, are characterized by significant bodily changes for the mother and baby. As the embryo’s major organs begin to develop, it will grow to up to one inch in length. These adjustments will cause the pregnant women to experience serious cramping, particularly in the pelvic region.

The mother’s breasts will also begin swelling as the body prepares for nursing. These aches and pains can easily contribute to disrupted sleep. Additionally, pregnant women in their first trimester often experience excessive nausea, an affliction commonly called morning sickness.

By the ninth week, the embryo will have grown into a fetus, and the uterus will be the size of a large tomato. More cramping, swelling and discomfort typically occur in the four remaining weeks of the first trimester.

Sleep tips for the first trimester

Here are a few tips for reducing physical pain and getting enough sleep during the first trimester:

  • Nap frequently to counteract the effects of rising progesterone levels during the first trimester. Experts suggest napping in the afternoon in order to maintain a standard nighttime sleep cycle; two catnaps, each lasting between 30 minutes to an hour, are considered more effective than one long nap.
  • Exercising in the morning can also help you maintain healthy sleep cycle.
  • Avoid consuming large amounts of fluid in the evening. This should reduce your urge to urinate in the middle of the night.
  • If you experience morning sickness, try snacking on light, salty foods like popcorn or pretzels.
  • If you’re looking to buy a new mattress, some are better for pregnant women than others. The ideal mattress for pregnancy will conform to the body, keeping the spine aligned while providing enough support to remain comfortable. Temperature neutrality is also an important consideration, as many pregnant women sleep hotter than normal.

Second trimester pregnant

The second trimester is the longest, usually lasting from the 13th week to the 27th week. An expecting mother’s experience during the second trimester will largely depend on whether or not this is her first pregnancy.

First-time mothers often begin to feel the baby move at around 20 weeks, but women who have already given birth may notice these sensations earlier in the trimester. At any rate, the fetus will grow considerably over the course of this trimester; by week 27, the average fetus is 10 inches in length and weighs more than a pound.

The second trimester is considered the best trimester in terms of the mother’s sleep patterns. The body will be mostly acclimated to the rising progesterone levels, so daytime fatigue and sleep onset problems are usually less prominent. Morning sickness is also uncommon after the first trimester. This is the best time to establish a healthy sleep schedule that can be maintained into the third trimester.

However, some pregnant women may encounter some physical symptoms during the second trimester that negatively impact sleep quality and quantity. Heartburn, for one, is quite common during this period, and lying down can often increase the discomfort of acid reflux.

Nocturnal leg cramps can also be an issue, particularly pains in the calf muscles. Although these will probably become more pronounced during the third trimester, cramping often begins during the second. Many pregnant women experience cramping at night, which can lead to sleep disruption. If an expecting mother is prone to lucid dreams, these may intensify during the second trimester, as well.

Another concern during the second trimester is preeclampsia, a complication characterized by high blood pressure. Preeclampsia symptoms typically begin to materialize after 20 weeks of pregnancy; these symptoms include headaches, light sensitivity, nausea, shortness of breath and decreased urination. Preeclampsia is somewhat rare, but the condition can be fatal for both the mother and the fetus.

Sleep tips for the second trimester

Follow these guidelines to sleep soundly and remain healthy during the second trimester:

  • Avoid eating and drinking certain things to ensure these second-trimester symptoms won’t be too severe. Spicy or fried food can lead to heartburn flare-ups, while soft drinks and other carbonated beverages can worsen the effects of leg cramping.
  • Try to stand or sit upright for at least four hours after eating in order to ease the digestive process and mitigate your heartburn.
  • If you experience a leg cramp in bed, try flexing your leg and/or foot muscles to relieve the temporary pain.
  • Consult your physician immediately if you begin to experience symptoms of preeclampsia, or notice a sharp rise in your blood pressure levels.

Third trimester pregnant

Last is the third trimester, which begins during the 28th week and lasts until childbirth. The average pregnancy spans 40 weeks in length, but some mothers may deliver as late as week 42 or 43.

The third trimester is a period of extraordinary fetal growth. Unfortunately, these developments can cause major aches and pains for expecting mothers. The majority of pregnant women experience severe lower back pain during the third trimester due to the excess weight around their midsection. Expecting mothers are also most likely to have nightmares during the third trimester.

Leg cramping may become more intense. Frequent urination spells will also return as the fetus grows and eventually settles in the lower pelvic region. All of these factors can disrupt sleep routines; the vast majority pregnant women wake up between three and six times each night during their third trimesters. For this reason, the third trimester is considered a more extreme version of the first.

In addition to insomnia brought on by physical discomfort, pregnant women in their third trimester are also prone to other serious sleep disorders. Up to 34 percent of pregnant women will experience restless leg syndrome, a condition characterized by painful tingling or itchy sensations beneath the skin. restless legs syndrome is most prevalent in the third trimester.

Restless legs syndrome symptoms can strike at any time, but are most commonly reported at night or after long periods of sitting. restless legs syndrome has been linked to iron and folate deficiencies. A doctor may prescribe supplements to alleviate some of the symptoms. However, there is no cure for restless legs syndrome. The good news: in most cases, restless legs syndrome symptoms disappear after childbirth.

Obstructive sleep apnea (OSA) is another commonly reported sleep disorder among women in their third trimester. obstructive sleep apnea occurs when the airway is partially or completely blocked, causing shallow breathing or loss of breath during sleep. Many women snore during pregnancy due to swollen nasal passages, and snoring can quickly evolve into obstructive sleep apnea, particularly in women who were obese prior to their pregnancy weight gain.

Obstructive sleep apnea in pregnant mothers is a serious issue because the lost air supply can lead to hormonal surges powerful enough to compromise fetal health. obstructive sleep apnea has also been linked to an increased risk for preeclampsia.

Sleep tips for the third trimester

During the third trimester, it’s important to prepare for the worst sleep of your pregnancy and make yourself as comfortable as possible leading up to bedtime. Here are a few tips for making it through the third trimester as comfortably as possible.

  • Reduce fluid intake in the late afternoon or evening.
  • Make sure to completely empty your bladder during your final urination before bed. Leaning completely forward while peeing can help.
  • Avoid anything that irritates your digestive system, and consume plenty of iron-rich foods to help stave off restless legs syndrome and excessive leg cramping.
  • Stretching, light exercise, and meditation before bed can help you fall asleep more quickly.
  • Sleeping on your left side may relieve pressure on your lower back. This will also boost your breathing circulation and help prevent apnea. Blood flow to the fetus, uterus and kidneys is best when laying on your left side.
  • For maximum comfort in bed, place pillows between your knees, behind your back and beneath the underside of your stomach.
read more

Pregnancy gas

pregnancy gas

Pregnancy gas

Gas during pregnancy is a frequent occurrence, which also means that gas during pregnancy is a common concern. During pregnancy, certain hormones and your growing baby crowding your belly can slow down your digestion and cause you to bloat, burp and pass gas. Digestion is the process of how your body breaks down food after you eat.

Most gas is caused by bacteria in the large intestine working to break down food that was not digested thoroughly by enzymes in the stomach. Gas is also related to constipation, so it should prove helpful to learn more about preventing constipation.

The typical person will pass gas approximately 18 times a day. The reason for this is that the average person produces up to 4 pints of gas daily.

For some, gas is the bloating feeling that is sometimes called indigestion. However, for most, it is the passing of gas. Gas is frequently referred to as “farting,” but professionally it is known as flatulence. Gas looks to escape the body; sometimes this is through flatulence, whereas other times it may be through belching or burping.

When to see your doctor

See your doctor right away if you have:

  • Gas that feels like labor contractions, that comes and goes regularly, every 5-10 minutes. Contractions are when the muscles of your uterus get tight and then relax. Contractions help push your baby out of your uterus.
  • Blood in your stool (poop)
  • Severe diarrhea
  • Nausea (feeling sick to your stomach) and vomiting

What causes gas during pregnancy?

The buildup of gas happens whether you are pregnant or not. However, you may discover more challenges with gas once you discover you are pregnant. One of the key contributing factors to experiencing more gas during pregnancy is the increased levels of progesterone. Progesterone is a hormone that causes the muscles throughout your body to relax.

Subsequently, your intestinal muscles relax more, which causes your digestion to slow down. The transient time through the intestine can increase by 30%. This allows gas to build up easier and creates bloating, burping and of course flatulence. Gas during pregnancy can also increase later in pregnancy when the enlarging uterus places pressure on your abdominal cavity.

This pressure can also slow digestion allowing gas to build up.

Unfortunately, the progesterone-induced muscle relaxation makes it harder to control the release of gas. Don’t be surprised if you ended up passing gas in an awkward situation creating a little embarrassment. Just laugh it off and blame it on the baby.

Gas in the small intestine or colon is typically caused by the digestion or fermentation of undigested food, such as plant fiber or certain sugars (carbohydrates), by bacteria found in the colon. Gas can also form when your digestive system doesn’t completely break down certain components in foods, such as gluten or the sugar in dairy products and fruit.

Other sources of intestinal gas may include:

  • Food residue in your colon
  • A change in the bacteria in the small intestine
  • Poor absorption of carbohydrates, which can upset the balance of helpful bacteria in your digestive system
  • Constipation, since the longer food waste remains in your colon, the more time it has to ferment
  • A digestive disorder, such as lactose or fructose intolerance or Celiac disease.

Gas during pregnancy prevention

It is pretty much impossible to prevent gas during pregnancy. However, there are steps you can take to manage the gas you experience. Your primary objective is making it happen less often. Certain foods can be triggers for experiencing gas during pregnancy.

If gas is really bothering you, you may want to start a diary tracking the food you eat daily. This can help you identify the foods that cause more gas for you.

Suspicious foods that frequently create gas include beans, peas, and whole grains. Unfortunately, there are other healthy foods that can be the cause of your gas. These include broccoli, asparagus, cabbage, and Brussels sprouts. The best course of action is to track your diet and make any associations between increased gas and what you eat. Increased gas is triggered by different foods for different people.

Here’s what you can do to help reduce or prevent excess gas during pregnancy:

  • Eliminate certain foods. Try removing one food at a time to see if your gas improves.
    • Common gas-causing offenders include beans, peas, lentils, cabbage, onions, broccoli, cauliflower, whole-grain foods, mushrooms, certain fruits, and beer and other carbonated (bubbly) drinks like soda.
    • Don’t eat foods that cause gas, like fried or fatty foods, and dairy products, like milk and cheese.
  • Avoid or reduce carbohydrate drinks
  • Avoid fatty fried foods. Fat slows digestion, giving food more time to ferment.
  • Drink from a glass without using a straw
  • Focus on smaller meals throughout the day
  • Do something active every day. Exercise, which will help stimulate digestion. Talk to your doctor about safe activities to do during pregnancy.
  • Avoid tight clothing around your waist
  • Limit or avoid artificial sweeteners
  • Drink plenty of water, which will help prevent constipation
  • Eat slowly and chew thoroughly. Chewing your food thoroughly is one of the best ways to reduce gas.
  • Read labels. If dairy products seem to be a problem, you may have some degree of lactose intolerance. Pay attention to what you eat and try low-lactose or lactose-free varieties. Certain indigestible carbohydrates found in sugar-free foods (sorbitol, mannitol and xylitol) also may result in increased gas.
  • Temporarily cut back on high-fiber foods. Fiber has many benefits, but many high-fiber foods are also great gas producers. After a break, slowly add fiber back to your diet.
  • Try an over-the-counter remedy. Some products such as Lactaid or Dairy Ease can help digest lactose. Products containing simethicone (Gas-X, Mylanta Gas) haven’t been proved to be helpful, but many people feel that these products work. Products such as Beano may decrease the gas produced during the breakdown of certain types of beans.

It is important you don’t eliminate everything from your diet that may increase your gas. It is more essential to make sure that you are getting the nutrients you and your baby need for healthy development.

There are no concerns for your baby when it comes to gas during pregnancy. You may not like burping or passing gas, but your baby doesn’t care one bit. As noted above, the most important thing is to eat the foods necessary for providing your baby with the nutrients he/she needs as they grow.

Food and drinks to avoid while pregnant

Most foods are safe; however, there are certain foods to avoid when pregnant.

There is NO amount of alcohol consumption that is known to be safe during pregnancy, and therefore alcohol should be avoided during pregnancy. Prenatal exposure to alcohol can interfere with the healthy development of the baby. Depending on the amount, timing, and pattern of use, alcohol consumption during pregnancy can lead to Fetal Alcohol Syndrome or other developmental disorders.

If you consumed alcohol before you knew you were pregnant, stop drinking now. You should continue to avoid alcohol during breastfeeding. Exposure of alcohol to an infant poses harmful risks, and alcohol does reach the baby during breastfeeding.

Also, check with your doctor before you take any vitamins or herbal products. Some of these can be harmful to the developing fetus.

And although many doctors feel that one or two 6- to 8-ounce cups per day of coffee, tea, or soda with caffeine won’t harm your baby, it’s probably wise to avoid caffeine altogether if you can. As a general rule, caffeine should be limited to fewer than 200 mg per day during pregnancy. High caffeine consumption has been linked to an increased risk of miscarriage and other problems, so limit your intake or switch to decaffeinated products.

When you’re pregnant, it’s also important to avoid food-borne illnesses, such as listeriosis and toxoplasmosis, which can be life threatening to an unborn baby and may cause birth defects or miscarriage.

Foods to steer clear of include:

  • Soft, unpasteurized cheeses (often advertised as “fresh”) such as feta, goat, Brie, Camembert, and blue cheese. Soft cheeses including imported soft cheeses may contain listeria. You would need to avoid soft cheeses such as Brie, Camembert, Roquefort, Feta, Gorgonzola, and Mexican style cheeses that include Queso Blanco and Queso Fresco unless they clearly state that they are made from pasteurized milk. All soft non-imported cheeses made with pasteurized milk are safe to eat.
  • Unpasteurized milk, juices, and apple cider. Unpasteurized milk may contain listeria. Make sure that any milk you drink is pasteurized.
  • Raw eggs or foods containing raw eggs, including mousse and tiramisu. Raw eggs or any foods that contain raw eggs should be avoided because of the potential exposure to salmonella. Some homemade Caesar dressings, mayonnaise, homemade ice cream or custards, and Hollandaise sauces may be made with raw eggs. If the recipe is cooked at some point, this will reduce the exposure to salmonella. Commercially manufactured ice cream, dressings, and eggnog is made with pasteurized eggs and do not increase the risk of salmonella. Restaurants should be using pasteurized eggs in any recipe that is made with raw eggs, such as Hollandaise sauce or dressings.
  • Raw or undercooked meats, fish, or shellfish. Uncooked seafood and rare or undercooked beef or poultry should be avoided during pregnancy because of the risk of contamination with coliform bacteria, toxoplasmosis, and salmonella.
  • Pate. Refrigerated pate or meat spreads should be avoided because they may contain the bacteria listeria. Canned pate or shelf-safe meat spreads can be eaten.
  • Raw shellfish. The majority of seafood-borne illness is caused by undercooked shellfish, which include oysters, clams, and mussels. Cooking helps prevent some types of infection, but it does not prevent the algae-related infections that are associated with red tides. Raw shellfish pose a concern for everybody, and they should be avoided altogether during pregnancy.
  • Processed meats such as hot dogs and deli meats (these should be thoroughly cooked). Deli meats have been known to be contaminated with listeria, which can cause miscarriage. Listeria has the ability to cross the placenta and may infect the baby, which could lead to infection or blood poisoning and may be life-threatening. If you are pregnant and you are considering eating deli meats, make certain that you reheat the meat until it is steaming.
  • Fish that are high in mercury, including shark, swordfish, king mackerel, marlin, orange roughy, tuna steak (bigeye or ahi), and tilefish. Mercury consumed during pregnancy has been linked to developmental delays and brain damage. A sample of these types of fish includes shark, swordfish, king mackerel, and tilefish. Canned, chunk light tuna generally has a lower amount of mercury than other tuna, but still should only be eaten in moderation.
  • Smoked seafood. Refrigerated, smoked seafood often labeled as lox, nova style, kippered, or jerky should be avoided because it could be contaminated with listeria. (These are safe to eat when they are in an ingredient in a meal that has been cooked, like a casserole.) This type of fish is often found in the deli section of your grocery store. Canned or shelf-safe smoked seafood is usually fine to eat.
  • Fish exposed to Industrial Pollutants. Avoid fish from contaminated lakes and rivers that may be exposed to high levels of polychlorinated biphenyls. This is primarily for those who fish in local lakes and streams. These fish include bluefish, striped bass, salmon, pike, trout, and walleye. Contact the local health department or the Environmental Protection Agency to determine which fish are safe to eat in your area. Remember, this is regarding fish caught in local waters and not fish from your local grocery store.
  • Unwashed vegetables. Vegetables are safe, and a necessary part of a balanced diet. However, it is essential to make sure they are washed to avoid potential exposure to toxoplasmosis. Toxoplasmosis may contaminate the soil where the vegetables were grown.

If you’ve eaten these foods at some point during your pregnancy, try not to worry too much about it now; just avoid them for the remainder of the pregnancy. If you’re really concerned, talk to your doctor.

Figure 1. Advice about eating fish for pregnant women

advice on eating fish and shellfish for pregnant women

Nutrition for expectant moms

Eating well-balanced meals is important at all times, but it is even more so when you are pregnant. There are essential nutrients, vitamins, and minerals that your developing baby needs.

Scientists know that your diet can affect your baby’s health — even before you become pregnant. For example, research shows that folic acid helps prevent neural tube defects (including spina bifida) during the earliest stages of fetal development. So it’s important to get plenty of it before you become pregnant and during the early weeks of your pregnancy.

Doctors encourage women to take folic acid supplements before and throughout pregnancy (especially for the first 28 days). Be sure to ask your doctor about folic acid if you’re considering becoming pregnant.

Calcium is another important nutrient. Because your growing baby’s calcium demands are high, you should increase your calcium consumption to prevent a loss of calcium from your own bones. Your doctor will also likely prescribe prenatal vitamins for you, which contain some extra calcium.

Your best food sources of calcium are milk and other dairy products. However, if you have lactose intolerance or dislike milk and milk products, ask your doctor about a calcium supplement. (Signs of lactose intolerance include diarrhea, bloating, or gas after eating milk or milk products. Taking a lactase capsule or pill or using lactose-free milk products may help.) Other calcium-rich foods include sardines or salmon with bones, tofu, broccoli, spinach, and calcium-fortified juices and foods.

Doctors don’t usually recommend starting a strict vegan diet when you become pregnant. However, if you already follow a vegan or vegetarian diet, you can continue to do so during your pregnancy — but do it carefully. Be sure your doctor knows about your diet. It’s challenging to get the nutrition you need if you don’t eat fish and chicken, or milk, cheese, or eggs. You’ll likely need supplemental protein and may also need to take vitamin B12 and D supplements.

To ensure that you and your baby receive adequate nutrition, consult a registered dietitian for help with planning meals.

Here are some of the most common nutrients you need and the foods that contain them:

Nutrient Needed for Best sources
Protein cell growth and blood production lean meat, fish, poultry, egg whites, beans, peanut butter, tofu
Carbohydrates daily energy production breads, cereals, rice, potatoes, pasta, fruits, vegetables
Calcium strong bones and teeth, muscle contraction, nerve function milk, cheese, yogurt, sardines or salmon with bones, spinach
Iron red blood cell production (to prevent anemia) lean red meat, spinach, iron-fortified whole-grain breads and cereals
Vitamin A healthy skin, good eyesight, growing bones carrots, dark leafy greens, sweet potatoes
Vitamin C healthy gums, teeth, and bones; assistance with iron absorption citrus fruit, broccoli, tomatoes, fortified fruit juices
Vitamin B6 red blood cell formation; effective use of protein, fat, and carbohydrates pork, ham, whole-grain cereals, bananas
Vitamin B12 formation of red blood cells, maintaining nervous system health meat, fish, poultry, milk
(Note: vegetarians who don’t eat dairy products need supplemental B12.)
Vitamin D healthy bones and teeth; aids absorption of calcium fortified milk, dairy products, cereals, and breads
Folic acid blood and protein production, effective enzyme function green leafy vegetables, dark yellow fruits and vegetables, beans, peas, nuts
Fat body energy stores meat, whole-milk dairy products, nuts, peanut butter, margarine, vegetable oils
(Note: limit fat intake to 30% or less of your total daily calorie intake.)
read more

Bowlegs

bowlegs

What is bow legged

Bowlegs also called genu varum, is a condition in which the knees stay wide apart when a person stands with the feet and ankles together. Bowlegs is considered normal in children under 18 months. Infants are born bowlegged because of their folded position in the mother’s womb. Bowed legs begin to straighten once the child starts to walk and the legs begin to bear weight (about 12 to 18 months old).

Bowed legs in a toddler is very common. When a child with bowed legs stands with his or her feet together, there is a distinct space between the lower legs and knees. This may be a result of either one, or both, of the legs curving outward. Walking often exaggerates this bowed appearance.

In most cases, bowed legs will naturally begin to straighten as the child grows. If bowed legs have not resolved by the age of 3 years, there may be an underlying cause, such as Blount’s disease or rickets.

Adolescents occasionally have bowed legs. In many of these cases, the child is significantly overweight.

By around age 3, the child can most often stand with the ankles apart and the knees just touching. If the bowed legs are still present, the child is called bowlegged.

When to see a medical professional

See your healthcare provider if your child shows ongoing or worsening bowed legs after age 3.

Here are some signs that suggest a child’s bowlegs or knock-knees may be caused by a serious problem:

  • The curvature is extreme.
  • Only one side is affected.
  • The bowlegs get worse after age two years.
  • The knock-knees persist after age seven years.
  • Your child also is unusually short for his/her age.

If your child fits any of these descriptions, talk to your pediatrician. In some cases, treatment, including referral to a pediatric orthopedist, may be needed.

Bow legged causes

In most children under 2 years old, bowing of the legs is simply a normal variation in leg appearance. Doctors refer to this type of bowing as physiologic genu varum.

In children with physiologic genu varum, the bowing begins to slowly improve at approximately 18 months of age and continues as the child grows. By ages 3 to 4, the bowing has corrected and the legs typically have a normal appearance.

Bowlegs may be caused by illnesses, such as:

  • Abnormal bone development
  • Blount disease
  • Fractures that do not heal correctly
  • Lead or fluoride poisoning
  • Rickets, which is caused by a lack of vitamin D
  • Paget’s disease of bone

What is rickets

Rickets causes soft, weak bones in children. It usually occurs when they do not get enough vitamin D, which helps growing bones absorb the minerals calcium and phosphorous. It can also happen when calcium or phosphorus levels are too low.

Your child might not get enough vitamin D if he or she:

  • Has dark skin
  • Spends too little time outside
  • Has on sunscreen all the time when out of doors
  • Doesn’t eat foods containing vitamin D because of lactose intolerance or a strict vegetarian diet
  • Is breastfed without receiving vitamin D supplements
  • Can’t make or use vitamin D because of a medical disorder such as celiac disease

In addition to dietary rickets, children can get an inherited form of the disease. Symptoms include bone pain or tenderness, impaired growth, and deformities of the bones and teeth. Your child’s doctor uses lab and imaging tests to make the diagnosis. Treatment is replacing the calcium, phosphorus, or vitamin D that are lacking in the diet. Rickets is rare in the United States.

Rickets signs and symptoms

Signs and symptoms of rickets can include:

  • Delayed growth
  • Pain in the spine, pelvis and legs
  • Muscle weakness

Because rickets softens the growth plates at the ends of a child’s bones, it can cause skeletal deformities such as:

  • Bowed legs or knock knees
  • Thickened wrists and ankles
  • Breastbone projection

Rickets also can cause dental issues, such as cavities and problems with teeth structure.

Rickets complications

Left untreated, rickets can lead to:

  • Failure to grow
  • Abnormally curved spine
  • Skeletal deformities
  • Dental defects
  • Seizures

What causes rickets?

A lack of vitamin D causes most cases of rickets. Vitamin D helps bones absorb calcium and phosphorus. If your child does not get enough vitamin D, their body may not get the nutrients it needs to make bones strong. Occasionally, not getting enough calcium or lack of calcium and vitamin D can cause rickets.

Rickets is most common in children ages 6 to 24 months. This is because their bones grow rapidly during this period. Your child also may be at risk if they:

  • Have dark skin.
  • Don’t get enough exposure to sunlight.
  • Don’t eat enough foods containing vitamin D, calcium, or phosphorus.
  • Breastfeed without getting a vitamin D supplement.
  • Have an illness that prevents their body from making or absorbing vitamin D. One example is celiac disease.

Rickets also can run in families, and children can inherit it.

Lack of vitamin D

Children who don’t get enough vitamin D from these two sources can develop a deficiency:

  • Sunlight. Your skin produces vitamin D when it’s exposed to sunlight. But children in developed countries tend to spend less time outdoors. They’re also more likely to use sunscreen, which blocks the rays that trigger the skin’s production of vitamin D.
  • Food. Fish oils, fatty fish and egg yolks contain vitamin D. Vitamin D also has been added to some foods, such as milk, cereal and some fruit juices.

Problems with vitamin D absorption

Some children are born with or develop medical conditions that affect the way their bodies absorb vitamin D. Some examples include:

  • Celiac disease
  • Inflammatory bowel disease
  • Cystic fibrosis
  • Kidney problems

Risk factors for rickets

Factors that can increase a child’s risk of rickets include:

  • Dark skin. Dark skin doesn’t react as strongly to sunshine as does lighter skin, so it produces less vitamin D.
  • Mother’s vitamin D deficiency during pregnancy. A baby born to a mother with severe vitamin D deficiency can be born with signs of rickets or develop them within a few months after birth.
  • Northern latitudes. Children who live in geographical locations where there is less sunshine are at higher risk of rickets.
  • Premature birth. Babies born before their due dates are more likely to develop rickets.
  • Medications. Certain types of anti-seizure medications and antiretroviral medications, used to treat HIV infections, appear to interfere with the body’s ability to use vitamin D.
  • Exclusive breast-feeding. Breast milk doesn’t contain enough vitamin D to prevent rickets. Babies who are exclusively breast-fed should receive vitamin D drops.

Rickets prevention

In most cases, you can help prevent your child from having rickets. Make sure they get enough vitamin D and calcium. If your baby is breastfed or consumes more breast milk than formula, they need a vitamin D supplement. This is because breast milk does not contain enough vitamin D alone. Do not give your child vitamin supplements unless your doctor recommends them. Ask your doctor for dosage information.

If your child eats solid foods, you should manage their diet. Offer them foods high in vitamin D, such as breakfast cereals and orange juice, and calcium, such as milk, cheese, and salad greens.

Ask your doctor how much time in the sun is safe for your child. Remember that infants and babies require protection from direct sunlight. In addition, because of skin cancer concerns, infants and young children, especially, are warned to avoid direct sun or to always wear sunscreen and protective clothing.

For adults, during most seasons, 10 to 15 minutes of exposure to the sun near midday is enough. However, if you’re dark-skinned, if it’s winter or if you live in northern latitudes, you might not be able to get enough vitamin D from sun exposure.

If you’re pregnant, ask your doctor about taking vitamin D supplements.

Because human milk contains only a small amount of vitamin D, all breast-fed infants should receive 400 international units (IU) of oral vitamin D daily. The American Academy of Pediatricians recommends that breast-fed infants or those who drink less than 33.8 ounces (1 liter) of infant formula a day to take an oral vitamin D supplement.

Rickets diagnosis

Your doctor will ask about your family health history and your child’s health and diet. Your child will need a full physical exam. Blood tests and bone X-rays also help the doctor determine if your child has rickets.

Your doctor will pay particular attention to your child’s:

  • Skull. Babies who have rickets often have softer skull bones and might have a delay in the closure of the soft spots (fontanels).
  • Legs. While even healthy toddlers are a little bowlegged, an exaggerated bowing of the legs is common with rickets.
  • Chest. Some children with rickets develop abnormalities in their rib cages, which can flatten and cause their breastbones to protrude.
  • Wrists and ankles. Children who have rickets often have wrists and ankles that are larger or thicker than normal.

X-rays of the affected bones can reveal bone deformities. Blood and urine tests can confirm a diagnosis of rickets and also monitor the progress of treatment.

Rickets treatment

Treatment depends on the type of rickets your child has. For children who lack enough nutrients, the doctor will prescribe supplements for vitamin D and calcium. Your child’s pain and muscle weakness should get better within a few weeks.

Follow your child’s doctor’s directions as to dosage. Too much vitamin D can be harmful.

Your child’s doctor will monitor your child’s progress with X-rays and blood tests.

If your child has bone defects caused by rickets, they may need braces or surgery to correct the problem.

For children who inherit rickets or have an illness that caused rickets, you may need to see a specialist.

Living with rickets

Most cases of rickets go away once your child gets enough vitamin D. There may be lasting effects or defects that require further treatment, such as braces or surgery. Your child may need therapy as a result. It is possible that your child may require a strict diet in order to stay healthy.

What is Blount disease

Blount disease is a growth disorder that affects the bones of the lower leg, causing them to bow outward. In younger kids, just the tibia (shin bone) is affected. In teens, it’s usually both the tibia and the femur (thigh bone).

Many babies are born with slightly bowed legs from being in the small space of the womb. Their legs usually straighten out as they grow and start walking.

Blount disease is different. The curve gets worse if it’s not treated, so early diagnosis is very important.

In a child under the age of 2 years, it may be impossible to distinguish infantile Blount’s disease from physiologic genu varum. By the age of 3 years, however, the bowing will worsen and an obvious problem can often be seen in an x-ray.

Figure 1. Blount disease

Blount disease

Footnote: 5 year old girl with bilateral early-onset Blount disease

[Source 1) ]

Risks factors for Blount disease

Most kids who get Blount disease are overweight or gained weight very quickly. It’s also more common in people of African heritage, kids who started walking at an early age, and those with a family member who had it.

In Blount disease, a lot of pressure is put on the growth plate (an area of growing bone tissue) at the top of the tibia. As a result, the bone can’t grow normally. The lateral (outer) side of the tibia keeps growing but the medial (inner) side of the bone does not.

This uneven bone growth causes the tibia to bend outward instead of grow straight. One leg may also become slightly shorter than the other.

Blount disease signs and symptoms

The most obvious symptom of Blount disease is a bowing of the leg below the knee. In young kids, it’s usually not painful, though it can affect the way they walk. For preteens and teens, Blount disease may cause knee pain that gets worse with activity.

The tibia can be rotated as well as bowed, causing a condition called in-toeing (when the feet point inward instead of straight out).

Over time, Blount disease can lead to arthritis of the knee joint and, in severe cases, trouble walking.

Blount disease diagnosis

When doctors suspect Blount disease, they may recommend taking a child to an orthopedic doctor (bone specialist) for leg X-rays and further examination.

Mild bone changes can be hard to spot in kids younger than 2 because their bowed legs might be normal and straighten out on their own. It’s easier for doctors to diagnose Blount disease in kids after age 2.

Blount disease treatment

Treatment of Blount disease depends on a child’s age and how curved the bone is.

Usually, doctors will just keep a close eye on the condition in children younger than 2. Kids 2 to 4 years old and those with severe bowing might need leg braces, called KAFOs (knee-ankle-foot orthotics). Knee-ankle-foot orthotics, which go from the thigh to the toes, are created for kids using a mold of their leg. The hope is that the braces gradually shift leg bones to a straighter position over time. However, doctors have differing opinions on KAFOs. If you have questions about them, talk to your doctor.

Older kids and teens, or kids who don’t get better wearing knee-ankle-foot orthotics, might need surgery:

  • The surgeon can cut the bone, straighten it, and fasten it with plates and screws. This is called an osteotomy.
  • Another procedure can slow or stop the growth of half of the growth plate to allow the other side to catch up and straighten the leg.
  • A device called an external fixator can be put on the outside of the leg and attached to the bones after they are cut. It holds the bones in place while gradually straightening the leg.

If surgery is necessary, it will be done under general anesthesia. This means your child will be sedated and asleep and won’t feel anything. Afterward, your child might wear a cast or use crutches and a wheelchair for a while. Physical therapy also might be needed.

Blount disease prognosis

Most kids who are treated for Blount disease get better and have active lives.

If being overweight caused the Blount disease, it’s important for parents to help their child reach and maintain a healthy weight. This can reduce stress on the bones and joints and prevent other long-term problems from weight gain (like type 2 diabetes and heart disease).

If you need help getting your child to adopt a healthier lifestyle that includes a balanced diet and exercise, talk to your doctor.

Bow legged prevention

There is no known way to prevent bowlegs, other than to avoid rickets. Make sure your child is exposed to sunlight and gets the proper amount of vitamin D in their diet.

Bow legged symptoms

Bowed legs are most evident when a child stands and walks. The most common symptom of bowed legs is an awkward walking pattern.

Toddlers with bowed legs usually have normal coordination, and are not delayed in learning how to walk. The amount of bowing can be significant, however, and can be quite alarming to parents and family members.

Turning in of the feet (intoeing) is also common in toddlers and frequently occurs in combination with bowed legs.

Bowed legs do not typically cause any pain. During adolescence, however, persistent bowing can lead to discomfort in the hips, knees, and/or ankles because of the abnormal stress that the curved legs have on these joints. In addition, parents are often concerned that the child trips too frequently, particularly if intoeing is also present.

Symptoms may include:

  • Knees that do not touch when standing with feet together (ankles touching)
  • Bowing of legs is same on both sides of the body (symmetrical)
  • Bowed legs continue beyond age 3

Bow legged diagnosis

Your doctor will begin your child’s evaluation with a thorough physical examination.

If your child is under age 2, in good health, and has symmetrical bowing (the same amount of bowing in both legs), then your doctor will most likely tell you that no further tests are currently needed.

However, if your doctor notes that one leg is more severely bowed than the other, he or she may recommend an x-ray of the lower legs. An x-ray of your child’s legs in the standing position can show Blount’s disease or rickets.

If your child is older than 2 1/2 at the first doctor’s visit and has symmetrical bowing, your doctor will most likely recommend an x-ray. The likelihood of your child having infantile Blount’s disease or rickets is greater at this age. If the x-ray shows signs of rickets, your doctor will order blood tests to confirm the presence of this disorder.

X-rays may be needed if:

  • The child is 3 years old or older.
  • The bowing is getting worse.
  • Bowing is not the same on both sides.
  • Other test results suggest disease.

Bow legged treatment

No treatment is recommended for bowlegs unless the condition is extreme. The child should be seen by a medical professional at least every 6 months.

Physiologic genu varum nearly always spontaneously corrects itself as the child grows. This correction usually occurs by the age of 3 to 4 years.

Untreated infantile Blount’s disease or untreated rickets results in progressive worsening of the bowing in later childhood and adolescence. Ultimately, these children have leg discomfort (especially the knees) due to the abnormal stresses that occur on the joints. Adolescents with Blount’s disease are most likely to experience pain with the bowing.

Nonsurgical Treatment

  • Physiologic genu varum. Although physiologic genu varum does not require active treatment, your doctor will want to see your child every 6 months until the bowing has resolved.
  • Blount’s disease. Infantile Blount’s disease does require treatment for the bowing to improve. If the disease is caught early, treatment with a brace may be all that is needed. Bracing is not effective, however, for adolescents with Blount’s disease.
  • Rickets. If your child has rickets, your doctor will refer you to a metabolic specialist for medical management, in addition to regular orthopaedic followup. The effects of rickets can often be controlled with medication.

Surgical Treatment

  • Physiologic genu varum. In rare instances, physiologic genu varum in the toddler will not completely resolve and during adolescence, the bowing may cause the child and family to have cosmetic concerns. If the deformity is severe enough, then surgery to correct the remaining bowing may be needed.
  • Blount’s disease. If bowing continues to progress in a child with infantile Blount’s disease despite the use of a brace, surgery will be needed by the age of 4 years. Surgery may stop further worsening and prevent permanent damage to the growth area of the shinbone. Older children with bowed legs due to adolescent Blount’s disease require surgery to correct the problem.
  • Rickets. Surgery may also be needed for children with rickets whose deformities persist despite proper management with medications.

Surgical procedures

There are different procedures to correct bowed legs, and they fall into two main types.

  1. Guided growth. This surgery of the growth plate stops the growth on the healthy side of the shinbone which gives the abnormal side a chance to catch up, straightening the leg with the child’s natural growth.
  2. Tibial osteotomy. In this procedure, the shinbone is cut just below the knee and reshaped to correct the alignment. The bone is held in place while it heals with either an internal plate and screws, or an external frame that is positioned on the outside of the leg.

After surgery, a cast may be applied to protect the bone while it heals. Crutches may be necessary for a few weeks, and your doctor may recommend physical therapy exercises to restore strength and range of motion. Your doctor will talk to you about full recovery time and return to regular activities.

References   [ + ]

read more