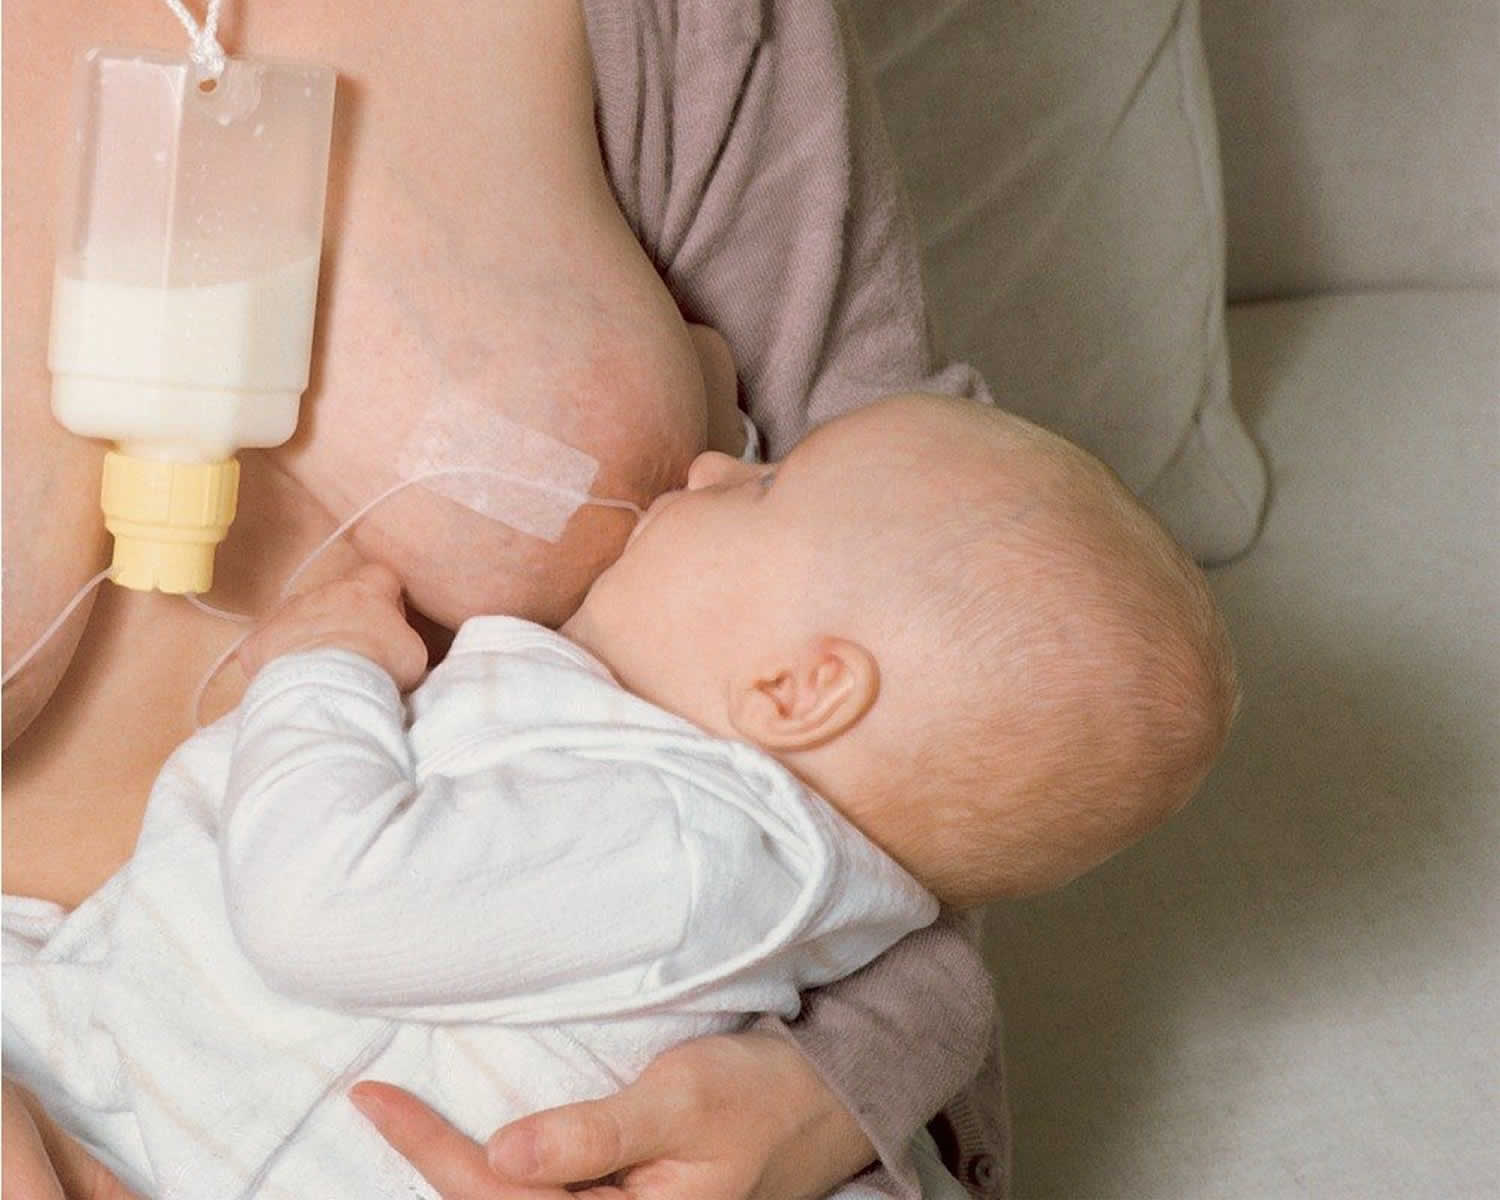
Uncategorized

Storing breast milk

storing breast milk

Storing breast milk

By following recommended storage and preparation techniques, breastfeeding mothers and caretakers of breastfed infants and children can maintain the safety and quality of expressed breast milk for the health of your baby.

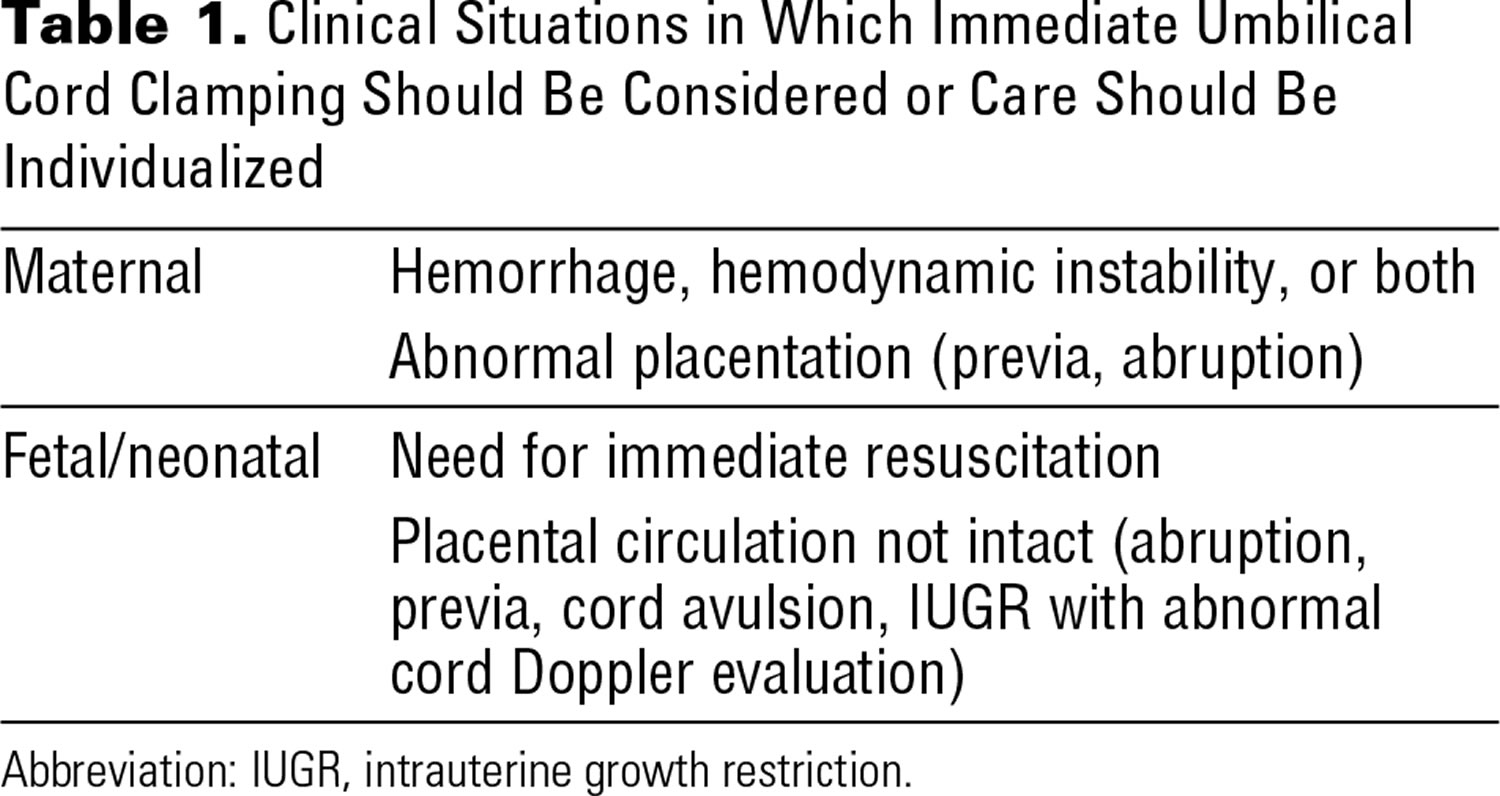
Table 1 are general guidelines for storing human milk at different temperatures. Various factors (milk volume, room temperature when milk is expressed, temperature fluctuations in the refrigerator and freezer, and cleanliness of the environment) can affect how long human milk can be stored safely.

The American Academy of Pediatrics recommends breastfeeding as the sole source of nutrition for your baby for about 6 months and can be continued for as long as both mother and baby desire it.

Stored breast milk can vary in color. It can be bluish, yellowish, or brownish. It is normal for breast milk to separate (the fatty part of the milk goes to the top). Shake the bottle or sealed bag and the fat should go back into the milk. If it does not, then the breast milk may be bad. You should smell the milk before feeding it to your baby. Bad milk smells sour. If you still aren’t sure, try tasting the milk. If it tastes sour, then it is bad and needs to be thrown away.

If you choose to freeze breast milk, you need to thaw it before giving it to your baby. Safe thawing of breast milk:

  • Always thaw the oldest breast milk first. Remember first in, first out. Over time, the quality of breast milk can decrease.
  • While many infants may be content drinking room temperature milk, some may have a preference for warmer milk. It is recommended to warm milk slowly in lukewarm water to protect fat content and nutrients.
  • There are 2 ways you can thaw the milk:
    • Put the container of milk in warm water. Swirl the container around in the water until the milk thaws.
    • Put the container of milk in the refrigerator the day before it is to be used.
  • Never thaw or heat breast milk in a microwave. Microwaving can destroy nutrients in breast milk and create hot spots, which can burn a baby’s mouth.
  • Avoid boiling as this method will cause loss of nutritional properties of human milk and could unevenly hot making it dangerous for infants to drink.
  • Use breast milk within 24 hours of thawing in the refrigerator (this means from the time it is no longer frozen or completely thawed, not from the time when you took it out of the freezer).
  • Once breast milk is brought to room temperature or warmed after storing in the refrigerator or freezer, it should be used within 2 hours.
  • Never refreeze breast milk once it has been thawed.

Thawed breast milk can be refrigerated for up to 24 hours, but it should not be refrozen. Do not use hot water to thaw breast milk. The milk could get too hot and burn your baby’s mouth. Do not thaw frozen breast milk in a microwave. This can damage valuable proteins in breast milk.

Table 1. Guidelines for storage of breastmilk at home for use with healthy, full-term babies

Breast milk status Room temperature (78.8 °F [26°C] or lower) Refrigerator (39.2 °F [4°C] or lower) Freezer
Freshly expressed into container 6–8 hours
If refrigerator is available store milk there
3–5 days
Store at back where it is coldest
2 weeks in freezer compartment inside refrigerator
3 months in freezer section of refrigerator with separate door
6–12 months in deep freeze (-0.4 °F [-18°C] or lower)
Previously frozen thawed in refrigerator but not warmed 4 hours or less – that is, the next feeding 24 hours NEVER refreeze human milk after it has been thawed
Thawed outside refrigerator in warm water For completion of feeding 4 hours or until next feeding NEVER refreeze human milk after it has been thawed
Infant has begun feeding Only for completion of feeding Discard Discard

Breast milk storage containers

  • Bottles
    • glass or hard-sided plastic containers with well-fitting tops
    • avoid containers made with the chemical bisphenol A (BPA), identified with a number 3 or 7 in the recycling symbol. A safe alternative is polypropylene, which is soft, semi-cloudy, and has the number 5 recycling symbol and/or the letters PP. You can avoid the risks of plastic completely by using glass.
    • containers which have been washed in hot, soapy, water, rinsed well, and allowed to air-dry before use or washed and dried in a dishwasher
    • containers should not be filled to the top – leave an inch of space to allow the milk to expand as it freezes
  • Bags
    • freezer milk bags that are designed for storing human milk
    • squeeze out the air at the top before sealing, and allow about an inch for the milk to expand when frozen.
    • stand/lay the bags in another container at the back of the refrigerator shelf or in the back of freezer where the temperature will remain the most consistently cold.

Disposable bottle liners or plastic bags are not recommended. With these, the risk of contamination is greater. Bags are less durable and tend to leak, and some types of plastic may destroy nutrients in milk.

Before expressing or handling breast milk:

  • Wash your hands well with soap and water. If soap and water are not available, use an alcohol-based hand sanitizer that contains at least 60% alcohol.
  • Mothers can express breast milk by hand or with a manual or electric pump.
  • If using a pump, inspect the pump kit and tubing to make sure it is clean. Discard and replace moldy tubing immediately.
  • If using a shared pump kit, clean pump dials, power switch, and countertop with disinfectant wipe.

Techniques you can use to encourage your let-down reflex when expressing your breast milk

There are several techniques you can use to encourage your let-down reflex when expressing. For example:

  • Consciously try to relax, using whatever method suits you. Try to express in a quiet, warm, relaxing area, away from distractions. While expressing, breathe slowly and deeply. You could express in the place you usually sit to feed. Some mothers have a warm drink first or listen to soft music. Warmth (expressing after a warm shower, warm face washers on the breast for a few minutes before starting) may also help.
  • Gently massaging your breasts by stroking down towards the nipple, and gently rolling the nipple between your fingers. While you can’t actually push the milk out of your breasts by massage, you can help trigger the let-down by touching your breasts.
  • Thinking about your baby and how much your breastmilk is helping her will encourage your let-down reflex. If she is premature or sick in hospital,you might find it easier to express near her cot or just after you leave her. If you are away from her, looking at her photo can help.
  • Having someone support you. Many mothers find they manage much better when they have an encouraging partner or friend.

Safe cleaning of infant feeding items and pumping equipment

  • Carefully cleaning, sanitizing, and storing your pump equipment, baby’s bottles, and other feeding items will help to protect your breast milk from contamination. CDC has guidance on how to safely clean and store pump equipment and infant feeding items.

Storing breast milk after expressing:

  • Use breast milk storage bags or clean food-grade containers with tight fitting lids made of glass or plastic to store expressed breast milk.
    • Avoid bottles with the recycle symbol number 7, which indicates that the container may be made of a BPA-containing plastic.
  • Never store breast milk in disposable bottle liners or plastic bags that are not intended for storing breast milk.
  • Freshly expressed or pumped milk can be stored:
    • At room temperature (77 °F [25 °C] or colder) for up to 4 hours.
    • In the refrigerator for up to 4 days.
    • In the freezer for about 6 months is best; up to 12 months is acceptable. Although freezing keeps food safe almost indefinitely, recommended storage times are important to follow for best quality.

Storage tips:

  • Clearly label the breast milk with the date it was expressed.
  • Do not store breast milk in the door of the refrigerator or freezer. This will help protect the breast milk from temperature changes from the door opening and closing.
  • If you don’t think you will use freshly expressed breast milk within 4 days, freeze it right away. This will help to protect the quality of the breast milk.
  • Freeze breast milk in small amounts of 2 to 4 ounces (or the amount that will be offered at one feeding) to avoid wasting breast milk that might not be finished.
  • When freezing breast milk, leave about an inch of space at the top of the container because breast milk expands as it freezes.
  • If you will be delivering breast milk to a childcare provider, clearly label the container with the child’s name and talk to your childcare provider about other requirements they might have for labeling and storing breast milk.
  • Breast milk can be stored in an insulated cooler bag with frozen ice packs for up to 24 hours when you are traveling. Once you arrive at your destination, milk should be used right away, stored in the refrigerator, or frozen.

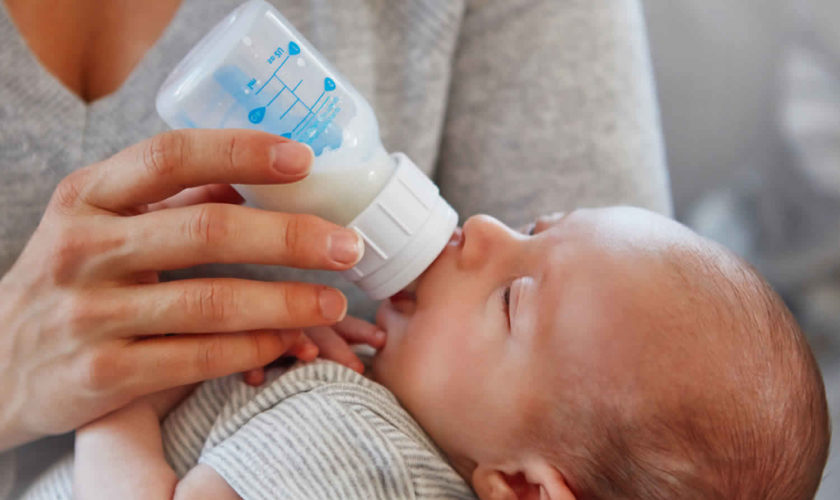
Feeding expressed breast milk

  • Breast milk does not need to be warmed. It can be served room temperature or cold.
  • If you decide to warm the breast milk, here are some tips:
    • Keep the container sealed while warming.
    • Warm breast milk by placing the container of breast milk into a separate container or pot of warm water for a few minutes or by running warm (not hot) tap water over the container for a few minutes.
    • Do not heat breast milk directly on the stove or in the microwave.
    • Test the temperature of the breast milk before feeding it to your baby by putting a few drops on your wrist. It should feel warm, not hot.
  • Swirl the breast milk to mix the fat, which may have separated.
  • If your baby did not finish the bottle, the leftover breast milk can still be used within 2 hours after the baby is finished feeding. After 2 hours, leftover breast milk should be discarded.

How to store breast milk

There are a couple of ways you can store breast milk. You can use a plastic or glass bottle with a sealable top. Or you can use a sterile, sealable bag. Store your breast milk in the amount your baby consumes in a feeding. This way you don’t waste any milk. For example, if your baby eats 4 ounces in a feeding, put 4 ounces of breast milk in the storage container. Always put a date on the container of breast milk so you know how long it will last.

Where should I store my breast milk?

Store your pumped breast milk in a refrigerator or cooler with ice as soon as possible. You also can freeze the milk if you aren’t going to use it right away.

How long can I store my breast milk?

The life of breast milk varies based on how it is stored.

  • At room temperature (less than 77°F), it lasts up to 6 hours.
  • In a cooler with ice packs, it lasts up to 24 hours.
  • At the back of a refrigerator, it lasts for 3 to 8 days.
  • At the back of a freezer, it lasts up to 6 months.

Why does my milk smell or taste soapy?

Sometimes thawed milk may smell or taste soapy. This is due to an enzyme in milk known as lipase 1). The milk is safe and most babies will still drink it. If there is a rancid smell from high lipase when the milk has been chilled or frozen, the milk can be heated to scalding (bubbles around the edges, not boiling) after expression, then quickly cooled and frozen. This deactivates the lipase enzyme. Scalded milk is still a healthier choice than commercial infant formula.

Why is my milk separating?

Human milk naturally separates into a milk layer and a cream top when it is stored. This is normal. It is safe to shake or swirl the milk to combine the cream prior to feeding.

How do I thaw and warm breast milk once I’m ready to use it?

To thaw frozen breast milk:

  1. Make sure the container is sealed tight.
  2. Put the container under running cold water.
  3. Pour the amount of thawed milk you need for your baby into a bottle for feeding.
  4. Use the thawed milk within 24 hours. Don’t refreeze breast milk after it’s been thawed.

To warm thawed or refrigerated milk:

  1. Put the container under running hot water or in a bowl of warm water.
  2. Pour the amount of milk you need for your baby into a bottle for feeding.
  3. Put a drop or two of milk on the back of your hand to test the temperature. If it’s too hot, let it cool.

Never heat breast milk in the microwave. It kills nutrients in the milk and can burn your baby’s mouth.

Is it safe to refreeze my milk after thawing?

Previously frozen milk that has been thawed can be kept in the refrigerator for up to 24 hours 2). There is currently limited research that supports the safety of refreezing breastmilk as this may introduce further breakdown of nutrients and increases the risk of bacterial growth. At this time, the accepted practice is not to refreeze thawed milk.

Can I reuse previously fed milk if my baby does not finish?

If baby does not finish the bottle during a feed, the recommendation is milk may be reused within 1-2 hours and after this time frame should be discarded to avoid transfer of bacteria from baby’s mouth to bottle 3). Many moms find storing milk in smaller quantities can help reduce waste if baby does not finish the bottle.

Is it safe to store my milk in a shared refrigerator?

Expressed milk can be kept in a common refrigerator at the workplace or in a day care center. The US Centers for Disease Control and Prevention (CDC) and the US Occupational Safety and Health Administration agree that human milk is not among the body fluids that require special handling or storage in a separate container.

CDC does not list human breast milk as a body fluid to which universal precautions apply 4). Occupational exposure to human breast milk has not been shown to lead to transmission of HIV or Hepatitis B infection. However, because human breast milk has been implicated in transmitting HIV from mother to infant, gloves may be worn as a precaution by health care workers who are frequently exposed to breast milk (e.g., people working in human milk banks (defined below). For additional information regarding universal precautions as they apply to breast milk in the transmission of HIV and Hepatitis B infections, visit the following resources:

I have thrush; is my breast milk safe?

If you or your baby has a thrush or yeast/fungus infection, continue to breastfeed during the outbreak and treatment. While being treated, you can continue to express your milk and give it to your baby. Label any milk stored while you or baby is undergoing treatment. Be aware that refrigerating or freezing milk does not kill yeast. The safest, most conservative option is to discard pumped milk during thrush treatment. Some research shows using frozen milk pumped during thrush treatment should not pose any risk to healthy babies especially if the milk is boiled prior to use 5).

How long should a mother breastfeed?

The American Academy of Pediatrics recommends that infants be exclusively breastfed for about the first 6 months with continued breastfeeding along with introducing appropriate complementary foods for 1 year or longer. The World Health Organization (WHO) also recommends exclusive breastfeeding up to 6 months of age with continued breastfeeding along with appropriate complementary foods up to 2 years of age or longer.

Mothers should be encouraged to breastfeed their children for at least 1 year. The longer an infant is breastfed, the greater the protection from certain illnesses and long-term diseases. The more months or years a woman breastfeeds (combined breastfeeding of all her children), the greater the benefits to her health as well.

The American Academy of Pediatrics recommends that children be introduced to foods other than breast milk or infant formula when they are about 6 months old.

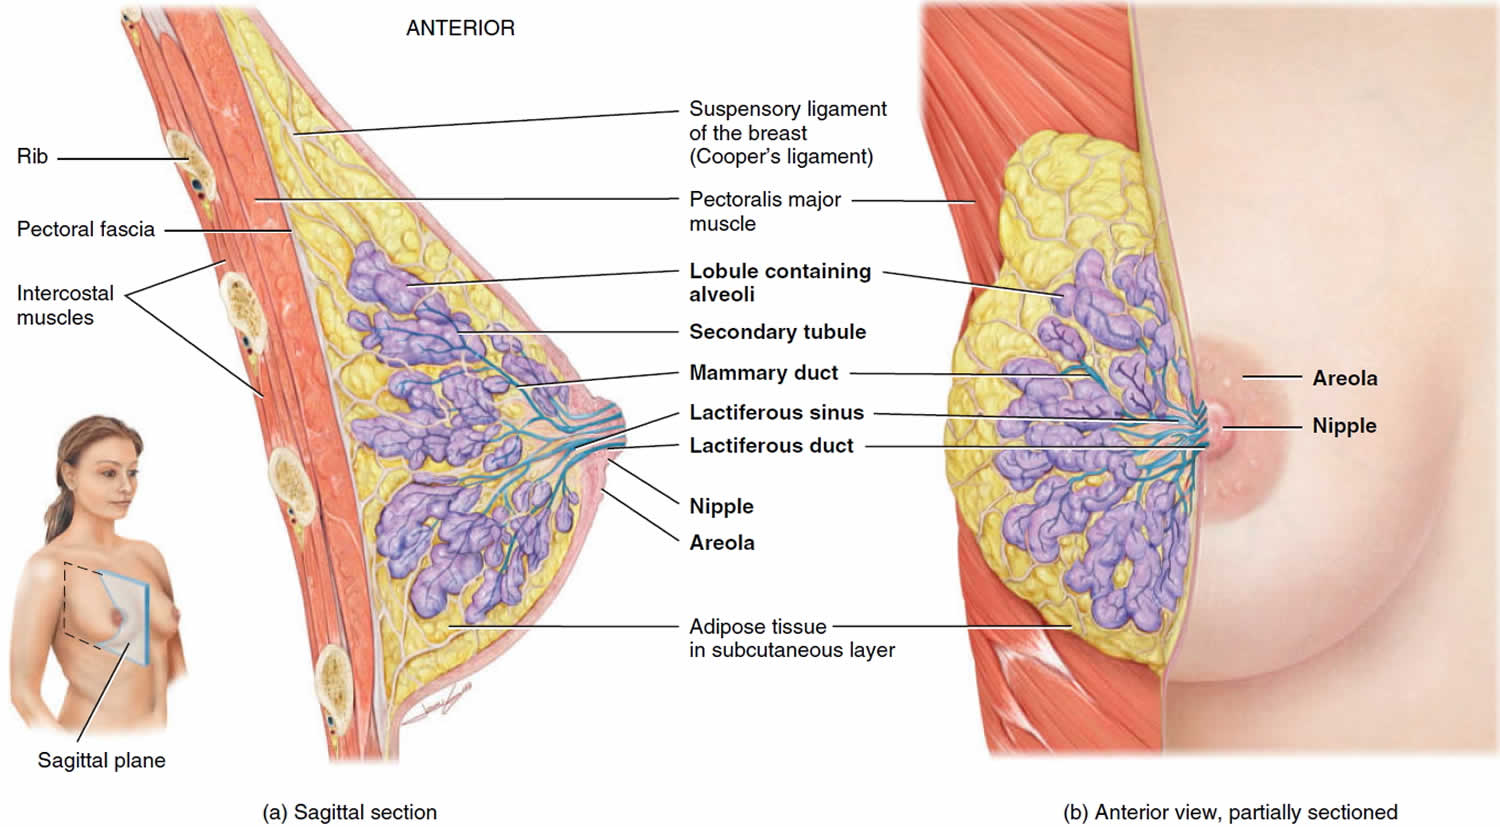
Structure of the women breast

The structure of the women breast:

  • Women’s human breast contains fatty tissue, support tissue and milk-making glands.
  • Human milk is produced inside these lobes of glands.
  • The glands contain clusters of alveoli. These are little hollow sacks containing milk-making cells around the outside, and milk that has been produced in the middle.
  • Tubes, called lactiferous ducts, carry the milk from the alveoli towards the nipple.
    When a human baby/child breastfeeds or a breastfeeding woman expresses (and the let-down reflex is triggered), the milk flows out of the nipple via tiny openings called duct openings.

The size of your breast is not related to how well it can make milk.

  • The amount of milk stored in breasts varies between women; however, it isn’t always to overall breast size.
  • Women with a smaller storage capacity in their breasts might need to breastfeed their babies more often than women with a larger capacity.
  • It’s important to remember that a smaller breast storage capacity is only one possible reason a baby may feed often.
  • Many women store more milk in one of their breasts than the other (because that breast has a larger storage capacity).
  • Babies might spend longer feeding on the side with a bigger capacity. This is perfectly normal.
  • Finally, remember that feeding patterns (such as how often or how long they feed from each breast) can vary between babies born to the same mother.

Figure 1. Women’s breast

Normal breast

Pumping breast milk

When you are away from your baby, you can pump or hand express milk from your breasts ahead of time so that your baby can drink your breast milk from a bottle.

Using the breast pump helpful suggestions:

  1. Assemble the clean electric breast pump kit using the maker’s instructions. There will be written instructions with the kit and you would have been shown how to put it together by the your breastfeeding consultant from whom you hired the pump. If you have any questions please ring her so you know you have it connected properly.
  2. Set the pump to the lowest suction setting. Try to start your let-down by using some of the ideas listed above. When putting on the breast cup, make sure the nipple is in the center and that the cup has good skin contact all around to stop air entering. If your nipple hurts when you start expressing with the pump, stop and check to make sure the nipple is centered in the breast cup and the suction is low.
  3. At first, you may find it helps to keep the session short, gradually lengthening sessions. Some mothers find it useful to change breasts several times during the session. If you use a double pump kit, the session will be shorter than expressing with a single kit. Once you are comfortable with using the pump, you can increase the suction setting. Make sure it is still comfortable for you. Keep the kit upright while you are expressing to prevent milk from going into the tubing. If milk does go into the tubing, stop the pump and rinse the tubing with water. It is best not to use the pump when the tubing is wet, particularly in pumps where the tubing connects to the inside of the pump. It can draw moisture into the pump and cause damage. In pumps with a closed kit, slight dampness or moisture in the tubing should not be a problem. However, after expressing with wet tubing, take the kit apart to allow all parts to dry.
  4. In the first few days or so after the birth, you will make only small amounts of the first milk, called colostrum. It is usually best to express this by hand. You will find that you will have a lot more milk a few days later, once the milk comes in. An electric breast pump is then very useful. The milk supply settles down within a few weeks to be the right amount to meet the baby’s needs. The mother of a premature baby makes slightly different milk to the mother of a term baby, because her milk is more suited to her baby’s level of maturity. Be guided by your medical advisers for your baby’s feeding needs. You will be able to express more milk as you get used to expressing.
  5. While you still have colostrum in your breasts, the milk will have a yellow color and may look rather creamy. It will form layers on standing. The color of colostrum from different mothers can vary a lot, so don’t be surprised if yours looks quite different to another mother’s. This is quite normal. As your milk supply increases, the color of the milk becomes more bluish-white.
  6. It still forms layers on standing, with the creamy layer at the top. Milk may look different at different times of the day and this also depends on how long it has been since you have expressed or fed your baby. Your milk is right for your baby.
  7. Some mothers find that after expressing for many weeks their milk supply decreases. This is because a baby is better at getting the milk from the breast than a pump. When you are able to feed your baby at the breast, you will find that with frequent feeds, your supply will soon increase. If you are unable to feed your baby at the breast, expressing more often will help to increase your milk supply. After a week or so, you may be able to return to your previous expressing schedule. It can be helpful to finish off each session with a few minutes of hand expressing. This will help to empty your breasts and help increase your milk supply. If your supply is decreasing despite your attempts to increase it, you may wish to contact your breastfeeding consultant to discuss other ideas.
  8. Contact the breastfeeding counselor from whom you hired the pump if any of the following happen:
    • the breast pump is not working (please check the instructions first)
    • your milk supply seems to be dropping
    • you feel the pump is not helping you
    • you need someone to talk to about breastfeeding or breastmilk.

Please contact your breastfeeding consultant at least once a week to let her know how you are getting on.

How do breast pumps work?

All pumps have a shield that covers your breast and a container that collects breast milk. If you’re not sure what kind of pump is best for you, ask your lactation consultant. This is a person who has special training to help women breastfeed. Check with your health insurance company to see if it helps pay for a pump.

You may not know how often you’ll need to pump until you have your baby. So you may want to wait until after your baby is born to get one.

There are two kinds of breast pumps:

  1. Manual breast pump. This is a pump that you work by hand. You can use a manual pump anywhere because it doesn’t need electricity. This kind of pump is good if you don’t need to pump very often or if you don’t need a lot of milk at one time.
  2. Powered breast pump. This pump uses batteries or electricity. It has a motor to pump your breasts. You can use a single pump that works on one breast at a time. Or you can use a double pump that works on both breasts at the same time. If you’re going back to school or work, you may like double pumps because they’re faster than single pumps.

Do all breastfeeding moms use a breast pump?

No. But if there are times you’ll be away from your baby, like if you’re going back to work or school, you may need a breast pump. A breast pump helps you remove breast milk from your breasts. You can use the milk at a later time to feed your baby. Breast milk that you pump from your breasts is called expressed milk.

Breast pumps can help you in lots of ways:

  • If you go back to work or school, you still can feed your baby breast milk.
  • Your partner or another caregiver can feed your baby breast milk.
  • Pumping helps keep your breast milk from building up in your breasts. This helps prevent discomfort and infection.

When to start pumping your breast milk?

If you are planning to return to work or school or will be away from your baby for other reasons, you may want to start pumping 1 or 2 weeks in advance. This helps you learn how your pump works and will give you the chance to practice pumping and will give your baby time to get used to feeding from a bottle.

You can pump right after your baby eats or between feedings. Or you may prefer to pump from one breast while you feed your baby from the other.

Starting at home also helps you build a collection of breast milk. You can store it for your baby’s feedings when you return to work.

How often to pump?

When away from your baby, try to pump at the same times or as often as your baby is breastfeeding. This will help remind your body to keep making the amount of milk your baby needs.

How much breast milk will I get when I pump?

You may not get much breast milk when you first start pumping. This will change as you continue to pump regularly. Pumping at the same times or as often as your baby normally breastfeeds should help your body make about the amount of milk your baby needs. Your breasts will begin to make more milk. This amount may differ from baby to baby and can change as babies grow. The more often you pump, the more milk your breasts make. Drink lots of water to stay hydrated. This will also help your milk supply.

If you find that you are not able to pump as much milk as your baby wants to eat while you are away, you may want to consider adding another pumping session to increase your milk supply.

How long should I pump each time?

It takes about the same time to pump breast milk as it does to breastfeed. With practice, you may be able to pump in as little as 10 to 15 minutes. While you are at work, try to pump as often as your baby usually feeds. This may be every 3 to 4 hours for 15 minutes each time. To keep up your milk supply, give your baby extra feedings when you are together. You also can pump right after your baby feeds to help your breasts make more milk.

Will there be times that my baby needs more milk than I have ready?

Yes, your baby needs more milk during growth spurts. These occur at about 2 weeks and 6 weeks of age and again at about 3 months and 6 months of age. The best way to increase your milk supply for a growth spurt is to breastfeed or pump more often.

Can what I eat and drink affect my breast milk?

Yes. Nutrients in foods and drinks help make your breast milk healthy. When you’re breastfeeding, eat healthy foods, like fruits, vegetables, whole-grain breads and lean meats. Eat fewer sweets and salty snacks. You may need 450 to 500 extra calories a day when you’re breastfeeding to make breast milk for your baby.

Drink lots of water. It’s important to stay hydrated (have fluid in your body) when you’re breastfeeding. Drink when you’re thirsty. A simple way to make sure you drink enough water is to have a glass each time you breastfeed.

Limit caffeine when you’re breastfeeding. Caffeine is a drug that’s found in things like coffee, tea, soda, energy drinks, chocolate and some energy drinks and medicines. Too much caffeine in breast milk can make your baby fussy or have trouble sleeping. If you drink coffee, have no more than two cups a day while you’re breastfeeding.

Do I need to take vitamins or supplements when I’m breastfeeding?

Yes. Food is the best source of nutrients. But even if you eat healthy foods every day, you may not get all the nutrients you need. So you may need a little help from supplements. A supplement is a product you take to make up for certain nutrients that you don’t get enough of in food. For example, you may take a vitamin supplement to help you get more vitamin B or C. Or you may take an iron or calcium supplement.

When you’re breastfeeding, take a multivitamin every day or keep taking your prenatal vitamin. A multivitamin contains many vitamins (like vitamins B and C and folic acid) and minerals (like iron and calcium) that help your body stay healthy. A prenatal vitamin is a vitamin made for pregnant women. Don’t take any vitamin or supplement without talking to your provider first.

Here are some nutrients you may need supplements for during breastfeeding:

DHA is short for docosahexaenoic acid. DHA is a kind of fat called omega-3 fatty acid that helps with growth and development. If you’re breastfeeding, you need 200 to 300 milligrams of DHA each day to help your baby’s brain and eyes develop. You can get this amount from foods, like fish that are low in mercury, like herring, salmon, trout, anchovies and halibut. Or you can get it from foods that have DHA added to them, like orange juice, milk and eggs. If you don’t get enough DHA from food, you can take a DHA supplement. Talk to your provider to make sure you get the right amount of DHA each day.

Iodine. When you’re breastfeeding, you need 290 micrograms of iodine each day. Iodine in your breast milk helps your baby’s body make thyroid hormones that help his bones and nerves develop. You may not get enough iodine from food you eat. And not all multivitamins and prenatal vitamins contain iodine. So talk to your provider to make sure you’re getting enough iodine each day. You can get iodine by:

  • Eating foods that are high in iodine, like fish, bread, cereal and milk products
  • Taking an iodine or iodide supplement. Iodide is a form of iodine.
  • Using iodized salt. This is salt that has iodine added to it. Read the package label to make sure your salt is iodized.

Vitamin B12. Vitamin B12 in your breast milk supports your baby’s brain development and helps him make healthy red blood cells. You can get vitamin B12 from foods, like meat, fish, eggs, milk and products made from milk. Or you may need a supplement. Ask your provider about taking a vitamin B12 supplement to make sure you and your baby get the right amount. You may need extra vitamin B12 if you:

  • Are a strict vegetarian or vegan. A vegetarian is someone who doesn’t eat meat and mostly east foods that come from plants. A vegan is someone who doesn’t eat meat or anything made with animal products, like eggs or milk.
  • Have had gastric bypass surgery. This is surgery on the stomach and intestines to help you lose weight.
  • Have digestive conditions, like celiac disease or Crohn’s disease. These conditions affect how your body digests (breaks down) food.

Don’t take herbal products, like ginkgo or St. John’s wort, when you’re breastfeeding. Herbal products are made from herbs. Herbs are plants used in cooking and medicine. Even though herbs are natural, they may not be safe for your baby. It’s best not to use these products while you’re breastfeeding.

Can smoking while breastfeeding hurt my baby?

Yes. Don’t smoke if you’re breastfeeding. Nicotine is a drug found in cigarettes. It passes to your baby in breast milk and can cause problems, like:

  • Making your baby fussy
  • Making it hard for your baby to sleep
  • Reducing your milk supply so your baby may not get all the milk he needs

Secondhand smoke also is bad for your baby. Secondhand smoke is smoke from someone else’s cigarette, cigar or pipe. It can cause lung and breathing problems. Babies of mothers who smoke are more likely than babies of non-smokers to die from sudden infant death syndrome (also called SIDS). SIDS is the unexplained death of a baby younger than 1 year old.

If you do smoke, it’s OK to breastfeed. But smoke as little as possible and don’t smoke around your baby.

Can I pass alcohol or street drugs to your baby through breast milk?

Yes. Don’t drink alcohol when you’re breastfeeding. Alcohol includes beer, wine, wine coolers and liquor. If you do drink alcohol, don’t have more than two drinks a week. Wait at least 2 hours after each drink before you breastfeed.

You also can pass street drugs, like heroin and cocaine, to your baby through breast milk. Tell your health care provider if you need help to quit using street drugs.

If you’re breastfeeding, don’t use marijuana. It’s not safe for your baby. You may pass THC and other chemicals from marijuana to your baby through breast milk. If you breastfeed your baby and smoke marijuana, your baby may be at increased risk for problems with brain development. Marijuana also may affect the amount and quality of breast milk you make. Even if marijuana is legal to use in your state, don’t use it when you’re breastfeeding.

Are prescription medicines safe to take when I’m breastfeeding?

Some are, and some aren’t. A prescription medicine (drug) is one your provider says you can take to treat a health condition. You need a prescription (an order from your provider) to get the medicine. Some prescription drugs, like medicine to help you sleep, some painkillers and drugs used to treat cancer or migraine headaches, aren’t safe to take while breastfeeding. Others, like certain kinds of birth control, may affect the amount of breast milk you make.

Here’s what you can do to make sure prescription medicine you take is safe for your baby when you’re breastfeeding:

  • Talk to your health care provider and your baby’s provider about breastfeeding before your baby is born. Tell each provider about any medicine you take. If you take a medicine that’s not safe for your baby, your provider may switch you to a safer one. Don’t start or stop taking any medicine during breastfeeding without talking to your providers first.
  • Make sure any doctor who prescribes you medicine knows that you’re breastfeeding.
  • Check with your provider even if you take medicine that’s usually prescribed for your baby, like baby aspirin.
  • Tell your baby’s doctor if your baby has any signs that may be a reaction to your medicine, like diarrhea, sleepiness, a change in eating or crying more than usual.

If you have a chronic health condition and you plan to breastfeed, talk to your providers about how your condition affects breastfeeding. You most likely can breastfeed even with a chronic health condition. Your provider can help you make sure that any medicine you take is safe for your baby. A chronic health condition is one that lasts for 1 year or more. It needs ongoing medical care and can limit a person’s usual activities and affect daily life. Examples are diabetes, high blood pressure, obesity and depression. Chronic health conditions need treatment from a health care provider.

Is it safe to take prescription opioids when I’m breastfeeding?

Prescription opioids are painkillers your provider may prescribe if you’ve been injured or had surgery or dental work. They’re sometimes used to treat a cough or diarrhea. If you had an episiotomy or a cesarean birth (also called a c-section), your provider may prescribe an opioid like codeine or tramadol to help relieve your pain. An episiotomy is a cut made at the opening of the vagina to help let your baby out. A c-section is surgery in which your baby is born through a cut that your doctor makes in your belly and uterus (womb).

Opioid use during pregnancy is the most common cause of neonatal abstinence syndrome also called NAS. Neonatal abstinence syndrome is a group of conditions caused when a baby withdraws from certain drugs she’s exposed to in the womb before birth. If your baby has neonatal abstinence syndrome, breastfeeding may help make her symptoms less severe. This may help her need less medicine and be able to leave the hospital sooner. If your baby has neonatal abstinence syndrome, talk to your provider and your baby’s provider about breastfeeding and how to make sure it’s safe for your baby.

If you’re using prescription opioids with your doctor’s supervision, you can breastfeed depending on the opioid you take. Some opioids can cause life-threatening problems for your baby. Make sure the provider who prescribes you the opioid knows you’re breastfeeding, and take the medicine exactly as our provider tells you to. If you take any of these opioids, talk to your provider about switching to a safer medicine:

  • Codeine or medicines that contain codeine
  • Hydrocodone
  • Meperidine
  • Oxycodone
  • Tramadol

If you’re in treatment for opioid use disorder with medicines like methadone or buprenorphine (also called medication-assisted therapy or MAT or opioid-assisted therapy or OAT), you can breastfeed your baby if:

  • Your health is stable and you’re no longer misusing opioids or using street drugs, like cocaine or marijuana.
  • You don’t have HIV (stands for human immunodeficiency virus. HIV is the virus that causes AIDS (stands for acquired immunodeficiency syndrome).
  • Your treatment is closely supervised and monitored.
  • You have social support from friends and family throughout your treatment.
  • Your baby continues to gain weight as you breastfeed.

If you’re breastfeeding and taking tramadol, codeine or medicines that contain codeine, call your baby’s doctor or emergency services number right away if your baby:

  • Is sleepier than usual. Breastfed babies usually eat every 2 to 3 hours and shouldn’t sleep more than 4 hours at a time.
  • Is limp
  • Has trouble breathing
  • Has trouble breastfeeding

Are over-the-counter medicines safe to take when you’re breastfeeding?

Most over-the-counter also called OTC medicine, like pain relievers and cold medicine, are OK to take when you’re breastfeeding. For example, OTC pain relievers like ibuprofen (Advil®) or acetaminophen (Tylenol®) are safe to use when breastfeeding.

Here’s what you can do to help make sure an OTC medicine is safe for your baby:

  • Don’t take an OTC medicine during breastfeeding without talking to your provider first. If you take a medicine that’s not safe for your baby, your provider can recommend a safer one.
  • Read the label on the package for information about how an OTC drug may affect breastfeeding.
  • Take the smallest dose (amount) of medicine to help lessen the amount that gets passed to your baby in breast milk.
  • Don’t take medicine that is extra-strength, long-acting (you take it just once or twice a day) or multi-symptom (treats more than one symptom). These medicines may have larger doses that stay in your body and breast milk longer than medicines with smaller doses.
  • Tell your baby’s doctor if your baby has signs of reaction, like diarrhea, sleepiness, a change in eating, or crying more than usual.

What medical conditions make breastfeeding unsafe for your baby?

Breastfeeding may be harmful to a baby if:

  • Your baby has galactosemia. Babies with this genetic condition can’t digest the sugar in breast milk (or any kind of milk). They can have brain damage or even die if they eat or drink breast milk, milk or anything made with milk. Babies with galactosemia need to eat a special formula that is not made with milk of any kind. Your baby gets tested for this condition soon after birth as part of newborn screening.
  • You have human immunodeficiency virus (HIV). You can pass HIV to your baby through breast milk. Note: recommendations about breastfeeding and HIV may be different in other countries 6).
  • You have cancer and are getting treated with medicine or radiation.
  • You have human T-cell lymphotropic virus type I or type II 7). This is a virus that can cause blood cancer and nerve problems.
  • You have untreated, active tuberculosis. This is an infection that mainly affects the lungs.
  • You have Ebola, a rare but very serious disease that can cause heavy bleeding, organ failure and death. It’s spread by coming in contact with body fluids from a person who has the disease. A mother who has Ebola should not have close contact—including breastfeeding—with her baby. This can help keep her baby safe from the disease. While the virus has been found in breast milk, we don’t know for sure if you can pass Ebola to your baby through breast milk.
  • You are using an illicit street drug, such as PCP (phencyclidine) or cocaine1 (Exception: Narcotic-dependent mothers who are enrolled in a supervised methadone program and have a negative screening for HIV infection and other illicit drugs can breastfeed)

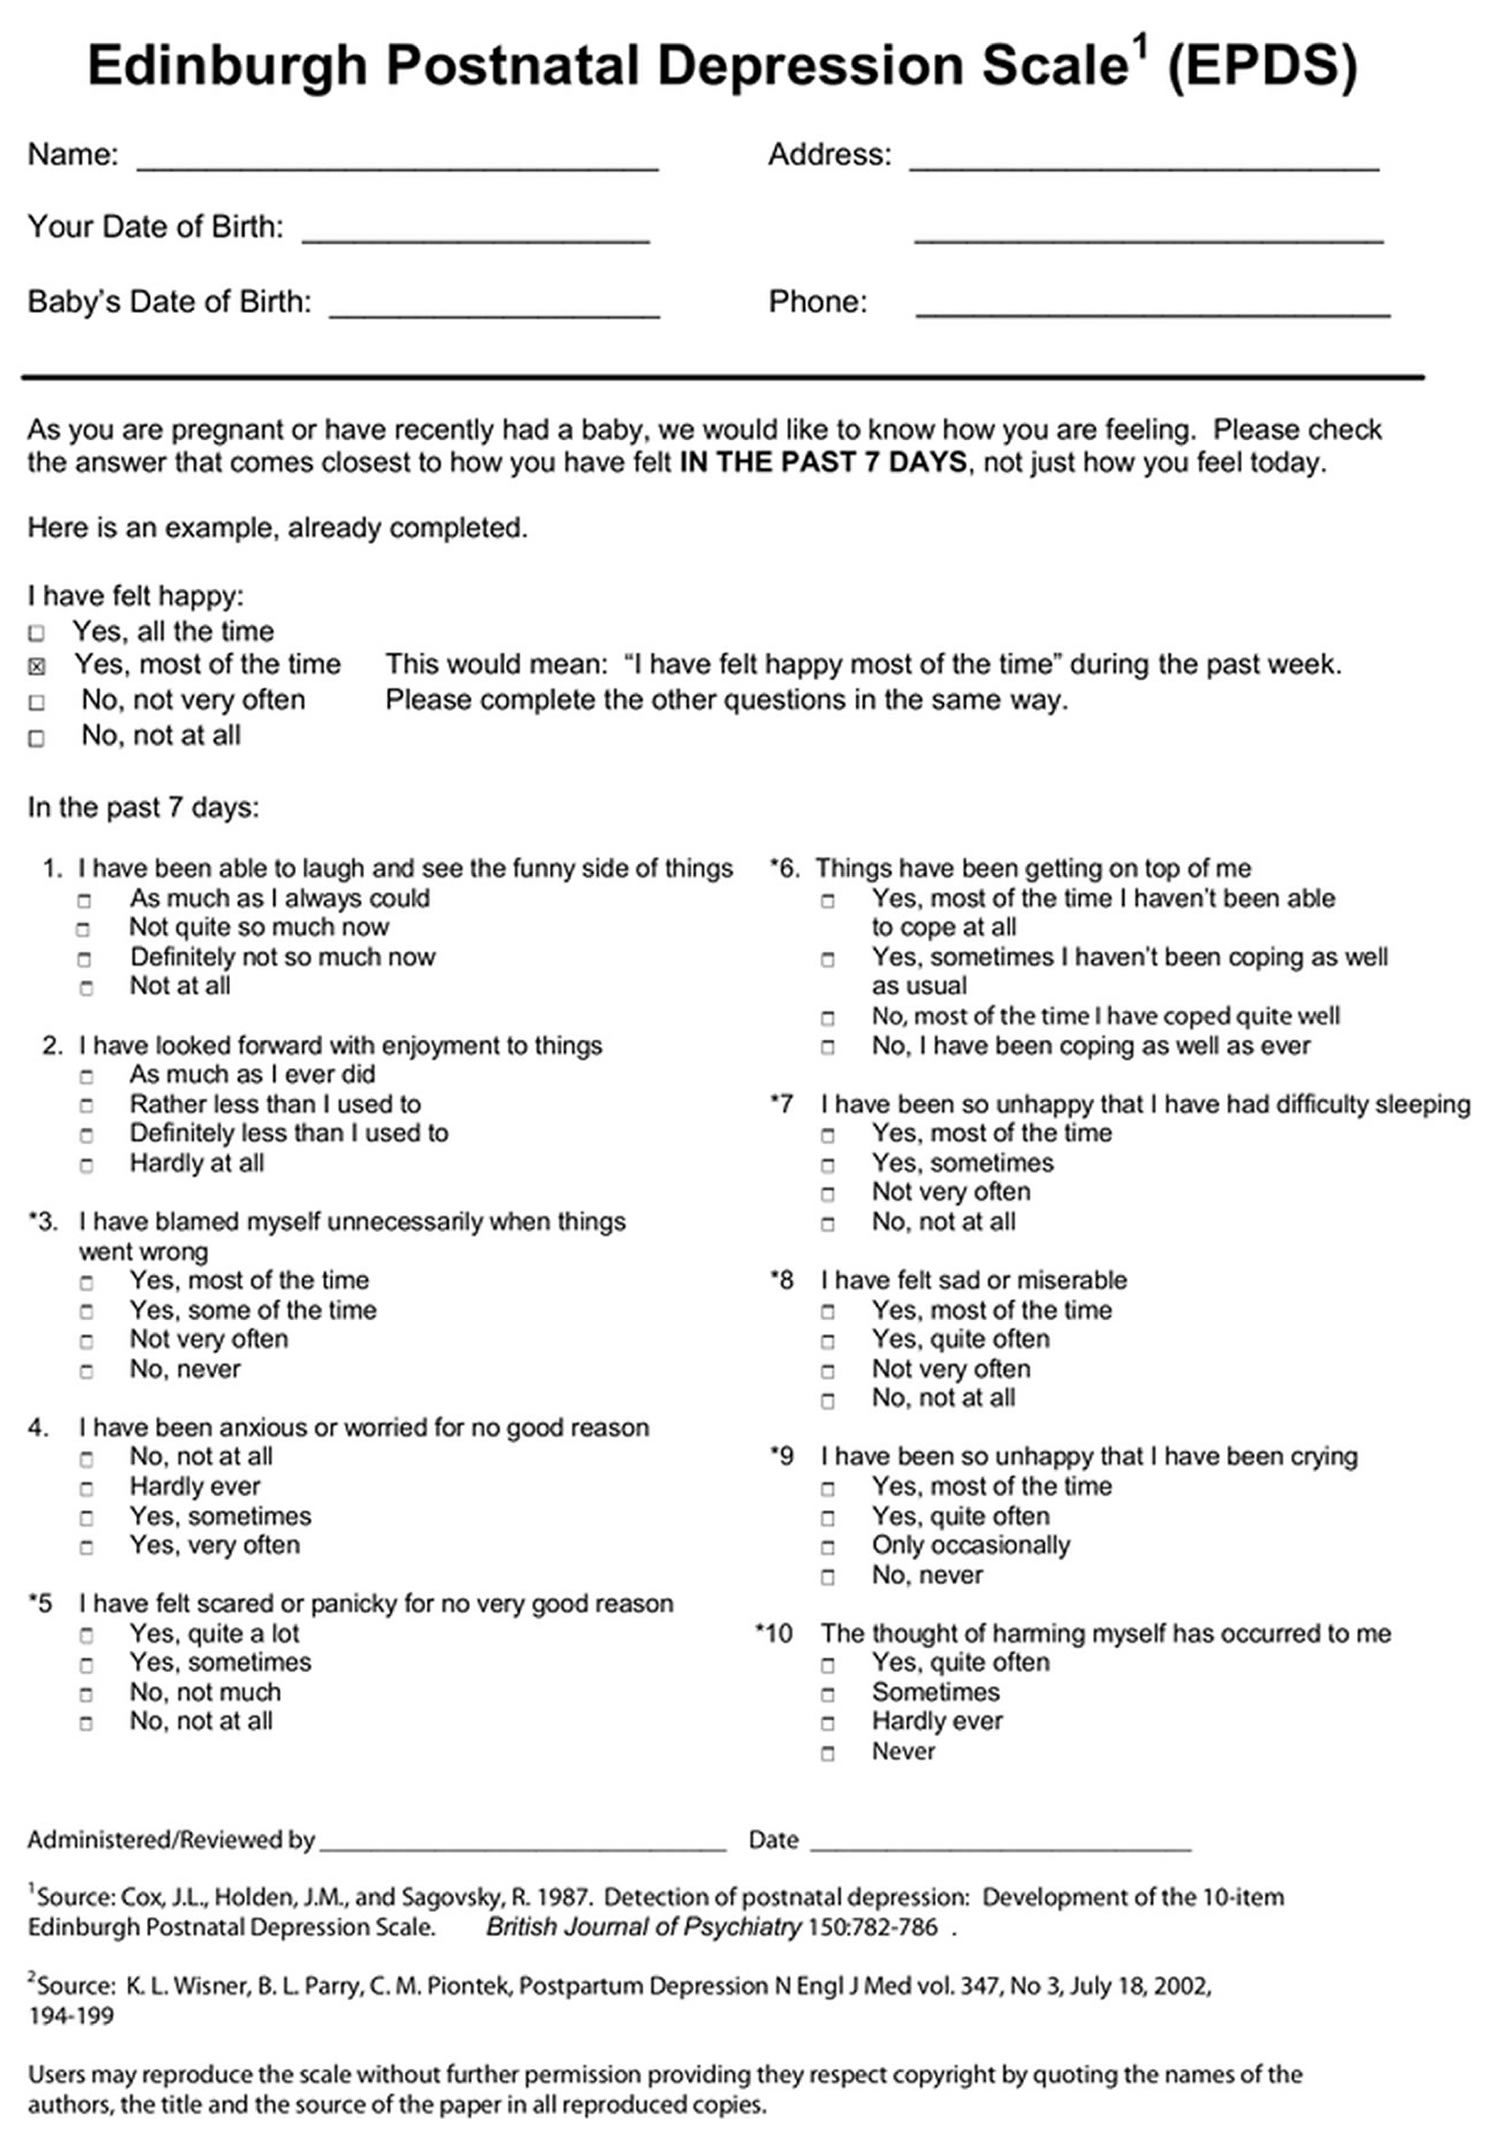
Mothers should temporarily NOT breastfeed and should NOT feed expressed breast milk to their infants if:

  • Mother is infected with untreated brucellosis 8).
  • Mother is taking certain medications 9).
  • The mother is undergoing diagnostic imaging with radiopharmaceuticals 10).
  • Mother has an active herpes simplex virus (HSV) infection with lesions present on the breast 11). Note: Mothers can breastfeed directly from the unaffected breast if lesions on the affected breast are covered completely to avoid transmission.

Mothers should temporarily NOT breastfeed, but CAN feed expressed breast milk if:

  • Mother has untreated, active tuberculosis 12). Note: The mother may resume breastfeeding once she has been treated appropriately for 2 weeks and is documented to be no longer contagious.
  • Mother has active varicella (chicken pox) infection that developed within the 5 days prior to delivery to the 2 days following delivery 13).

If you’ve had breast surgery or piercing, it’s most likely safe to breastfeed. Breast surgery includes getting implants, having a breast reduction or having a lump removed. Piercing means inserting jewelry into the breast, including nipple piercing. If you’ve had surgery or piercing, talk to your doctor or lactation consultant. A lactation consultant is a person with special training in helping women breastfeed.

If I’ve been exposed to lead, is it safe to breastfeed?

It depends on the amount of lead you have in your body. Lead is a metal that comes from the ground, but it can be in the air, water and food. You can’t see, smell or taste it. High levels of lead in your body called lead poisoning can cause serious health problems.

If you think you’ve been exposed to lead and are breastfeeding or planning to breastfeed, tell your provider. She can test your lead levels to see if breastfeeding is safe for your baby. If you have more than 40 micrograms/dL of lead in your system, it’s not safe to breastfeed. Pump your breast milk and throw it out until your lead levels are safe.

What are human milk banks?

Human milk banks are a service established for the purpose of collecting milk from donors and processing, screening, storing, and distributing donated milk to meet the specific needs of individuals for whom human milk is prescribed by licensed health care providers. When possible, human milk banks also serve healthy infants who have been adopted or are not able to get their own mother’s milk.

Is it safe for families to buy breast milk on the internet?

The American Academy of Pediatrics (https://www.aappublications.org/content/34/12/29.6) and the Food and Drug Administration (https://www.fda.gov/science-research/pediatrics/use-donor-human-milk) recommend avoiding Internet-based milk sharing sites and instead recommend contacting milk banks. Research 14) has demonstrated that some milk samples sold online have been contaminated with a range of bacteria.

Nonprofit donor human milk banks, where processed human milk comes from screened donors, have a long safety record in North America. All member banks of the Human Milk Banking Association of North America (HMBANA) must operate under specific evidence-based guidelines that require extensive testing and processing procedures as well as self-reported health information and a health statement from both the donor’s health care provider and the infant’s health care provider. Because most of the milk from milk banks is given to hospitalized and fragile infants, milk banks may not have enough to serve healthy infants at all times. To find a human milk bank, contact HMBANA (https://www.hmbana.org).

How to keep your breast pump clean

Germs can grow quickly in breast milk or breast milk residue that remains on pump parts. Following these steps can keep your breast pump clean and help protect your baby from these germs. If your baby was born prematurely or has other health concerns, your baby’s health care providers may have more recommendations for pumping breast milk safely.

Before each use:

  1. Wash hands. Wash your hands well with soap and water for 20 seconds.
  2. Assemble. Assemble clean pump kit. Inspect whether the pump kit or tubing has become moldy or soiled during storage. If your tubing is moldy, discard and replace immediately.
  3. Clean if using a shared pump.Clean pump dials, power switch, and countertop with disinfectant wipe.

After each use:

  1. Store milk safely. Cap milk collection bottle or seal milk collection bag, label with date and time, and immediately place in a refrigerator, freezer, or cooler bag with ice packs.
    If milk collection container will be stored at a hospital or childcare facility, add name to the label.
  2. Clean pumping area. Especially if using a shared pump, clean the dials, power switch, and countertop with disinfectant wipes.
  3. Take apart and inspect pump kit. Take apart breast pump tubing and separate all parts that come in contact with breast/breast milk for example, flanges, valves, membranes, connectors, and milk collection bottles.
  4. Rinse pump kit. Rinse breast pump parts that come into contact with breast/breast milk under running water to remove remaining milk
  5. Clean pump kit. As soon as possible after pumping, clean pump parts that come into contact with breast/breast milk in one of the following ways.
    1. Clean by hand.
      1. Use a wash basin. Place pump parts in a clean wash basin used only for washing infant feeding equipment. Do not place pump parts directly in the sink, because germs in sinks or drains could contaminate the pump.
      2. Add soap and water. Fill wash basin with hot water and add soap.
      3. Scrub. Scrub items according to pump kit manufacturer’s guidance. If using a brush, use a clean one that is used only to clean infant feeding items.
      4. Rinse. Rinse by holding items under running water, or by submerging in fresh water in a separate basin that is used only for cleaning infant feeding items.
      5. Dry. Allow to air-dry thoroughly. Place pump parts, wash basin, and bottle brush on a clean, unused dish towel or paper towel in an area protected from dirt and dust. Do not use a dish towel to rub or pat items dry because doing so may transfer germs to the items.
    2. Clean in a dishwasher (if recommended by pump kit manufacturer).
      1. Wash. Place disassembled pump parts in dishwasher. Be sure to place small items into a closed-top basket or mesh laundry bag so they don’t end up in the dishwasher filter. If possible, run the dishwasher using hot water and a heated drying cycle (or sanitizing setting); this can help kill more germs.
      2. Remove from dishwasher. Wash your hands with soap and water before removing and storing cleaned items. If items are not completely dry, place items on a clean, unused dish towel or paper towel to air-dry thoroughly before storing. Do not use a dish towel to rub or pat items dry because doing so may transfer germs to the items.
  6. Clean wash basin and bottle brush. If you use a wash basin or bottle brush when cleaning your pump parts, rinse them well and allow them to air-dry after each use. Consider washing them every few days, either in a dishwasher with hot water and a heated drying cycle, if they are dishwasher-safe, or by hand with soap and warm water.

For extra germ removal, sanitize pump parts at least once daily. Sanitizing is especially important if your baby is less than 3 months old, was born prematurely, or has a weakened immune system due to illness or medical treatment (such as chemotherapy for cancer). Daily sanitizing of pump parts may not be necessary for older, healthy babies, if the parts are cleaned carefully after each use. Sanitize all items (even the bottle brush and wash basin!) by using one of the following options.

Note: If you use a dishwasher with hot water and a heating drying cycle (or sanitizing setting) to clean infant feeding items, a separate sanitizing step is not necessary.

  1. Clean first. Pump parts, bottle brushes, and wash basins should be sanitized only after they have been cleaned.
  2. Sanitize. Sanitize the pump kit, bottle brushes, and wash basins using one of the following options. Check manufacturer’s instructions about whether items may be steamed or boiled.
    • Steam: Use a microwave or plug-in steam system according to the manufacturer’s directions.
    • Boil:
      • Place disassembled items that are safe to boil into a pot and cover with water.
      • Put the pot over heat and bring to a boil.
      • Boil for 5 minutes.
      • Remove items with clean tongs.
  3. Allow to air-dry thoroughly. Place sanitized pump parts, wash basin, and bottle brush on a clean, unused dish towel or paper towel in an area protected from dirt and dust. Do not use a dish towel to rub or pat items dry because doing so may transfer germs to the items.

Allow the clean pump parts, bottle brushes, and wash basins to air-dry thoroughly before storing to help prevent germs and mold from growing. Once completely dry, the items should be stored in a clean, protected area to prevent contamination during storage.

  • Wash hands. Wash hands well with soap and water.
  • Reassemble. Put together the clean, dry pump parts.
  • Store safely. Place reassembled pump kit in a clean, protected area such as inside an unused, sealable food storage bag. Store wash basins and bottle brushes in a clean area.

References   [ + ]

read more

Mastitis

mastitis

What is mastitis

Mastitis is a condition which causes a woman’s breast tissue to become painful and inflamed (swelling, warmth and redness) that can be caused by an infection, some type of obstruction, or an allergy. You also might have fever and chills. It’s most common in breastfeeding women, usually within the first three months after giving birth, although sometimes mastitis can occur in women who aren’t breast-feeding.

If mastitis is caused by breastfeeding, doctors may refer to it as lactation mastitis or puerperal mastitis. Non-breastfeeding women often have a type called periductal mastitis.

Mastitis can cause you to feel run down, making it difficult to care for your baby.

Sometimes mastitis leads a mother to wean her baby before she intends to, but continuing to breast-feed, even while taking an antibiotic for the mastitis, is better for you and your baby.

Figure 1. Normal breast (female)

Normal breast

Figure 2. Breast mastitis

Breast mastitis

Mastitis usually only affects one breast, and symptoms often develop quickly. Symptoms of mastitis can include:

  • a red, swollen area on your breast that may feel hot and painful to touch
  • a breast lump or area of hardness on your breast
  • a burning pain in your breast that may be continuous or may only occur when you are breastfeeding
  • nipple discharge, which may be white or contain streaks of blood

You may also experience flu-like symptoms, such as aches, a high temperature (fever), chills and tiredness.

When to see your doctor

See your doctor as soon as possible if you think you might have mastitis. It may help to try some self-help measures before your appointment.

It’s important to see your doctor promptly as mastitis could lead to a painful collection of pus (breast abscess), which may need to be drained surgically.

Mastitis causes

Breast-feeding is a learned skill, and poor technique can lead to milk being trapped in the breast, a main cause of mastitis.

Mastitis can be caused by a build-up of milk within the breast (milk stasis) or damage to the nipple, which may lead to a bacterial infection.

What causes mastitis

In breastfeeding women, mastitis is often caused by a build-up of milk within the breast. This is known as milk stasis.

Milk stasis can occur for a number of reasons, including:

  • a baby not properly attaching to the breast during feeding
  • a baby having problems sucking
  • infrequent feeds or missing feeds

In some cases, this build-up of milk can also become infected with bacteria. This is known as infective mastitis.

In non-breastfeeding women, mastitis most often occurs when the breast becomes infected as a result of damage to the nipple, such as a cracked or sore nipple, or a nipple piercing.

Mastitis in breastfeeding

Milk stasis

Many cases of mastitis in breastfeeding women are thought to be caused by milk stasis. This occurs when the milk isn’t properly removed from your breast during breastfeeding.

It can be caused by:

  • a baby not properly attaching to the breast during feeding – this may mean that not enough milk is removed; see breastfeeding position and attachment for advice on helping your child feed correctly
  • a baby having problems sucking – for example, because they have a tongue-tie, a piece of skin between the underside of their tongue and the floor of their mouth
  • infrequent or missed feeds – for example, when they start to sleep through the night
  • favoring one breast for breastfeeding – for example, because one of your nipples is sore; this can lead to milk stasis developing in the other breast
  • a knock or blow to the breast that damages the milk duct or the glands in your breast
  • pressure on your breast – for example, from tight-fitting clothing (including bras), seat belts or sleeping on your front

Milk stasis can cause the milk ducts in your breasts to become blocked, and can cause milk to build up within the affected breast.

Experts aren’t sure exactly why breast milk can cause the breast tissue to become inflamed. One theory is that the pressure building up inside the breast forces some milk into the surrounding tissue.

Your immune system may then mistake proteins in the milk for a bacterial or viral infection and responds by inflaming the breast tissue in an effort to stop the spread of infection.

Infection

Fresh human milk doesn’t usually provide a good environment in which bacteria can breed. However, milk stasis can cause milk to stagnate and become infected. This is known as infective mastitis.

Exactly how bacteria enter the breast tissue hasn’t been conclusively proven.

The bacteria that usually live harmlessly on the skin of your breast may enter through a small crack or break in your skin, or bacteria present in the baby’s mouth and throat may be transferred during breastfeeding.

You may be at greater risk of developing infective mastitis if your nipple is damaged – for example, as a result of using a manual breast pump incorrectly or because your baby has a cleft lip or palate, an opening or split in their lip or roof of their mouth.

Mastitis in breastfeeding women is more likely to be caused by an infection if self-help measures to express milk from the affected breast haven’t improved symptoms within 12 to 24 hours.

Mastitis non-breastfeeding

In women who don’t breastfeed, mastitis is often caused by a bacterial infection. This can occur as a result of bacteria getting into the milk ducts through a cracked or sore nipple, or a nipple piercing.

This type of mastitis is known as periductal mastitis. It usually affects women in their late 20s and early 30s, and is more common among women who smoke.

Occasionally, mastitis can occur in non-breastfeeding women as a result of duct ectasia. This is when the milk ducts behind the nipple get shorter and wider as the breasts age. It typically occurs in women approaching the menopause.

Duct ectasia is usually nothing to be concerned about, but in some cases a thick, sticky secretion can collect in the widened ducts, and this can irritate and inflame the duct lining.

Risk factors for mastitis

Risk factors for mastitis include:

  • Breast-feeding during the first few weeks after childbirth
  • Sore or cracked nipples, although mastitis can develop without broken skin
  • Using only one position to breast-feed, which may not fully drain your breast
  • Wearing a tightfitting bra or putting pressure on your breast from using a seatbelt or carrying a heavy bag, which may restrict milk flow
  • Becoming overly tired or stressed
  • Previous bout of mastitis while breast-feeding
  • Poor nutrition

Mastitis complications

If mastitis isn’t adequately treated, or it’s related to a blocked duct, a collection of pus (abscess) can develop in your breast and form a breast mass or area of firmness with thickening. An abscess usually requires surgical drainage. To avoid this complication, talk to your doctor as soon as you develop signs or symptoms of mastitis.

How to prevent mastitis

Although mastitis can usually be treated easily, the condition can recur if the underlying cause isn’t addressed.

If you’re breastfeeding, you can help reduce your risk of developing mastitis by taking steps to stop milk building up in your breasts, such as:

  • breastfeed exclusively for around six months, if possible
  • encourage your baby to feed frequently, particularly when your breasts feel overfull
  • ensure your baby is well attached to your breast during feeds – ask for advice if you’re unsure
  • let your baby finish their feeds – most babies release the breast when they’ve finished feeding; try not to take your baby off the breast unless they’re finished
  • avoid suddenly going longer between feeds – if possible, cut down gradually
  • avoid pressure on your breasts from tight clothing, including bras

Your doctor, midwife or health visitor can advise about how to improve your breastfeeding technique.

How to breastfeed

If breastfeeding feels a bit awkward at first, don’t worry. Breastfeeding is a skill that you and your baby learn together, and it can take time to get used to.

In the first few days, you and your baby will be getting to know each other. It may take time for both of you to get the hang of breastfeeding.

This happens more quickly for some women than others. But nearly all women produce enough milk for their baby.

Having skin-to-skin contact with your baby straight after the birth will help to keep them warm and calm, and steady their breathing.

Skin to skin means holding your baby naked or dressed only in a nappy against your skin, usually under your top or under a blanket.

Skin-to-skin time can be a bonding experience for you and your baby. It’s also a great time to have your first breastfeed. If you need any help, your midwife will support you with positioning and attachment.

Skin-to-skin contact is good at any time. It will help to comfort you and your baby over the first few days and weeks as you get to know each other. It also helps your baby attach to your breast using their natural crawling and latching on reflexes.

If skin-to-skin contact is delayed for some reason – for example, if your baby needs to spend some time in special care – it doesn’t mean you won’t be able to bond with or breastfeed your baby.

If necessary, your midwife will show you how to express your breast milk until your baby is ready to breastfeed. They will also help you have skin-to-skin contact with your baby as soon as it’s possible.

There are lots of different positions you can use to breastfeed. You just need to check the following points:

  • Are you comfortable? It’s worth getting comfortable before a feed. Use pillows or cushions if necessary. Your shoulders and arms should be relaxed.
  • Are your baby’s head and body in a straight line? (It’s hard for your baby to swallow if their head and neck are twisted.)
  • Are you holding your baby close to you, facing your breast? Supporting their neck, shoulders and back should allow them to tilt their head back and swallow easily.
  • Always bring your baby to the breast rather than leaning forward to ‘post’ your breast into your baby’s mouth, as this can lead to poor attachment.
  • Your baby needs to get a big mouthful of breast. Placing your baby with their nose level with your nipple will encourage them to open their mouth wide and attach to the breast well.
  • Avoid holding the back of your baby’s head, so that they can tip their head back. This way your nipple goes past the hard roof of their mouth and ends up at the back of their mouth against the soft palate.

Colostrum: your first milk

The fluid your breasts produce in the first few days after birth is called colostrum. It’s usually a golden yellow color. It’s a very concentrated food, so your baby will only need about a teaspoonful at each feed.

Your baby may want to feed quite often, perhaps every hour to begin with. They’ll begin to have fewer, longer feeds once your breasts start to produce more “mature” milk after a few days.

The more you breastfeed, the more your baby’s sucking will stimulate your supply and the more milk you’ll make.

Your let-down reflex

Your baby’s sucking causes milk stored in your breasts to be squeezed down ducts towards your nipples. This is called the let-down reflex.

Some women get a tingling feeling, which can be quite strong. Others feel nothing at all.

You’ll see your baby respond when your milk lets down. Their quick sucks will change to deep rhythmic swallows as the milk begins to flow. Babies often pause after the initial quick sucks while they wait for more milk to be delivered.

Occasionally this let-down reflex can be so strong that your baby coughs and splutters. Your midwife, health visitor or breastfeeding supporter can help with this, or see some tips for when you have too much breast milk.

If your baby seems to be falling asleep before the deep swallowing stage of feeds, they may not be properly attached to the breast. Ask your midwife, health visitor or breastfeeding supporter to check your baby’s positioning and attachment.

Sometimes you’ll notice your milk letting down in response to your baby crying or when you have a warm bath or shower. This is normal.

Building up your milk supply

Around two to four days after birth you may notice that your breasts become fuller and warmer. This is often referred to as your milk “coming in”.

Your milk will vary according to your baby’s needs. Each time your baby feeds, your body knows to make more milk for the next feed. The amount of milk you make will increase or decrease depending on how often your baby feeds.

In the early weeks, “topping up” with formula milk or giving your baby a dummy can lower your milk supply.

Feed your baby as often as they want and for as long as they want. This is called responsive feeding. In other words, responding to your baby’s needs. It’s also known as on-demand or baby-led feeding.

In the beginning, it can feel like you’re doing nothing but feeding. But gradually you and your baby will get into a pattern, and the amount of milk you produce will settle down.

It’s important to breastfeed at night because this is when you produce more hormones (prolactin) to build up your milk supply.

Ways to boost your breast milk supply

  • Ask your midwife, health visitor or breastfeeding specialist to watch your baby feeding. They can offer guidance and support to help you properly position and attach your baby to the breast.
  • Avoid giving your baby bottles of formula or a dummy until breastfeeding is well established. This usually takes a few weeks.
  • Feed your baby as often as you and they want to.
  • Expressing some breast milk after feeds once breastfeeding is established will help build up your supply.
  • Offer both breasts at each feed and alternate which breast you start with.
  • Keep your baby close to you and hold them skin to skin. This will help you spot signs your baby is ready to feed early on, before they start crying.

In rare cases, women may need to take a drug to help them produce more milk, but this isn’t usually necessary.

How to latch your baby on to your breast

  1. Hold your baby close to you with their nose level with the nipple.
  2. Wait until your baby opens their mouth really wide with their tongue down. You can encourage them to do this by gently stroking their top lip.
  3. Bring your baby on to your breast.
  4. Your baby will tilt their head back and come to your breast chin first. Remember to support your baby’s neck but not hold the back of their head. They should then be able to take a large mouthful of breast. Your nipple should go towards the roof of their mouth.

Step by Step Guide in Getting your baby into position

Breastfeeding – Step 1. Hold your baby’s whole body close with their nose level with your nipple.

Breastfeeding - Step 1

Breastfeeding – Step 2. Let your baby’s head tip back a little so that their top lip can brush against your nipple. This should help your baby to make a wide open mouth.

Breastfeeding - Step 2

Breastfeeding – Step 3. When your baby’s mouth opens wide, their chin should be able to touch your breast first, with their head tipped back so that their tongue can reach as much breast as possible.

Breastfeeding – Step 3

Breastfeeding – Step 4. With your baby’s chin firmly touching your breast and their nose clear, their mouth should be wide open. You should see much more of the darker nipple skin above your baby’s top lip than below their bottom lip. Your baby’s cheeks will look full and rounded as they feed.

Breastfeeding - Step 4

Signs your baby is well attached to your breast

  • Your baby has a wide mouth and a large mouthful of breast.
  • Your baby’s chin is touching your breast, their lower lip is rolled down (you can’t always see this) and their nose isn’t squashed against your breast.
  • You don’t feel any pain in your breasts or nipples when your baby is feeding, although the first few sucks may feel strong.
  • You can see more of the dark skin around your nipple (areola) above your baby’s top lip than below their bottom lip.

How to tell if your baby is getting enough milk

  • Your baby will appear content and satisfied after most feeds.
  • They should be healthy and gaining weight (although it’s normal for babies to lose a little weight in the first days after birth). Talk to your midwife or health visitor if you are concerned your baby is not gaining weight and is unsettled during or after breast feeds.
  • After the first few days, your baby should have at least six wet nappies a day.
  • After the first few days, they should also pass at least two soft yellow poos (stools) every day.

How often you should feed your baby

How often babies feed varies. As a very rough guide, your baby should feed at least eight times or more every 24 hours during the first few weeks.

It’s fine to feed your baby whenever they are hungry, when your breasts feel full or if you just want to have a cuddle.

It’s not possible to overfeed a breastfed baby.

When your baby is hungry they may:

  • get restless
  • suck their fist or fingers
  • make murmuring sounds
  • turn their head and open their mouth (rooting)

It’s best to try and feed your baby during these early feeding cues as a crying baby is difficult to feed.

How to tell if your baby is getting enough milk

When you first start breastfeeding, you may be concerned your baby is not getting enough milk. You can’t always tell how much a breastfed baby is drinking.

It’s very rare that women don’t make enough breast milk for their babies, but it may take a little while before you feel confident your baby is getting what they need.

Your baby will generally let you know, but wet and dirty nappies are a good indication, as well as hearing your baby swallow.

If you need some reassurance your baby is getting enough milk, it’s a good idea to get a midwife, health visitor or breastfeeding specialist to watch your baby feed.

Try to carry on breastfeeding if you can. Introducing bottles of formula milk can fill up your baby’s stomach so they no longer want to breastfeed as frequently. This then reduces the stimulation for you to make more milk.

Signs your baby is getting enough milk

  • Your baby starts feeds with a few rapid sucks followed by long, rhythmic sucks and swallows with occasional pauses.
  • You can hear and see your baby swallowing.
  • Your baby’s cheeks stay rounded, not hollow, during sucking.
  • They seem calm and relaxed during feeds.
  • Your baby comes off the breast on their own at the end of feeds.
  • Their mouth looks moist after feeds.
  • Your baby appears content and satisfied after most feeds.
  • Your breasts feel softer after feeds.
  • Your nipple looks more or less the same after feeds – not flattened, pinched or white.
  • You may feel sleepy and relaxed after feeds.

Other signs your baby is feeding well

  • Your baby gains weight steadily after the first two weeks – it’s normal for babies to lose some of their birth weight in the first two weeks.
  • They appear healthy and alert when they’re awake.
  • From the fourth day, they should do at least two soft, yellow poos (stools) every day for the first few weeks.
  • From day five onwards, wet nappies should start to become more frequent, with at least six heavy, wet nappies every 24 hours. In the first 48 hours, your baby is likely to have only two or three wet nappies.

It can be hard to tell if disposable nappies are wet. To get an idea, take a nappy and add two to four tablespoons of water. This will give you an idea of what to look and feel for.

Things that can affect your milk supply

  • Poor attachment and positioning.
  • Not feeding your baby often enough.
  • Drinking alcohol and smoking while breastfeeding – these can both interfere with your milk production.
  • Previous breast surgery, particularly if your nipples have been moved.
  • Having to spend time away from your baby after the birth – for example, because they were premature: Frequent gentle hand expression will help.
  • Illness in you or your baby.
  • Giving your baby bottles of formula or a dummy before breastfeeding is well established.
  • Using nipple shields – although this may be the only way to feed your baby with damaged nipples and is preferable to stopping feeding.
  • Some medications, including dopamine, ergotamine and pyridoxine.
  • Anxiety, stress or depression.
  • Your baby having a tongue tie that restricts the movement of their tongue.

With skilled help, lots of these problems can be sorted out. If you have concerns about how much milk your baby is getting, it’s important to ask for help early. Speak to your midwife, health visitor or a breastfeeding specialist. They can also tell you where you can get further support.

What medicines can I take while I’m breastfeeding?

Medicines that can be taken while breastfeeding include:

  • most antibiotics
  • common painkillers, such as paracetamol and ibuprofen – but not aspirin
  • asthma inhalers
  • vitamins – but only at the recommended dose

You can use some methods of contraception and some cold remedies, but not all.

Always check with your doctor, midwife, health visitor or pharmacist, who can advise you.

It’s fine to have dental treatments, local anesthetics, vaccinations – including MMR, tetanus and flu injections – and most operations.

Common drugs that are NOT recommended when you’re breastfeeding include:

  • codeine phosphate – used to control diarrhea
  • nasal decongestants – but simple salt water drops are fine
  • aspirin for pain relief – although you can take it if your doctor prescribes it for you as an anti-platelet drug

Talk to you doctor or pharmacist before taking antihistamines for allergies or allergy-related conditions, such as hay fever.

The most comprehensive, up-to-date source of information regarding the safety of maternal medications when the mother is breastfeeding is LactMed (https://toxnet.nlm.nih.gov/newtoxnet/lactmed.htm), an Internet-accessed source published by the National Library of Medicine/National Institutes of Health. In general, breastfeeding is not recommended when mothers are receiving medication from the following classes of drugs: amphetamines, chemotherapy agents, ergotamines, and statins.

It’s dangerous to take illegal drugs while you’re breastfeeding. They can affect your ability to look after your baby safely, and reach your baby via your breast milk.

The long-term effects on babies if you use illegal drugs while breastfeeding aren’t known. Talk to your midwife, health visitor or doctor if you’re using them.

Breastfeeding your premature baby

Your breast milk is important to your baby at any age. Research shows that giving your premature baby your breast milk benefits their health as well as yours.

Among other things, your breast milk:

  • helps protect your baby from infections, particularly of their gut (premature babies are more prone to these)
  • contains hormones, nutrients and growth factors that help your baby to grow and develop
  • is easier for your baby to digest than formula milk, because it’s human milk specially designed by your body for your baby

If your baby is too small or sick to breastfeed, you’ll need to start regularly expressing your breast milk soon after they’re born to get your milk supply going. Then you can start breastfeeding once you and your baby are ready.

Even if you weren’t planning to breastfeed, you could express your breast milk for a while and see how it goes.

Spending lots of time close together can help boost your breast milk supply and establish breastfeeding.

As soon as possible, you’ll be encouraged to spend time holding your baby against your skin. This is sometimes called kangaroo care.

Your baby will be dressed just in a nappy and then placed inside your top or under a blanket so they can be held securely against your skin.

This skin-to-skin contact helps you feel close to your baby. Your partner can enjoy this kind of contact as well.

For your premature baby, skin-to-skin contact:

  • reduces stress and/or pain
  • promotes healthy weight gain
  • helps to establish breastfeeding
  • helps them adapt to their environment
  • helps to regulate and support their heart rate and breathing

For mums, skin-to-skin contact:

  • helps prevent postnatal depression
  • increases your confidence as a new parent
  • supports the hormones that help with breast milk production and supply

For dads, holding your baby skin to skin:

  • helps you bond with your baby – babies can hear both parents’ voices in the womb and will be calmed by the sound of your voice as well as their mum’s
  • helps you feel more confident as a parent

Expressing milk if your baby is premature

Always ask for help early if you have any worries or questions.

It’s recommended you express eight to 10 times a day to begin with, including at least once at night, to keep your milk supply up.

In the early days, it’s often easier to express your milk by hand. Your midwife or a breastfeeding supporter can show you how.

You’ll probably only express a few drops to begin with but, if you hand express often, this will increase.

In the early days you can collect your breast milk in a small, sterile cup and store it in a syringe. Every drop is beneficial for your baby.

Once you are producing more milk, you could try using a breast pump. If your baby is in a neonatal unit, the hospital will usually be able to lend you an electric breast pump for expressing your milk. If they can’t lend you one, you can hire one.

Dealing with leaking breasts

Sometimes, breast milk may leak unexpectedly from your nipples. Press the heel of your hand gently but firmly on your breast when this happens.

Wearing breast pads will stop your clothes becoming wet with breast milk. Remember to change them frequently to prevent any infection.

Expressing some milk may also help. Only express enough to feel comfortable as you don’t want to overstimulate your supply.

If your baby hasn’t fed recently you could offer them a feed as breastfeeding is also about you being comfortable.

Mastitis signs and symptoms

With mastitis, signs and symptoms can appear suddenly and may include:

  • Breast tenderness or warmth to the touch
  • Generally feeling ill (malaise)
  • Breast swelling
  • Pain or a burning sensation continuously or while breast-feeding
  • Skin redness, often in a wedge-shaped pattern
  • Fever of 101 °F (38.3 °C) or greater

Although mastitis usually occurs in the first several weeks of breast-feeding, it can happen anytime during breast-feeding. Lactation mastitis tends to affect only one breast.

In most cases, you’ll feel ill with flu-like symptoms for several hours before you recognize that your breast has an area of tenderness and redness. As soon as you recognize this combination of signs and symptoms, it’s time to contact your doctor.

Breast mastitis diagnosis

Your doctor can often diagnose mastitis based on your symptoms and an examination of your breasts.

If you’re breastfeeding, they may ask you to show them how you breastfeed. Try not to feel as if you’re being tested or blamed – it can take time and practice to breastfeed correctly.

Your doctor may request a small sample of your breast milk for testing if:

  • your symptoms are particularly severe
  • you’ve had recurrent episodes of mastitis
  • you’ve been given antibiotics and your condition hasn’t improved

This will help determine whether you have a bacterial infection and allow your doctor to prescribe an effective antibiotic.

If you have mastitis and aren’t breastfeeding, your doctor should refer you to hospital for a specialist examination and a breast scan to rule out other conditions, particularly if your symptoms haven’t improved after a few days of treatment.

A rare form of breast cancer — inflammatory breast cancer — also can cause redness and swelling that could initially be confused with mastitis. Your doctor may recommend a diagnostic ultrasound scan and a mammogram (X-ray of the breast). If your signs and symptoms persist even after you complete a course of antibiotics, you may need a biopsy to make sure you don’t have breast cancer.

Mastitis treatment

Mastitis can usually be easily treated and most women make a full recovery very quickly.

Home remedies for mastitis

Many cases of mastitis that aren’t caused by an infection often improve through using self-care techniques, such as:

  • Continue to breast-feed as often and as long as your baby is hungry
  • Making sure you get plenty of rest, preferably in bed with your baby, which will encourage frequent feedings
  • Drinking plenty of fluids
  • Avoid prolonged overfilling of your breast with milk (engorgement) before breast-feeding
  • Using over-the-counter painkillers such as paracetamol (acetaminophen) or ibuprofen to reduce any pain or fever – a small amount of paracetamol can enter the breast milk, but it’s not enough to harm your baby (it’s not safe to take aspirin while breastfeeding)
  • Avoiding tight-fitting clothing, including bras, until your symptoms improve
  • Wear a supportive bra
  • If you’re breastfeeding, regularly expressing milk from your breasts
  • Placing a warm cloth soaked with warm water (a compress) over your breast to help relieve the pain – a warm shower or bath may also help
  • Vary your breast-feeding positions
  • If breast-feeding on the infected breast is too painful or your infant refuses to nurse on that breast, try pumping or hand-expressing milk.

Breastfeeding your baby when you have mastitis, even if you have an infection, won’t harm your baby and can help improve your symptoms.

It may also help to feed more frequently than usual, express any remaining milk after a feed, and express milk between feeds.

For non-breastfeeding women with mastitis and breastfeeding women with a suspected infection, a course of antibiotic tablets will usually be prescribed to bring the infection under control.

Expressing breast milk

If you’re breastfeeding and you have mastitis, it’s likely to be caused by a build-up of milk within the affected breast. Regularly expressing milk from your breast can often help improve the condition quickly.

One of the best ways to express milk from your breast is to continue breastfeeding your baby, or expressing milk by hand or using a pump. Continuing to breastfeed your baby won’t harm them, even if your breast is also infected.

The milk from the affected breast may be a little saltier than normal, but it’s safe for your baby to drink. Any bacteria present in the milk will be harmlessly absorbed by the baby’s digestive system and won’t cause any problems.

You may find that expressing breast milk becomes easier by:

  • breastfeeding your baby as often and as long as they’re willing to feed, starting feeds with the sore breast first
  • making sure your baby is properly positioned and attached to your breasts – your midwife or health visitor will advise you about how to do this
  • experimenting by feeding your baby in different positions
  • massaging your breast to clear any blockages – stroke from the lumpy or tender area towards your nipple to help the milk flow
  • warming your breast with warm water – this can soften it and help your breast milk flow better, making it easier for your baby to feed
  • making sure your breast is empty after feeds by expressing any remaining milk
  • if necessary, expressing milk between feeds – see expressing breast milk for more information

Contact your doctor if your symptoms worsen or don’t improve within 12 to 24 hours of trying these techniques. If this happens, it’s likely that you have an infection and will need antibiotics.

Antibiotics

If you’re breastfeeding and the above measures haven’t helped improve your symptoms, or your doctor can see your nipple is clearly infected, you’ll be prescribed a course of antibiotics to kill the bacteria responsible. These should be taken in addition to continuing the self-help measures above.

Your doctor will also usually prescribe a course of antibiotics if you develop mastitis and aren’t breastfeeding.

If you’re breastfeeding, your doctor will prescribe a safe antibiotic. This will usually be a tablet or capsule that you take by mouth (orally) four times a day for up to 14 days.

A very small amount of the antibiotic may enter your breast milk, which may make your baby irritable and restless. Their stools may become looser and more frequent.

This is usually temporary and will resolve once you’ve finished the course of antibiotics. They don’t pose a risk to your baby.

Contact your doctor again if your symptoms worsen or haven’t begun to improve within 48 hours of starting antibiotic treatment.

Surgery

Surgery to remove one or more of your milk ducts may be recommended in some cases in non-breastfeeding women that recur frequently or persist despite treatment.

This operation is usually performed with a general anesthetic where you’re asleep, and lasts about 30 minutes. Most people can go home the same day as the procedure or the day after.

If all of the milk ducts in one of your breasts are removed during this operation, you’ll no longer be able to breastfeed using that breast. You may also lose some sensation in the nipple of the treated breast(s).

Make sure you discuss all the risks and implications of surgery with your doctor and surgeon beforehand.

read more

Nursing strike

nursing strike

Baby nursing strike

Baby nursing strike also known as baby’s breast refusal or breastfeeding strike, is a baby’s refusal to suck at the breast is a most distressing problem and worrying problem for breastfeeding mothers 1). Some mothers might take nursing strike personally and believe her child is refusing her and not the breast milk. She might also think that there is something missing from her milk and it’s insufficient for her child 2). In fact a common reason for cessation of nursing is infant’s refusal to breastfeed. But this problem can often be overcome 3). A baby may refuse the breast at some or all feedings, at any age, and his reasons for doing so will vary with his stage of development or even his health at the time. He may suck for a few minutes, then break away with signs of distress and refuse to continue. He may refuse even to begin sucking although he is obviously hungry.

Most breast refusal is temporary and in most cases it should not be too long before your baby is again breastfeeding happily. Sometimes you may never discover why he did refuse. However, there are some babies who cannot be persuaded to return to the breast. If that is the case for you, it is important to remember that your baby is not rejecting you and that you will soon find other ways of relating to each other.

Sometimes, a baby does not actually refuse but is very fussy and difficult to feed. He may be the kind of baby who seems to be very unwilling to start sucking and takes a long time to get going, but once he has started, feeds well. A fussy baby can seem to receive little satisfaction from feeding. He sucks for a short while and then breaks away, finishing his feed after a series of stops and starts. He may be easily distracted and restless during the feed, perhaps pushing away from his mother with his fists or his feet. He stops as soon as his hunger is satisfied and may remain restless and fidgety afterwards.

When managing a picky feeder or a baby who is refusing to breastfeed, it is important to remain calm and patient, handling your baby gently. If you are both on edge, try taking deep breathes similar to that which you may have used during labor or when trying to calm or meditate. The deep breathing helps slow your own breathing and make it more regular which can help calm everyone, concentrate on staying relaxed, use soothing music, rock your baby gently or carry him around. This relaxation will help your milk flow readily so your baby will get milk once he latches on.

If your baby is quite unsettled, cross or crying or if you are feeling angry and upset, you may find it helps to try again when you are both feeling calmer. In the meantime a cuddle or a game may distract your baby or a walk outside may relax you both. This is the time when your partner (or a friend or relative) may be able to step in and give you both a break.

Normal nursing strike is defined as a baby who is contented and healthy and getting sufficient breastmilk for her/his needs. However, if you are still worried, you may find it comforting to have your baby checked thoroughly by your doctor.

Mother-to-mother breastfeeding support

Search the internet for a breastfeeding center near you. These centers may offer support groups. Some resources include:

  • Nursing Mothers Advisory Council (https://nursingmoms.net)
  • Breastfeeding USA (https://breastfeedingusa.org)
  • La Leche League International (https://www.llli.org) to find a local La Leche League International support group.
  • International Board Certified Lactation Consultants (https://ilca.org). International Board Certified Lactation Consultants are certified breastfeeding professionals with the highest level of knowledge and skill in breastfeeding support. International Board Certified Lactation Consultants help with a wide range of breastfeeding concerns. To earn the International Board Certified Lactation Consultant certification, candidates must have a medical or health-related education and breastfeeding-specific education and experience. They must also pass a challenging exam.

How many feeds does my baby need in 24 hours?

The number of feeds your baby needs changes as she/he grows older. A very young baby commonly needs eight to twelve breastfeeds in 24 hours, but there is a wide variation in the number of feeds an older baby needs. There is a big difference between a four-month-old who refuses one or two feeds in eight, and a baby of the same age who refuses four out of five feeds.

Regardless of the number of feeds she has, signs that your baby is getting enough breastmilk include if she has, over 24 hours, regular soft bowel motions, at least six to eight pale, very wet cloth nappies, or at least five heavy wet disposable nappies with pale, odorless urine. Check with your medical adviser if your baby’s urine is dark and has a strong smell. She is being adequately nourished if she is reasonably contented, looks alert, has bright eyes and good skin color and muscle tone and has some weight gains.

How do I know if my baby is getting enough breastmilk?

If your baby shows the following signs then it is likely that you do have enough milk:

  • At least 6 very wet cloth nappies or at least 5 very wet disposable nappies in 24 hours. The urine should be odorless and clear/very pale in color. Strong, dark urine suggest that the baby needs more breastmilk and you should seek medical advice.
  • A young baby will usually have 3 or more soft or runny bowel movements each day for several weeks. An older baby is likely to have fewer bowel movements than this. Formed bowel motions suggest that the baby needs more breastmilk and you should seek medical advice.
  • Some weight gain and growth in length and head circumference.
  • Good skin color and muscle tone. Does she look like she fits her skin? If you gently ‘pinch’ her skin, it should spring back into place.
  • Your baby is alert and reasonably contented and does not want to feed constantly. It is however normal for babies to have times when they feed more frequently. It is also normal for babies to wake for night feeds. Some babies sleep through the night at an early age while others wake during the night for some time.

A newborn’s nappies

Wide variation exists in what is seen in a newborn’s nappies. The following gives a general guide as to what might be seen.

The first bowel motions a baby has are black and sticky. This is from the meconium present in the baby’s digestive tract before birth. By day 2, the bowel motions should be softer but still dark in colour. Over the next few days, the bowel motions change to a greenish-brown and then to a mustard-yellow. As the colour changes they become less sticky and larger in volume.

A baby should have at least 1 wet nappy on day one, at least 2 on day two, at least 3 on day three, at least 4 on day four and at least 5 on day five. From day 5 onwards, the information above is relevant.

Over the first few days, salts of uric acid in your baby’s wee may leave a rusty, orange-red stain on the nappy. This is normal during this time. If you see this after day 4, consult your doctor.

My baby is suddenly refusing to nurse. Does that mean it’s time to wean?

A baby who is truly ready to wean will almost always do so gradually, over a period of weeks or months. If your baby or toddler has been breastfeeding well and suddenly refuses to nurse, it is probably what is called a “nursing strike,” rather than a signal that it’s time to wean. Nursing strikes can be frightening and upsetting to both you and your baby, but they are almost always temporary. Most nursing strikes are over, with the baby back to breastfeeding, within two to four days.

First thing to remember is to feed the baby. The other important thing is to protect your supply.

Nursing strikes happen for many reasons. They are almost always a temporary reaction to an external factor, although sometimes their cause is never determined. Here are some of the most common triggers of nursing strikes:

  • You changed your deodorant, soap, perfume, lotion, etc. and you smell “different” to your baby.
  • You have been under stress (such as having extra company, returning to work, traveling, moving, dealing with a family crisis).
  • Your baby or toddler has an illness or injury that makes nursing uncomfortable (an ear infection, a stuffy nose, thrush, a cut in the mouth).
  • Your baby has sore gums from teething.
  • You recently changed your nursing patterns (started a new job, left the baby with a sitter more than usual, put off nursing because of being busy, etc.).
  • You reacted strongly when your baby bit you, and the baby was frightened.
  • You are newly pregnant and your milk supply may be reduced.
  • You are ovulating and your milk supply may be temporarily reduced.
  • You have been pumping less time or with less frequency when away from baby.
  • You have been sick and/or taking a medication (including some methods of birth control), which can have a negative impact on your supply.

One additional consideration is a strong or overactive letdown, where your milk comes in so fast and sprays hard that baby can’t control it well and closes his mouth, refusing the breast.

Only you know for certain which, if any, of the above factors apply in your current situation. No matter what the cause, a nursing strike is upsetting for everyone. The baby may be difficult to calm and unhappy. You might feel frustrated and upset. Remember your baby isn’t rejecting you. Breastfeeding will almost always get back to normal with a little time.

Getting over the nursing strike and getting your baby back to the breast takes patience and persistence. Get medical attention if an illness or injury seems to have caused the strike. See if you can get some extra help with your household chores and any older children so that you can spent lots of time with the baby.

Try to relax and concentrate on making breastfeeding a pleasant experience. Stop and comfort your baby if he or she gets upset when you try to nurse. Extra cuddling, stroking, and skin-to-skin contact with the baby can help you re-establish closeness.

Additionally, these time-tested suggestions have helped many nursing parents overcome a nursing strike. They are best to try before a baby’s normal feeding times, to assure that baby is not hungry and likely more resistant at the breast.

  • Try not to stress about it. (So easy to say, not to do.) The baby will pick up on stress. Play calming music, lower lights in the house, go skin to skin as much as possible.
  • Nurse the baby as he is asleep, just awakening, or is very drowsy. As we drift to sleep or awaken, we are in a more primitive state of mind and since breastfeeding is a survival behavior for babies, sometimes they revert to feeding well at this time.
  • Vary nursing positions.
  • Nurse when in motion. In this case, a sling or cloth carrier can be useful.
  • Give the baby extra attention and skin to skin contact.
  • Hold the baby in a sling or baby carrier between attempts to nurse to increase bonding.
  • Lay in bed to play with baby while you are topless, with no pressure to nurse. Just the open invitation if baby searches for the breast.
  • Nurse in a quiet, darkened room free of distractions.
  • Stimulate your let-down and get your milk flowing before offering the breast so the baby gets an immediate reward.
  • Take a warm bath together with lots of skin to skin snuggling and no pressure to nurse.
  • Sleep together, giving baby easy access to the breast while sleeping.
  • Spend time around other nursing babies and toddlers. Sometimes peer pressure can be a good thing. Playgroups or busy store nursing rooms can also be helpful.

While you are trying to persuade your baby back to the breast, you’ll want to make sure baby gets enough milk to sustain him and you keep your milk supply flowing.

You may consider feeding by cup, spoon, eyedropper, or syringe while you work on getting him back to the breast. You might feed baby by bottle, making sure to practice paced bottle feeding. Tilting a bottle or using fast-flow nipples can sometimes confuse baby and bring on a nursing strike. You may find that his need to suck will encourage him to nurse instead of “just eating” by the other methods. Try to keep in mind, this could all be over in a day or two.

While baby is refusing breast, you need to extract your milk as often as baby has been nursing. Some moms find hand expression to be effective, while others rely on pumping. Not only does this practice protect your supply, it also saves you from potential clogged ducts or mastitis.

Take one hour at a time. Be gentle with yourself.

Finally, if this strike goes on and days turn into weeks, this may signal the end of your nursing journey. Please recognize what a gift you have given your child. It can be an emotional time, especially when your “plan” was to nurse longer. Not to mention hormonal changes as your milk supply diminishes. Take care of yourself and manage the weaning carefully to avoid clogged ducts or mastitis.

Nursing strike causes

There are many, many reasons for babies to refuse the breast, whatever their age. Below are some of the main reasons that mothers have found for their babies’ refusal – but sometimes no reason can be found. Just as suddenly as the baby started refusing, the whole episode is over and he is happily breastfeeding again as if nothing had happened.

Baby-centered reasons

  • Attachment problems
  • Baby confused by bottle feeds
  • Overtiredness/overstimulation
  • Baby refusing one breast
  • Recent immunization
  • Illness, e.g. a cold or earache, sore throat
  • Feeding pattern is changing
  • Distractions
  • Introduction of other foods
  • Teething
  • Biting
  • Overuse of a dummy (or pacifier)
  • The weather
  • Discomfort associated with sucking
  • Weaning
  • Respiratory, infectious
  • Gastro-esophageal reflux
  • Nasal obstruction
  • Cerebral injuries and pain 4).

Milk supply reasons

  • Fast flow
  • Low supply
  • Slow let-down

Mother-centered reasons

  • Overtired or overstressed
  • Sick or taking prescribed or over the counter medications
  • Unusual food in your diet
  • You smell different for some reason- e.g., different perfume, deodorant, chlorine/ salt from swimming; visit to hairdresser, smoke
  • Hormonal changes
  • Menstruation and pre-menstrual tension
  • Ovulation
  • Pregnancy
  • Oral contraceptives
  • Mastitis
  • Drugs

Nursing strike treatment

Here are some things you can do to get your baby on your breast:

  • Be as patient and calm as you can, even though you may be feeling frustrated or impatient. Forcing your baby to feed is likely to make the situation worse. If he has just been refusing the breast and is upset, distract him by doing something completely different – a walk outdoors, looking at toys, singing a nursery rhyme. When he has settled down he may be eased on to the breast, or he may be happier just being cuddled.
  • Walk around with your baby in an upright position against your body with her head level with your nipple. Walk and feed simultaneously. You could try putting your baby in a baby sling but remember to have your bra undone so that her face is touching the skin of your breast and she can find your nipple. The sling will need to be worn lower than normal for this purpose.
  • Try a completely different feeding position: your baby tucked under your arm (twin style); or lying down on a bed next to your baby with no body contact – this is especially good if it is very hot, or your baby is sensing your tension; or lying down with your baby cuddled in close next to you.
  • Feeding your baby while you are both in the bath may help. You may want to have someone available to help you lift your baby in and out of the bath.
  • Try breastfeeding baby after his bath when he is warm and relaxed (if he likes baths).
  • You could try playing with your baby on the floor while you are bare from the waist up. After some time gradually offer your breast.
  • Anticipate your baby’s waking time and lift her to feed while still sleepy – you may slip in extra night feeds this way.
  • Try to soothe baby with a pacifier (dummy). Walking, singing and rocking while baby sucks the dummy may gradually soothe him so you can gently put your baby to the breast while removing the dummy. It may be necessary to start a very hungry baby sucking on a bottle with a small amount of expressed breastmilk, e.g. 30 ml, then gently replace it with the breast.
  • Some mothers, whose babies have become accustomed to a bottle, have found that putting ice wrapped in a flannel on the nipple or tickling the nipple and areola makes it easier for the baby to grasp. Alternatively, you may use a nipple shield to begin a feed, slipping if off quickly and putting your baby back to the breast once the milk is flowing and she is sucking happily.
  • Feed in a rocking chair.
  • Express some milk into your baby’s open mouth to encourage him.
  • Spend five minutes or so before the feed massaging your baby’s naked body to relax her, if she is receptive to this.
  • Try singing to your baby – he probably won’t mind if it is the same few lines over and over.
  • Try playing some favorite relaxing background music.
  • Once you get your baby on to the breast, it may help to provide an instant milk reward. This can be done with a breastfeeding supplementer. This allows baby to receive additional milk at the breast whilst stimulating your milk supply by his sucking. If your milk supply continues to be low or your let-down slow or your baby is a ‘poor’ sucker, you may like to discuss with a Breastfeeding Association counselor the possibility of using a supplementer.


Figure 1. Breastfeeding supplementer (Supplemental Nursing System)

Supplemental Nursing System

Breastfeeding supplementer

Breastfeeding supplementer also known as Supplemental Nursing System (SNS), is a device that allows a baby to receive extra milk at the breast rather than by bottle and teat. There are two types of breastfeeding supplementer, one the is Medela Supplemental Nursing System that uses a hard sided container for the supplement and the ‘Lactaid’ uses a soft bag to hold the supplement. Each has its own advantages and disadvantages. It is also possible to make a homemade version. Breastfeeding supplementer consists of a container that is worn on a cord around the mother’s neck. Fine tubing carries expressed breastmilk or formula from the container to the nipple. When the baby sucks at the breast, milk is drawn through the tubing into his mouth, along with any milk from the breast.

When extra milk is needed for medical reasons it is better to give it through a breastfeeding supplementer than by bottle:

  • Milk given in this way rewards the baby’s efforts at sucking and he is more likely to be happy to feed from the breast and stay there for a longer time.
  • Since the amount of milk a mother makes depends on how much her baby sucks and takes milk from her breasts, this extra sucking will increase her milk supply.
  • Use of the mother’s own expressed breastmilk in the supplementer helps a weak or easily tired baby to get more milk with the same amount of sucking.
  • The sucking action required during breastfeeding differs from that used with a bottle. Some babies find it hard to do both, or reject the breast in favor of the different bottle.
  • The mother is able to provide milk at the breast and this helps with both the hormonal and physical aspects of breastfeeding.

Guide to storing fresh breastmilk for use with healthy, full-term babies

By following recommended storage and preparation techniques, nursing mothers and caretakers of breastfed infants and children can maintain the safety and quality of expressed breast milk for the health of the baby.

These are general guidelines for storing human milk at different temperatures. Various factors (milk volume, room temperature when milk is expressed, temperature fluctuations in the refrigerator and freezer, and cleanliness of the environment) can affect how long human milk can be stored safely.

Guide to storing fresh breastmilk for use with healthy, full-term babies
Place Temperature How long Things to know
Countertop, table Room temperature (up to 77 °F [25 °C]) Up to 4 hours Containers should be covered and kept as cool as possible. Covering the container with a clean cool towel may keep milk cooler. Throw out any leftover milk within 2 hours after the baby is finished feeding.
Refrigerator 40 °F (4 °C) Up to 4 days Store milk in the back of the refrigerator. When at work, it’s OK to put breastmilk in a shared refrigerator. Be sure to label the container clearly.
Freezer 0°F (minus 18 °C) or colder Within 6 months is best.

Up to 12 months is acceptable.

Store milk toward the back of the freezer where the temperature is most constant. Milk stored at 0°F or colder is safe for longer durations, but the quality of the milk might not be as high.
[Source 5) ]

When a breastfeeding supplementer might be useful

A supplementer can be a useful tool in starting and being able to maintain breastfeeding. The baby may be premature or sick and unable to suck well; some mothers have problems due to the shape of their nipples or previous breast surgery. In rare cases, mothers may not have enough milk-making tissue in their breasts to be able to make a full supply of milk for their baby. Babies and their mothers may have had a difficult birth, causing a setback to the start of breastfeeding. Other mothers who may find a breastfeeding supplementer useful include those with a very low supply that they are trying to increase, mothers who have weaned and are trying to relactate, as well as mothers who are building a milk supply for an adopted baby. They might use the supplementer for only a short while or long term. A breastfeeding supplementer allows a mother to fully breastfeed while giving her baby extra milk, which could be her own expressed breastmilk, donor human milk or formula. Breastfeeding supplementers may be fiddly to use at the start but they become easier to use with practice.

When a breastfeeding supplementer is not likely to be useful

Most mothers who have problems getting breastfeeding started will solve them without using a breastfeeding supplementer. Often all some mothers need is information and support. Talking the problem over with someone who understands and supports your wish to breastfeed and who knows a lot about breastfeeding can help you work through any problems. Often they will be able to suggest new ideas to try. Sometimes, you can solve your own problems by learning more about how breastfeeding works. It can help give you confidence if you have the support of your medical adviser, child health nurse, lactation consultant or Breastfeeding Association counselor.

It is important that the baby is able to suck well at the breast, even if he tires easily, in order for the breastfeeding supplementer to work. A baby with a poor or abnormal suck may not be able to get the milk through the tubing any better than from the breast itself.

A Breastfeeding Association counselor will be happy to talk things over with you. She will help you look at the problem and will suggest options so that you decide what you want to do about it. Every mother and baby pair is unique. Other people can give you the information you need, but only you can decide what will work in your own family situation.

Here are some ideas that you may like to think about and perhaps discuss with a counselor, a lactation consultant or your medical adviser:

  • Sometimes mothers feel that their milk supply is low when it is really quite normal. An unhappy baby is not always a hungry baby — nor are low weight gains always due to low milk supply.
  • If a baby breastfeeds often, looks healthy, alert and active, has plenty of wet nappies (at least 5 disposable or 6–8 cloth nappies in 24 hours), regular soft bowel motions and gains some weight, she is usually getting enough breastmilk.
  • If a mother’s milk supply is low, frequent feeding over several days (perhaps 10–12 times in 24 hours) will usually increase it. Unless your medical adviser feels that there is an urgent need for your baby to have extra milk, it is worth trying extra breastfeeds for a few days before adding in any other milk. Giving extra milk will reduce your baby’s hunger and the amount she takes from the breast. This is more likely to cause a decrease in your breastmilk supply than an increase.
  • Is your baby facing you and tucked in close while feeding? Is she attached well, not hurting your nipples and can you hear her swallowing milk well? A good feeding position and being able to suck well helps your baby get your milk easily.
  • If extra feeds are needed, but only at some feeds or in small amounts, it may be easier to give them from a cup or syringe.

How do I get a breastfeeding supplementer?

A breastfeeding supplementer may be bought online from some breastfeeding retailers. Some hospitals and pharmacies also sell them. Based on the experiences of many mothers, it is best if you have your own support while you are using a breastfeeding supplementer. This can be from an Breastfeeding Association counselor or a health professional who knows a lot about its use. Breastfeeding Association counselors are not medically trained. They are mothers who have breastfed at least one baby and who have completed a training course that includes information about breastfeeding and counseling breastfeeding mothers. This training is conducted according to Registered Training Organization guidelines. Counselors offer friendship and counseling on a mother-to-mother basis to women who wish to breastfeed and who ask for their help. If there are medical problems, mothers are referred to their doctor or child health nurse.

References   [ + ]

read more

Lotus birth

lotus birth

Lotus birth

Lotus Birth is the practice of not cutting the umbilical cord and leaving the placenta attached to the newborn after its expulsion, but allowed instead to dry and fall off on its own, which generally occurs 3–10 days after birth 1). Lotus birth may result in neonatal omphalitis 2) and cases of idiopathic neonatal hepatitis 3) following Lotus Birth have also been described in the literature.

The term “Lotus Birth” was coined in 1979 4) to identify the practice of not cutting the umbilical cord and of leaving the placenta attached to the newborn after its expulsion until it detaches spontaneously, which generally occurs 3–10 days after birth. According to the “Lotus Birth” advocates, the fetus and the placenta are formed from the same cells, and are therefore a single unit. Thus, if the newborn is not artificially separated from this part of itself, it will be endowed with a more robust immune system, as all the “vital force” contained in the placenta and a considerable amount of blood will be conveyed to it through the umbilical cord. Even babies delivered by means of cesarean section are said to benefit. Moreover, supporters of this method claim that, if the mother has suffered emotional trauma or stress during pregnancy, the baby will not display signs of “residual stress”; indeed, babies born in this way are described as “calm and well-balanced”: in short, “born with… the placenta”.

From the practical standpoint, this technique requires the mother to take her newborn baby home and to procure a sieve of appropriate size, which will be placed in a bowl and in which the placenta will be kept. The placenta will be preserved in this way for a minimum of two days up to a maximum of two weeks, during which time it will be treated with sea salt and ginger in order to improve its conservation and at the same time, reduce the unpleasant smell that a decomposing organ inevitably produces.

The first reported cases of Lotus Birth date back to 2004 in Australia 5). In Italy, it is estimated that about 100 women per year request this so-called “integral birth” 6).

Supporters of keeping the placenta attached after birth claim that the newborn is better perfused, endowed with a more robust immune system and “less stressed”.

However, it should be pointed out that histopathological study of the placenta is increasingly being requested in order to investigate problems of an infective nature or dysmaturity affecting the foetus, and situations of risk affecting the mother. Moreover, from the legal standpoint, there is no uniform position on the question of whether the placenta belongs to the mother or to the newborn. Lastly, a proper conservation of the embryonic adnexa is very difficult and includes problems of a hygiene/health, infectivological and medico-legal nature.

What is delayed umbilical cord clamping?

Delayed umbilical cord clamping is usually defined as umbilical cord clamping at least 30–60 seconds after birth 7). Before the mid 1950s, the term early clamping was defined as umbilical cord clamping within 1 minute of birth and late clamping was defined as umbilical cord clamping more than 5 minutes after birth. In a series of small studies of blood volume changes after birth, it was reported that 80–100 mL of blood transfers from the placenta to the newborn in the first 3 minutes after birth 8) and up to 90% of that blood volume transfer was achieved within the first few breaths in healthy term infants 9). Because of these early observations and the lack of specific recommendations regarding optimal timing, the interval between birth and umbilical cord clamping began to be shortened and it became common practice to clamp the umbilical cord shortly after birth, usually within 15–20 seconds. However, more recent randomized controlled trials of term and preterm infants as well as physiologic studies of blood volume, oxygenation, and arterial pressure have evaluated the effects of immediate versus delayed umbilical cord clamping usually defined as cord clamping at least 30–60 seconds after birth 10).

Process and technique of delayed umbilical cord clamping

Delayed umbilical cord clamping is a straightforward process that allows placental transfusion of warm, oxygenated blood to flow passively into the newborn. The position of the newborn during delayed umbilical cord clamping generally has been at or below the level of the placenta, based on the assumption that gravity facilitates the placental transfusion 11). However, a recent trial of healthy term infants born vaginally found that those newborns placed on the maternal abdomen or chest did not have a lower volume of transfusion compared with infants held at the level of the introitus 12). This suggests that immediate skin-to-skin care is appropriate while awaiting umbilical cord clamping. In the case of cesarean delivery, the newborn can be placed on the maternal abdomen or legs or held by the surgeon or assistant at close to the level of the placenta until the umbilical cord is clamped.

During delayed umbilical cord clamping, early care of the newborn should be initiated, including drying and stimulating for first breath or cry, and maintaining normal temperature with skin-to-skin contact and covering the infant with dry linen. Secretions should be cleared only if they are copious or appear to be obstructing the airway. If meconium is present and the baby is vigorous at birth, plans for delayed umbilical cord clamping can continue. The Apgar timer may be useful to monitor elapsed time and facilitate an interval of at least 30–60 seconds between birth and cord clamp.

Delayed umbilical cord clamping should not interfere with active management of the third stage of labor, including the use of uterotonic agents after delivery of the newborn to minimize maternal bleeding. If the placental circulation is not intact, such as in the case of abnormal placentation, placental abruption, or umbilical cord avulsion, immediate cord clamping is appropriate. Similarly, maternal hemodynamic instability or the need for immediate resuscitation of the newborn on the warmer would be an indication for immediate umbilical cord clamping (Table 1). Communication with the neonatal care provider is essential.

The ability to provide delayed umbilical cord clamping may vary among institutions and settings; decisions in those circumstances are best made by the team caring for the mother–infant dyad. There are several situations in which data are limited and decisions regarding timing of umbilical cord clamping should be individualized (Table 1). For example, in cases of fetal growth restriction with abnormal umbilical artery Doppler studies or other situations in which uteroplacental perfusion or umbilical cord flow may be compromised, a discussion between neonatal and obstetric teams can help weigh the relative risks and benefits of immediate or delayed umbilical cord clamping.

Data are somewhat conflicting regarding the effect of delayed umbilical cord clamping on umbilical cord pH measurements. Two studies suggest a small but statistically significant decrease in umbilical artery pH (decrease of approximately 0.03 with delayed umbilical cord clamping) 13). However, a larger study of 116 infants found no difference in umbilical cord pH levels and found an increase in umbilical artery pO2 levels in infants with delayed umbilical cord clamping 14). These studies included infants who did not require resuscitation at birth. Whether the effect of delayed umbilical cord clamping on cord pH in nonvigorous infants would be similar is an important question requiring further study.

clinical situations in which immediate umbilical cord clamping should be considered

Clinical trials in preterm infants

A 2012 systematic review on timing of umbilical cord clamping in preterm infants analyzed the results from 15 eligible studies that involved 738 infants born between 24 weeks and 36 weeks of gestation 4. This review defined delayed umbilical cord clamping as a delay of more than 30 seconds, with a maximum of 180 seconds, and included some studies that also used umbilical cord milking in addition to delayed cord clamping. Delayed umbilical cord clamping was associated with fewer infants requiring transfusion for anemia (seven trials, 392 infants; relative risk [RR], 0.61; 95% confidence interval [CI], 0.46–0.81). There was a lower incidence of intraventricular hemorrhage (ultrasonographic diagnosis, all grades) (10 trials, 539 infants; RR, 0.59;95% CI, 0.41–0.85) as well as necrotizing enterocolitis (five trials, 241 infants; RR, 0.62; 95% CI, 0.43–0.90) compared with immediate umbilical cord clamping. Peak bilirubin levels were higher in infants in the delayed umbilical cord clamping group, but there was no statistically significant difference in the need for phototherapy between the groups. For outcomes of infant death, severe (grade 3–4) intraventricular hemorrhage, and periventricular leukomalacia, no clear differences were identified between groups; however, many trials were affected by incomplete reporting and wide confidence intervals.

Outcome after discharge from the hospital was reported in a small study in which no significant differences were reported between the groups in mean Bayley II scores at age 7 months (corrected for gestational age at birth and involved 58 children) 4. In another study, delayed umbilical cord clamping among infants born before 32 weeks of gestation was associated with improved motor function at 18–22 months corrected age 17.

Clinical trials in term infants

A 2013 Cochrane review 15) assessed the effect of timing of umbilical cord clamping on term neonatal outcomes in 15 clinical trials that involved 3,911 women and their singleton infants. This analysis defined early umbilical cord clamping as clamping at less than 1 minute after birth and late umbilical cord clamping as clamping at more than 1 minute or when cord pulsation ceased. The reviewers found that newborns in the early umbilical cord clamping group had significantly lower hemoglobin concentrations at birth (weighted mean difference, –2.17 g/dL) as well as at 24–48 hours after birth (mean difference –1.49 g/dL). In addition, at 3–6 months of age, infants exposed to early umbilical cord clamping were more likely to have iron deficiency compared with the late cord clamping group.

There was no difference in the rate of polycythemia between the two groups, nor were overall rates of jaundice different, but jaundice requiring phototherapy was less common among those newborns who had early umbilical cord clamping (2.74% of infants in the early cord clamping group compared with 4.36% in the late cord clamping group). However, the authors concluded that given the benefit of delayed umbilical cord clamping in term infants, delayed cord clamping is beneficial overall, provided that the obstetrician–gynecologist or other obstetric care provider has the ability to monitor and treat jaundice.

Long-term effects of delayed umbilical cord clamping have been evaluated in a limited number of studies. In a single cohort, assessed from 4 months to 4 years of age 16), scores of neurodevelopment did not differ by timing of umbilical cord clamping among patients at 4 months and 12 months of age. At 4 years of age, children in the early umbilical cord clamping group had modestly lower scores in social and fine motor domains compared with the delayed umbilical cord clamping group 17).

Multiple gestations

Many of the clinical trials that evaluated delayed umbilical cord clamping did not include multiple gestations; consequently, there is little information with regard to its safety or efficacy in this group. Because multiple gestations increase the risk of preterm birth with inherent risks to the newborn, these neonates could derive particular benefit from delayed umbilical cord clamping. Theoretical risks exist for unfavorable hemodynamic changes during delayed umbilical cord clamping, especially in monochorionic multiple gestations. At this time, there is not sufficient evidence to recommend for or against delayed umbilical cord clamping in multiple gestations.

What is umbilical cord milking?

Umbilical cord milking or stripping has been considered as a method of achieving increased placental transfusion to the newborn in a rapid time frame, usually less than 10–15 seconds. It has particular appeal for circumstances in which the 30–60-second delay in umbilical cord clamping may be too long, such as when immediate infant resuscitation is needed or maternal hemodynamic instability occurs. However, umbilical cord milking has not been studied as rigorously as delayed umbilical cord clamping. A recent meta-analysis 18) of seven studies that involved 501 preterm infants compared umbilical cord milking with immediate cord clamping (six studies) or with delayed umbilical cord clamping (one study). The method of umbilical cord milking varied considerably in the trials in terms of the number of times the cord was milked, the length of milked cord, and whether the cord was clamped before or after milking. The analysis found that infants in the umbilical cord-milking groups had higher hemoglobin levels and decreased incidence of intraventricular hemorrhage with no increase in adverse effects. Subgroup analysis comparing umbilical cord milking directly with delayed umbilical cord clamping was not able to be carried out because of small numbers in those groups. Several subsequent studies have been published. A recent trial in term infants comparing delayed umbilical cord clamping with umbilical cord milking found that the two strategies had similar effects on hemoglobin and ferritin levels 19). Another recent trial evaluating infants born before 32 weeks of gestation found that among those infants born by cesarean delivery, umbilical cord milking was associated with higher hemoglobin levels and improved blood pressure compared with those in the delayed umbilical cord clamping group, but the differences were not seen among those born vaginally 20). Long-term (at age 2 years and 3.5 years) neurodevelopmental outcomes evaluated in one small study showed no difference between preterm infants exposed to delayed umbilical cord clamping compared with umbilical cord milking 21). This is an area of active research, and several ongoing studies are evaluating the possible benefits and risks of umbilical cord milking compared with delayed umbilical cord clamping, especially in extremely preterm infants. Currently, there is insufficient evidence to either support or refute umbilical cord milking in term or preterm infants.

Lotus birth benefits

At the present moment in time there is a lack of research regarding the safety and benefits of “Lotus Birth”. However, there are studies looking at the benefits of “delayed umbilical cord clamping” which is defined as umbilical cord clamping at least 30–60 seconds after birth 22) found delayed umbilical cord clamping appears to be beneficial for term and preterm infants. In term infants, delayed umbilical cord clamping increases hemoglobin levels at birth and improves iron stores in the first several months of life, which may have a favorable effect on developmental outcomes 23). However, there is a small increase in jaundice that requires phototherapy in this group of infants. Consequently, health care providers adopting delayed umbilical cord clamping in term infants should ensure that mechanisms are in place to monitor for and treat neonatal jaundice. In preterm infants, delayed umbilical cord clamping is associated with significant neonatal benefits, including improved transitional circulation, better establishment of red blood cell volume, decreased need for blood transfusion, and lower incidence of necrotizing enterocolitis and intraventricular hemorrhage. Delayed umbilical cord clamping was not associated with an increased risk of postpartum hemorrhage or increased blood loss at delivery, nor was it associated with a difference in postpartum hemoglobin levels or the need for blood transfusion.

This growing body of evidence has led a number of professional organizations to recommend “delayed umbilical cord clamping” in term and preterm infants. For example, the World Health Organization (WHO) recommends that the umbilical cord not be clamped earlier than 1 minute after birth in term or preterm infants who do not require positive pressure ventilation 24). Recent Neonatal Resuscitation Program guidelines from the American Academy of Pediatrics recommend delayed umbilical cord clamping for at least 30–60 seconds for most vigorous term and preterm infants. The American College of Obstetricians and Gynecologists (ACOG) now recommends a delay in umbilical cord clamping in vigorous term and preterm infants for at least 30–60 seconds after birth. The Royal College of Obstetricians and Gynaecologists (RCOG) also recommends deferring umbilical cord clamping for healthy term and preterm infants for at least 2 minutes after birth. Additionally, the American College of Nurse–Midwives recommends delayed umbilical cord clamping for term and preterm infants for 2–5 minutes after birth 25). The universal implementation of delayed umbilical cord clamping has raised concern. Delay in umbilical cord clamping may delay timely resuscitation efforts, if needed, especially in preterm infants. However, because the placenta continues to perform gas exchange after delivery, sick and preterm infants are likely to benefit most from additional blood volume derived from continued placental transfusion. Another concern is that a delay in umbilical cord clamping could increase the potential for excessive placental transfusion. To date, the literature does not show evidence of an increased risk of polycythemia or jaundice; however, in some studies there is a slightly higher rate of jaundice that meets criteria for phototherapy in term infants. Given the benefits to most newborns and concordant with other professional organizations, the American College of Obstetricians and Gynecologists now recommends a delay in umbilical cord clamping for at least 30–60 seconds after birth in vigorous term and preterm

The American College of Obstetricians and Gynecologists’ Committee on Obstetric Practice 26) makes the following recommendations regarding the timing of umbilical cord clamping after birth:

  • In term infants, delayed umbilical cord clamping (umbilical cord clamping more than 5 minutes after birth) increases hemoglobin levels at birth and improves iron stores in the first several months of life, which may have a favorable effect on developmental outcomes.
  • Delayed umbilical cord clamping is associated with significant neonatal benefits in preterm infants, including improved transitional circulation, better establishment of red blood cell volume, decreased need for blood transfusion, and lower incidence of necrotizing enterocolitis and intraventricular hemorrhage.
  • Given the benefits to most newborns and concordant with other professional organizations, the American College of Obstetricians and Gynecologists now recommends a delay in umbilical cord clamping in vigorous term and preterm infants for at least 30–60 seconds after birth.
  • There is a small increase in the incidence of jaundice that requires phototherapy in term infants undergoing delayed umbilical cord clamping. Consequently, obstetrician–gynecologists and other obstetric care providers adopting delayed umbilical cord clamping in term infants should ensure that mechanisms are in place to monitor and treat neonatal jaundice.
  • Delayed umbilical cord clamping does not increase the risk of postpartum hemorrhage.

Neonatal outcomes

Physiologic studies in term infants have shown that a transfer from the placenta of approximately 80 mL of blood occurs by 1 minute after birth, reaching approximately 100 mL at 3 minutes after birth 27). Initial breaths taken by the newborn appear to facilitate this placental transfusion 28). A recent study of umbilical cord blood flow patterns assessed by Doppler ultrasonography during delayed umbilical cord clamping 29) showed a marked increase in placental transfusion during the initial breaths of the newborn, which is thought to be due to the negative intrathoracic pressure generated by lung inflation. This additional blood supplies physiologic quantities of iron, amounting to 40–50 mg/kg of body weight. This extra iron has been shown to reduce and prevent iron deficiency during the first year of life 30) Iron deficiency during infancy and childhood has been linked to impaired cognitive, motor, and behavioral development that may be irreversible 31). Iron deficiency in childhood is particularly prevalent in low-income countries but also is common in high-income countries, where rates range from 5% to 25% 32).

A longer duration of placental transfusion after birth also facilitates transfer of immunoglobulins and stem cells, which are essential for tissue and organ repair. The transfer of immunoglobulins and stem cells may be particularly beneficial after cellular injury, inflammation, and organ dysfunction, which are common in preterm birth 33). The magnitude of these benefits requires further study, but this physiologic reservoir of hematopoietic and pluripotent stem cell lines may provide therapeutic effects and benefit for the infant later in life 34).

Maternal outcomes

Immediate umbilical cord clamping has traditionally been carried out along with other strategies of active management in the third stage of labor in an effort to reduce postpartum hemorrhage. Consequently, concern has arisen that delayed umbilical cord clamping may increase the risk of maternal hemorrhage. However, recent data do not support these concerns. In a review of five trials that included more than 2,200 women, delayed umbilical cord clamping was not associated with an increased risk of postpartum hemorrhage or increased blood loss at delivery, nor was it associated with a difference in postpartum hemoglobin level or need for blood transfusion 35). However, when there is increased risk of hemorrhage (eg, placenta previa or placental abruption), the benefits of delayed umbilical cord clamping need to be balanced with the need for timely hemodynamic stabilization of the woman (Table 1).

clinical situations in which immediate umbilical cord clamping should be considered

Lotus birth summary

In summary, in the light of what has been expounded above, it can be claimed that the practice of Lotus Birth is inadvisable from both the scientific and logical/rational points of view 36). Furthermore, it must also be pointed out that, if the Lotus Birth “guidelines” are followed to the letter, the lack of clamping could give rise to a potential thrombotic risk, in that the establishment of a low-flow, low-resistance circulation, like that of the fetus-placenta post-partum could facilitate the formation of blood clots. Similarly, cases of idiopathic neonatal hepatitis 37) and neonatal omphalitis 38) following Lotus Birth have been described in the literature.

References   [ + ]

read more

Postpartum recovery

postpartum-recovery

Recovery after childbirth

The postpartum period is commonly defined as the six weeks after childbirth. After your baby arrives, you’ll notice some changes — both physical and emotional. This is a very important time for both you and your newborn baby as you adjust to each other and your expanded family. In the first few hours and days after childbirth, you will experience many changes, both physically and emotionally. Over the next six weeks or so, your reproductive tract will slowly return to the way it was before you became pregnant. If you had a caesarean section, your recovery will be different from that of a vaginal delivery.

Your breasts, which began enlarging during pregnancy, will be filled with a special clear fluid called colostrum for the first few days after childbirth. At first when your breasts fill with colostrum and then breast milk, your breasts may become enlarged, firm, and painful. This is called breast engorgement, and it should disappear after a few days. Try to persevere with breastfeeding during this time, as breast milk is the ideal food for your newborn baby.

Some new mothers develop physical problems after childbirth. These may include infections, difficulty urinating, constipation, hemorrhoids, or other conditions. Prompt and appropriate treatment can help to alleviate discomfort and treat the problem.

You might feel irritable, indecisive, anxious, and prone to sudden mood swings after childbirth. This is called the “baby blues” and it usually lasts just a few days. Some women experience a depression that is so pronounced and continuous that it disrupts their normal functioning. This is called major depression or postpartum depression, and if left untreated, it can last for months. Early diagnosis and treatment is very important to the well-being of the mother.

What to expect physically

As your body recovers from pregnancy and childbirth, you may experience some physical changes including exhaustion, breast changes, urinary system changes, flabbiness and stretch marks.

If you do not breastfeed your baby, your period should return in about six to eight weeks; if you do breastfeed, if can return between two to 18 months after delivery.

You will have a postpartum check-up with your health-care provider at about four to six weeks after delivery.

Physically, you might experience:

  • Sore breasts. Your breasts may be painfully engorged for several days when your milk comes in and your nipples may be sore.
  • Constipation. The first postpartum bowel movement may be a few days after delivery, and sensitive hemorrhoids, healing episiotomies, and sore muscles can make it painful.
  • Episiotomy. If your perineum (the area of skin between the vagina and the anus) was cut by your doctor or if it was torn during the birth, the stitches may make it painful to sit or walk for a little while during healing. It also can be painful when you cough or sneeze during the healing time.
  • Hemorrhoids. Although common, hemorrhoids (swollen blood vessels in the rectum or anus) are frequently unexpected.
  • Hot and cold flashes. Your body’s adjustment to new hormone and blood flow levels can wreak havoc on your internal thermostat.
  • Urinary or fecal incontinence. The stretching of your muscles during delivery can cause you to accidentally pass urine (pee) when you cough, laugh, or strain or may make it difficult to control your bowel movements, especially if you had a lengthy labor before a vaginal delivery.
  • “After pains”. After giving birth, your uterus will continue to have contractions for a few days. These are most noticeable when your baby nurses or when you are given medication to reduce bleeding.
  • Vaginal discharge (lochia). Initially heavier than your period and often containing clots, vaginal discharge gradually fades to white or yellow and then stops within several weeks.
  • Weight. Your postpartum weight will probably be about 12 or 13 pounds (the weight of the baby, placenta, and amniotic fluid) below your full-term weight, before additional water weight drops off within the first week as your body regains its balance.

If you had a normal vaginal birth, your body will still need time to recover from pregnancy and the birth. You may notice certain changes occurring in your body over the next six weeks. At your six-week check-up, your health-care provider will check to make sure you are recovering well, and you can ask them about any questions you may have about your health.

Recovery and medical care after normal vaginal birth

If you had a normal vaginal birth, your recovery and postpartum care should go through the following steps:

Blood pressure and pulse

After childbirth, your blood pressure should remain about the same as it was during labor, and your pulse will gradually decrease. A high or low blood pressure can be helpful in diagnosing potential complications such as hemorrhaging or hypertension. A fast pulse may be due to blood loss, anemia, fever, or shock. Your health-care providers will check your blood pressure and pulse periodically.

Blood loss

Most women lose about 500 mL (half a quart) of blood during and immediately after childbirth. Your body has been preparing for this by making extra blood in pregnancy. The amount of vaginal bleeding will be monitored. Because the risk of hemorrhage is greatest immediately after childbirth, a trained attendant will monitor you for the first hour or longer. The attendant will check your vaginal blood loss and whether your uterus is firm and well contracted. You will continue to lose blood at a slower pace for the next two weeks or so, and your body will bring its blood level back to its pre-pregnancy state. If you notice large clots, notify your health-care provider.

Vaginal discharge

You will have a vaginal discharge called lochia, which may be colored red with blood at first. Your health-care provider will monitor the amount and character of the lochia. After a week, the bleeding should gradually cease, and the lochia should be a white or yellowish color. You may have some bleeding on and off within the postpartum period. If you notice heavy or bright red lochia, with or without clots, notify your health-care provider right away.

Vaginal and perineal soreness

Your vagina will be sore and swollen after delivery, and there may be small tears in the vaginal wall. Your perineum, which is the area between your vagina and anus, will be sore and red, even if you did not have an episiotomy. Applying an ice pack to the area for the first 24 hours may help to reduce swelling and discomfort. To help you take care of your vaginal and perineal area, many hospitals will recommend the use of a squirt water bottle, to cleanse the area after passing urine or bowel movements. To reduce soreness and help in healing, try soaking the area in warm water for 10 to 15 minutes several times a day until the area is well-healed. You can do this just after feeding your newborn baby so you can relax in the bath knowing someone else can take care of their needs.

In the first few weeks after childbirth, your vagina will gradually become smaller. It will approach the size it was before childbirth, although it will never be quite that small again.

Exhaustion

At first, you will feel exhausted, and this exhaustion will last a few weeks. You need to be well rested in order to recover properly and to promote milk production. Also, extreme fatigue can make you feel frustrated and depressed. Try to make sure that you have support from your partner or another friend or family member, so you can rebuild your energy and take over more responsibilities. Limit visitors so that you can get your rest, and try to sleep when the baby sleeps.

Mobility

Within a few hours after childbirth, an attendant will help you to sit up and move around off the bed. Moving about early helps to increase circulation and reduce the risk of developing bladder complications, constipation, and other health problems.

Breast changes

Your breasts will become filled with a clear fluid called colostrum, which will gradually change over the next few days into breast milk. In the first few days, your breasts may feel quite engorged and your nipples sore. Ask your health-care providers to help you with breastfeeding so you can get off to a good start.

Uterine contractions

After you give birth, you might be surprised that your belly does not immediately shrink down. This is because your uterus is still quite large after childbirth. Soon, though, your uterus will start to rapidly contract and shrink. These contractions may feel like cramps, and are called “after pains.” The after pains will subside in a few days. Your health-care provider will monitor the size and consistency of the top of your uterus. Your uterus should be back to its pre-pregnancy size by about four weeks. By this time, it will have decreased to 10% of the weight it was just after childbirth. Your uterus will be about the size of your fist.

Narrowing of the cervix

Your cervix measures about the width of two fingers for a few days after childbirth. Within the next few weeks, the cervix gradually narrows and thickens. Your cervix might not become as narrow as it was before you gave birth.

Urinary system changes

At first, you may have some problems emptying your bladder, or with leaking. This may be due in part to certain types of anesthesia that were used during childbirth, or to trauma from the birth itself. It may be difficult for you to urinate at all. However, it is important that you urinate as soon as possible after giving birth, to help restore the tone of your bladder. You should also try to urinate every few hours so as not to overstretch your bladder. If you find it difficult to urinate, drink lots of water, run warm water on your perineal area with the water bottle, and turn on the tap water to provide the sound of running water. Your urinary system should return to normal in about two to eight weeks.

Flabbiness and stretch marks

Your abdominal wall will be flabby due to the stretching it received during pregnancy, and you may have a few silvery stretch marks. Exercise can help you to firm up your abdominal muscles after childbirth.

Sweating

You may notice excessive sweating soon after delivery, especially at night. This is generally associated with hormonal changes and the normal loss of blood volume after childbirth. Sweating is not something to be concerned about unless you also have a fever.

Having sex again

After a few weeks, if you have completely stopped bleeding and your doctor gives the OK, you can try having sex again. Don’t forget to use birth control because you can get pregnant again. You may feel tenderness at first, so try to relax as much as possible. Note that breastfeeding can make your vagina dry, and you may need a good lubricant to make intercourse more comfortable. Sometimes being on top can help, because you can control what happens during penetration.

Return of menstruation

If you do not breastfeed your baby, your period should return in about six to eight weeks. If you do breastfeed, your first period can occur anytime from two to 18 months after delivery. Ovulation is much less frequent in women who breastfeed, but it is still possible to get pregnant while breastfeeding.

Your six-week check-up

Most women have a postpartum check-up at about four to six weeks after delivery. During this visit, your health-care provider will check a number of things, including:

  • blood pressure
  • weight
  • size, shape, and location of your uterus
  • condition of your cervix and vagina
  • incision sites such as those for episiotomy, tear repair, or caesarean section
  • breasts

Usually a Pap smear and swabs are done at the same time to make sure everything is OK. At this point, you can also ask questions about your health, and discuss contraception options.

What to expect emotionally

Emotionally, you may be feeling:

  • “Baby blues”. Many new moms have irritability, sadness, crying, or anxiety, beginning within the first several days after delivery. These baby blues are very common and may be related to physical changes (including hormonal changes, exhaustion, and unexpected birth experiences) and the emotional transition as you adjust to changing roles and your new baby. Baby blues usually go away within 1 to 2 weeks.
  • Postpartum depression. More serious and longer lasting than the baby blues, this condition may cause mood swings, anxiety, guilt, and persistent sadness. Postpartum depression can be diagnosed up to a year after giving birth, and it’s more common in women with a history of depression, multiple life stressors, and a family history of depression.

Also, when it comes to intimacy, you and your partner may be on completely different pages. Your partner may be ready to pick up where you left off before baby’s arrival, whereas you may not feel comfortable enough — physically or emotionally — and might crave nothing more than a good night’s sleep. Doctors often ask women to wait a few weeks before having sex to allow them to heal.

Relationships and friendships after birth

Your emotional and sexual relationship with your partner might feel different in the early weeks after your baby arrives. For example, it’s quite normal to take weeks, even months, before you feel like having sex again. It’s OK to wait to have sex until you feel ready.

New friendships can open up after you have a baby. For example, many women join a mothers group in the first couple of months.

It can be comforting and reassuring to talk in person or online with other mums who’ve had a similar experience to you.

Baby blues

During the first week after childbirth, many women get what’s often called the “baby blues”. Women can experience a low mood and feel mildly depressed at a time when they expect they should feel happy after having a baby. “Baby blues” are probably due to the sudden hormonal and chemical changes that take place in your body after childbirth.

Symptoms can include:

  • feeling emotional and bursting into tears for no apparent reason
  • feeling irritable or touchy
  • low mood
  • anxiety and restlessness

All these symptoms are normal and usually only last for a few days.

Postpartum depression

In the first few weeks of caring for a newborn, most new moms feel anxious, sad, frustrated, tired, and overwhelmed. Sometimes known as the “baby blues,” these feelings get better within a few weeks. But for some women, they are very strong or don’t get better. Postpartum depression also called postnatal depression, is when these feelings don’t go away after about 2 weeks or make it hard for a woman to take care of her baby. Postpartum depression after a baby is born can be extremely distressing. Postpartum depression is associated with impaired bonding and development, marital discord, suicide, and infanticide 1).

Postpartum depression is thought to affect around 1 in 7 to 1 to 10 women and can begin anytime within the first year after giving birth. While mom seeks help for her mental health needs, it is still possible to meet breastfeeding goals.

It’s not anyone’s fault or a weakness when a woman gets postpartum depression. Postpartum depression is treatable. Treatment helps most women feel like themselves again. Then they can enjoy having a new baby at home.

Nonsystematic reviews have indicated that the risks to children of untreated depressed mothers (compared to mothers without postpartum depression) include problems such as poor cognitive functioning, behavioral inhibition, emotional maladjustment, violent behavior, externalizing disorders, and psychiatric and medical disorders in adolescence 2). These nonsystematic reviews reported the outcomes of these children from birth to adolescence. Other nonsystematic and systematic reviews have also explored specific maternal risks when mothers’ postpartum depression is untreated, including more weight problems 3), alcohol and illicit drug use 4), social relationship problems 5), breastfeeding problems 6) or persistent depression 7) compared with women who have received treatment. Nevertheless, there are no well-established systematic reviews of the overall maternal and/or infant outcomes of maternal postpartum depression. However, study results suggest that postpartum depression creates an environment that is not conducive to the personal development of mothers or the optimal development of a child. It therefore seems important to detect and treat depression during the postnatal period as early as possible to avoid harmful consequences 8).

The American Academy of Pediatrics 9) recommends pediatricians screen new mothers for Postpartum Depression at their baby’s 1, 2, 4, and 6 month well-child visit.

The screening tool most pediatricians use is the Edinburgh Postpartum Depression Scale, a 10-item questionnaire for mom to fill out.

The Edinburgh Postpartum Depression Scale is a simple, 10-question screen that is completed by the mother. A score of ≥10 indicates risk that depression is present 10). An affirmative response on question 10 (suicidality indicator) also constitutes a positive screen result 11).

The 2-question screen for depression is 12):

  • Over the past 2 weeks:
    • Have you ever felt down, depressed, or hopeless?
    • Have you felt little interest or pleasure in doing things?

One yes answer is a positive screening result. This screen is suitable to indicate risk of depression for adults in general and is not specific to postpartum depression. Beyond the postpartum period, incorporating surveillance for parental mental health is warranted as well and might be accomplished by use of this 2-question screen.

Figure 1. Edinburgh Postpartum Depression Scale

Edinburgh Postpartum Depression Scale

When to see a doctor

Getting help for postpartum depression

If you think you have postpartum depression, don’t struggle alone. It’s not a sign that you’re a bad mother or are unable to cope. postpartum depression is an illness and you need to get help, just as you would if you had the flu or a broken leg.

Talk to someone you trust, such as your partner or a friend. Or ask your health visitor to call in and visit you. Many health visitors have been trained to recognise postpartum depression and have techniques that can help. If they can’t help, they’ll know someone in your area who can.

It’s also important to see your doctor. If you don’t feel up to making an appointment, ask someone to do it for you.

Postpartum depression signs and symptoms

Symptoms of postpartum depression can vary from woman to woman. But common signs include:

  • feeling sad, hopeless, or overwhelmed
  • feeling worried, scared, or panicked
  • blaming yourself unnecessarily
  • crying a lot
  • feeling moody
  • anger
  • sleeping too much or too little
  • eating too much or too little
  • trouble concentrating
  • not wanting to be with friends and family
  • not feeling attached to the baby
  • not wanting to do things that usually are enjoyable

Although it is very rare, some women have very serious symptoms such as:

  • thoughts of hurting the baby or themselves
  • hearing voices, seeing things that are not there, or feeling paranoid (very worried, suspicious, or mistrustful).

Who gets postpartum depression?

Postpartum depression can affect any woman — but some may be more at risk for developing it. Women who have had any kind of depression in the past (including postpartum depression) or who have a family history of depression are more likely to get postpartum depression.

Other things that might increase the chance of postpartum depression include serious stress during the pregnancy, medical problems during the pregnancy or after birth, and lack of support at home.

How does postpartum depression affects my baby?

There is no denying that a mother’s mental health is crucial—not just to her, but also to her baby. A depressed or anxious mom, however, may not be able to provide the nurturing that her baby needs to grow and thrive. She is less likely to read to, cuddle with, and interact with her baby—putting him or her at risk for a number of negative health outcomes, such as:

  • Failure to thrive
  • Delayed development
  • Sleep difficulties
  • Behavioral and emotional problems
  • Learning problems

Note that sometimes these symptoms take years to show up. In addition, many studies have also found mothers with postpartum depression neglect to follow the American Academy of Pediatrics schedule of well-child visits and health care advice, including safety measures such as car seats and childproofing.

What causes postpartum depression?

Postpartum depression is caused by a combination of:

  • hormonal changes that happen after a baby is born
  • changes such as the loss of sleep and increased stress that come with taking care of a newborn baby

Postpartum depression diagnosis

A doctor or psychologist usually diagnosis a woman with postpartum depression based on her symptoms. Sometimes the woman herself notices the symptoms. Other times a concerned partner, spouse, family member, or friend notices the symptoms.

How is postpartum depression treated?

Treatment for postpartum depression can vary. It might include:

  • counseling or talk therapy
  • improving self-care (getting enough sleep, eating well, exercising, and taking time to relax)
  • getting more support by joining a group or talking (by phone or online) with others going through postpartum depression
  • taking medicine. There are medicines that are safe to take while breastfeeding.

Milder cases of postpartum depression can be treated with counseling. This can be given by the health visitor or a psychotherapist. More severe cases often require antidepressants and you may need to see a specialist.

It’s important to let your doctor know if you’re breastfeeding. If you need to take antidepressants, they’ll prescribe a type of medication that’s suitable while you’re breastfeeding.

Your local children’s center can put you in touch with your nearest postnatal group. These groups provide contact with other new mothers and encourage mums to support each other. They offer social activities and help with parenting skills.

Avoiding alcohol

Alcohol may appear to help you relax and unwind. In fact, it’s a depressant that affects your mood, judgement, self-control and co-ordination. It has even more of an effect if you’re tired and run-down. Be careful about when and how much you drink, and don’t drink alcohol if you’re taking anti-depressants or tranquilizers.

Postpartum depression recovery

Recovering from postpartum depression involves ongoing treatment, family support, education and coping skills as well as regular self-help practices. A full recovery from postpartum depression is almost always possible for anyone affected. Though no one can guarantee when it will go away, it eventually does pass.

The reason that postpartum depression recovery looks different to each person is that many different factors determine how you will recover. Some of these factors may include:

  • The severity of the postpartum depression
  • How soon you sought treatment after symptoms began
  • The effectiveness of the treatment plan you are on
  • Other life factors that are contributing to depression symptoms
  • Past medical and mental health histories

Any of these factors will determine someone’s ability to recover and even the length of time it may take to recover.

While the process itself may be different for each person, there are certain practices that can help you effectively recover from postpartum depression. These include continuing medical support, implementing self-care practices, prioritizing diet and exercise and getting enough rest.

Tips for postpartum depression recovery

If you’re currently recovering from postpartum depression then here are some helpful tips to consider. These tips will help you to set realistic expectations about the recovery process.

  • Don’t compare yourself to others: It’s natural to compare your story to others in order to try and make sense of your suffering. However, this can create unrealistic expectations and place more added pressure on yourself. Remember that your recovery process is different from others for any number of reasons and you cannot necessarily control the outcome.
  • Forget perfection: You may feel a strong sense of needing to be perfect and not living up to this ideal can be hard. Instead, remind yourself that you’re doing your best and that’s all you can ask for.
  • Include your friends and family: Suffering through postpartum depression alone creates a more difficult path to recovery. Avoid isolating yourself. Be sure to include your friends and family in your recovery process. This support will help improve your confidence.
  • Adjust your treatment plan as needed: Remember that nothing is permanent when it comes to your postpartum depression treatment. If you feel that your treatment isn’t working, talk to your doctor to adjust it. It may be necessary to change medications or to include other types of therapies.
  • Don’t rely on medication alone: While medication can dramatically improve symptoms, it shouldn’t be the sole approach to postpartum depression recovery. A holistic treatment plan that includes other well-being practices can greatly aid your recovery.

Ongoing doctor visits

As you recover, it is best to stay in communication with your doctor or a mental health professional. Communication with doctors shouldn’t end after a diagnosis is reached and treatments are prescribed.

Ongoing communication with doctors allows you to adjust your treatment plan as needed. It’s also a way for you to bring up any concerns you may have throughout your recovery. Seeing your doctor regularly can also provide a sense of support and understanding about your condition and symptoms.

Self-care and well-being practices

To help ensure a healthy recovery, it’s important for women to be proactive when it comes to self-care. While this can be difficult, it is important to look after yourself during this time.

Self-care practices can include meditation, yoga, journaling, prayer, deep breathing and anything else that calms the mind. Positive self-talk and reminding yourself of the temporary nature of postpartum depression can also help you during this time.

Ultimately, the goal of these self-care practices is to limit the amount of stress you experience. This is why it’s important to not take on any unnecessary responsibilities or commitments, as these can trigger anxiety.

Diet and exercise

Proper diet and exercise are important for everyone, but they are especially important for women suffering from postpartum depression. The food you eat can directly impact the symptoms you experience. If you are undereating or aren’t eating the right foods, it can worsen your symptoms. Nutritional deficiencies can cause fatigue, which further compounds feelings of sadness and irritability.

The amount of exercise you get can also directly impact postpartum depression symptoms — for better or worse. Without exercise, the body becomes weak and susceptible to illnesses that can aggravate depression and anxiety. Daily exercise, even in limited quantities, can go a long way to managing postpartum depression symptoms.

If you’re concerned about your diet and exercise habits as you recover, consult a professional to coordinate a diet and exercise plan that’s right for you.

Rest and relaxation

There is perhaps nothing more important during postpartum depression recovery than getting enough rest. Sleep deprivation is a terrible condition that can worsen postpartum depression symptoms. Without enough rest, the risk of becoming further depressed, anxious and irritable increases. A lack of rest also affects the immune system which increases your risk of illnesses and infections.

Ensuring that you are in a relaxed state is important so you get enough rest. Part of relaxation should include spending time in nature and getting outside frequently.

Postpartum depression recovery timelines

Due to the personal nature of postpartum depression, there is no definite recovery timeline. While most cases heal within one year after symptoms begin, many women might still experience postpartum depression symptoms years after their onset.

The most important aspect of ensuring the smoothest recovery possible is adhering to and adjusting your postpartum depression treatment plan. The more proactive you are in regards to your own health, the sooner you will likely recover from postpartum depression. Women who leave their symptoms unaddressed and untreated can suffer from long-term postpartum depression.

Postpartum psychosis

Postpartum psychosis also called puerperal psychosis, is extremely rare. Postpartum psychosis is a medical emergency. Women who have been diagnosed with bipolar disorder or schizophrenia before their pregnancy have a higher risk or getting postpartum psychosis but it can happen to any woman, even if they have not had a mental illness before.

You should get help as soon as you think you (or someone you know) might have postpartum psychosis. It can be frightening, but most women make a full recovery with the right treatment.

Only 1 or 2 mothers in 1,000 develop postpartum psychosis that requires medical or hospital treatment after the birth of a baby. Postpartum psychosis can develop within hours of childbirth and is very serious, needing urgent attention.

Other people usually notice it first as the mother often acts strangely. Postpartum psychosis is more likely to happen if you have a severe mental illness, a past history of severe mental illness or a family history of perinatal mental illness. Specialist mother and baby units can provide expert treatment without separating you from your baby.

Most women make a complete recovery, although this may take a few weeks or months.

When to see a doctor

Postpartum psychosis is a medical emergency. Some women become very unwell very quickly. If you suspect that you (or someone you know) may have postpartum psychosis, contact your doctor or your mental health team and ask to be seen the same day, or go immediately to the emergency department.

If you have bipolar disorder or a schizoaffective disorder, which increase your risk of getting postpartum psychosis, make sure everyone in your healthcare team is aware of it.

What are the symptoms of postpartum psychosis?

Symptoms of postpartum psychosis include:

  • being severely depressed and/or being manic – extremely energetic and talkative
  • quick changes of mood (up and down)
  • being restless and agitated
  • being very withdrawn and not talking to anyone
  • being very confused
  • not sleeping
  • racing thoughts
  • hearing voices or seeing things that aren’t there (hallucinations)
  • developing unusual beliefs (delusions)
  • feeling things aren’t real (like you’re in a dream world)
  • feeling paranoid and suspicious of other people
  • behavior that is out of character
  • feeling suicidal
  • thinking about, and/or planning suicide, and sometimes thinking of taking your baby with you because of bad feelings about the world around you.

This is a list of all possible symptoms. If you have postpartum psychosis you may not have all these symptoms and they may change. You may not be able to look after yourself or your baby very well.

Who is more likely to get postpartum psychosis?

Postpartum psychosis is not your fault and isn’t caused by anything you have done. Some women develop postpartum psychosis even if they have never had a mental health problem before. However, you are at greater risk of getting postpartum psychosis if you have:

  • had postpartum psychosis before
  • had a diagnosis of bipolar disorder or schizoaffective disorder
  • had a diagnosis of schizophrenia or another psychotic illness
  • a mum or sister who have had postpartum psychosis.

Can anything be done to prevent postpartum psychosis?

If you have one of the mental health conditions mentioned above, you can have treatment that may prevent you getting postpartum psychosis.

Tell your midwife as soon as possible about your condition, even if you have been well for some time.

The midwife can refer you to a mental health service (ideally a specialist perinatal mental health service) so you can talk about what can be done to prevent you becoming unwell. They will also make a plan with you to make sure you stay as well as possible and get help quickly if you do become unwell.

You should be visited regularly by a healthcare professional after you have your baby so any symptoms can be spotted quickly.

It would also be helpful to share the list of symptoms above with others in your household (for example, your partner or a parent who is helping out) so that they can be watchful too.

How is postpartum psychosis treated?

You will normally be treated with medication. It’s essential to get treatment as soon as possible because if you get treated quickly you will usually recover well.

Most women need to be treated in hospital. Ideally, you should be offered a bed in a psychiatric mother and baby unit so your baby can stay with you. These are not available in every hospital so you may be admitted to a general psychiatric ward. If this happens your partner or family may need to look after your baby.

It can take 6-12 months or more to recover from postpartum psychosis.

Breastfeeding and medication

It is possible to breastfeed while taking some types of medications.You can talk to the doctor about the pros and cons of this.

Social services referral

If you have a high risk of developing postpartum psychosis in pregnancy or you develop it after giving birth you may be referred to social services. The referral will be discussed with you (unless you are too unwell).

Sometimes women worry that this means that people think they can’t care for their baby. This isn’t usually the case. In fact, asking for help and getting treatment is a good sign and shows that you are thinking about your baby’s wellbeing. It is very rare for babies to be removed from women with postpartum psychosis.

A social services assessment will:

  • check what support you have from family, friends and professionals
  • make sure there is safe plan for your baby if you are too unwell to care for him or her.

You may need extra help from family members while you are unwell and during recovery. Social services may be able to help if you don’t have any support. Social workers can find a temporary carer for your baby if you need to go into hospital and there is no place available in a mother and baby unit.

Postnatal post-traumatic stress disorder (PTSD)

Postnatal post-traumatic stress disorder (PTSD) is often the result of a traumatic birth, such as a long or painful labor, or an emergency or problematic delivery. It can also develop after other types of trauma, such as:

  • a fear of dying or your baby dying
  • life-threatening situations

The symptoms of postnatal PTSD can occur alone or in addition to the symptoms of postnatal depression.

The symptoms can develop straight after the birth or months afterwards.

It’s extremely important to talk to someone about how you’re feeling. Your midwife or doctor will be able help you. If you’re worried about talking to a health professional, consider asking a close friend or family member to come with you for support.

There are effective treatments available, such as cognitive behavioral therapy (CBT) and medications.

Assessment

Before having treatment for PTSD, a detailed assessment of your symptoms will be carried out to ensure treatment is tailored to your individual needs.

Your doctor will often carry out an initial assessment, but you’ll be referred to a mental health specialist for further assessment and treatment if you have had symptoms of PTSD for more than 4 weeks or your symptoms are severe.

There are a number of mental health specialists you may see if you have PTSD, such as a psychologist, community psychiatric nurse or psychiatrist.

How is post-traumatic stress disorder treated?

The main treatments for post-traumatic stress disorder (PTSD) are psychological therapies and medication. Traumatic events can be very difficult to come to terms with, but confronting your feelings and seeking professional help is often the only way of effectively treating PTSD.

It’s possible for PTSD to be successfully treated many years after the traumatic event or events occurred, which means it’s never too late to seek help.

Watchful waiting

If you have mild symptoms of PTSD, or you have had symptoms for less than 4 weeks, an approach called watchful waiting may be recommended. Watchful waiting involves carefully monitoring your symptoms to see whether they improve or get worse. It’s sometimes recommended because 2 in every 3 people who develop problems after a traumatic experience get better within a few weeks without treatment.

If watchful waiting is recommended, you should have a follow-up appointment within 1 month.

Psychological therapies

If you have PTSD that requires treatment, psychological therapies are usually recommended first. A combination of a psychological therapy and medication may be recommended if you have severe or persistent PTSD. Your doctor can refer you to a clinic that specialises in treating PTSD if there’s one in your area.

Or you can refer yourself directly to a psychological therapies service.

There are 3 main types of psychological therapies used to treat people with PTSD:

  1. Cognitive behavioral therapy (CBT)
  2. Eye movement desensitization and reprocessing (EMDR)
  3. Group therapy

Cognitive behavioral therapy (CBT)

Cognitive behavioral therapy (CBT) is a type of therapy that aims to help you manage your problems by changing how you think and act.

Trauma-focused CBT uses a range of psychological techniques to help you come to terms with the traumatic event.

For example, your therapist may ask you to confront your traumatic memories by thinking about your experience in detail.

During this process, your therapist helps you cope with any distress you feel while identifying any unhelpful thoughts or misrepresentations you have about the experience.

Your therapist can help you gain control of your fear and distress by changing the negative way you think about your experience (for example, feeling you’re to blame for what happened, or fear that it may happen again).

You may also be encouraged to gradually restart any activities you have avoided since your experience, such as driving a car if you had an accident.

You’ll usually have 8 to 12 weekly sessions of trauma-focused CBT, although fewer may be needed. Sessions usually last for around 60 to 90 minutes.

Eye movement desensitization and reprocessing (EMDR)

Eye movement desensitization and reprocessing (EMDR) is a relatively new treatment that’s been found to reduce the symptoms of PTSD. Eye movement desensitization and reprocessing (EMDR) involves making side-to-side eye movements, usually by following the movement of your therapist’s finger, while recalling the traumatic incident.

Other methods may include the therapist tapping their finger or playing a tone.

It’s not clear exactly how EMDR works, but it may help you change the negative way you think about a traumatic experience.

Group therapy

Some people find it helpful to speak about their experiences with other people who also have PTSD. Group therapy can help you find ways to manage your symptoms and understand the condition. There are also a number of charities that provide counseling and support groups for PTSD.

Medication

Antidepressants, such as paroxetine, sertraline, mirtazapine, amitriptyline or phenelzine, are sometimes used to treat PTSD in adults. Of these medications, only paroxetine and sertraline are licensed specifically for the treatment of PTSD. But mirtazapine, amitriptyline and phenelzine have also been found to be effective and may be recommended as well.

These medications will only be used if:

  • you choose not to have trauma-focused psychological treatment
  • psychological treatment would not be effective because there’s an ongoing threat of further trauma (such as domestic violence)
  • you have gained little or no benefit from a course of trauma-focused psychological treatment
  • you have an underlying medical condition, such as severe depression, that significantly affects your ability to benefit from psychological treatment

Amitriptyline or phenelzine will usually only be used under the supervision of a mental health specialist.

Antidepressants can also be prescribed to reduce any associated symptoms of depression and anxiety, and help with sleeping problems.

But they’re not usually prescribed for people younger than 18 unless recommended by a specialist.

If medication for PTSD is effective, it’ll usually be continued for a minimum of 12 months before being gradually withdrawn over the course of 4 weeks or longer.

If a medication is not effective at reducing your symptoms, your dosage may be increased.

Before prescribing a medication, your doctor should inform you about possible side effects you may have while taking it, along with any possible withdrawal symptoms when the medication is withdrawn.

For example, common side effects of paroxetine include feeling sick, blurred vision, constipation and diarrhoea.

Possible withdrawal symptoms associated with paroxetine include sleep disturbances, intense dreams, anxiety and irritability.

Withdrawal symptoms are less likely if the medication is reduced slowly.

Recovery after cesarean section

After your cesarean section, you’ll have some vaginal bleeding and soreness around your vagina or caesarean wound. You might also have afterpains and nipple or breast tenderness. That’s why the first week or so after birth is also a time for you to rest and recover as much as you can. You’ll stay in hospital for about 3-5 days. This can vary between hospitals. Sometimes it depends on how long your cesarean recovery takes.

In some hospitals you can choose to go home early in the first 72 hours and have your follow-up care at home. Ask the nurse or midwife about what your hospital offers.

A cesarean is major surgery, so it’s important to focus on caring for your baby and giving your body the rest it needs to recover.

Some communities have a tradition of the mother staying at home in the first six weeks after birth, and others don’t. Whatever your situation, taking it easy as much as you can and being kind to yourself are really important in these weeks.

If you see any signs of infection around your wound, see your doctor or midwife straight away. Signs of infection include pain, redness, swelling, smelly discharge or the wound coming apart.

Bleeding after cesarean

Even though you’ve had a cesarean, you’ll still have bleeding from your vagina after birth. This is normal bleeding from where the placenta was attached to your uterus.

To deal with the bleeding, you’ll need to have plenty of maternity sanitary pads handy, both in hospital and when you come home. You shouldn’t use tampons in the first six weeks after birth.

The bleeding might be quite heavy in the first week, like a heavy period. It might also be heavy after exercise, when you first get up in the morning and after breastfeeding. You might see some small blood clots on your pad. If you’re soaking through a pad in one hour or seeing lots of blood clots, tell your doctor, midwife or child and family health nurse.

After the first week, your bleeding should gradually get lighter and change from red to dark-red to brown to yellowish-white. You’ll probably be able to use regular sanitary pads around this time. You might have some bleeding for up to six weeks.

Check with your doctor, nurse or midwife if the bleeding gets heavier rather than lighter, you have a sudden heavy blood loss or large clots after the first few days, the blood smells bad, your uterus feels tender or sore, or you’re still bleeding after six weeks.

Pain relief after cesarean

In the early days, it’s OK to take pain relievers. Talk with your doctor about which pain relievers will be best for you, especially if you’re breastfeeding.

Some women find that basic things like coughing, laughing and showering can hurt in the first weeks after a cesarean.

Cesarean wound care

Your cesarean wound will usually be along or just below your bikini line. Very rarely it might be straight up and down your tummy. It will usually have dissolvable stitches or staples.

Keeping your wound clean and dry helps to prevent infection.

The wound will be covered by a waterproof dressing for several days, and you can usually shower with this on.

Once the dressing has been removed, you can gently wash your wound with water and dry around it with a towel. It’s best to leave it uncovered to ‘air dry’. Be especially careful if your wound is under a tummy fold because this will make it harder to keep dry.

Some bruising around the wound is common. Numbness or itching around the wound is common too. This can last a long time in some women.

Wear loose cotton clothing that doesn’t press on your wound.

It’ll take 6-10 weeks for your wound to heal completely.

Postpartum stitches healing

The abdominal incision will be sore for the first few days. Your midwife should also advise you on how to look after your wound.

Your doctor can prescribe pain medication for you to take after the anesthesia wears off. A heating pad may be helpful. There are many different ways to control pain. Talk with your ob-gyn or other health care professional about your options.

You’ll usually be advised to:

  • gently clean and dry the wound every day
  • wear loose, comfortable clothes and cotton underwear
  • take painkillers if the wound is sore – see controlling pain
  • watch out for signs of infection – see when to get medical advice

Non-dissolvable stitches or staples will usually be taken out by your midwife after five to seven days.

Your cesarean section scar

The wound in your tummy will eventually form a scar.

This will usually be a horizontal scar about 10-20cm long, just below your bikini line.

In rare cases, you may have a vertical scar just below your belly button.

The cesarean section scar will probably be red and obvious at first, but it should fade with time and will often be hidden in your pubic hair.

Controlling pain and bleeding

Most women experience some discomfort for the first few days after a cesarean, and for some women the pain can last several weeks.

You should be given regular painkillers to take at home, for as long as you need them.

Paracetamol is usually recommended for mild pain, co-codamol for moderate pain, and a combination of co-codamol and ibuprofen for more severe pain.

You may also have some vaginal bleeding. Use sanitary pads rather than tampons to reduce the risk of spreading infection into the vagina, and get medical advice if the bleeding is heavy.

What should I expect during recovery?

While you recover, the following things may happen:

  • Mild cramping, especially if you are breastfeeding
  • Bleeding or discharge for about 4–6 weeks
  • Bleeding with clots and cramps
  • Pain in the incision

To prevent infection, for a few weeks after the cesarean birth you should not place anything in your vagina or have sex. Allow time to heal before doing any strenuous activity. Call your Obstetrician–Gynecologist or other health care professional if you have a fever, heavy bleeding, or the pain gets worse.

If you experience severe mood swings, loss of appetite, overwhelming fatigue and lack of joy in life shortly after childbirth, you might have postpartum depression. Contact your health care provider if you think you might be depressed, especially if your signs and symptoms don’t fade on their own, you have trouble caring for your baby or completing daily tasks, or you have thoughts of harming yourself or your baby.

The American College of Obstetricians and Gynecologists recommends that postpartum care be an ongoing process rather than just a single visit after your delivery. Have contact with your health care provider within the first three weeks after delivery. Within 12 weeks after delivery, see your health care provider for a comprehensive postpartum evaluation. During this appointment your health care provider will check your mood and emotional well-being, discuss contraception and birth spacing, review information about infant care and feeding, talk about your sleep habits and issues related to fatigue and do a physical exam. This might include a check of your abdomen, vagina, cervix and uterus to make sure you’re healing well. In some cases, you might have the checkup earlier so that your health care provider can examine your C-section incision. Use this visit to ask questions about your recovery and caring for your baby.

Returning to your normal activities

Try to stay mobile and do gentle activities, such as going for a daily walk, while you’re recovering to reduce the risk of blood clots. Be careful not to overexert yourself.

You should be able to hold and carry your baby once you get home. But you may not be able to do some activities straight away, such as:

  • driving
  • exercising
  • carrying anything heavier than your baby
  • having sex

Only start to do these things again when you feel able to do so and don’t find them uncomfortable. This may not be for six weeks or so.

Ask your midwife for advice if you’re unsure when it’s safe to start returning to your normal activities. You can also ask your doctor at your six-week postnatal check.

When to see your doctor

When to get medical advice

Contact your midwife or Obstetrician–Gynecologist straight away if you have any of the following symptoms after a cesarean:

  • severe pain
  • leaking urine
  • pain when peeing
  • heavy vaginal bleeding
  • your wound becomes more red, painful and swollen
  • a discharge of pus or foul-smelling fluid from your wound
  • a cough or shortness of breath
  • swelling or pain in your lower leg

These symptoms may be the sign of an infection or blood clot, which should be treated as soon as possible.

Practical help after cesarean

It’s OK to ask for help at any time, especially in these first six weeks after cesarean. And family, friends and other people will probably appreciate you telling them exactly what you need.

For example, you could say, ‘Could you pick up some bread and milk on your way to visit today?’ Or ‘Thanks for offering to pick up some groceries, but I really just need someone to hang out the washing today’.

Check whether your hospital offers any home services to help with these jobs for a few weeks.

If you feel you need other support at home – for example, with breastfeeding – talk with your doctor, midwife or child and family health nurse.

Lifting, stretching and bending

You’ll definitely need some help with any jobs that involve stretching upwards, lifting or bending, because of the strain these activities put on your cesarean wound. This means you’ll need someone to hang washing on the line, do the vacuuming and help with any other strenuous household jobs.

Don’t lift any weight that’s heavier than your baby or anything that causes you pain – for example, a full basket of wet washing or your toddler.

If your toddler is used to being picked up, there are other ways for the two of you to be close. For example, she could sit next to you on the couch while you put your arm around her and read a story.

Driving

Doctors usually recommend that you avoid driving a car until your cesarean wound has healed and you can brake suddenly without feeling sharp pain. This is usually around 4-6 weeks. It’s best to talk with your doctor or midwife about when it’s safe to start driving again.

Check the policy of your car insurance company because some companies won’t cover you if your doctor hasn’t cleared you to drive.

Exercise, food and sleep after cesarean

A gentle walk each day can help your body and your mind feel better – for example, you could start with five minutes walking around your home. You might like to ask a physiotherapist at the hospital to give you some other good exercise ideas as you start to recover.

Healthy eating and drinking can help you feel better too. And foods that are high in fibre are good for avoiding constipation – these foods include cereals, fruits and vegetables. Drinking water will also help and is especially important if you’re breastfeeding.

Getting as much rest and sleep as you can is another top tip. Try to rest or sleep when your baby sleeps, and don’t feel guilty if the housework isn’t done – you and your baby are more important.

Breastfeeding after cesarean

You can try different positions for breastfeeding to find what’s most comfortable for you. Ask the midwives to show you different positions while you’re in hospital.

Positions you might find useful for breastfeeding after cesarean birth are:

  • sitting with a pillow on your lap to support your baby and protect your wound
  • lying down on your side
  • holding baby underarm with baby’s feet towards your back – the ‘football’ position.

Your feelings after cesarean birth

Some women feel fine about having a cesarean, whereas others feel disappointed or sad that they weren’t able to give birth vaginally.

For women who have an unplanned (emergency) cesarean, the change in plan can sometimes be a shock. Whatever your feelings, they’re OK. But it can really help to talk through those feelings with someone you trust.

Your six-week check

Your health and your baby’s health will be reviewed at a six-week check-up with your doctor, midwife or child and family health nurse.

This is a good time to ask any questions you still have – for example, why you had a cesarean or what your birth options are if you have another baby. After any birth, it’s good to leave time for your body to heal between births.

Your doctor, midwife or nurse can also give you information on topics like family planning and baby development.

Cesarean section complications

A cesarean section is generally a very safe procedure, but like any type of surgery it carries a certain amount of risk of complications. The maternal mortality rate in the USA is approximately 2.2 per 100,000 cesarean deliveries 13). Though this is overall low, it is significantly greater than for vaginal delivery. The maternal mortality for a vaginal birth is approximately 0.2 per 100,000 14).

It’s important to be aware of the possible complications, particularly if you’re considering having a cesarean for non-medical reasons.

The level of risk will depend on things such as whether cesarean section procedure is planned or carried out as an emergency, and your general health.

If there’s time to plan your cesarean section, your doctor or midwife will talk to you about the potential risks and benefits of the procedure.

Possible complications include:

  • infection of the wound or womb lining
  • blood clots in the legs, pelvic organs, or lungs
  • excessive bleeding
  • damage to nearby areas, such as the bowel or the bladder or the tubes that connect the kidneys and bladder (ureter)
  • temporary breathing difficulties in your baby
  • accidentally cutting your baby when your womb is opened

As with any delivery and with surgery in general, there is a risk of excessive bleeding during and after a cesarean section. Bleeding (hemorrhage) is the leading cause in the United States of serious maternal morbidity 15). Certain conditions preceding a cesarean, such as prolonged labor or fetal macrosomia or polyhydramnios, may increase the risk of uterine atony and subsequent hemorrhage. Intraoperative conditions such as the need for significant adhesiolysis or extension of the hysterotomy laterally into the uterine vessels could also lead to excessive blood loss. Hemorrhage during delivery may then lead to the need for blood product transfusion, which itself has risks of complications. Sheehan syndrome is a known complication of hemorrhage at delivery 16). Approximately ten percent of maternal mortality in the United States is secondary to obstetric hemorrhage 17).

As previously discussed, there is a significant risk of infection after cesarean delivery. In addition to postpartum hemorrhage, wound infection and endometritis are the other most common complications that occur after a cesarean section. In a study 18) examining the efficacy of vaginal cleansing, postoperative endometritis was reduced from 8.7% to 3.8% with cleansing. A study 19) investigating adjunctive azithromycin saw a decrease in wound infection from 6.6% to 2.4% with the additional antibiotic, and serious adverse events decreased from 2.9% to 1.5%. However, given that over a million women have a cesarean every year, these percentages still represent a significant number of women suffering from infectious complications.

In data reported in 2010, the overall risk of infectious morbidity was 3.2% in elective repeat cesarean deliveries as compared to 4.6% in women undergoing a trial of labor 20). This same data reported elective repeat cesareans to have a blood transfusion rate of 0.46%, a surgical injury rate of 0.3 to 0.6%, and a hysterectomy rate of 0.16% 21). Thromboembolism and anesthetic complications can also occur.

While the cesarean section often has the perception of being safer for the fetus, there are risks to fetal delivery in this fashion. The risk of fetal trauma during cesarean is approximately 1%, including skin laceration, fracture of the clavicle or skull, facial or brachial plexus nerve damage, and cephalohematoma 22). Overall, these risks are lower than in vaginal deliveries. With regards to the neonate, there are risks of respiratory complications as well as higher rates of asthma and allergy in those born via cesarean compared to vaginal delivery 23). In 2010 transient tachypnea of the newborn was reported in 4.2% of elected repeat cesareans, and the need for bag-and-mask ventilation was 2.5% 24).

In addition to short-term and surgical risks, cesarean delivery also confers long-term risk, both to the patient and to her subsequent pregnancies. As stated previously, the presence of a vertical scar on the uterus requires a woman to delivery subsequent pregnancies via cesarean. As the number of cesarean sections increases, so too do the surgical risks. Adhesion formation can make each subsequent cesarean more difficult and increase the risk of inadvertent injury. The risks of abnormal placentation also increase with each subsequent surgery. For a woman who has had one cesarean section, the risk of placenta accreta is 0.3%, while the risk increases to 6.74% with five or more cesarean deliveries 25). A morbidly adherent placenta carries with it a risk of significant hemorrhage and possible loss of fertility if a hysterectomy becomes necessary.

Risks to you

Some of the main risks to you of having a cesarean section include:

  • infection of the wound (common) – causing redness, swelling, increasing pain and discharge from the wound
  • infection of the womb lining (common) – symptoms include a fever, tummy pain, abnormal vaginal discharge and heavy vaginal bleeding
  • excessive bleeding (uncommon) – this may require a blood transfusion in severe cases or possibly further surgery to stop the bleeding
  • deep vein thrombosis (DVT) (rare) – a blood clot in your leg, which can cause pain and swelling and could be very dangerous if it travels to the lungs (pulmonary embolism)
  • damage to your bladder or the tubes that connect the kidneys and bladder (rare) – this may require further surgery
  • reaction to medications or to the anesthesia that is used

Women are now given antibiotics before having a cesarean, which should mean infections become much less common.

Risks to your baby

A cesarean doesn’t affect the risk of some of the rarest and most serious birth complications, such as an injury to the nerves in the neck and arms, bleeding inside the skull, or death.

But a cesarean section can sometimes cause the following problems in babies:

  • a cut in the skin (common) – this may happen accidentally as your womb is opened, but it’s usually minor and heals without any problems
  • breathing difficulties (common) – this most often affects babies born before 39 weeks of pregnancy; it will usually improve after a few days and your baby will be closely monitored in hospital

If you think your baby is experiencing breathing difficulties after you’ve left hospital, contact your doctor straight away.

Risks to future pregnancies

Women who have a cesarean will usually have no problems with future pregnancies.

Most women who have had a cesarean section can safely have a vaginal delivery for their next baby – known as vaginal birth after cesarean. But sometimes another cesarean may be necessary.

Although uncommon, having a cesarean can increase the risk of certain problems in future pregnancies, including:

  • the scar in your womb opening up
  • the placenta being abnormally attached to the wall of the womb, leading to difficulties delivering the placenta
  • stillbirth

Speak to your doctor or midwife if you have any concerns.

Vaginal birth after cesarean section

If you’ve delivered a baby by C-section and you’re pregnant again, you might be able to choose between scheduling a repeat C-section or attempting vaginal birth after C-section (vaginal birth after cesarean section).

For many women, vaginal birth after cesarean section is an option. In fact, research on women who attempt a trial of labor after cesarean shows that about 60 to 80 percent have a successful vaginal delivery.

Vaginal birth after cesarean section isn’t right for everyone, though. Certain factors, such as a high-risk uterine scar, can make vaginal birth after cesarean section inappropriate. Some hospitals don’t offer vaginal birth after cesarean section because they don’t have the staff or resources to handle emergency C-sections. If you’re considering vaginal birth after cesarean section, your health care provider can help you understand if you’re a candidate and what’s involved.

Why vaginal birth after cesarean section is done?

Women consider vaginal birth after cesarean section for various reasons, including:

  • Shorter recovery time. You’ll have a shorter hospital stay after a vaginal birth after cesarean section than you would after a repeat C-section. Avoiding surgery will help your energy and stamina return more quickly, as well as reduce the expense of childbirth.
  • More participation in the birth. For some women, it’s important to experience a vaginal delivery. Your labor coach and others also may be able to play a greater role.
  • Impact on future pregnancies. If you’re planning a larger family, vaginal birth after cesarean section might help you avoid the risks of multiple cesarean deliveries.

The chances of a successful vaginal birth after cesarean section are higher if:

  • You’ve had only one prior low transverse uterine incision — the most common type for a C-section
  • You and your baby are healthy and your pregnancy is progressing normally
  • The reason you had your prior C-section isn’t a factor this time
  • Your labor begins naturally on or before your due date
  • You’ve had a previous successful vaginal delivery

The chances of a successful vaginal birth after cesarean section are lower if:

  • Your pregnancy continues beyond your due date
  • You have an unusually large baby — suspected fetal macrosomia
  • You’ve had two or more cesarean sections

You’re not a candidate for vaginal birth after cesarean section if you had a uterine rupture during a previous pregnancy. Similarly, vaginal birth after cesarean section isn’t recommended if you have had a vertical incision in the upper part of your uterus (classical incision) due to the risk of uterine rupture.

Vaginal birth after cesarean section risks

Vaginal birth after cesarean section poses potentially serious risks, including:

  • Failed attempt at labor. Labor can results in a repeat C-section.
  • Uterine rupture. Rarely, the uterus might tear open along the scar line from a prior C-section. If your uterus ruptures, an emergency C-section is needed to prevent life-threatening complications, including heavy bleeding and infection for the mother and brain damage for the baby. In some cases, the uterus might need to be removed (hysterectomy) to stop the bleeding. If your uterus is removed, you won’t be able to get pregnant again.

How you prepare for vaginal birth after cesarean section

If you choose vaginal birth after cesarean section, boost your odds of a positive experience:

  • Learn about vaginal birth after cesarean section. Take a childbirth class on vaginal birth after cesarean section. Include your partner or another loved one, if possible. Also discuss your concerns and expectations with your health care provider. Make sure he or she has your complete medical history, including records of your previous cesarean section and any other uterine procedures.
  • Plan to deliver the baby at a well-equipped hospital. Close monitoring can decrease the risk of complications. Look for a facility that’s equipped to handle an emergency cesarean section.
  • Allow labor to begin naturally, if you can. Drugs to induce labor can make contractions stronger and more frequent, which might contribute to the risk of uterine rupture — especially if the cervix is tightly closed and not ready for labor.
  • Be prepared for a cesarean section. Some complications of pregnancy or delivery might require a cesarean section. For example, you might need a cesarean section if there’s a problem with the placenta or umbilical cord, your baby is in an abnormal position or your labor fails to progress.

What you can expect

If you choose vaginal birth after cesarean section, your prenatal care will be just like the care you’d receive during any other healthy pregnancy.

When you go into labor, you’ll follow the same process as any woman expecting to deliver vaginally — although you and your baby will be more closely monitored during labor. Your health care provider will be prepared to do a repeat cesarean section if needed.

References   [ + ]

read more

Picky eaters

picky eaters

Healthy food for picky eaters

It’s normal for toddlers to be picky eaters – that is, to not like the taste, shape, color or texture of particular foods. But they’ll probably be less picky as they get older. It’s also normal for children to like something one day but dislike it the next, to refuse new foods, and to eat more or less from day to day. The good news is that children are likely to get less fussy as they get older. One day your child will probably eat and enjoy a whole range of different foods.

This all happens because fussy eating is part of children’s development. It’s a way of exploring their environment and asserting their independence. And it’s also because children’s appetites go up and down depending on how much they’re growing and how active they are. After the rapid growth of infancy, when babies usually triple in weight, a toddler’s growth rate and appetite tends to slow down.

Toddlers also are beginning to develop food preferences, a fickle process. A toddler’s favorite food one day may hit the floor the next, or a snubbed food might suddenly become the one he or she can’t get enough of. For weeks, they may eat 1 or 2 preferred foods and nothing else.

Try not to get frustrated by this typical toddler behavior. Just make healthy food choices available and know that, with time, your child’s appetite and eating behaviors will level out. In the meantime, here are some tips that can help you get through the picky eater stage.

  1. Offer picky eaters a few healthy options and let them choose what to eat. Offer a variety of healthy foods, especially vegetables and fruits, and include higher protein foods like meat and deboned fish at least 2 times per week. Help your child explore new flavors and textures in food. Try adding different herbs and spices to simple meals to make them tastier. To minimize waste, offer new foods in small amounts and wait at least a week or two before reintroducing the same food.
  2. Offer a variety of nutritious foods from the five food groups at each family meal. Go for variety yourself – show your child that you’re willing to try new foods and that you enjoy them too. Healthy family food and an eating environment that encourages a positive attitude to healthy food make a great start for your child.
  3. Family style. Share a meal together as a family as often as you can. This means no media distractions like TV or cell phones at mealtime. Use this time to model healthy eating. Serve one meal for the whole family and resist the urge to make another meal if your child refuses what you’ve served. This only encourages picky eating. Try to include at least one food your child likes with each meal and continue to provide a balanced meal, whether she eats it or not.
  4. Making mealtimes pleasant. If your toddler refuses a meal, avoid fussing over it. It’s good for children to learn to listen to their bodies and use hunger as a guide. If they ate a big breakfast or lunch, for example, they may not be interested in eating much the rest of the day. It’s a parent’s responsibility to provide food, and the child’s decision to eat it. Pressuring kids to eat, or punishing them if they don’t, can make them actively dislike foods they may otherwise like.
  5. Break from bribes. Tempting as it may be, try not to bribe your children with treats for eating other foods. This can make the “prize” food even more exciting, and the food you want them to try an unpleasant chore. It also can lead to nightly battles at the dinner table.
  6. Try, try again. Just because a child refuses a food once, don’t give up. Keep offering new foods and those your child didn’t like before. It can take as many as 10 or more times tasting a food before a toddler’s taste buds accept it. Scheduled meals and limiting snacks can help ensure your child is hungry when a new food is introduced.
  7. Pleasant, low-stress and regular mealtimes can help with fussy eating. Your child’s willingness to try food will depend partly on the eating environment. Pleasant, low-stress mealtimes can help.
  8. Making healthy foods fun. Toddlers are especially open to trying foods arranged in eye-catching, creative ways. Make foods look irresistible by arranging them in fun, colorful shapes kids can recognize. Kids this age also tend to enjoy any food involving a dip. Finger foods are also usually a hit with toddlers. Cut solid foods into bite size pieces they can easily eat themselves, making sure the pieces are small enough to avoid the risk of choking. Turning food into something ‘precious’ can also make healthy eating fun.
  9. Involve kids in meal planning. Put your toddler’s growing interest in exercising control to good use. Let you child pick which fruit and vegetable to make for dinner or during visits to the grocery store or farmer’s market. Read kid-friendly cookbooks together and let your child pick out new recipes to try.
  10. Tiny chefs. Some cooking tasks are perfect for toddlers with lots of supervision: sifting, stirring, counting ingredients, picking fresh herbs from a garden or windowsill, and “painting” on cooking oil with a pastry brush, to name a few.
  11. Crossing bridges. Once a food is accepted, use what nutritionists call “food bridges” to introduce others with similar color, flavor and texture to help expand variety in what your child will eat. If your child likes pumpkin pie, for example, try mashed sweet potatoes and then mashed carrots.
  12. A fine pair. Try serving unfamiliar foods, or flavors young children tend to dislike at first (sour and bitter), with familiar foods toddlers naturally prefer (sweet and salty). Pairing broccoli (bitter) with grated cheese (salty), for example, is a great combination for toddler taste buds.

Picky eating key facts

These facts can help you understand why children sometimes fuss about their food:

  • It’s normal for children to be picky eaters
  • Children’s appetites are affected by their growth cycles. Even babies have changing appetites. At 1 to 6 years, it’s common for children to be really hungry one day and picky the next.
  • Children have different taste preferences from grown-ups.
  • Life is too exciting for children sometimes, and they’re too busy exploring the world around them to spend time eating.
  • Children learn by testing the boundaries of acceptable behavior. They can be very strong willed when it comes to making decisions about food (to eat or not to eat, and what to eat). It’s all part of their social, intellectual and emotional development.
  • If your child is healthy and has enough energy to play, learn and explore, she’s probably eating enough. But if your child eats only a very small range of foods or won’t eat entire food groups for a long time, see your doctor or a dietitian.

Tips for handling fussy eaters

Here are some tips handling fussy eaters:

  • Make mealtimes happy, regular and social occasions. Try not to worry about spilled drinks or food on the floor.
  • Start small. For example, start by asking your child to lick a piece of food, and work up to trying a mouthful. And praise your child for these small attempts.
  • Never force your child to try a food. He’ll have lots of other opportunities to try new foods.
  • If your child is fussing about food, ignore it as much as you can. Giving fussy eating lots of attention can sometimes encourage children to keep behaving this way.
  • Make healthy foods fun – for example, cut sandwiches into interesting shapes, or let your child help prepare a salad or whisk eggs for an omelette.
  • Turn the TV off so your family members can talk to each other instead.
  • Set a time limit of about 20 minutes for meals. Anything that goes on too long isn’t fun. If your child hasn’t eaten the food in this time, take it away and don’t offer your child more food until the next planned meal or snack time.

Sometimes toddlers are too distracted to sit at the family table for a meal. If this sounds like your child, try having quiet time before meals so she can calm down before eating. Even the ritual of hand-washing can help.

Giving picky eaters independence with food

It can be a good idea to support your child’s need for independence when it comes to food. You provide healthy food options for your child. But let your child decide how much he’ll eat.

You could also try letting your child make choices within a range of healthy foods. Just limit the options to 2-3 things, so your child doesn’t get too confused or overwhelmed to eat. For example, instead of asking your child to pick what she wants from the fridge, you could ask, ‘Would you like grapes or carrot sticks?’

Another top tip is getting your child involved in preparing family meals. For example, your child could help out with:

  • picking a recipe
  • getting food out of the fridge
  • washing fruit and vegetables
  • tossing a salad
  • planting and picking herbs at home.

He’ll feel proud of helping and be more likely to eat something he has helped to make.

Sometimes your child will refuse food just because it gets an interesting reaction from you! If children refuse to eat a food, it doesn’t necessarily mean they dislike it – after all, they might not have even tasted it yet. They might just be putting on a show of independence to see what you’ll do. Try to stay calm when this happens.

Introducing new foods to picky eaters

If you have a picky eater who doesn’t like trying new food, here are some tips that might help:

  • Keep offering new foods at different times. Your child will probably try them and eventually like them – but she might have to see a food on the plate 10-15 times before she even tries a taste.
  • Put a small amount of new food on the plate with familiar food your child already likes – for example, a piece of broccoli alongside some mashed potato. Encourage your child to touch, smell or lick the new food.
  • Make food attractive. Offer your child a variety of different colors, shapes and sizes and let your child choose what he eats from the plate.
  • Serve your child the same meal the family is eating but in a portion size your child will eat. If your child doesn’t eat it, say something like, ‘Try it, it’s yummy’. If she still doesn’t want it, calmly say, ‘OK, we’ll try it another time when you’re hungry’.
  • Offer different foods from each of the five healthy food groups. For example, if your child doesn’t like cheese, he might enjoy yogurt instead.
  • Try not to let your child fill up on drinks or ‘sometimes’ foods before introducing new foods. She’s more likely to try food if she’s hungry and doesn’t have the option of something else to eat.
  • When possible, look for opportunities for your child to share meals and snacks with other children – he might be more willing to try a food if other children are tucking in.

Punishments and bribes for picky eaters

Punishing your child for refusing to try new foods can turn new foods into a negative thing. If your child refuses to eat it, calmly take it away and offer it to her again another time.

It’s tempting to offer your child food treats just so he eats something – for example, ‘If you have a carrot, you can have some chocolate’. But this can make your child more interested in treats than healthy food. It also sends the message that eating healthy food is a chore.

read more

Baby head banging

baby head banging

Baby head banging

Head banging is a behavior where children repeatedly hit their heads against their mattress, pillow, crib, headboard, or even wall, can be upsetting for parents to see. Many children rock on all fours, bang their heads on the bed or roll from side to side as they fall asleep. Surprisingly, the seemingly painful bedtime and naptime habit may actually help children fall asleep. In most cases, occasional head banging is a form of self-stimulation, self-comfort, or a way to release frustration. It’s not a sign of another problem. If your child is otherwise healthy, it’s likely not something you should stress about.

Sometimes children rock, roll and bang their heads more if they’re experiencing some anxiety or stress during the day. But rocking, banging or rolling doesn’t mean your child has an emotional problem.

Babies may start banging their heads around 6 months of age, and the behavior can last into childhood, though most children drop the habit by age 5. Babies typically either lie face down or sit upright while banging their heads, and they may also rock their body back and forth at the same time. Episodes of head banging can last as long as 15 minutes, during which children may hit their head every one to two seconds.

Your child might:

  • get on all fours and rock back and forth, hitting her forehead on the headboard or edges of the cot
  • sit in bed and bang her head backwards against the headboard
  • lie face down and bang her head and chest into the pillow or mattress
  • lie on her back and move her head or body from side to side
  • make noises while she’s rocking.

While head banging is common and usually nothing to worry about, in some kids it can be part of a developmental problem. A child who is head banging often, particularly if there’s a question of developmental delay or abnormal social interactions, should be seen by a doctor.

If the noisy habit is disrupting the rest of your household, you could try moving your baby’s crib away from the wall and other hard surfaces. You can help by dealing with whatever is causing his or her emotional upset and protecting your son from injury as much as possible. Try not to make a big deal about the head banging or scold him for this behavior.

Otherwise, there isn’t much that parents can do to discourage the behavior. Although you may want to cushion the blows with pillows, you should avoid this since placing soft objects or blankets in the crib can increase a baby’s risk of Sudden Infant Death Syndrome (SIDS).

Fortunately, children usually grow out of the behavior by kindergarten without any need for intervention. If you’re worried that the head banging is injuring your child, however, you should talk to your pediatrician.

When to see a doctor

When to get help for rocking, rolling and banging:

If this behavior happens a lot through the night and your child also snores, it’s a good idea to talk with your doctor. The doctor will check for things that might be disturbing your child’s sleep, like obstructive sleep apnea.

For some children, body-rocking and head-banging can be particularly intense. This includes children with developmental delay, autism spectrum disorder or blindness. These children are also more likely to rock or bang during the day. For these children, the rocking and banging can be harmful.

If you’re really worried about your child’s rocking or about other areas in your child’s development, talk to your child’s doctor or child and family health nurse. It’s a good idea to take a video of the behavior to show the doctor or nurse.

Why does a baby bang his head?

Children often bang their heads just before going to sleep as well as during middle-of-the-night awakenings. It’s common and normal to see young children body-rocking, head-rolling and head-banging at bedtime or during the night. They do it because it’s rhythmic, and it comforts and soothes them. Although the behavior looks anything but calming, it’s thought that the repetitive movement soothes babies and actually helps them nod off.

Body-rocking often starts around six months of age. Head-rolling and head-banging usually start at around nine months of age. Most children stop this behaviour by five years, but occasionally it keeps going after this.

Children usually grow out of this behavior by their fifth birthdays.

Head banging in babies treatment

Simple tips to handle body-rocking, head-rolling and head-banging at bedtime

If your child is developing well in all other ways, you might decide to put up with the body-rocking, head-rolling or head-banging. This behavior will eventually go away.

Here are some other ideas that might help:

  • Think about how long your child is spending in bed before falling asleep. Too much time awake in bed might result in head-banging and body-rocking.
  • Try to pay no attention to the behavior. Your child might behave this way more if he sees it’s a good way to get your attention or get you to come into the bedroom (even if it’s only to tell him to stop).
  • If your child is in a bed, remove bedside tables or other hard surfaces, and move the bed well away from walls. This will help to stop bruising or thickening of your child’s skin in the spot where she bangs her head.
read more

Congenital nevus

Congenital melanocytic nevus

Congenital nevus

Congenital nevus is a type of birthmark that is essentially colored skin markings that develop before or shortly after birth. Nevus is sometimes called hamartoma, which is disordered proliferations of cells within the tissue of origin, and are due to a developmental error.

Benign developmental skin lesions that develop later in life are called ‘acquired’ nevus.

Nevus may be derived from the outside layers of the skin (epithelial nevus) or from the deeper layers (dermal/subcutaneous nevus). Nevus are further classified based on the cell type involved. Melanocytic and vascular nevi are generally the most common types of birthmarks.

Some congenital nevi are given specific descriptive names. Some of these are listed here.

  • Speckled lentiginous nevus
    • Also called nevus spilus
    • Dark spots on a flat tan background
    • The number of spots may increase or decrease over time
  • Satellite lesions
    • Found on the periphery of central congenital melanocytic nevus or elsewhere on the body
    • Smaller melanocytic naevi similar in appearance to
    • Present in > 70% of patients with a large congenital melanocytic nevus
  • Tardive nevus
    • Melanocytic nevus that appears after birth
    • Slower growth and less synthesis of melanin than congenital nevus 1)
    • Histopathology is similar to true congenital melanocytic naevi
  • Garment nevus
    • The name relates to the anatomical location of nevus
    • Bathing trunk nevus involves central areas usually covered by a bathing costume, for example, buttocks
    • Coat sleeve nevus involves an entire arm and proximal shoulder
  • Halo nevus
    • Affects some congenital and tardive melanocytic naevi
    • Surrounding skin becomes lighter or white
    • The central lesion may also become lighter and smaller and may disappear
    • Due to immune destruction of melanocytes

Congenital melanocytic nevus

A congenital melanocytic nevus is a nests of benign melanocytes (cells that produce pigment) that are present at birth or develop shortly after birth 2). This form of a congenital nevus is also known as a brown birthmark. Congenital melanocytic nevi occur in approximately 1 in 100 live births.

Congenital melanocytic nevus are classified according to their predicted adult size 3):

  • Small – reach less than 1.5cm
  • Medium – reach between 1.5cm and 19.9cm
  • Large (giant) – reach at least 20cm (40cm). A giant nevus is one which covers a large portion of an anatomical site, for example scalp, face, arm, leg or back. Another definition is if it covers more than 2% of a patients total body area or will measure over about twenty centimeters when the patient is fully grown. Many large or giant nevi are far more extensive than this.
  • Satellite nevi: none, 1–20, > 20–50, and > 50 satellites.

Congenital melanocytic nevi should be described according to their body site, colors, surface features and whether or not there is hypertrichosis (hairs).

Similar melanocytic nevi or moles that were not present at birth, are often called ‘congenital melanocytic nevus-like’ nevi, ‘congenital type’ nevi or ‘tardive’ nevi.

Nevus may also form from other skin cells (eg, vascular nevi, which are formed from blood vessels). Some of these are also congenital (present at birth).

Congenital melanocytic nevus can exist on any part of the body, and usually grow in proportion to body growth with the child. As a rough guide, the likely adult size of a congenital nevus can be calculated as follows:

  • Lower limbs: adult size is x 3.3 size at birth
  • Upper limbs/torso: adult size is x 2.8 size at birth
  • Head: adult size is x 1.7 size at birth.

Many patients also have multiple other nevi called satellite nevi on other parts of their body, and some will continue to develop these over their lifespan. Most nevi are brown or black in color, and have an increased tendency for hair growth. The skin texture can be smooth or leathery and because oil and sweat glands do not form properly within the nevus, overheating can be a problem. The skin is often dry and fragile. Many nevi have tumors just below the skin that give the nevus a lumpy or folded appearance.

Congenital melanocytic nevus treatment requires an individualised approach, based on the potential risk factors for complications, psychosocial and cosmetic considerations and the expectations of those affected with this condition and their families.

Infants with large lesions are usually managed by a multidisciplinary team and have regular follow-up by a dermatologist because of the increased risk of complications.

It is important that those with symptoms suggestive, or at high risk, of neurocutaneous melanocytosis have magnetic resonance imaging (MRI) to detect the disease. Those at high risk should have an MRI in the first 6 months of life.

Complete surgical excisions may reduce the risk of melanomas. However, this is associated with complications, and total removal may be impractical for very large lesions.

Non-surgical treatments such as dermabrasion may produce some cosmetic improvement. However, these treatments do not reduce the risk of melanoma as melanomas can occur deep in the skin. Options are best discussed with the dermatologist and plastic surgeon involved.

Figure 1. Congenital melanocytic nevus of the abdomen

Congenital melanocytic nevus of the abdomen

Figure 2. Congenital melanocytic nevus of the thigh

Congenital melanocytic nevus of the thigh

Figure 3. Congenital melanocytic nevus of the shoulder

Congenital melanocytic nevus of the shoulder

Figure 4. Giant congenital melanocytic nevus in “bathing trunk” with evident hypertrichosis, irregular surface and nodular areas

Giant congenital melanocytic nevus

[Source 4) ]

How common are congenital melanocytic nevi?

  • Small congenital nevi occur in 1 in 100 births 5).
  • Medium congenital nevi occur in 1 in 1000 births 6).
  • Giant congenital melanocytic nevi are much rarer (1 in 20,000 live births) 7).

They occur in all races and ethnic groups, and males and females are at equal risk.

What is the likely outcome of a congenital melanocytic nevus?

Congenital melanocytic nevus usually grow proportionally as the child grows. Some may become lighter with time. However, they generally persist for life.

What other problems can occur with a congenital melanocytic nevus?

Due to their appearance, congenital melanocytic nevus can cause significant psychosocial consequences if they occur on prominent sites.

Giant congenital melanocytic nevus are associated with a risk of melanoma in the early years and over a lifetime. The risk increases with the size of the lesion and number of lesions. Large lesions (larger than 20 cm and especially larger than 40 cm predicted adult size) are associated with a 2-5% risk of melanoma over a lifetime. The risk of melanoma with small and medium congenital melanocytic nevus is not significant.

Large or giant lesions have been associated with other cancers.

Another complication of large or multiple lesions is neurocutaneous melanocytosis (melanocytes in the central nervous system). The risk is between 2.5% and 45% depending on factors such as size of the congenital melanocytic nevus, trunk location and number of satellite lesions. There may be no symptoms. However, a small percentage of children with large congenital melanocytic nevus and many satellites may experience neurological symptoms such as headaches and seizures.

Risk of developing melanoma within a congenital melanocytic nevus

The following characteristics of congenital melanocytic nevus are associated with the increased risk of development of melanoma (a skin cancer).

  • Large or giant size
  • Axial or paravertebral location (crossing the spine)
  • Multiple congenital satellite nevi
  • Neurocutaneous melanosis.

The risk of melanoma is mainly related to the size of the congenital melanocytic nevus. Small and medium-sized congenital melanocytic nevi have a very small risk, well under 1%. Melanoma is more likely to develop in giant congenital nevi (lifetime estimates are 5–10%), particularly in lesions that lie across the spine or where there are multiple satellite lesions. Melanoma can start deep inside the nevus or within any neuromelanosis found in the brain and spinal cord. Very rarely, other tissues that contain melanocytes may also be a source of melanoma such as the gastrointestinal tract mucosa. In 24% of cases, the origin of the melanoma cannot be identified 8)..

Melanoma associated with a giant congenital melanocytic nevus or neuromelanosis can be very difficult to detect and treat.

The risk of development of melanoma is greater in early childhood; 70% of melanomas associated with giant congenital melanocytic nevi are diagnosed by the age of ten years 9).

Rarely, other types of tumour may develop within giant congenital melanocytic nevi including benign tumours (lipomas, schwannomas) and other malignant tumours (including sarcomas).

Melanoma can also develop within a small congenital melanocytic nevus. This is rare and likely to occur on the periphery of the nevus during adult life.

Prognosis of melanoma associated with congenital melanocytic nevus

Unfortunately, when a rare melanoma arises within a giant congenital melanocytic nevus, the prognosis is unfavourable. This is due to the deeper origin of the tumor rendering it more difficult to detect on clinical examination, resulting in a later stage at presentation. The deeper location also facilitates earlier spread through blood and lymph vessels. In 24% of cases, the melanoma has already spread to other sites (metastases) at the time of the first diagnosis.

Is regular follow-up recommended?

  • It can be useful to have a close-up photograph of the congenital nevus with a ruler beside it to assess for changes in size.
  • Digital surveillance using dermoscopic images (mole mapping) may also be helpful to detect changes in structure. However, such changes are normal in childhood and should not usually give rise to concern.
  • It is advisable to continue neurodevelopmental observation in those at risk of neurocutaneous melanosis 10).

Congenital melanocytic nevus causes

Congenital melanocytic nevus usually occur sporadically. The condition is generally not inherited but arises from a mutation in the body’s cells that occurs after conception.

Congenital melanocytic nevi are caused by localized genetic abnormalities resulting in the proliferation of melanocytes; these are cells in the skin responsible for normal skin color. This abnormal proliferation is thought to occur between the 5th and 24th weeks of gestation. If proliferation starts early in development, giant and medium-sized congenital melanocytic nevi are formed 11). Smaller congenital melanocytic nevi are formed later in development after the melanoblasts (immature melanocytes) have migrated from the neural crest to the skin 12).

In some cases, there is also overgrowth of hair-forming cells and epidermis, forming an organoid nevus.

Very early onset of congenital nevus before the separation of the upper and lower eyelids results in kissing nevi, that is one part of the nevus is on the upper lid and the other part is on the lower eyelid.

NRAS gene mutations cause most cases of giant congenital melanocytic nevus. Rarely, mutations in the BRAF gene are responsible for this condition. The proteins produced from these genes instruct the cell to grow and divide (proliferate) or to mature and take on specialised functions (differentiate). The NRAS or BRAF gene mutations responsible for giant congenital melanocytic nevus are somatic, meaning that they are acquired after conception.

A somatic mutation in one copy of the NRAS or BRAF gene is sufficient to cause this disorder.

These mutations occur early in embryonic development during the growth and division (proliferation) of cells that develop into melanocytes. The overactive protein may contribute to the development of giant congenital melanocytic naevus by allowing cells that develop into melanocytes to grow and divide uncontrollably, starting before birth.

Molecular changes

Proto-oncogenes c-met and c-kit have important roles in the development of melanocytes. Hepatocyte growth factor, a cytokine (messenger protein) that regulates the proliferation and migration of melanocytes, may also be important in the development of congenital melanocytic nevi 13).

Neurocutaneous melanosis

Neurocutaneous melanocytosis is a rare syndrome defined by the proliferation of melanocytes in the central nervous system (brain and spinal cord) and the presence of a congenital melanocytic nevus 14). The majority of cases are associated with a giant congenital melanocytic nevus and satellite lesions.

It is estimated neurocutaneous melanosis affects 5–10% of people that have a giant congenital melanocytic nevus. However it is likely that the majority of cases remain asymptomatic, and the true incidence remains unknown 15). The melanocytes in the brain and spinal cord may often be detected by an MRI scan but the use of these scans is controversial because the condition is not easily treatable.

Neurocutaneous melanocytosis may present with symptoms of raised intracranial pressure, such as 16):

  • A headache
  • Vomiting
  • Irritability
  • Focal cranial nerve signs
  • Seizures
  • Hydrocephalus
  • Delayed development.

Congenital melanocytic nevus signs and symptoms

Congenital melanocytic nevi are usually asymptomatic, however, some may be itchy, particularly larger lesions. It is thought there may be a reduced function of sebaceous (oil) and eccrine (sweat) glands, which may result in skin dryness and a heightened sensation of itch.

The overlying skin may become fragile and erode or ulcerate. Deep nests of melanocytes in the dermis may weaken the bonds between the epidermis and the dermis and account for skin fragility 17).

Congenital melanocytic nevi are often unsightly, especially when extensive, ie large or giant congenital melanocytic nevi. They may, therefore, result in anxiety and impaired self-image, especially when the lesions are in visible areas.

Giant melanocytic nevi, and to a lesser degree small lesions, are associated with increased risk of developing cutaneous melanoma, neurocutaneous melanoma and rarely other tumors.

What do congenital melanocytic nevi look like?

Congenital melanocytic nevi present as single or multi-shaded, round or oval-shaped pigmented patches 18). They may have increased hair growth (hypertrichosis). The surface may be slightly rough or bumpy.

Congenital nevi usually enlarge as the child grows but they may sometimes become smaller and less obvious with time. Rarely some may even disappear. However, they may also become darker, raised, more bumpy and hairy, particularly around the time of puberty.

Congenital melanocytic nevus diagnosis

The diagnosis of a congenital melanocytic nevus is usually based on the clinical appearance. If there is any doubt, examining the lesion with dermoscopy or taking a sample of the lesion for histology (biopsy) may show characteristic microscopic features.

Dermoscopy

Evaluation of the congenital melanocytic nevus by dermoscopy will reveal the pattern of pigmentation and its symmetry or lack of symmetry. The most common global pattern of congenital or tardive melanocytic nevus is globular, but reticular, structureless and mixed patterns may occur. The nevus may have differing structures across the lesion, sometimes leading to overall asymmetry of the structure.

Pathology

Congenital melanocytic nevi are usually larger than acquired nevi (which are melanocytic nevi that appear after 2 years of age), and the nevus cells often extend deeper into the dermis, fat layer, and deeper structures. The nevus cells characteristically cluster around blood vessels, hair follicles, sebaceous and eccrine glands, and other skin structures. Congenital nevus cells tend to involve collagen bundles in the deeper layers of the skin more than is the case in an acquired nevus 19).

Congenital melanocytic nevus treatment

Management of a congenital melanocytic nevus must take into account the age of the subject, the lesion size, the location and depth, and the risk of developing malignant change within the lesion.

Giant congenital melanocytic nevus

The only definite indication for surgery in a giant congenital melanocytic nevus is when melanoma develops within it 20)..

Small congenital nevus

If a small congenital nevus is growing at the same rate as the child and is not changing in any other way, the usual practice is not to remove it until the child is old enough to co-operate with a local anesthetic injection, usually around the age of 10 to 12 years. Even then, removal is not essential.

Reasons to consider surgical removal may include:

  • Unsightly appearance
  • Difficulty in observing the mole (eg, scalp, back)
  • A recent change in the lesion (darkening, lumpiness, increasing size)
  • Melanoma-like appearance (irregular shape, variegated color).

Prophylactic surgical removal of a nevus

The following factors should be considered prior to prophylactic surgical removal of a nevus.

  • Prophylactic excision of a small lesion may be delayed until an age when the patient is old enough to make an informed choice 21).
  • Small or medium-sized congenital melanocytic nevi are at low risk for developing malignant change.
  • Irregular, lumpy or thick lesions or lesions that are difficult to clinically assess may have a lower threshold for consideration of surgical excision, so as not to miss a melanoma.
  • 50% of melanomas diagnosed in those with giant congenital melanocytic nevi occur at another body site such as within the central nervous system [2]. Therefore surgical excision of the lesion may not eliminate the risk of melanoma.
  • Large or giant melanocytic lesions may be too large to excise completely.
  • Large lesions may require a skin flap or graft to close the surgical defect.

Complications of surgery

Complications that may occur after surgery include:

  • Graft or flap failure
  • Infection
  • Wound breakdown
  • Bleeding or hematoma
  • Hypertrophic or keloid scar
  • Irritable or itchy scar.

Other treatment options for a congenital melanocytic nevus

Dermabrasion

Dermabrasion can allow partial removal of a large congenital nevus; deeper nevus cells may persist. Dermabrasion may lighten the colour of the nevus but may not reduce hair growth within it. It can cause scarring.

Tangential (shave) excision

Tangential or shave excision uses a blade to remove the top layers of the skin (epidermis and upper dermis). This may reduce the pigmentation but the lesion may not be completely removed. Shave excision may result in significant scarring.

Chemical peels

Chemical peels using trichloroacetic acid or phenol may lighten the pigmentation of a superficial (surface) congenital nevus that is located in the upper layers of the skin.

Laser ablation

Laser treatment is considered if surgical intervention is not possible. They may result in lightening of the lesion. Suitable devices include:

  • Ruby Q-switched laser
  • Carbon dioxide resurfacing laser

Techniques that result in partial removal of a congenital nevus can make the lesion more difficult to assess during long-term surveillance 22).

References   [ + ]

read more

Perineal tears

perineal-tear

Perineal tears

Perineal tear is a spontaneous (unintended) tear in the perineum, which is the area between the vagina and the rectum. Your perineum may tear naturally during vaginal childbirth, which strains the perineum. More than 8 in 10 women who give birth vaginally experience ‘perineal trauma’ or a perineal tear or surgical cut (also known as episiotomy) to the area between the vagina and anus. A perineal tear is distinct from an episiotomy, in which the perineum is intentionally lacerated to facilitate delivery. Over 85% of women having a vaginal birth sustain some form of perineal trauma, and 60-70% receive stitches 1). A retrospective study of 8603 vaginal deliveries found a third degree tear had been clinically diagnosed in only 50 women (0.6%) 2). However, when the same authors used anal endosonography in a consecutive group of 202 deliveries, there was evidence of third degree tears in 35% of first-time mothers and 44% of mothers with previous children 3). These numbers are confirmed by other researchers 4).

The perineum is the wall between the vagina and anus and everything that is in it (Figure 1). The female perineum is the diamond-shaped inferior outlet of the pelvis 5). This structure is at risk of trauma during labor because of spontaneous perineal tears of varying degrees or iatrogenic episiotomies. These injuries can result in disabling immediate and long-term complications in the woman.

Perineal trauma involves any type of damage to the female genitalia during labor, which can occur spontaneously or iatrogenically (medically caused) via episiotomy or instrumental delivery 6). Anterior perineal trauma can affect the anterior vaginal wall, urethra, clitoris and labia. Posterior perineal trauma can affect the posterior vaginal wall, perineal muscle, perineal body, external and internal anal sphincters, and anal canal. During labor, the majority of perineal tears occur along the posterior vaginal wall, extending towards the anus.

Perineal tears vary widely in severity. The majority are superficial and require no treatment, but severe perineal tears can cause significant bleeding, long-term pain or dysfunction.

Figure 1. Perineum

Perineum


Figure 2. Perineal tears

perineal tears

Perineum anatomy

In a woman, the anus and the vaginal opening lie within the anatomical region known as the perineum. Each opening is surrounded by a wall, and the anal wall is separated from the vaginal wall by a mass of soft tissue including:

  • The muscles of the anus (corrugator cutis ani, the internal anal sphincter and the external anal sphincter)
  • The medial muscles of the urogenital region (the superficial transverse perineal muscle, the deep transverse perineal muscle and bulbocavernosus)
  • The medial levator ani muscles (puborectalis and pubococcygeus)
  • The fascia of perineum, which covers these muscles
  • The overlying skin and subcutaneous tissue 7)

A perineal tear may involve some or all of these structures, which normally aid in supporting the pelvic organs and maintaining fecal continence 8).

Perineal tear classification

Perineal tears are classified into four categories 9):

  • 1st degree tear, the laceration is limited to the fourchette and superifcial perineal skin or vaginal mucosa. 1st degree doesn’t involve the perineal muscles.
  • 2nd degree tear, the laceration extends beyond fourchette, perineal skin and vaginal mucosa – to perineal muscles and fascia, but not the anal sphincter. 2nd degree doesn’t involve the anal muscles.
  • 3rd degree tear, where the fourchette, perineal skin, vaginal mucosa, muscles, and anal sphincter are torn. 3rd degree doesn’t involve the anal mucosa. They can be subdivided into:
    • 3a: Partial tear of the external anal sphincter involving <50% thickness
    • 3b: Where >50% tear of the external anal sphincter is torn
    • 3c: Where the external and internal anal sphincters are torn
  • 4th degree tear, where the fourchette, perineal skin, vaginal mucosa, muscles, anal sphincter, and rectal mucosa are torn (resulting with a communication of the vagina epithelium and anal epithelium).

Perineal tear causes

Perineal tear mainly occurs in women as a result of vaginal childbirth, which strains the perineum. In humans, the head of the fetus is so large in comparison to the size of the birth canal, term delivery is rarely possible without some degree of trauma. As the head passes through the pelvis, the soft tissues are stretched and compressed

Risk factors for perineal tear

Maternal risk factors

  • Nulliparity (mother has not given birth before)
  • Asian ethnicity
  • Vaginal birth after caesarean section
  • ≤20 years of age
  • Shortened perineal length (<25 mm)

Fetal risk factors

  • Large fetal weight (>4000 g)
  • Shoulder dystocia
  • Fetal head is oriented OP (occiput posterior, i.e. face forward)

Intrapartum risk factors

  • Instrumental delivery (eg forceps, vacuum)
  • Prolonged second stage of labour (>60 minutes)
  • Epidural use
  • Oxytocin use
  • Midline episiotomy
  • Delivery in lithotomy or deep squatting position

Can you prevent perineal tears?

It’s not uncommon for the perineum to tear during childbirth. But there are steps you can take to help prevent perineal tear 10):

  • Pay attention to your position during labor. Different positions may put less pressure on your perineum. You may feel more comfortable sitting upright, lying on your side, or getting down on your hands and knees, for example.
  • Talk to your birthing coach ahead of time so you agree on when and how hard you should push.
  • Have someone provide perineal support. This means pushing against the perineum to protect it from tearing as the baby’s head stretches it. This is sometimes done with a hot, moist cloth.
  • Practice perineal massage. This type of massage may help make the tissue around the vagina more flexible and reduce the chance of having a perineal tear or an episiotomy.

The risk of perineal tear is reduced by the use of medio-lateral episiotomy, although this procedure is also traumatic. Epidural anesthesia and induction of labor also reduce the risk. Instrumentation (the use of forceps or ventouse) reduces the risk if the fetus is in the occiput anterior (normal) position 11).

Perineal tear diagnosis

The perineum should always be thoroughly assessed after a vaginal birth to determine the presence of any lacerations. This examination should include a digital rectal examination to evaluate the tone of the anal sphincter 12). From here, the midwife or obstetrician can decide if conservative or surgical management is required.

Although not a routine practice, if there is difficulty in diagnosing perineal trauma during the puerperium period, ultrasound investigation of the perineum has been shown to be an effective diagnostic tool 13).

Perineum tear treatment

If you had a perineal tear in the area between your vagina and anus (perineum) during delivery, your doctor or midwife will repair it with stitches, using a local anesthetic. An ice pack will be placed against your perineum to ease pain and swelling.

Regardless of the severity of the perineal tear, the following principles should be applied during the repair 14):

  • The repair should be completed by an experienced clinician, ideally one trained in obstetrics.
  • Good lighting and access are important – ideally, the procedure should be conducted in an operating theatre with the patient in lithotomy.
  • Adequate anaesthesia should be used.
  • Each layer should be repaired independently to restore function.
  • The repair should be conducted in a cephalocaudal (or top-down) direction as this ensures access to superior sites is not restricted.
  • Resorbable sutures should be used, with the knots of each layer buried as this reduces the risk of dyspareunia and vaginal discomfort following the recovery.

Recovery from a perineal tear can be uncomfortable or quite painful, depending on how deep and long the incision or tear is. Pain typically affects sitting, walking, urinating, and bowel movements for at least a week. Your first bowel movement may be quite painful. A perineal tear is usually healed in about 4 to 6 weeks.

To reduce pain and promote healing:

  • Keep an ice pack on your perineal area. Ask your nurse to apply ice packs right after the birth. Using ice packs in the first 24 hours after birth decreases the swelling and helps with pain.
  • Try an anesthetic spray.
  • Have regular sitz baths (sit in water that covers your vulvar area) in a tub of warm, shallow water, but wait until 24 hours after you have given birth. Make sure that the bathtub is cleaned with a disinfectant before every bath.
  • Take pain medicine. Take medicine like ibuprofen to relieve pain. Some pain medicines can be constipating, so ask your health professional for a formulation that includes a stool softener.
  • Take stool softeners and drink lots of fluids to help soften stools and ease pain.
  • Use warm water from a squeeze bottle to keep the perineal area clean. Pat it dry with gauze or a sanitary wipe. Only wipe your perineal area from front to back.

Your stitches DO NOT need to be removed. Your body will absorb them. You can return to normal activities when you feel ready, such as light office work or house cleaning. Wait 6 weeks before you:

  • Use tampons
  • Have sex
  • Do any other activity that might rupture (break) the stitches

Self-care

You can do many other things to help speed up the healing process, such as:

  • Use sitz baths a few times a day. Wait until 24 hours after you have given birth to take a sitz bath as well. You can buy tubs in any drug store that will fit on the rim of the toilet. If you prefer, you can sit in this kind of tub instead of climbing into the bathtub.
  • Change your pads every 2 to 4 hours.
  • Keep the area around the stitches clean and dry. Pat the area dry with a clean towel after you bathe.
  • After you urinate or have a bowel movement, spray warm water over the area and pat dry with a clean towel or baby wipe. DO NOT use toilet paper.

Take stool softeners and drink lots of water. This will prevent constipation. Eating lots of fiber will also help. Your health care provider can suggest foods with plenty of fiber.

Do Kegel exercises. Squeeze the muscles that you use to hold in urine for 5 minutes. Do this 10 times a day throughout the day.

When to see your doctor

See your doctor if:

  • Your pain gets worse.
  • You go for 4 or more days without a bowel movement.
  • You pass a blood clot larger than a walnut.
  • You have a discharge with a bad odor.
  • The wound seems to break open.

Postoperative management

Antibiotics

Broad-spectrum antibiotics are recommended in the immediate postoperative period to reduce the risk of infections and the wound reopened (dehiscence) 15).

Analgesia

Cold packs should be used topically in 10–20 minute intervals in the first 24–72 hours after surgery.26 Paracetamol and nonsteroidal anti-inflammatory drugs (NSAIDs) can be used 16). However, limit the use of opioids to reduce the risk of constipation. A urinary alkalinizer can assist in reducing discomfort during toileting 17).

Laxatives or stool softeners

Laxatives are recommended following perineal repair as the passage of stool can result in wound dehiscence 18). Stool softeners (eg lactulose) are recommended for around 10 days postoperatively.29 Stool softeners should be titrated to keep the stools soft but not loose 19).

Positioning and movement

During the first 48 hours after surgery, the patient should use positions that will reduce perineal edema. This involves lying on a flatbed while resting, on their side when breastfeeding, and avoiding the overuse of seated positions 20). The patient should also avoid activities that may increase intra-abdominal pressure for the first six to 12 months after delivery 21).

Pelvic floor exercises

Pelvic floor exercises should be commenced two to three days postpartum, or when the patient feels comfortable 22). Patients with third‑degree or fourth-degree perineal tears should be referred to a physiotherapist who specializes in perineology, as it can reduce flatal, fecal and urinary stress incontinence 23).

Wound care

Ensure that the wound is washed and patted dry after toileting. The patient should inspect the wound daily with the use of a hand mirror for any signs of wound breakdown.

Follow-up

Obstetrician follow-up

Generally, women with obstetric anal sphincter injury repairs are reviewed by the obstetrician six to 12 weeks postpartum 24), when the repair site and anal sphincter tone are assessed.

Family physician follow-up

The role of the general practitioner in the postpartum period will be to titrate the analgaesia and laxative/stool softener requirements to facilitate the woman’s recovery, and to inspect the wound for signs of infection. The major indications for a referral to an obstetrician are:

  • wound dehiscence
  • severe dyspareunia (painful sex)
  • constipation, including:
  • excessive straining
  • sensation of incomplete emptying
  • sensation of anorectal obstruction
  • digitation (manual disimpaction)
  • faecal incontinence, including:
  • urge faecal incontinence
  • passive or post-defaecation incontinence.

Perineal tear complications

  • Chronic perineal pain
  • Dyspareunia (painful sex)
  • Fecal incontinence
  • Fecal urgency

First and second degree tears rarely cause long-term problems. Among women who experience a third or fourth degree tear, 60-80% are asymptomatic after 12 months 25). Fecal incontinence, faecal urgency, chronic perineal pain and dyspareunia occur in a minority of patients, but may be permanent 26). The symptoms associated with perineal tear are not always due to the tear itself, since there are often other injuries, such as avulsion of pelvic floor muscles, that are not evident on examination 27).

Perineal tear prognosis

  • 1st and 2nd degree tears rarely cause long term problems
  • In women who’ve experienced a 3rd or 4th degree tear, 70% are asymptomatic after 12 months
  • Severe tears can cause significant bleeding, long-term pain, or dysfunction.

Fortunately, first-degree and second-degree perineal lacerations are minor and patients usually recover uneventfully. As third-degree and fourth-degree perineal tears are more extensive, there is an increased likelihood of residual defects resulting in ongoing symptoms that can have a significant impact on the woman’s quality of life. The most common long-term problems are dyspareunia, perineal pain, and flatal and fecal incontinence 28). In fact, obstetric anal sphincter injury are strong risk factors for postponed coital resumption after delivery and dyspareunia at one year postpartum 29). However, anal sphincter competence remains the biggest concern as flatal incontinence can be present even 10 years after obstetric anal sphincter injury 30).. Despite these concerning potential outcomes following obstetric anal sphincter injury, women should be reassured that 60–80% of women are asymptomatic 12 months after a delivery and an external anal sphincter repair 31).

Future deliveries

Women who have sustained obstetric anal sphincter injury in their previous pregnancy should be thoroughly counseled regarding their mode of delivery, with an elective caesarean section being one of the options 32). If the woman chooses a vaginal delivery, it is important to note that there is insufficient evidence for prophylactic episiotomies in the prevention of another obstetric anal sphincter injury, and should thus only be performed if clinically indicated 33).

Resumption of sexual activity

There is currently no evidenced-based research demonstrating the ideal time to resume sexual intercourse following a perineal injury. Thus, the abstinence period is typically determined by the woman during her recovery period. The median time of return to intercourse is six to eight weeks postpartum 34).

Dyspareunia

Dyspareunia or painful sexual intercourse is a common postpartum complaint that must be addressed early because of its impact on the woman’s quality of life (ie physical, relational, psychological wellbeing). The following recommendations can be made 35):

  • Lubrication should be used generously during vaginal intercourse.
  • The woman should be in control of the initiation of intercourse. If the woman is having difficulty obtaining control, consider having the discussion with the woman and her partner together.
  • Experimenting with different sexual positions can facilitate the woman’s comfort.
  • Refer to a physiotherapist with a special interest in dyspareunia, or an obstetrician or gynecologist.

References   [ + ]

read more

Baby hair loss

infant hair loss

Baby hair loss

Hair loss also called alopecia in children can be quite normal. Many babies are bald from birth, or lose their hair shortly afterwards. Almost all newborns lose some or all of their hair. This is normal and to be expected before your baby’s permanent hair starts growing. The baby hair falls out before the mature hair comes in. So hair loss occurring in the first six months of life is not a cause for concern.

Also very commonly, healthy babies often have bald patches at the backs or sides of their scalps. This is because they lie on their backs a lot of the time, so their heads often rub against something like the mattress or as a result of a head banging habit. This type of hair loss is also called friction alopecia or pressure alopecia. Repeated or severe friction can cause hair loss at any age. Your baby’s hair will grow normally when he can spend more time sitting up.

Many babies also lose hair on the back of the scalp at age four months as their hair grows at varying times and rates. In very rare cases, babies may be born with alopecia (hair loss), which can occur by itself or in association with certain abnormalities of the nails and the teeth. Later in childhood, hair loss may be due to medications, a scalp injury, or a medical or nutritional problem.

An older child may also lose her hair if it’s braided too tightly or pulled too hard when combing or brushing. Some children (under age three or four) twirl their hair as a comforting habit and innocently may pull it out. Other children (usually older ones) may pull their hair out on purpose but deny doing so, or they simply may be unaware that they are doing it; this often is a signal of emotional stress, which you should discuss with your pediatrician.

Alopecia areata, a condition common in children and teenagers, seems to be an “allergic” reaction to one’s own hair. In this disorder, children lose hair in a circular area, causing a bald spot. In general, when it’s limited to a few patches, the outlook for complete recovery is good. But when the condition persists or worsens, steroid creams and even steroid injections and other forms of therapy at the site of the hair loss often are used. Unfortunately, if the hair loss is extensive, it may be difficult to renew its growth.

Because alopecia and other types of hair loss can be a sign of other medical or nutritional problems, bring these conditions to your doctor’s attention whenever they occur after the first six months of age, seeing your doctor can help you rule out any cause for concern. Your doctor will look at your child’s scalp, determine the cause, and prescribe treatment. Sometimes, a referral to a pediatric dermatologist is necessary.

Newborn normal hair loss in infancy key points

  • Newborns are born with varying amounts of hair.
  • The baby hair of many newborns falls out during the first 6 months of life. Hair loss peaks at 3 months old. The mother may also lose some of her hair at this time.
  • This baby hair is then replaced by permanent hair.
  • The normal hair comes in between 6 and 12 months.
  • This shedding phase in newborns is always normal.
  • Hair loss is not caused by shampoos.

Hair loss on back of head from chronic rubbing and friction key points

  • Babies can rub off a patch of hair on the back of the head. This most commonly occurs in infant 3 to 6 months old.
  • The hair loss is from friction during head-turning against a firm surface. Examples are crib mattresses, playpens, activity mats and infant seats.
  • The hair grows back once the baby starts to sit up.
  • This may take 6 to 12 months.
  • Can also occur in any bedridden child (e.g., severe cerebral palsy).
When to see your doctor about hair loss

You should take your child to see your doctor if your child:

  • Your child looks or acts very sick
  • You think your child needs to be seen, and the problem is urgent
  • Has significant hair loss or thinning for no apparent reason
  • Has an itchy or tender scalp
  • Is generally unwell, in addition to hair loss
  • The scalp is red and very swollen in area of hair loss
  • Scabs or crusts are present in the hair
  • Ringworm of the scalp suspected. Round patch of hair loss with scales, rough surface, redness or itching
  • Broken hairs from tight hair style and pimples are present in scalp
  • Patch of hair loss and cause not known
  • Widespread hair thinning and cause not known
  • Hair loss from nervous habit of twisting the hair (needs counseling)
  • Hair loss is a chronic problem
  • Normal hair loss suspected, but doesn’t grow back within 6 months
  • You have other questions or concerns

If your child is losing hair from large areas and is feeling upset or stressed about it, it might be a good idea to ask your doctor for a referral to a dermatologist.

Baby hair loss causes

Causes of hair loss or alopecia:

  • Normal hair loss.
    • Newborn hair loss – The hair of many newborns falls out during the first few months of life. This baby hair is replaced by permanent hair.
    • Rubbing or friction. Babies can rub off a patch of hair on the back of the head. This most commonly occurs in infant 3 to 6 months old. It is a result of friction during head-turning against a firm surface. Examples are crib mattresses, playpens, and infant seats. The hair grows back once the baby starts sitting up. Also called friction alopecia or pressure alopecia. Repeated or severe friction can cause hair loss at any age.
  • Abnormal hair loss: There are several causes of abnormal hair loss in children and teenagers.
    • Ringworm of the scalp (tinea capitis) is a common cause of abnormal hair loss. This is the main cause of patchy hair loss that needs medical treatment. Your child’s doctor will prescribe a medicine to treat ringworm of the scalp. It’s taken by mouth.
    • Alopecia areata is a common skin condition that causes hair loss from different parts of the body. It doesn’t scar, but older children can feel distressed if they lose hair from large or noticeable areas.
    • Tight hair styles also known as traction alopecia, mechanical alopecia, or “hair abuse”. If hair is pulled too tight, it will eventually break. This gives a frizzy look from hairs broken off at various lengths. Mostly seen with tight braids, pony tails or dreadlocks (especially corn row styles). Hair loss can also occur during exercise while wearing head phones.
    • Some children might have incomplete hair loss in areas of their scalp because of vigorous hair-brushing or back combing. This is because of immature hair follicles and because the hair shaft is poorly attached to the scalp. This pattern of hair loss will sort itself out gradually as your child grows. Hot hairstyling tools can also cause hair damage.
    • Older children might pull out their hair as a kind of nervous habit. Some children pull at their eyebrows and eyelashes also. This nervous habit is called trichotillomania and can be a sign of an emotional disorder. Frequent twisting of the hair results in broken hairs of different lengths. The missing hair occurs in patches of different shapes. This creates bald spots. Rarely, it can include plucking of the eyebrows or eyelashes. Can occur with nail biting, lip biting or sucking, and sore picking habits. In older children, may be associated with OCD.
    • Stress is called telogen effluvium. Hair follicles are very sensitive to physical or emotional stress. Examples are a high fever, severe illness or surgery. Also, an emotional crisis or a crash diet can be triggers. In pregnant teens, the stress can be childbirth. The hair begins to fall out about 3-4 months after a severe stress. After hair stops shedding, the hair will slowly grow back. This can take 6 to 8 months for all the hair to grow back. The whole cycle takes about 12 months. There’s no way to hurry the process. The hair growth cycle needs to run its course. What to expect:
      • No more than 50% of the hair will be lost.
      • Once the hair starts to regrow, all the hair will grow back in about 6 months.
      • The new hair will look normal.

Hair loss is not caused by shampoos.

If you notice your child’s hair thinning, it could be a sign of thyroid gland problems. Thyroid disease is rare in children, but if you notice this symptom, discuss it with your doctor.

Hair loss prevention

Be careful when combing, brushing and shampooing your child’s hair, because pulling too hard on hair shafts can cause hair loss. Also, try not to make ponytails or pigtails too tight. And avoid using hair straighteners or chemicals on your child’s hair.

Hair loss symptoms

The main symptom of hair loss is a bald or thinning patch.

If your child has ringworm or impetigo, she/he might complain of an itchy or tender scalp too. With ringworm, you might also see some redness and scaling in your child’s bald patch, as well as some short, dull and bent hairs, which are only a few millimeters in length.

If your child has alopecia areata, the patch will be completely bald, and the scalp won’t have any signs of scaling, redness or scarring. It isn’t itchy or tender. This condition can happen anywhere on the scalp, eyebrows, eyelashes or hairy areas of the body.

In trichotillomania, the bald patches are usually at the front or side of the scalp. The patches are never completely bald, might be an irregular shape, and will have hairs of different lengths.

Hair loss from tight hair style symptoms include broken hairs are seen at the hairline or where the hair is parted. It’s usually the same on both sides of the head.

Hair loss after stress symptoms include lots of hair is noticed in a comb or brush. The hair falls out from all parts of the scalp. This leads to major thinning of the hair, but no bald spots.

Hair loss diagnosis

A careful history and full skin examination can generally result in the correct diagnosis. Additional tests may include:

  • Hair pull test to determine the relative proportion of anagen and telogen hairs
  • Wood lamp examination
  • Swabs of pustules for bacterial and viral culture
  • Skin scrapings and hair clippings for mycology
  • Blood tests for hematology, thyroid function, serology.

Hair loss treatment

Treatment for hair loss involves treating the underlying cause, and reassuring your child that the hair will regrow and won’t cause scarring.

Small patches of alopecia areata that don’t grow in size can sort themselves out without treatment. If your child’s bald patches are getting worse, your doctor might prescribe corticosteroid cream or another treatment for a few weeks.

Treatment for hair loss from friction and too much time on back:

  • After 1 month old, give your baby more tummy time.
  • Caution: Tummy time should always occur under adult supervision. Reason: Risk of suffocation until child reaches an age when can turn over.
  • Tummy time has many benefits.
  • It will help the back of head become more rounded and less flat.
  • It will also build up strength in shoulder muscles.

Treatment of broken hairs from tight hair style:

  • Change the hair style to one that doesn’t put tension on the hair.
  • If that is not acceptable, loosen the ponytail or braids.
  • These hair styles are at risk if they feel tight or cause any pain.
  • Outcome: If tight hair styles are avoided, the hair will return to normal.
  • Warning: If tight braiding continues over 10 years, permanent hair loss can occur.

Hair loss after stress hair care:

  • Treat the hair gently.
  • Wash the hair no more than once per day. Always use a hair conditioner.
  • Comb the hair rather than brushing it.
  • Be careful at combing out any tangled hair.
  • Avoid any tight hair styles such as braids or a pony tail.
  • Don’t put tension on the hair.
  • No special shampoo or cream is needed or helpful.
  • See your doctor if your hair does not grow back by 12 months after stressful event.
read more